This tutorial will show you how to use the break statement within JavaScript.
The break statement allows you to control a loop within JavaScript by stopping its execution.
This statement is helpful in a wide variety of cases. For example, a common use is using a loop to iterate over data to search for a value. When the desired value is found, you can use break in JavaScript to stop the execution of the loop.
In addition to being useful for loops, the break statement is also critical to JavaScript’s switch statement.
If you only want to skip a loop’s current iteration rather than stop it completely, you will want to look into JavaScript’s continue statement.
Over the next couple of sections, we will be showing you how you can utilize this statement within your script.
Syntax of the break Statement in JavaScript
This first section will explore how exactly the break statement is written within JavaScript. By the end of this, you should have a good understanding of how it is used.
To use this statement, all you need to do is write the word “break” followed by a semicolon (;). However, it does support labels. By using labels, you can control exactly where JavaScript breaks out from.
Later in this guide, we will explore how labels operate with the break statement.
Below is the general syntax for how the break statement is written in JavaScript. This syntax includes the optional label field.
break [LABEL];CopyYou can also see a basic example of using the break statement to jump out of a labeled loop below. In the example below, we are using JavaScript’s while loop.
while (true) {
    break;
}Copy
Additionally, below, you can see a basic example of using the break statement to jump out of a labeled loop.
outer: while (true) {
   while (true) {
       break outer;
   }
}Copy
Finally, the break statement in JavaScript is crucial to the switch statement. Below you can see how the break statement is typically used within this structure.
switch (0) {
    case 0:
        break;
}Copy
JavaScript Examples of Using the break Statement
Over the following sections, we will explore how JavaScript’s break statement is used in various cases.
This tutorial will include how the break statement is used in both the for and while loops. In addition
Using the break Statement in a while Loop
For this first example, we will be showing you how JavaScript’s break statement is utilized within a while loop.
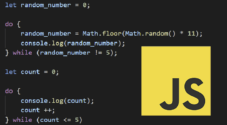
At the top of this script, we will create a variable called “count” that will increment on every loop. We start by assigning it the value of 0.
After creating this variable, we will write a simple infinite while loop by using “true” as the condition. The break statement is the only way we can ever leave this loop now.
Within this loop, we increment the count variable. We then use a JavaScript conditional if statement to check if “count” is greater than 10. JavaScript will execute the break statement and exit the loop if the value is greater.
If the loop proceeds, we utilize the “console.log()” function to print the value.
let count = 0;

while (true) {
    count++;
    if (count > 10) {
        break;
    }

    console.log(count);
}Copy
Below you can see the output produced from this loop. You can see that the loop ended at “10” as once the value was incremented to 11, JavaScript executed the break statement.
0
1
2
3
4
5
6
7
8
9
10
How JavaScript’s break Statement is Used in a for Loop
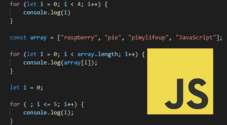
Using a break statement within a for loop is the same as you would a while loop. All you need to do is write “break“.
To showcase the behavior of the break statement in JavaScript, we will write a simple for loop that counts from 0 to 10.
However, within this loop, we will check whether the value of our loop is greater than 5. Once the value is greater than 5, JavaScript will execute the break statement and jump out of the loop.
On every loop, the value of count will be logged to the console.
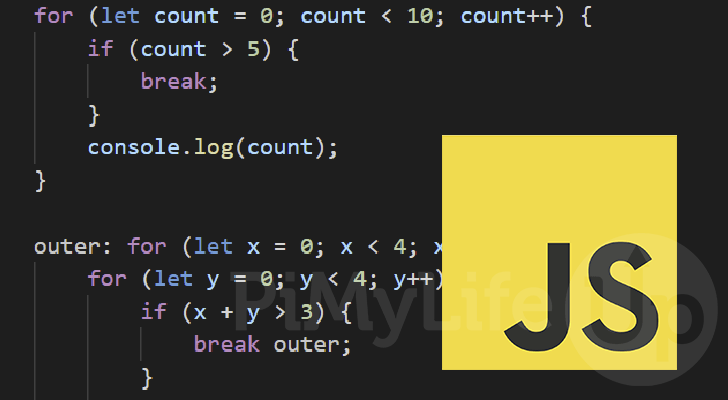
for (let count = 0; count < 10; count++) {
    if (count > 5) {
        break;
    }
    console.log(count);
}Copy
After running the code above, you should get the following result. With this result, you can see that the break statement ended the for loop early.
0
1
2
3
4
5
Break out of a Nested Loop in JavaScript
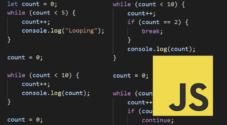
JavaScript’s break statement allows you to break out of nested loops by utilizing labels. By labeling a loop, you can jump to that specific loop when using break.
First, you should label the loop you want using a name followed by a colon (:) in front of your loop definition. For this example, we will label our first for loop “outer:“.
Within the labeled loop we have another for loop. Both loops will simply count from 0 to 3. Once the values of “x” plus “y” is greater than 3, we will break out of then nested loop by using “break outer;“
outer: for (let x = 0; x < 4; x++) {
    for (let y = 0; y < 4; y++) {
        if (x + y > 3) {
            break outer;
        }
        console.log(x, y);
    }
    console.log("Looped");
}Copy
By logging “looped” at the end of every loop, we can easily tell exactly when we break out of the nested loops. For example, as shown in the result below, both loops ended as soon as the value exceeded 3.
0 0
0 1
0 2
0 3
Looped
1 0
1 1
1 2
Using the break Statement in a JavaScript switch
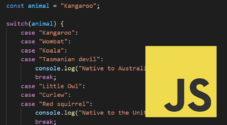
The break statement is a crucial component to controlling the flow of a break statement in JavaScript. Without a break, JavaScript will simply fall through to the next case.
To showcase this, we have the following simple JavaScript. First, we have a switch statement that we are passing in the value “0“.
Within the structure itself, we have two cases, one with the value “0” and one with the value “1”. Since we have passed in the value 0, the text “Example Switch” will be logged to the console.
switch(0) {
    case 0:
        console.log("Example Switch");
        break;
    case 1:
        console.log("Won't get here");
        break;

}Copy
Below you can see the output that you should see in your console after running the example above.
Example SwitchHowever, if you remove the “break” statement from the first case JavaScript will execute the code in the next case and continue to do so until it hits a break or the structure ends.
Example Switch
Won't get here
Conclusion
By the end of this guide, you should understand how you can use the break statement within JavaScript.
This statement allows you to break out of loops and is how you jump out of a switch statement.
If you have any questions about utilizing this within your code, please comment below.
Be sure to check out our many JavaScript tutorials. Alternatively, we also have plenty of other programming guides.