In this Raspberry Pi Deluge project, we will show you how to set up the popular Deluge torrent client on the Pi.

Throughout this tutorial, we will be showing you how to install and configure the Deluge torrent client alongside the Deluge web interface. We will also show you how to enable Deluge’s remote access ability.
As well as showing you how to install and setup the software on your Raspberry Pi we will also be showing you how you can setup Deluge as a service.
Setting Deluge up on your Raspberry Pi as a service will allow it so that the software will automatically start when the Raspberry Pi boots up.
There are VPNs that you can setup on the Raspberry Pi to help with privacy. I recommend using something like ExpressVPN or VyprVPN. There are plenty others that you can install.
For the maximum amount of storage you might want to mount an external hard drive. You also might want to sett up a Raspberry Pi NAS so you can access your files remotely.
Equipment List
Below is all the equipment that I made use of for this Raspberry Pi Deluge tutorial.
Recommended
Optional
Setting up Deluge on the Raspberry Pi
Firstly, we will be using the latest Raspberry Pi operating system; anything else, you might run into problems.
1. Before we install the Deluge torrent client onto the Raspberry Pi, we should first ensure all our packages are up to date. You can do this by running the following two commands.
sudo apt update
sudo apt upgradeCopy
2. In this step, we will now install the Deluge torrent client to the Raspberry Pi.
The version of the Deluge torrent client that we will be installing contains its web interface. The Deluge web interface will allow you to manage your torrents from any web browser easily.
To install Deluge, deluges web interface module and the python module the web interface requires we run the command below.
sudo apt install deluged deluge-web deluge-console python3-makoCopy3. If you want to store your downloaded torrents in a different location, then you can now go ahead and create the required folder.
In our example, we will be creating a folder within a drive we mounted to our “/media/NASHDD” folder called “torrent-downloads“.
This folder is a Samba share, and our pi user already has the privileges to write to this directory.
We can create this folder by running the following command.
mkdir /media/NASHDD/torrent-downloadsCopy4. Let’s now start-up and then shutdown the Deluged daemon by running the following two commands. This process will make the Deluge torrent software create the config files we need on our Raspberry Pi.
We will modify two config files so that we can allow remote access to Deluge and create a user to login to the Deluge daemon.
deluged
sudo pkill -i delugedCopy
5. We can easily insert a user into Deluge’s auth file by running the command below.
Make sure you swap out certain parts of this command such as “<USERNAME>” with the username you want to set and “<PASSWORD>” with the password that you want to give the user.
echo "<USERNAME>:<PASSWORD>:10" >> ~/.config/deluge/authCopy6. With the authentication now modified we need to go ahead and fire up the Deluge software again.
Without the software running we won’t be able to make the next configuration change.
delugedCopy7. Now we can go ahead and change Deluge’s config file so that the “allow_remote” variable is set to “True“.
We can do this by making use of the “deluge-console” package and running the command below.
deluge-console "config -s allow_remote True"Copy8. With all the required configuration changes done, we can now go ahead and fire up the Deluge web interface.
Run the following command to launch the web interface. We use “-f” on “deluge-web” to launch it as a daemon.
deluge-web -fCopy9. Lastly, let’s grab the Raspberry Pi’s local IP address with the command below. We will need this IP so that we can access the Raspberry Pi Deluge web interface.
hostname -ICopyThe Deluge Web Interface
1. With the Deluge web interface up and running on the Raspberry Pi, we can now access it by going to the Pi’s IP address followed by the “8112” port.
Enter the following web address, make sure you swap out “<IPADDRESS>” with your Pi’s IP address.
http://<IPADDRESS>:81122. Upon going to the web address, you will be greeted by Deluge’s web interface.
To access the interface, you will be first asked to enter a password (1.). The web interface password by default is “deluge“. We will update this password later on in the tutorial.
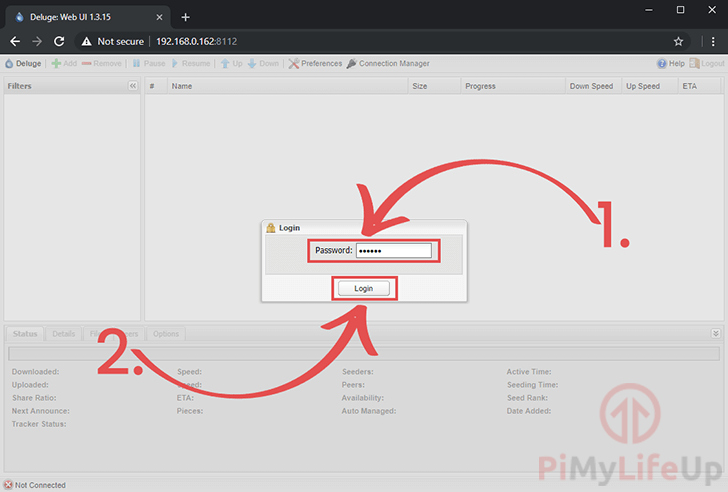
Once you have entered the password for Deluge, click the “Login” button (2.).
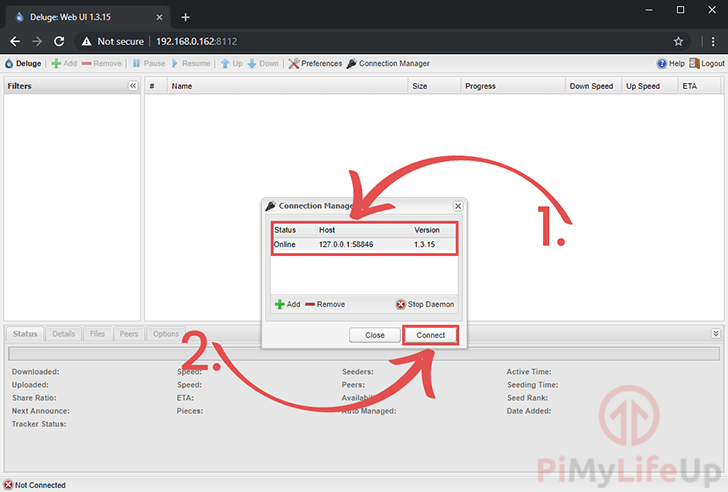
3. After logging into the Deluge web interface, you will then be shown the “Connection Manager” (1.).
Click the available host and then click the “Connect” button (2.).
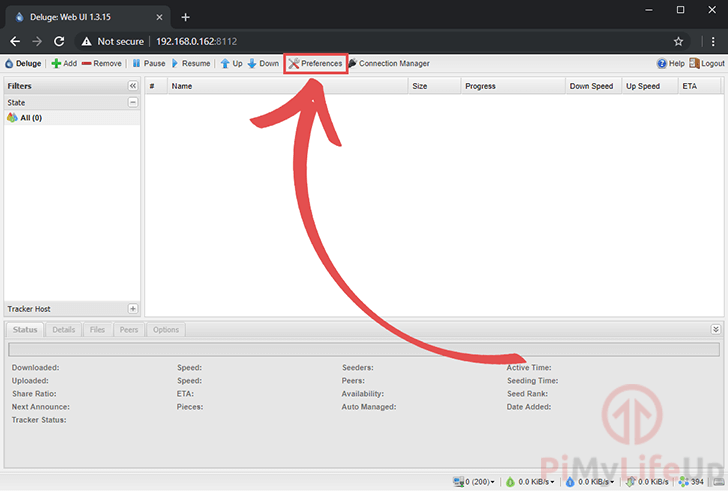
4. Once you have selected a connection in the “Connection Manager” box, you will now be brought to the main Deluge web interface screen.
If you want to change the download location or the default password, you can now do this by opening up the preferences dialog box by clicking “Preferences” in the toolbar.
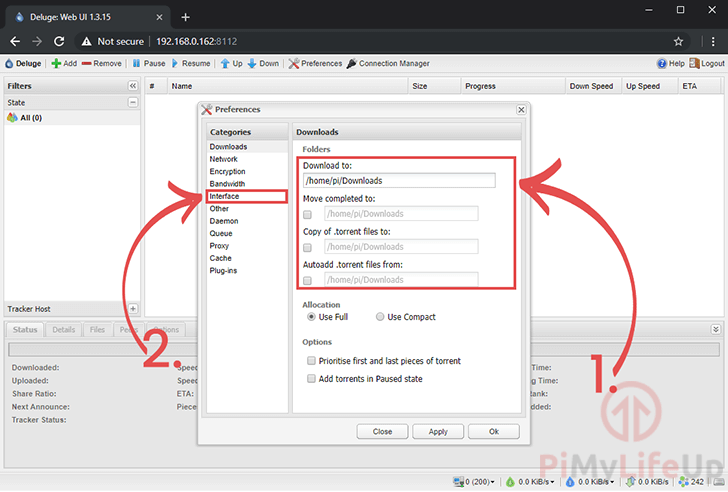
5. The first screen within the Deluge preferences interface is the “Downloads” screen. This screen lets you set things such as the download folder (1.)
Within this interface, you can specify the general download folder. You can also pick more specific options such as a location you want the completed torrents kept.
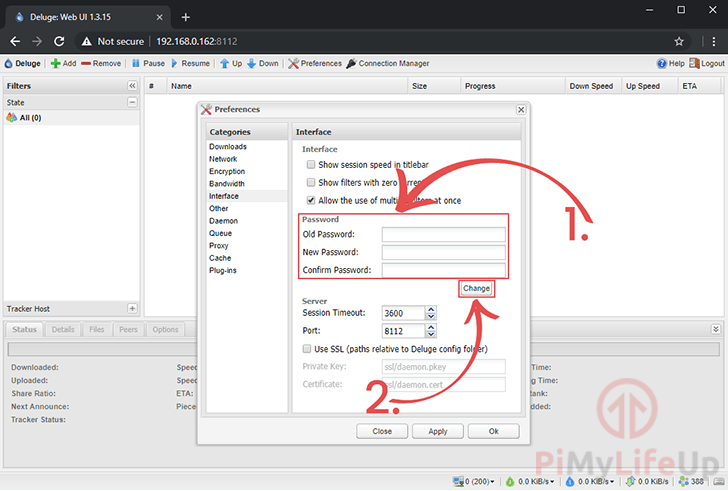
If you want to change the default password for the Deluge web interface, then you will need to go to the “Interface” screen (2.).
6. Now within the “Interface” screen, you can set the password (1.).
First, you will need to specify the original password in the “Old password” textbox, which in a first-run case, this will be “deluge“.
Next, specify your desired password in both the “New Password:” and “Confirm Password:” text fields.
Once you are all set, click the “Change” button (2.)
Setting up Deluge as a service
1. Now we need to make a service file for the Deluge daemon. This service file is what systemd will read from so that it knows how to manage the daemon.
Run the following command to begin writing our “deluged.service” file.
sudo nano /etc/systemd/system/deluged.serviceCopy2. Within this file, enter the following text.
These settings will set it up so that Deluged daemon will be started after the network has come online.
Make sure that you replace “pi” with the name of your user. This is the user that will be used to run Deluge and helps prevent potential permission issues.
[Unit]
Description=Deluge Daemon
After=network-online.target

[Service]
Type=simple
User=pi
Group=pi
UMask=007
ExecStart=/usr/bin/deluged -d
Restart=on-failure
TimeoutStopSec=300

[Install]
WantedBy=multi-user.targetCopy
3. Once done, you can go ahead and save the Deluged service file by pressing CTRL + X then Y followed by ENTER.
4. Now that we have created our Deluged service file let’s go ahead and enable it. Enabling the service means that on the next boot, it will start automatically.
Enable the service by running the following command.
sudo systemctl enable deluged.serviceCopyWe won’t be running the service straight away because the “deluged” daemon will be running already from the previous sections of this tutorial.
5. Next, we will need to create another service that will manage running the deluge web interface for us.
We will be calling this service file “deluge-web.service“, we can begin writing this file by running the following command on the Raspberry Pi
sudo nano /etc/systemd/system/deluge-web.serviceCopy6. Within this file, enter the following text.
This text defines our Deluge web interface service. This service will only start up after both the network has come online and the deluged service is active.
Before saving this file, ensure that you have replaced “pi” with the name of your user.
[Unit]
Description=Deluge Web Interface
After=network-online.target deluged.service
Wants=deluged.service

[Service]
Type=simple
User=pi
Group=pi
UMask=027
ExecStart=/usr/bin/deluge-web
Restart=on-failure

[Install]
WantedBy=multi-user.targetCopy
Once written you can save and quit by pressing CTRL + X, followed by Y then the ENTER key.
7. With our “deluge-web.service” now created, let’s go ahead and enable it by running the command below.
sudo systemctl enable deluge-web.serviceCopy8. Finally, we need to restart our Raspberry Pi Deluge setup by running the following command.
Restarting our Raspberry Pi will allow us to test that our services are running as they should be.
sudo rebootCopy9. Once your Raspberry Pi has finished rebooting you can now check to ensure that both Deluged and the Deluge web service is up and running.
Run the following two commands to retrieve the current status of the two services.
sudo systemctl status deluged
sudo systemctl status deluge-webCopy
If the status returns as “Active: active (running)” then you have successfully set up the Deluge torrent client on your Raspberry Pi.
There are other alternative torrent software packages for the Raspberry Pi that you can utilize. Each has its pros and cons, so it’s entirely up to you which one you pick.
By the time you’re at this point in this Raspberry Pi Deluge tutorial, you should have everything configured and set up correctly. If you’re running into issues, then please don’t hesitate to leave a comment below.


Anyone having issues after updating the O/S with Deluge? I realize this is a very general question but all worked well until about a month ago.
Thank you for an easy to follow tutorial. However, there is one thing that I believe got missed in the updates: The systemctl service section for deluged (section 2 of “Setting up Deluge as a service” above) still includes the “-d” switch, which, if I understand some of the other feedback, should be removed.
For what it’s worth, with that change, I’ve got Deluge 2.0.3 running on my RasPi 3b+ running RasPi 11 “bullseye”
Hi Geordon,
Thank you for pointing out that mistake. I have now corrected it.
Cheers,
Emmet
The -d switch DOES need including in the service file for Deluge 2.x
I was able to walk through the guide (thanks!) but ran into this issue after rebooting
Hi Al,
I have adjusted the service file based on some feedback to remove the “
-d” option when starting Deluge.Can you please try adjusting both of your service files, then running the following three commands.
Cheers,
Emmet
Is it not possible at this time to run delugeVPN on raspberrypi??
Hi AI,
Having a quick glance at the DelugeVPN GitHub (Assuming you are referring to the docker container), it should be possible to run if you are using a 64-bit release of Raspberry Pi OS.
Cheers,
Emmet
Hi Emmet,
I followed your guide and everything works. However, following the guide installs version 2.x of the web GUI. I have a different pi which still runs 1.x even though apt update says everything is up to date. When setting up the older device I followed this guide too, so I’m wondering if it’s possible to force an update to deluge-web somehow?
Hi Jeroen,
WIth the way we are installing Deluge in this guide we are just installing it directly from the official package repository.
The most likely reason your older Raspberry Pi isn’t using the “2.x” version of deluge is that it is running an older version of Raspberry Pi OS.
You can check the version of Raspberry Pi OS both devices are running by using the following command.
Cheers,
Emmet
seems deluge-web has updated their cli and -d option is removed. i just changed this line in /etc/systemd/system/deluge-web.service:
ExecStart=/usr/bin/deluge-web -d
to
ExecStart=/usr/bin/deluge-web
hello
i had to add the -d switch for it to work on pi 1 B+
I recently had an SD card fail, and used it as an opportunity to upgrade to a pi 4 as a seedbox, but had to reinstall of the programs.
This tutorial was great, and was very easy to follow. I have Deluge up and running, and the web interface is working great. For some reason though, with all of the information input the same as before, just the remote Daemon will not connect. I have the IP address, the username and password correct, but it just never shows up as available. I’ve verified that Remote Connection is enabled, and am at a loss.
Used this tutorial several times before, it’s excellent thank you. But I just setup again after a SD card failure and the services don’t seem to work anymore. I have zero linux skills so now I just have to manually launch deluged and deluged web on restart.
This is what I get when I run:
and for the web
Hi Ian,
I just re-ran the tutorial and am unable to reproduce this issue.
May I ask what operating system you are using exactly?
Cheers,
Emmet
Solved it myself.
When I booted up the OS for the first time it prompted me to created a new user, so I thought why not. Later in deluged.service I changed the user=pi and group=pi it =myusername, and the service worked fine after that.
6th February 2022 – successfully installed on a new Pi 4 with Bullseye OS 11.
Great tutorial, very easy to follow and clear explanations. Thanks for doing it so well!
Great tutorial, just a not for the deluge-web service it needs to be “
ExecStart=/usr/bin/deluge-web -d” without-don the actual system it would not start.Hi Kay,
Thank you for pointing that out. I have updated the tutorial so it should now be correct.
Cheers,
Emmet
For me it did NOT work when having “-d” at the end. Gave me exit code 2 or something like that. Having “-f” didn’t throw an error, but it sat “inactive” or something like that. Omitting the parameter completely worked for me. Then it started as it should. Running in the background of RetroPie 4.8, which is Buster based.
I get:
There seem to be no way around it.
Hi Odyseja,
If you want to use Raspberry Pi OS Bullseye you will have to use something like Transmission or qBittorrent instead.
The version of “libtorrent” being provided through the package repository in Bullseye is not compatible with the Pi’s architecture at this time.
Cheers,
Emmet
Is this guide accurate for Bullseye? I’m getting errors when installing python-mako, and when running deluged for the first time, I see an error ModuleNotFoundError: No module named ‘deluge.libtorrent’
Hi Deke,
Unfortunately the “libtorrent” library that Deluge relies on is not currently working on Raspberry Pi OS Bullseye.
I am testing compiling libtorrent as a separate tutorial and will link to that if everything works.
In the meantime I would recommend checking out our guide on Transmission or qBittorrent. Both are solid alternatives to managing your torrents on a Raspberry Pi.
Cheers,
Emmet
mthx, great tutorial
in case anyone needs to also use a thin client, in my case anyway, has also to edit the .config/deluge/auth file by running:
sudo nano .config/deluge/auth
(in my case I had to remove the on username and password) and save the file
thx agn!
I follow the guide but for some reason cannot connect to the webui on any browser other than on the rpi.
I’ve spent quite a lot of time trying to find out what’s going wrong but I can’t figure it out.
Please help
Hi Chris,
Can you make sure that you ran the following command to allow remote connections to Deluge.
The web UI should be accessible after running this command. You may have to restart the web service after running this command.
Cheers,
Emmet
Tutorial is good. However, the Raspberry Pi original version 1 has some performance issues while running torrents, so keep that in mind. Opening more than 2 torrents will cause the web connection to go down and the downloading of the torrents may stall also.
Hi. Thanks for the tutorial, is by far, the best i found out over the net. Just to add, I´ve used it to install it on Debian 10 (Buster) just changing the user and group in service files, both deluge-web.service and deluged.service.
Hi Ibarra,
Glad to hear that this tutorial on installing Deluge has been a great help to you!
Cheers,
Emmet
If you keep a lot of torrents in Deluge, you will probably get a “too many open files” error eventually. To fix this, you can add the following line after the TimeoutStopSec=300 setting in the deluged.service file:
LimitNOFILE=16384
You can adjust the value as needed to eliminate the error.
Thanks for this point
This tutorial is excellent..
Thank you and keep up the good work.