Help get yourself started with Linux operating systems with this handy guide on Linux commands.
We mostly refer to basic Linux commands that a beginner will find handy. However, it does not include highly detailed information regarding each command to help keep things brief.
This command cheat sheet should prove helpful to more than just Raspberry Pi users. It is important for anyone who wants to learn what they are entering into their Linux-based terminal.
I hope that the information below is detailed enough to understand the basics of what the commands do. With almost every command, there are many more advanced options that you can use to help achieve the task you are trying to do.
If you need more information, simply check out the link associated with some of the more complex commands; alternatively, you can check out the manual page within Linux itself.
If you want to learn more about the Raspberry Pi and all the cool things you can do with it, check out my many cool Pi projects, guides, and much more.
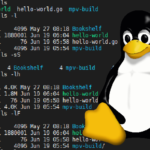
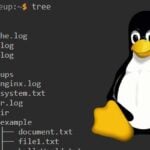
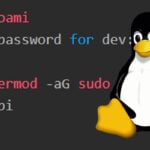
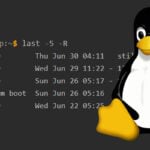
Table of Contents
- General Commands
- File System Commands
- Search Commands
- Networking Commands
- Process Management Commands
- User Commands
- Conclusion
General Commands
This section is for general Linux commands that do not fit into a specific category but are useful to know.
These general commands can be helpful for your general day-to-day usage of a Linux system.
For example, you can utilize the man command to display helpful information on almost any command.
MAN Command
The man command is short for manual and is used to retrieve the manual page for a specified command.
man [COMMAND]The man command is useful when you want to find out what a specific command does while also exposing any additional options it might provide.
Using the man command is a helpful tool for learning how the huge variety of Linux commands work and can be useful when you are stuck.
You can even use the command man man to view the manual pages of the man command itself.
Example of using the man command
man man
man ls
One thing to note is that not every command in Linux has a manual page. The lack of a manual is more of a problem with third-party party packages than the tools provided by Linux.
You can learn more about the man command in our full guide.
PIPES
A pipe in Linux is a form of redirection that can send the output of one command to another.
[COMMAND1] | [COMMAND2]The pipe is an incredibly useful tool for getting the result from a command and using it to perform another task.
The pipe is represented by a vertical bar | and is used in-between two commands. The output of the first command is then redirected into the second.
For example, to only show the first ten entries of the ls command, we can pipe the results through to the head command.
Example of using pipes in Linux
ls | headThere are a variety of other use cases for pipes in Linux. Pipes are a tool that can simplify managing a Linux-based operating system.
File System Commands
This section touches on Linux commands that help manage the file system on a Linux-based distribution.
These Linux commands deal with tasks such as copying, moving, deleting, editing, unzipping, and renaming files. In addition, the commands touch on tasks such as file permissions.
Traversing Directories in Linux
In Linux, there are a couple of different commands that make it easier for you to traverse and deal with directories.
Placing a dot in front of the slash (/) like this ./ will mean that you are referring to the current directory you are in
Adding two dots in front of the slash like this ../ will mean that you are referring to the parent directory of the current directory.
The tilde symbol ~ refers to the home directory. This symbol is handy whenever you need to quickly refer to a file in the home directory or navigate to a file from the home directory.
Example of traversing directories
./
../
~
LS Command
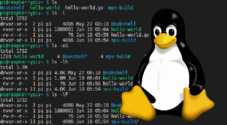
The ls command in Linux will list the contents of the current working directory or the one that you have specified. For example, ls /home/pi.
ls [OPTIONS] [FILE/DIRECTORY]You can utilize the -l flag to display more information about the file or directory.
This flag provides an abundance of extra information such as the permissions, owner, group, size, date, and timestamp of the last edit.

You can refer to our graphic below to see the extra data returned using the -l flag with the ls command.
The ls command returns its data in a list format, with each file or directory being listed on a new line.
Example of using the ls command
ls /home/pi
ls -l /home/pi
Please out more by following our guide on using the ls command in Linux.
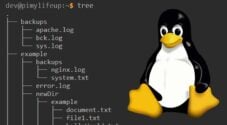
TREE Command
In Linux, the tree command is used to recursively display the contents of a directory.
tree [DIRECTORY]The tree command returns a depth-based indented list of all the files in the current directory and subdirectories.
This command is incredibly helpful when you want to work out the folder structure of a directory.
When the tree command is used without a specifying directory, it will recursively list the contents of the current working directory. If you have specified a directory, the tree command will search through that directory instead.
Example of using the tree command
tree
tree /home/pimylifeup
Example result from the tree command
Below you can see the result of using the tree command within the home directory of a user on our Raspberry Pi.
pi@raspberrypi:~ $ tree
.
├── Downloads
│   ├── SampleFile.zip
│   └── TestFolder
│       ├── Hello.txt
│       └── PiMyLifeUp.com
├── hellofile.txt
├── MagPi
│   └── MagPi85.pdf
└── SampleFile
Be sure to check out our complete guide on the tree command for more information regarding options that you can use.
CD Command
The cd command is a straightforward yet essential command for dealing with Linux systems.
The reason this command is so important is that it allows you to change from one directory to another.
cd [DIRECTORY]To use the cd command, all you need to do is type in cd followed by the path you want as your working directory. This command makes a directory change super easy.
You can refer to our Traversing Directories in Linux section for tips on how to deal with directories quicker using some simple shortcuts.
Example of using the cd command
cd /directory
cd ..
You can always learn more about traversing Linux using the cd command with our guide.
PWD Command
The pwd command is a straightforward command that outputs the path of the current directory starting from the root directory (/).
pwd stands for Print Working Directory.
This command can be useful when you want to know the path of the current working directory.
Example of using the pwd command
pwdWe have a guide that gives more information regarding the pwd command that you might be interested in checking out.
MKDIR Command
The mkdir command will create a new directory in the location that you specify.
mkdir [OPTIONS] [DIRECTORY]If you run the mkdir command with just a name, it will create that directory in the current working directory. For example, mkdir newDirectoryName.
Otherwise, if you run the command with a path specified that it will create a directory in that location. For example, mkdir /home/newDirectoryName.
By default, the mkdir command will only create a new directory in that path if all of its parent directories exist.
For example, mkdir /home/parent/old/young will not work if “parent” or “old” directories do not exist.
To make all the non-existing parent directories, you can utilize the -p flag. This flag will recursively create any missing directories.
Example of using the mkdir command
mkdir pimylifeup
mkdir /home/pimylifeup
mkdir -p /home/pimylifeup/create/new/directories
Please read our complete guide on the mkdir command if you require more information.
RMDIR Command
The rmdir command is useful for removing empty directories.
rmdir [OPTIONS] [DIRECTORY]There are two ways to use the rmdir command, and the first is to remove a single empty directory by specifying its path.
For example, rmdir emptydir
The second way of using the rmdir command is to use the -p flag, which will remove all parent directories as long as they are empty.
For example: rmdir /emptydir1/emptydir2/emptydir3/
You cannot force the rmdir command to remove directories if they are not empty. To do that, you will need to use the rm command.
Example of using the rmdir command
rmdir emptydir
rmdir /emptydir1/emptydir2/emptydir3/
There is not a considerable amount to cover for this command but check out our full tutorial on the rmdir command if you want more information.
RM Command
The rm command will remove the specified file or directory. You will rely on this command a lot during the day-to-day usage of Linux.
rm [OPTIONS] [FILE/DIRECTORY]There are a couple of different ways to utilize the rm command in Linux.
The first way is to remove a single file. You can remove a single file by utilizing the rm command, followed by the path to a file.
For example, rm /home/pimylifeup/samplefile.txt
To remove directories, you will need to use the -r flag. This flag will also remove any files or directories contained within that directory.
For example, rm -r /home/pimylifeup/
Note: The rm command does not truly delete your files but instead un-links them from the file system and marks it as available space.
To ensure a file has been thoroughly deleted, you should utilize the shred command.
Be careful though the rm command will still make restoring a file extremely hard.
Example of using the rm command
rm /path/to/file
rm -r /home/pimylifeup
Check our full rm command tutorial for in-depth information on using the command effectively.
CP Command
The cp command will create a copy of a file in the specified location.
cp [OPTIONS] [FILETOCOPY] [NEWFILENAME]You can use the -r flag with the cp command to recursively copy the entire contents of a directory.
Example of using the cp command
cp file newfilename
cp -r /path/to/copy/ /newpath/to/copy/to
You can use more options and techniques with the cp command, and we cover them in our complete cp guide.
MV Command
The mv command moves a file and places it at the specified location.
mv [OPTIONS] [FILETOMOVE] [WHERETOMOVETO]If you want to move the contents of a directory using the mv command, you need to utilize the -r flag.
This command is similar to cp, but it moves it instead of copying the file.
You can also use the mv command in Linux to rename a file by referencing the file you want to rename, followed by the new name.
Example of using the mv command
mv file.txt ./newdirectory
mv file.txt newname.txt
mv /directorytomove /newdirectory
If you want to learn more about moving files and directories, be sure to check out our mv command guide.
TOUCH Command
The touch command will either update the last modified timestamp of the specified file(s) or create the files if they do not already exist.
touch [FILENAME]...Files created using the touch command will be empty.
This command is useful for those who want to create a file but have no data to store at its time of creation.
Example of using the touch command
touch file.txt
touch file1.txt file2.txt file3.txt
For more information on using the touch command, be sure to check out our in-depth guide.
CAT Command
The cat command is short for “concatenate” and has various functions.
cat [OPTION] [FILENAME]...First, you can use the cat command to view the contents of a file by using cat followed by the filename.
For example, cat filename.txt will display the contents of the file called filename.txt.
You can also use the cat command to create a file by using the greater than > character.
For example, cat > newfile.txt will create a file called newfile.txt.
You can also use the cat command to output the contents of multiple files.
For example, cat *.txt will list the contents of all of the .txt files in the current directory.
Example of using the cat command
cat file.txt
cat file.txt file.txt
cat *.txt
cat > newfile.txt
There is plenty more to the cat command, but we will cover that in our cat command tutorial.
HEAD Command
The head command will display the beginning of a file.
It is the opposite of the tail command.
head [OPTIONS] [FILENAME]You can utilize the –n flag with the head command to specify the number of lines to show.
By default, the amount of lines shown by the head command is 10.
Example of using the head command
head file.txt
head file.txt -n 20
For more information on using the head command, please read our full guide.
TAIL Command
The tail command will display the end of a file. For example, it is useful for retrieving the latest lines in a log file.
It is the opposite of the head command.
tail [OPTIONS] [FILENAME]To specify the number of lines you want to be displayed, you can use the -n flag.
The tail command will display the last ten lines in a file by default.
Example of using the tail command
tail file.txt
tail file.txt -n 20
We have a more detailed guide on the tail command that I recommend checking out if you need more information.
CHMOD Command
The chmod command is used to alter the permissions of a file or files. Very handy for changing the ownership of a file.
The chmod offers both symbolic or numerical notation depending on what you prefer.
For example, the symbols used for the symbolic notation are u (user), g (group), o (other users), r (read), w (write), and x (execute).
An example of this is chmod u+x samplefile. This command will add the execute permission to the owner of a file called samplefile.
If you are using the numerical notation, refer to the table below to see which number represents the permissions you want.
| Number | Permissions |
|---|---|
| 0 | No Permissions |
| 1 | Execute |
| 2 | Write |
| 3 | Write and execute |
| 4 | Read |
| 5 | Read and Execute |
| 6 | Read and Write |
| 7 | Read, Write, and Execute |
The order of the numbers should be as follows owner, group, and then others,
For example, the command chmod 777 samplefile will give full permissions to the user, group, and others on a file called samplefile.
Example of using the chmod command
chmod 754 file
chmod u=rw file
We delve further into the chmod command in our dedicated chmod guide. This guide will more thoroughly explain the differences between symbolic and numeric notation.
CHOWN Command
You can use the chown command to change the user or the group that owns a file.
chown [OPTIONS] [USER]:[GROUP] [FILE/DIRECTORY]For example, we can use the following command sudo chown pi:root samplefile to change the owner of a file called samplefile to pi and the group to root.
Note that the chown command typically needs to be run as a superuser to work.
You can do this by either running sudo su prior to running the command or appending sudo in front of the command.
Example of using the chown command
sudo chown pi:root fileWe touch more on this command in our chown tutorial. I highly recommend checking it out if you require more information.
DD Command
The dd command is primarily utilized to copy and convert files on Unix-based systems.
dd [OPTIONS]The dd command is often used to create a copy of an entire disk to a single file, a feature that is useful for creating backups.
For example, using the command dd if=/dev/sdd of=backup.img will create a backup image of an SD card or USB drive mounted at /dev/sdd.
Use the correct drive when restoring an image as the dd utility will overwrite/wipe the disk that you restore to.
Example of using the dd command
dd if=/dev/sdd of=backup.img
dd if=backup.img of=/dev/sdd
DF Command
The df command will display the disk space available for all currently mounted file systems.
df [OPTIONS] [FILE]If you specify a file with the df command, it will return the free space for the mount containing the file.
You can also use the -h flag(df -h) to see the output in a human-readable format.
For example, bytes will be replaced with kilobytes (KB), megabytes (MB), gigabytes (GB), or terabytes (TB)
Example of using the df command
df
df /home/pimylifeup/samplefile
df -h
df -h /home/pimylifeup/samplefile
For more information regarding the df command, be sure to check out our full tutorial on using df.
UNZIP Command
You can use the unzip command to extract files and directories from a compressed zip archive. Zip is a great file compression format that is often used for reducing the size of archived files and folders.
unzip [OPTIONS] [ARCHIVE]If you want to extract the files with the unzip command to a particular destination, you can use the -d flag.
Example of using the unzip command
unzip archive.zip
unzip archive.zip /dir/to/unzip/to/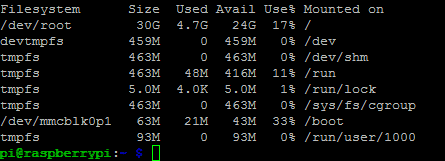
We have written a full guide on using the unzip command that I highly recommend checking out.
TAR Command
You can use the tar command to compress files in the tar file format and extract tar archives.
tar [OPTIONS] [ARCHIVE]You can also use the tar command to extract both tar.gz and tar.bz2 archives.
To create a compressed tar file, you need to use the -c flag.
For example, tar -cvzf archive.tar.gz directory.
To extract the contents of a tar archive, you need to use the -x flag.
For example, tar -xvzf filename.tar.gz.
If you want to extract the contents of a tar archive to a different directory, you can utilize the -C flag.
For example, tar -C /dir/tar/here -zxvf archive.tar.gz.
Example of using the tar command
tar -cvzf archive.tar.gz directory
tar -xvzf archive.tar.gz
tar -C /dir/tar/here -zxvf archive.tar.gz
To learn more about the tar command, be sure to check out our full guide. It will take you through some of the different options you can use with the command.
WGET Command
The wget command is useful for downloading files from a website to your device.
wget [OPTIONS] [URL]The most basic usage of the wget command involves using wget followed by the URL that links to the file you want to download.
For example, wget https://example.com/file.txt will download file.txt from the website https://example.com/ into the current directory.
If you would like to save the file to your device with a different name, you use the -O flag, followed by the name of the file you want to use.
For example, wget -O pimylifeup.txt https://example.com/file.txt will download the file called file.txt then redirect the download output to our pimylifeup.txt file.
Example of using the wget command
wget https://example.com/file.txtTo learn more about the wget command, check out our dedicated guide.
Search Commands
This Linux command cheat sheet section is for commands that search or find directories and files.
These commands are handy when trying to find something that is not in its usual location.
GREP Command
The grep command is useful to search inside files for certain patterns.
It is quite a powerful tool as you can use complex
grep [OPTIONS] [REGEX] [FILE]GREP stands for globally search a regular expression and print.
For example, grep "search" *.txt will search all text files in the current directory for the string “search”.
GREP also supports regular expressions, allowing special letter combinations to be included in the search.
Example of using the grep command
grep "search" *.txt
grep "Pi.*Life Up" *.txt
You can do a lot more with the grep command, so make sure you read our in-depth tutorial for more information.
FIND Command
The find command will search for directories and files that match a specific pattern.
find [DIRECTORY] [OPTIONS]There are a lot of different combinations that can be used to help extend the accuracy of this command.
The find command results can be piped (|) through to other commands such as grep to improve the search.
Example of using the find command
find . -name 'help'WHEREIS Command
The whereis command will display a specific command’s documentation, binaries, and source files.
It will look through standard program locations until it finds the requested command.
Example of using the whereis command
whereis grepWe have a bit more information on the whereis command that might be worth checking out.
Networking Commands
The following commands are related to networking and can be used for diagnostics when working out network-related issues or just for information gathering.
We have included these commands as they can be useful for dealing with a Linux operating system and testing networking.
PING Command
The ping command is typically used to check if communication can be made with another host and monitor the response time.
ping [IPADDRESS/HOSTNAME]You can simply use it with the default settings by specifying a hostname (e.g. ping pimylifeup.com) or an IP address (e.g. ping 8.8.8.8).
Example of using the ping command
ping pimylifeup.com
ping 8.8.8.8
Be sure to learn some of the other useful options you can use with the ping command.
HOSTNAME Command
The hostname command will display the current hostname of the system.
hostname [OPTIONS] [HOSTNAME]A privileged (super) user can set the hostname to a new one by supplying it as an argument (sudo hostname newName).
The -I flag can be used alongside the hostname command to show the device’s IP.
Example of using the hostname command
hostname
hostname -I
sudo hostname newName
There is more to know and understand about this command, so check out our hostname command tutorial if you are interested.
IFCONFIG Command
The ifconfig command displays the network configuration details for the interfaces on the current system when you run it without any arguments.
ifconfig [INTERFACE]By supplying the command with the name of an interface (e.g. eth0 or lo), you can see the configuration for that specific interface.
You can also configure interfaces and also set them to up or down. It is best to refer to the manual pages for more information.
Example of using the ifconfig command
ifconfig
ifconfig eth0
SSH Command
The ssh command stands for “secure shell” and allows you to connect to another terminal over an encrypted network connection.
ssh [OPTIONS] [USERNAME]@[IPADDRESS]Using SSH is how we usually connect to the Raspberry Pi remotely.
You would have likely used a tool such as Putty to connect to a network over SSH on a Windows system.
Example of using the ssh command
ssh user@IP_AddressSCP Command
The scp command is useful for securely copying files from one computer to another using the SSH protocol.
scp [TO COPY FILE/DIRECTORY] [COPY TO FILE/DIRECTORY]SCP is short for secure copy and works exactly like the cp command, except it accepts locations over the SSH protocol.
Upon using the scp command, you will be prompted for a password before the transfer begins.
Example of using the scp command
scp /home/bob/*.jpg gus@example.com:/home/gus/archive
scp gus@example.com:/home/gus/archive/*.jpg /home/bob
Refer to our scp guide for more information on how to use this very useful Linux command.
Process Management Commands
This section of the Linux command cheat sheet will cover commands that help with process management.
Process management, just like any operating system, is critical on Linux.
The commands below will help you diagnose, monitor, and kill processes if required.
PS Command
The ps command will provide a snapshot of the processes currently running on your Linux-based operating system.
ps [OPTIONS]There are a variety of options that you can use with this command. If you need more information, simply use man ps to get all the details.
Example of using the ps command
psWe have a full guide on using the PS command, so I highly recommend reading it if you want more information.
TOP Command
You can use the top command to see real-time information on the currently running processes.
top [OPTIONS]Much like the ps command, there are a ton of additional options you can use with this command.
Example of using the top command
topBe sure to read our top command tutorial as it goes into a lot more depth on how to use the command and read the output correctly.
KILL Command
The kill command might sound grim but is a useful utility used to terminate a process or many processes.
kill [PID]
pkill [NAME]
killall [NAME]
It is a useful command to use when you find yourself with a process that will not terminate or is frozen.
There are a few variations on this command that you can use.
See the examples below to get a good idea of how you can use each variation of the kill command.
Example of using the kill command
#Kill process with id pid (pid is process id)
kill pid

#Kill the process with matching name
pkill name

#Kill all processes with the matching name
killall name
There is quite a bit more to learn about this command, so I recommend checking out our complete guide on the kill command.
User Commands
These commands are primarily helpful for anyone running multiple users on the same operating system.
System administrators typically use them to add, delete, and view the users and their actions.
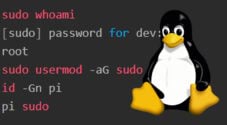
ID Command
You can use the id command to print the ids of the current users and groups.
id [OPTION] [USERNAME]This command is extremely handy for setting permissions to a specific group or user where the id number is required.
The -g flag will print the group id, while the -u flag will print the user id.
Example of using the id command
id
id -u pi
id -g pi
WHO Command
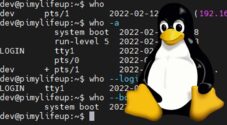
The who command will list all the currently logged-in users and any other useful information about the logged-in users.
Example of using the who command
whoCheck out the full guide on the who command more information on how to use it effectively.
LAST Command
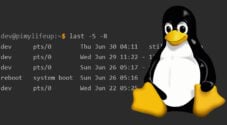
The last command shows a list of users who have recently logged in.
This command works by searching through the file located at /var/log/wtmp
Example of using the last command
lastRead through our full tutorial on the last command if you want to know all the basics of using this helpful command.
GROUPADD Command
The groupadd command will create a new group with the options you provide it.
groupadd [OPTIONS] [GROUPNAME]You will need to be logged in as root for this command to work correctly.
Example of using the groupadd command
groupadd gusWe have a more detailed tutorial on the groupadd command that I highly recommend checking out. It will take you through some of the many options that you can use.
USERADD Command
The useradd command will create a new user.
useradd [OPTIONS] [USERNAME]When you create a new user, you will need to use passwd to assign a password to that account before using it.
You will need to have superuser rights or be the root user for this to work.
Example of using the useradd command
useradd gusWe have more information on using the useradd command if you wish to use it more.
USERDEL Command
The userdel command will delete a user’s account.
userdel [OPTIONS] [USERNAME]It is also extremely important to note that it will also delete all the associated files with that user.
If this sounds a little heavy-handed, then deluser might be a better alternative as it will not remove the home directory unless you use the --remove-home flag.
As you would expect, both these commands need superuser rights.
Example of using the userdel command
userdel gus
deluser gus
Be sure to check out our full userdel command tutorial if you wish to learn more.
USERMOD Command
You can use the usermod command to modify a user account.
usermod [OPTIONS] [USERNAME]There are many options that you can use to make the changes.
For example, -d will allow you to alter the user’s home directory.
You will need to be a superuser to make any changes.
Example of using the usermod command
usermod -d /home/gusNewDirectory gusThere is quite a bit more you can do with this command, so I recommend checking out our usermod command tutorial.
PASSWD Command
passwd command is one of the most important as this will allow you to change the password of an account.
passwd [USERNAME]If you specify a username, then the passwd command will modify the password for that account.
To modify the password of a different account, you require superuser privileges.
Example of using the passwd command
passwd
passwd gus
Check out our complete guide if you need to know more information on the passwd command.
Conclusion
There are always more commands, but hopefully, this Linux commands cheat sheet has covered all the important ones.
If you are just starting with the Pi and want more information, then be sure to check out the handy section on getting started with the Pi.
If you want an excellent downloadable version of this Linux cheat sheet, you can download it right here. Again, much like this article, if you notice a problem, leave a comment below.
Also, if you feel like I have missed some crucial commands to beginners and advanced users, be sure to leave a comment below.

Great I needed a cheat sheet!
Thanks 🙂
You should consider adding systemd commands and some new network commands as ip, ss etc.
The pdf document has a dark red for contrast between commands. This does not print so well on a B&W laser printer. Could you change the red to light grey?
thanks
Hi Cagey,
I’ll fix that up as soon as I can!
It should be fixed now, let me know if there are any more issues with it.
Hello.
I’m old enough to have learned computing and programming, before the world had the PC. This means CPM commands, programming in Fortran, Algol etc, so trying out some Linux (for the fun of it), should be an easy task (?). Have bought a few RPIs and look forward to playing…
Here your command overview comes handy, but I would prefer a paperbased version. Can you point me to such an overview? Perhaps a bit more elaborate than the one you have her?
Thanks.