In this tutorial, we will show you how to run Syncthing on your Linux device using Docker Compose.
Syncthing is a self-hosted peer-to-peer file synchronization software. Using this platform, you can easily synchronize entire systems locally or over the internet. You can even synchronize files when behind a firewall, as the software can fall back to using relay servers rather than a direct connection.
The Syncthing software uses encrypted TLS connections to help keep your files secure when they are being synchronized. Additionally, to synchronize with any device, you have to explicitly approve each connection.
One key advantage of using Syncthing is that once you have it set up, it requires little to no maintenance to maintain the synchronization. The software is also super easy to configure and use, so you can control how it handles situations such as duplicate files.
You can even set up this synchronization tool to only act as a read-only node. This means it can pull and upload the files to other connected clients but can’t make any changes to the files themselves.
To make setting up Syncthing easier, we will utilize a Docker container. Using this container, you can have Syncthing running in a few steps. Additionally, since we are using the official container, you should always have access to the latest version.
Setting up Syncthing using a Docker Container on Linux
Over the following sections, we will walk you through using Docker Compose to install Syncthing to your Linux system.
We tested these steps on a Debian operating system, but they should work on any Linux-based system that can run Docker.
Installing Docker to your Device
1. If you already have Docker installed on your system, you can safely skip to step 4. We require Docker to run the Syncthing container that we are using.
Docker provides a straightforward script that you can use to install and set up Docker on your machine. Run the command below to download and execute the Docker install script.
curl -sSL https://get.docker.com | shCopy2. Once Docker has been installed, we can use the usermod command to add our current user to the “docker” group.
Adding your user to this group will enable you to control your Docker containers without elevating to the superuser.
sudo usermod -aG docker $USERCopy3. Before we can continue, you must log out or restart your system. This is because group changes don’t take effect while a user is logged in.
If you are using the terminal, you can log out by running the command below.
logoutCopyAlternatively, restarting your system using the reboot command will ensure the changes take effect.
sudo rebootCopyPreparing your System to Run the Syncthing Docker Container
4. Our next step is to create a directory to store the Syncthing Docker compose file.
Using the mkdir command within the terminal, we can create a directory located at “/opt/stacks/syncthing“. We use the “-p” option to ensure Linux will create all missing folders.
sudo mkdir -p /opt/stacks/syncthingCopy5. After creating this new directory, change into it by using the cd command.
cd /opt/stacks/syncthingCopy6. Since Syncthing is downloading and transferring files from your system, it must run under the user who will own the files you are accessing.
You can get your current user’s ID using the “id” command, as shown below.
id -uCopyBelow, you can see that our current user’s ID was “1000“.
10007. While, the user and group ID are typically the same value, this isn’t always the case.
Use the following command within the terminal to retrieve your current user’s group ID.
id -gCopyThe result below shows that our group ID was the same as our user ID.
1000Writing your Docker Compose File for Syncthing
8. Now that we have all the pieces in place, our next step is writing a Docker Compose file for Syncthing. A Compose file tells Docker what container to download and how to run it.
By running the following command, you can begin writing this Compose file using the nano text editor.
sudo nano compose.yamlCopy9. Within this file, fill out the following information. This information tells Docker to retrieve the Syncthing container and where to mount its volumes.
Additionally, we are running this container in host mode, which allows Syncthing to operate correctly and detect local nodes.
<USERID>: Replace this value with the ID of the user that will own the files synchronized by Syncthing.<GROUPID>: Swap this placeholder out with the group ID. We showed you how to get this value earlier in the guide.<DIRECTORY>: Change this to the directory where you want your files synched to and from.
services:
  syncthing:
    image: syncthing/syncthing
    container_name: syncthing
    hostname: syncthing
    environment:
      - PUID=<USERID>
      - PGID=<GROUPID>
    volumes:
      - <DIRECTORY>:/var/syncthing
    network_mode: host
    restart: unless-stoppedCopy
10. After writing this file, save and quit by pressing CTRL + X, Y, and then ENTER.
Starting the Syncthing Server
11. With our Compose file now written, we can start our Syncthing Docker Container using the following command within the terminal.
By using the “-d” option, Docker will detach from the current terminal session once the container has started.
docker compose up -dCopyAccessing the Syncthing Web Interface
12. Now that you have Syncthing running within a Docker container, you will want to know how to access its web interface.
Before you can access its web interface, you will need to know the IP address of your machine. You can get the IP of your machine by using the hostname command.
hostname -ICopy13. Once you know the IP address of your machine, go to the following address in your favorite web browser.
Ensure that you replace “<IPADDRESS>” with the IP of the device you are running Syncthing on.
http://<IPADDRESS>:8384Setting a Password to Access Syncthing
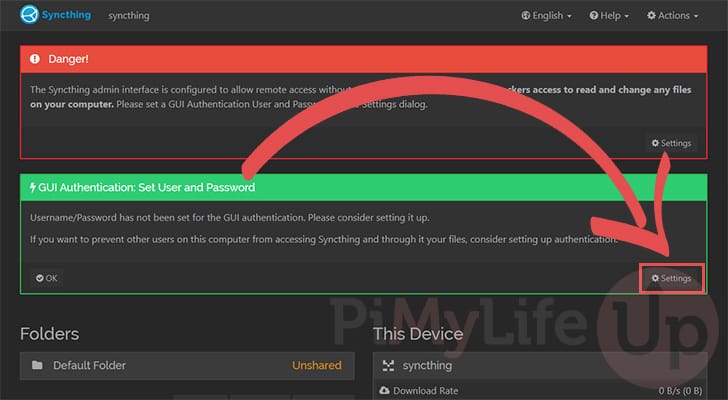
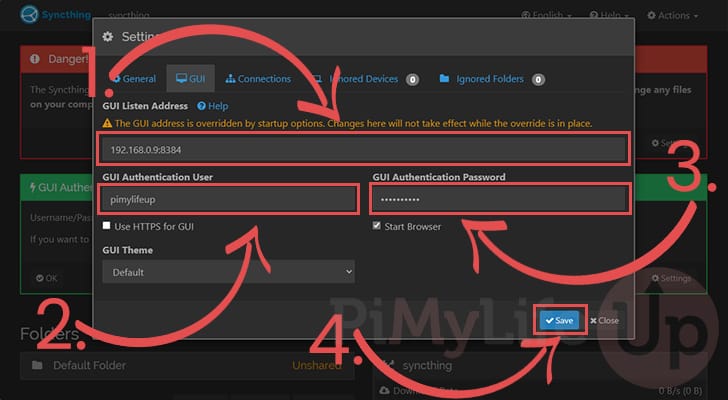
14. By default, the Syncthing Docker container allows access without a password. We highly recommend setting a password to help secure your installation.
You can open the settings screen by clicking one of the “Settings” buttons on your screen,
15. With the settings screen open, change to the “GUI” tab.
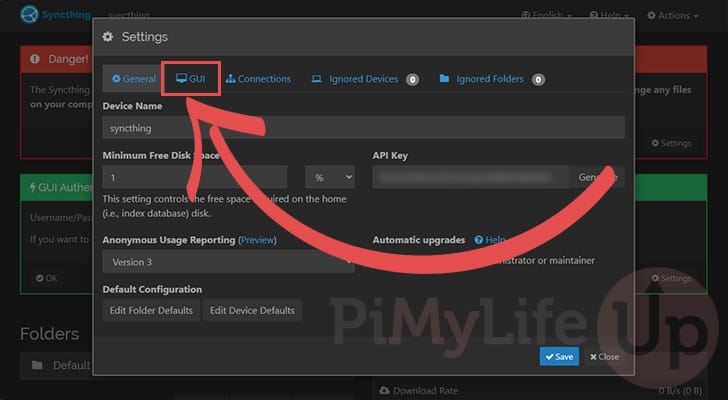
16. On this screen, we can now set a password for you to access your Syncthing Docker container.
- If you want, you can lock Syncthing so it only listens on a particular IP address for its web interface. When adjusting this address, ensure that you leave the port as is. For example, we set our installation to listen on its assigned local IP address by setting this value to “
192.168.0.9:9384“.
For this option to take effect, you will need to make a slight change to the Docker Compose file. - Next, you can set the username you want to use to access this Syncthing web interface.
- Finally, the last option you must change is the password you will use to access this software.
Once you have filled out all of the important options, click the “Save” button (4.) to confirm your changes.
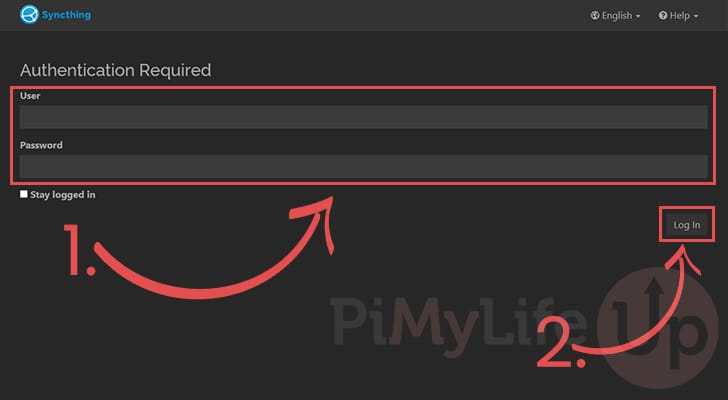
17. Since we set a username and password, you will be automatically booted to the login screen.
Fill out the username and password you just set within the web interface (1.), and then click the “Log In” button to sign in (2.).
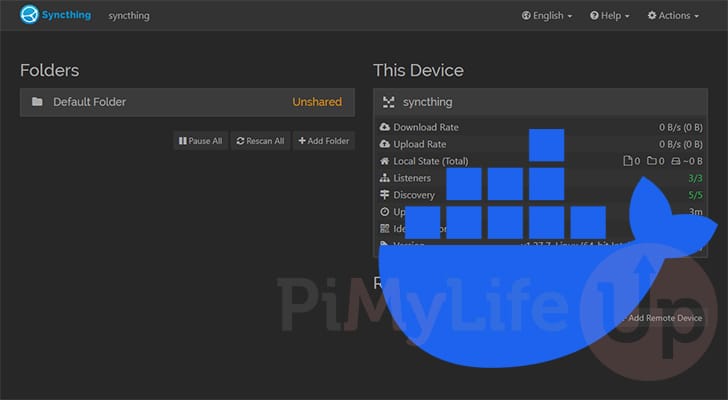
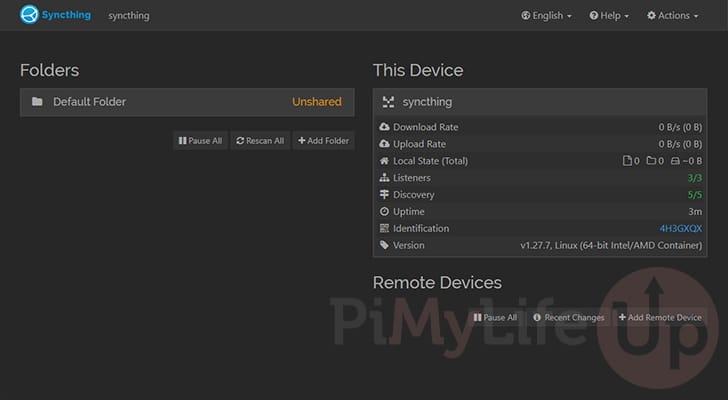
18. At this point, you have successfully installed Syncthing on your machine, thanks to our use of Docker Compose.
You should now be able to start sharing folders to and from your device.
Disabling the GUI Listen Address Override
19. If you want to stop Syncthing from making its web interface available on all your device’s IP addresses, you will need to stop the Docker Container from overriding the options.
To make this change, first change to the directory where we wrote the Syncthing Compose file.
cd /opt/stacks/syncthingCopy20. Now that we are in the correct place, begin editing the Compose file using the following command.
sudo nano compose.yamlCopy21. Within this file, find the option labeled “environment:” as shown below.
environment:CopyBelow this line, you will want to add the following. This line sets the “STGUIADDRESS” variable to blank which will make the software accessible using the IP address you set within its web interface.
STGUIADDRESS=Copy22. Once you have made this change to the Compose file, save and quit by pressing CTRL + X, Y, and then ENTER.
23. Since we made a change to the Compose file, we will want to restart the Syncthing Docker container using the new settings.
To do this, all we need to do is use the following command within the terminal
docker compose restartCopyUpdating the Syncthing Docker Container using Compose
One advantage of using a Docker Compose file to run the Syncthing container is that it makes updating to the newest version simple.
These next three steps will show you how easy it is to start using the latest version of Syncthing.
1. Use the cd command as shown below to change to the directory where we wrote the Compose file earlier in this guide.
cd /opt/stacks/syncthingCopy2. Once we are in the correct directory, we can use Docker to pull the latest version of the Syncthing container by running the following command.
While Docker will download the latest release, it won’t automatically upgrade the currently running container.
docker compose pullCopy3. Luckily, if we use the same command we used to start Syncthing in the first place, Docker will handle the process of moving our running container over to the latest version.
docker compose up -dCopyConclusion
Hopefully, at this stage of the tutorial, you will have the Syncthing Docker container up and running on your device.
Syncthing is a fantastic tool that makes synchronizing files between devices straightforward and eliminates the need to rely on cloud services such as OneDrive or Google Drive.
Please comment below if you have issues getting this container to run on your machine.
If you liked this guide, we recommend checking out our many other Docker guides to see the other software you can self-host with ease.