In this guide, we will show you how to enable and use SSH on your Raspberry Pi.

SSH stands for “Secure Shell” and is one of the most useful ways for remotely managing a device such as the Raspberry Pi.
Using SSH, we will be able to interact with the Raspberry Pi’s command line without having to have a keyboard, mouse or screen connected to it. It is very useful for a lot of Raspberry Pi projects that don’t require you to be at the Pi.
The process of using SSH is straightforward and should be easy enough for anyone to pick up.
Unlike other methods for connecting to your Raspberry Pi, such as VNC or RDP, SSH is purely for command line and file access. The Pi even offers its own remote management service if you want something easy to set up.
Equipment List
Below is a list of the equipment that we used when setting up SSH on our Raspberry Pi.
Recommended
Optional
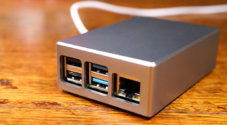
We last tested this guide on a Raspberry Pi 5 running the latest version of Raspberry Pi OS Bookworm.
Video Tutorial
If you would like to watch a video on how to setup SSH on your Raspberry Pi, be sure to check out the video below. Alternatively, you can read our written guide below.
Please note, it has been some time since we have updated this video, so it may not correctly reflect the current operating system. Please refer to the text tutorial if you require further help.
Enabling SSH on the Raspberry Pi
Over the next few sections, we will be covering some of the different methods you can use to enable the SSH protocol on your Raspberry Pi.
All of these methods are relatively easy to follow, so pick the option that best suits your needs.
How to Enable SSH From the Raspberry Pi OS Desktop
This first section will be showing you how you can use the Raspberry Pi OS desktop interface to enable SSH. This is probably the easiest method for those who aren’t too comfortable with using a Linux system.
Before you get started with this method, you will need to have a monitor, keyboard, and moues.
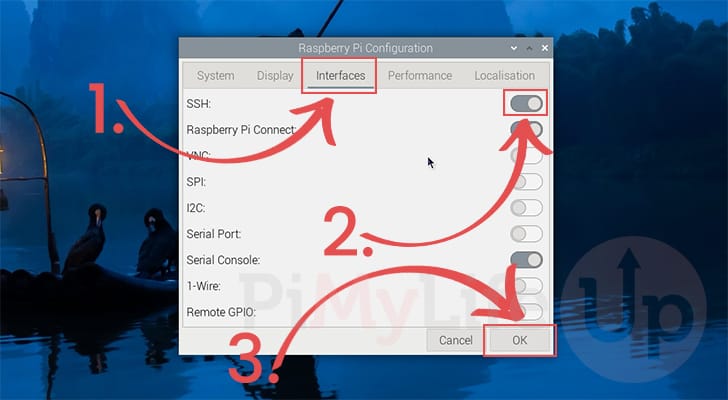
1. The tool that we will be using to turn on the SSH functionality on your Raspberry Pi is called “Raspberry Pi Configuration“.
To get to this tool, you must first click the Raspberry icon in the top-left corner to bring up the start menu.

2. Next, hover over the “Preferences” option (1.).
Finally, click the “Raspberry Pi Configuration” option (2.).

3. With the Raspberry Pi Configuration tool now open, enabling the SSH protocol is very straightforward.
First, change to the “Interfaces” tab (1.). This is where the tool allows you to easily enable or disable certain functions, including SSH.
After changing tabs, find and toggle the “SSH” option so that it is enabled (2.).
Finally, for SSH to actually be enabled on your Raspberry Pi, you will need to click the “OK” button (3.).
Turning on SSH on the Raspberry Pi from the Terminal using Raspi-Config
Of course, with a device like your Raspberry Pi, there is a high chance that you are running a slimmed down version of Raspberry Pi OS that doesn’t have a desktop interface.
Over these next couple of steps, we will be walking you through how you can use the raspi-config tool to enable SSH on your Pi. While there are other ways you can enable SSH, this is the easiest method when using the terminal.
For these steps, you will just need a monitor and keyboard.
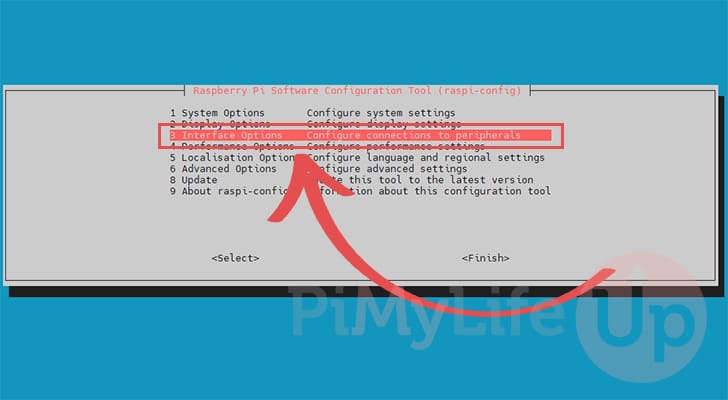
1. To start this whole process, you will want to launch the “raspi-config” tool from within the terminal by running the following command.
sudo raspi-configCopy2. Within the tool use the arrow keys on your keyboard to select “3 Interface Options“.
Once selected, press the ENTER key.
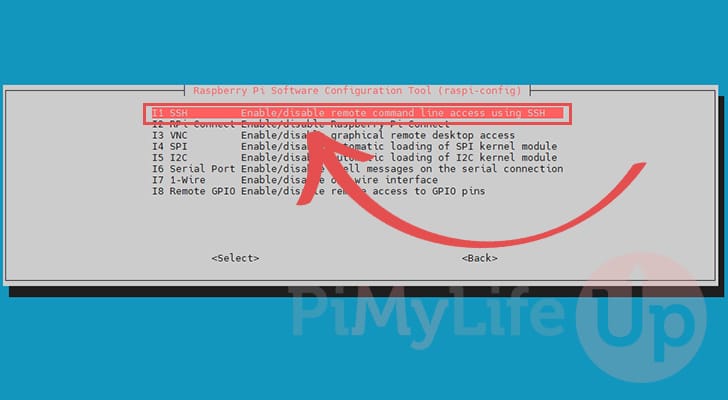
3. Now in this next menu, select the “I1 SSH” option.
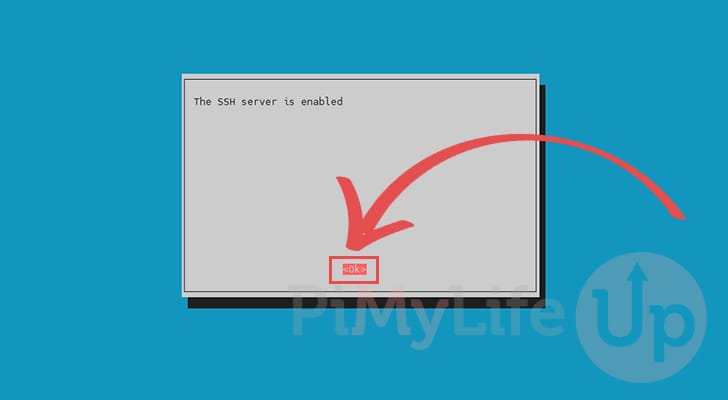
4. You will see a prompt asking if you want to enable the SSH server on your Raspberry Pi.
To enable SSH, select the “<Yes>” option and press the ENTER key.
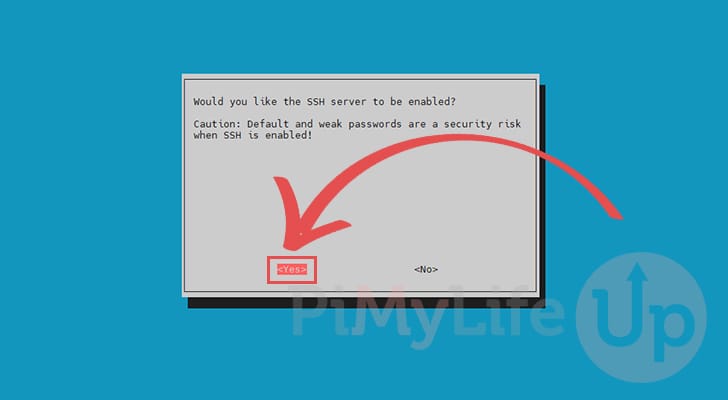
5. You have now successfully enabled SSH on your Raspberry Pi from the terminal.
Select the “<Yes>” option to continue.
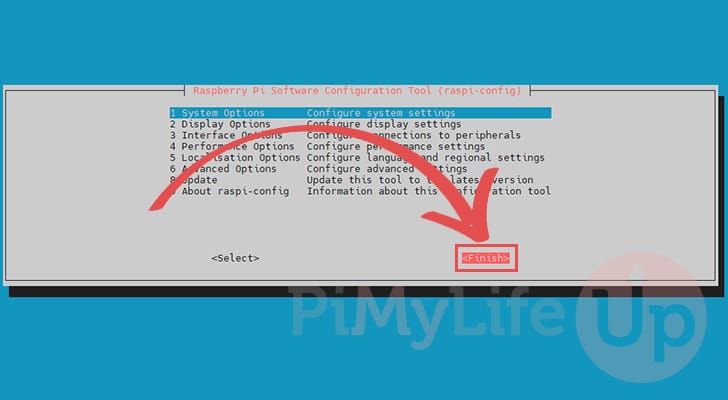
5. Now quit out of the tool by selecting the “<Finish> option and pressing ENTER.
Using the Terminal to Enable SSH
The raspi-config tool is not the only method that you can use to enable SSH on your Raspberry Pi. You can actually avoid using the tool altogether if you would prefer. These steps will be assuming that you are running Raspberry Pi OS.
For this section, you will need to have the terminal open your Raspberry Pi and access to a monitor and keyboard.
1. While Pi OS comes with the SSH service pre-installed, it is off by default with no keys generated.
Your first step is to generate a new key for your SSH service by using the following command. This process can take a few minutes to complete.
sudo ssh-keygen -ACopy2. Once the key is generated, we can use the command below to enable the SSH service. This will ensure that SSH starts when your Raspberry Pi powers on.
sudo update-rc.d ssh enableCopy3. Finally, to ensure that you have access to SSH immediately, you can start the SSH service now by running the following command.
sudo invoke-rc.d ssh startCopyHow to Enable SSH on a Headless Raspberry Pi
In this final section, we will be showing you how to enable SSH when using a Raspberry Pi in a headless (No screen) environment.
While the best way to set up SSH for a headless Pi is using the Raspberry Pi Imager there is an alternative method that you can use. Pi OS is built with a feature so that when it boots up, it will look for a file called ssh within the boot partition.
If the operating system finds this file on boot, it will automatically enable SSH and delete the file.
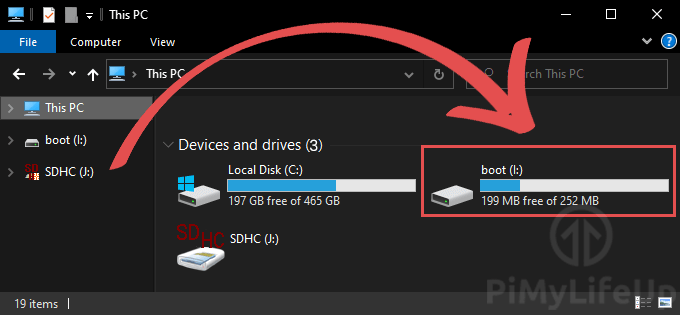
1. On your Windows, Linux, or macOS device, insert your Raspberry Pi’s SD Card.
This SD card should already have the Raspbian operating system installed to it.
2. With the SD card connected to your device, open up the partition named “boot“.
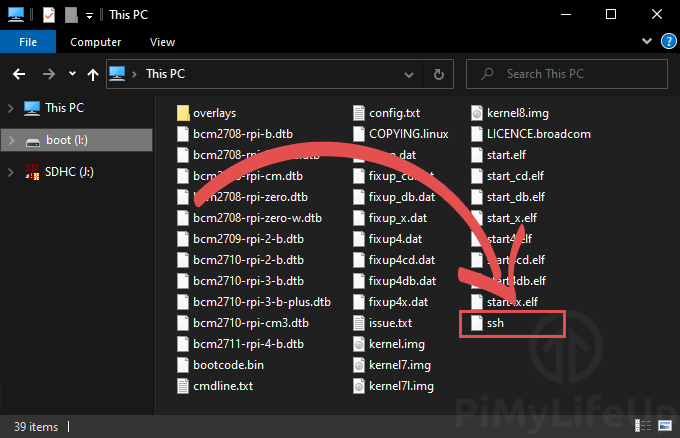
3. In this partition, create a file called “ssh“.
This file does not need to contain anything. All that matters is that the name is correct.
4. Now, insert the SD Card back into your Raspberry Pi and turn it on.
After your Raspberry Pi has finished booting, you should now be able to SSH to your Raspberry Pi.
Connecting to Your Raspberry Pi over SSH
In this section, we will be showing you how to connect to your Raspberry Pi over SSH using Windows, Linux, or macOS.
As you will soon find out, connecting using SSH is a very straightforward and quick process.
Using SSH on Windows
In this section, we will be showing you how to connect to your Raspberry Pi over SSH on Windows.
Compared to Linux and Mac, Windows is the slightly more complicated one. The reason for this is that unlike those operating systems, Windows does not have an SSH client built-in.
To resolve this, we will be making use of a popular tool called Putty.
1. To start, you need to download and install Putty to your Windows device.
You will find the downloads you are after under the “MSI (‘Windows Installer’)” header.
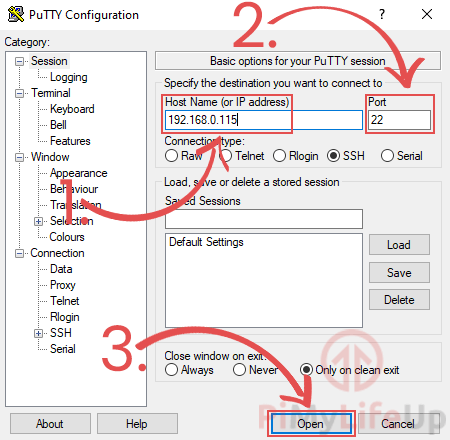
2. Upon launching Putty, you will be greeted by the following screen.
There is a couple of boxes that need filling out on this screen.
First, you need to specify the IP address of the device you want to connect to. (1.)
Next, make sure that the port is set to 22 (2.). This is the default port number for SSH.
Once you have set the IP address and port, click the “Open” button (3.).
If you don’t know your Pi’s IP address, then you can follow our guide on finding it’s IP.
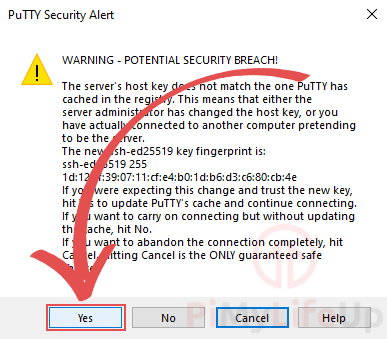
3. As this is the first time connecting to your Raspberry Pi, you will be warned that the SSH key is not known.
You need to click the “Yes” button to continue with the connection.
4. Upon the initial connection, you will be asked to enter the username that you are trying to connect using and also the password for that user.
If you are still using the default user and password, these will be pi and raspberry.
5. You should now have successfully connected to your Raspberry Pi over SSH from Windows.

Using SSH on Mac & Linux
Both macOS and Linux come with SSH tools installed out of the box. Having these tools built-in makes it incredibly simple to connect to your Raspberry Pi over SSH.
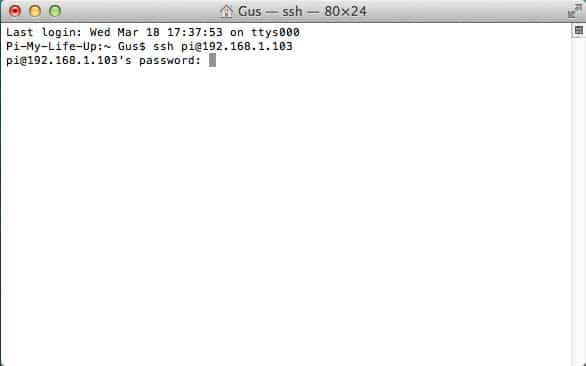
1. On your chosen operating system, begin by opening up the terminal app.
2. Now in the terminal, run the following command.
When running this command, make sure that you replace “192.168.0.115” with your Raspberry Pi’s own IP address.
ssh pi@192.168.0.115CopyIf you would like to SSH into your Raspberry Pi using a different user, all you need to do is replace pi with your chosen username.
3. You will receive a warning about being unable to verify the authenticity of the host.
To continue, type Yes into the command line and press the ENTER key to confirm it.
4. You should now be prompted to enter the password for your pi user.
If you are still using the default password, type in raspberry and press the ENTER key.
5. You should now be successfully connected to your Raspberry Pi over SSH from your macOS or Linux device.
Troubleshooting SSH
If you have run into any issues with connecting to your Raspberry Pi over SSH, you can try using the following tips.
“I am getting a connection error”
Most connection issues with SSH or caused by one or two things.
First, make sure that your Raspberry Pi is connected to the same network as the device you are connecting from.
Secondly, make sure that you are using the correct IP address for your Raspberry Pi. If you are unsure of how to find this, we have a guide on retrieving the Pi’s IP address.
If you intend to connect to your device from outside your home network, make sure that you port forward port 22 and that you are using a password or SSH keys.
“I am getting access denied”
Access denied errors are typically caused by using an incorrect username or password.
Make sure that the user you are trying to connect with exists and that the password that you are typing in is correct.
If you are still using the default login, then the username should be pi and the password raspberry.
Conclusion
Hopefully, at this point in the guide, you will now have a good understanding of how to enable and connect using SSH on your Raspberry Pi.
SSH is one of the best ways to securely manage your Raspberry Pi remotely, especially when using the terminal.
If you have run into any issues with this guide, feel free to drop a comment below.
If you found this quick guide to be helpful, we highly recommend checking out our many other Raspberry Pi guides.


Very good guide.
I ran into and error “Network error: Permission denied”. The problem was NordVPNs setting “Invisible to LAN”.
Thanks for the guide.
Is there a way to set up ssh headless?
Hi Keagan,
If you create a file called “ssh” on the root of the SD card the Raspbian operating system will detect it and automatically setup SSH.
Cheers
In all this HowTo’s, why don’t you have at least rpi to rpi install walk throughs if not command line linux?
Hi Ted,
Connecting between two linux systems is a rather simple process, in fact the “mac” method that is currently mentioned in the tutorial is relevant for the Linux as well.
We plan on updating this guide to better reflect this in the near future.
Cheers,
Emmet
If you add -X option to the ssh command you list under Mac, X authority will be carried across. This works with Linux, Cygwin & likely Mac.
Copy & paste works between local and remote windows.
GUI programs can be invoked from the command line. Though some programs, like firefox, will give a local instance if it is already running.
Just something to note, I was able to work on my Pi by hooking onto ethernet and then accessing my router to find the Pi’s IP before ssh; beforehand while setting up the SD card I made sure to make an empty “ssh” file before I ejected it. So with that I could theoretically set up headlessly through and through.
Hello Gus.
Thanks for all the guides, i’m trying to access my PI on my mobile (not from the local network). i forwarded port 80 to the PI and then tried to connect from the external IP address but i get this error:
“Connecting to xx.xx.xx.xx port 80, please wait….
Failed to connect to xx.xx.xx.xx: Connection refused.”
i got my PI as an always on torrent box + NAS and it works perfectly, also the access from another computer etc.
Regards
Morten
Did you enable ssh of the rpi
What is generally range of raspberry pi IP address ???
Any idea ?
Thanks
Whatever your router/DHCP server can assign to it, if you’re trying to find out the actual IP address of the Pi then the command
hostname -Iwill return it.And another option with Windows 10 now is to use the “Bash on Ubuntu on Windows” if you have that installed (enable in Windows Features | Windows Subsytem for Linux (Beta))
Just a quick comment regarding recent updates to Raspbian (inc. Jessie) where SSH is disabled by default.
When you first setup a Pi from an image file, if you, like me, don’t have the peripherals (keyboard/mouse/monitor) around, putting a file (even an empty one) called ssh in /boot will enable SSH on boot up meaning you can do everything “headless”.
I haven’t explained any further because if what’s above doesn’t make sense to you, you should probably be setting your Pi up with the peripherals rather than “headless” and blind (I do not intend any disrespect to anyone by that comment)
Cheers
Simon
I am new to raspberry Pi, using raspberry pi 2 model b, after installing raspbian-jessie, and entering login:pi and password:raspberry , getting error accces denied on putty.
Your instructions on where to find the option to enable SSH is wrong. Instead of being under “Advanced Options”, the setting is found under “Interfacing Options”.
They were correct, Raspbian has updated recently and changed the location. I will update the tutorial so it’s up to date with the latest version.
i am a huge fan of your guides , but with all due respect this thread should be entitled ” how to connect to your pi remotely ” not ” how to control your pi remotely ” , i have connected no probs but i haven’t a clue how to access the browser or open files or play videos or in fact do anything with pi when using command box ?
I’m getting an access denied error message. I tried changing the password on the pi using sudo passwd, but I’m still receiving the error. Any ideas?
Thanks.
Hi, Your presentations are excellent both in content and clarity.
However, I need to know, how do I reboot or shutdown the RPi from the remote terminal? the screen say I am not authorized and use (pi) or root, but I am not sure what that means and using these two choices with reboot or shutdown -h now did not work.
Thanks
rlp
The command
sudo rebootshould reboot your Pi from the remote terminal.Let me know if that helps!
Any advice when getting “Network Error: connection timed out.”? I’m new to all this and have found that port 22 may be blocked but not too sure how to change that on my pi. Could this me correct? Also, what else could be the problem? Any ideas/advice would be appreciated.
If your connection is timing out then either the port 22 is blocked, you’re connecting to the wrong IP or you have SSH disabled on the Pi.
To enable it on the Pi you need to do the following:
In the command line:
sudo raspi-configThis will open up settings. Go to Advanced Options and then SSH.
Enable SSH then exit and reboot the Pi.
We were able to get the surveillance camera to work on the local network but am unable to access it outside the network. Any tutorials on this?
Thanks.
Will
Hi Will,
If you follow my port forwarding tutorial this will help you with allowing outside access to it. You can find the full tutorial here: http://pimylifeup.com/raspberry-pi-port-forwarding/
I recommend using a random port for the external port but the internal port will need to 80.