In this tutorial, we cover the basics of using the usermod command on a Linux-based distribution.

The usermod command is useful for modifying various settings associated with a user. For example, you can alter the user’s groups, change the user id, or lock their account. We go through some of the most common uses of this command in this tutorial.
You will need to ensure that the user you are editing is not performing any tasks, especially if you are editing the user ID, username, or home directory. You can close all the user’s tasks using the killall command, and you might also need to check their crontab.
This tutorial will take you through the various options you can use with the usermod command. We will also take you through a few examples of using the command to alter various user settings such as groups, login name, user ID, and much more.
Table of Contents
usermod command Syntax
The syntax of the usermod command is easy to understand as it only accepts two parameters. However, there are several options that you can use with this command that I recommend learning.
usermod [OPTIONS] [LOGIN]- [OPTIONS] is where you specify the options you want to set for the command. We cover the many options you can use in the text below.
- [LOGIN] is the username of the user you wish to modify.
usermod Command Options
There are quite a few different options that you can use with the usermod command. Below is a list of the popular available options. I recommend using the man command or inbuilt help documents for a complete list.
User
-bor--badnamesallows the use of user names that do not meet standards.-cor--comment COMMENTsets a new comment in the GECOS field of the user.-dor--home HOME_DIRchanges the user’s home directory to a new location.-lor--login NEW_LOGINwill change the username toNEW_LOGIN. Nothing else will be affected.-mor--move-homewill move the contents of the user’s home directory to the new location. You will need to use this option alongside-dor--home. Otherwise, it will not work.-uor--uid UIDwill change the user’s ID to the one specified. The ID will need to be unique unless you also use the-oor--non-uniqueoption. Changing the ID may require extra work to ensure all file permissions are updated correctly.-oor--non-uniqueis designed to be used alongside-uor-uidand will allow the user ID to be changed to a non-unique value.
User Control
-Lor--locklocks the user account by adding a!in front of the user’s password.-Uor--unlockdoes the opposite of the lock option and removes the!from in front of the user’s password. It will unlock the user’s password but will not remove any expiry that you might have set.-eor--expiredate EXPIRE_DATEsets an expiry date for the user account. After expiry, the account will no longer be accessible. The date must be in the format ofYYYY-MM-DD.-for--inactiveallows you to set the number of days after the password expires before an account is disabled. A value of0disables the account immediately after expiry, and-1disables the setting.
Groups
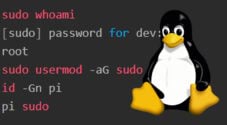
-gor-gid GROUPoptions will change the user’s primary group. The group must already exist.-Gor--groups GROUPSwill add the user to a list of supplementary groups. A comma must separate each group without any extra whitespace.-aor--appendoptions are to be used alongside the-Goption. These options will add the user to the supplementary groups. Without these options,-Gwill remove the user from any group that is not listed.
Miscellaneous
-Ror--root CHROOT_DIRmakes changes in theCHROOT_DIRdirectory and uses configuration files from within the same directory.-Por--prefix PREFIX_DIRmakes changes in thePREFIX_DIRdirectory and uses configuration files from within the same directory.-sor--shell SHELLallows you to change the path of the user’s login shell. Setting this to blank will make the system use the default login shell.
As I mentioned earlier, this is not all of the options you can use with this command. Use the inbuilt help options to see all available options.
Using the usermod Command
Using the usermod command is straightforward. However, remembering the many options and what they can do can be quite the task. Below we go through some of the more popular uses of the command.
You will need to be the root user or a user with superuser rights (sudo) to be able to use the usermod command. If you do not have the correct rights, you will likely receive errors in the terminal whenever you attempt to use the command.
Add a Comment to a User Account
You can add a comment to a specific user using the -c or --comment option. For example, you may want to include a comment containing contact information, the user’s real name, building and room number, their role, and much more.
The example below adds a simple comment to our pi user.
sudo usermod -c 'The Raspberry Pi User' piCopyWe can find our user and the newly added comment using the cat command.
dev@pimylifeup:~$ cat /etc/passwd
pi:x:1001:1001:The Raspberry Pi User:/home/pi:/bin/bashCopy
Change the Home Directory of a User
There are a few reasons why you may want to change the location of a user’s home directory. For example, you might not like the default home directory.
To change the home directory, simply use the -d or --home option followed by the path of the new directory.
sudo usermod -d /home/newDir piCopyBy default, -d or --home will not create the directory if it is missing and will not move any files. If you want to move the content, you can use the -m or --move-home option. Usermod will also create the directory if it does not already exist.
sudo usermod -m -d /home/newDir piCopyThe output below demonstrates the change when we move our user’s directory from pi to newDir using the -d and -m options.
dev@pimylifeup:~$ ls /home/
dev  pi
dev@pimylifeup:~$ sudo usermod -m -d /home/newDir pi
dev@pimylifeup:~$ ls /home/
dev  newDirCopy
Set an Expiry Date for a User Account
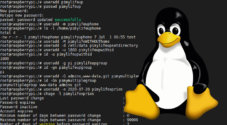
You can set an expiry date for when the user account will expire and become inaccessible. It is perfect if you only want the user’s account accessible for a specific time period. To do this, simply use the -e or --expiredate option followed by the date in the format of YYYY-MM-DD.
sudo usermod -e '2022-06-10' exampleUserCopyYou can use the chage command to see if the new expiry has been set for the user. As you can see in our output below, the account expires setting has our new date.
dev@pimylifeup:~$ sudo chage -l exampleUser
Last password change                                    : Jun 08, 2022
Password expires                                        : never
Password inactive                                       : never
Account expires                                         : Jun 10, 2022
Minimum number of days between password change          : 0
Maximum number of days between password change          : 99999
Number of days of warning before password expires       : 7Copy
If you need to remove the expiry, simply use the same command but do not specify a date.
sudo usermod -e '' exampleUserCopyYou can use the chage command to check that the expiry is now set back to never.
dev@pimylifeup:~$ sudo chage -l exampleUser
Last password change                                    : Jun 08, 2022
Password expires                                        : never
Password inactive                                       : never
Account expires                                         : never
Minimum number of days between password change          : 0
Maximum number of days between password change          : 99999
Number of days of warning before password expires       : 7Copy
Change User’s Primary Group
You can use the usermod command with either the -g or --gid option to change a user’s primary group. Changing the user’s primary group can be helpful in situations where you want a set of users to share the same group.
This option will only work if the group exists, so you may need to create the group before adding the user.
Below is an example of how you can change the exampleUser primary group to www-data.
sudo usermod -g www-data exampleUserCopyYou can confirm the group has been changed by using the groups command followed by the username. Below is the output from before and after we ran the above command.
dev@pimylifeup:~$ groups exampleUser
exampleUser : exampleUser
dev@pimylifeup:~$ sudo usermod -g www-data exampleUser
dev@pimylifeup:~$ groups exampleUser
exampleUser : www-dataCopy
Add User to New Groups
You can add a user to multiple supplementary groups in a single command using the -G or --groups options.
You must include any current supplementary groups; otherwise, usermod will remove them. To avoid this issue, use the -a or --append options if you want to prevent any existing groups from being removed.
In the example below, we add our exampleUser to various groups. We do not use the -a option, so any existing supplementary groups not listed will be removed.
sudo usermod -G adm,cdrom,sudo,dip,plugdev,lxd exampleUserCopyYou can see all our newly added supplementary groups using the groups command. The first group on the list is our primary group which is not affected by the -G or --groups options.
dev@pimylifeup:~$ groups exampleUser
exampleUser : www-data adm cdrom sudo dip plugdev lxdCopy
Change Login Name
You can change the login name of a user by using the -l or --login options with the usermod command.
This option will change just the login and will not affect anything else. For example, the home directory will be under the original name, so you will need to update that separately.
In the example below, we change our exampleUser login to newUser.
sudo usermod -l newUser exampleUserCopyUsing the cat command, you can confirm that the change has been made to the user. You will notice that nothing else has been changed with the user.
dev@pimylifeup:~$ cat /etc/passwd
newUser:x:1002:33::/home/exampleUser:/bin/shCopy
Update User ID
You can alter a user’s ID by using the -u or --uid option with the command. You must ensure you pick an ID that is not assigned to another user or reserved for services, special, and system accounts.
The reserve range can vary depending on the Linux distribution you are using. Typically anything above 1000 should be fine, but it varies depending on the operating system. For example, Debian has ranges reserved higher than 60000.
It is also possible to assign a user a non-unique ID using the -o or --non-unique option. Using a non-unique ID means two users can share the same ID.
Usermod will update most permissions correctly after using this option. However, files and directories outside the home directory may need to be updated.
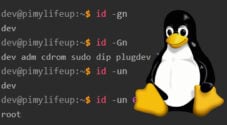
In the example below, we update our newUser id to 1010 using the usermod command and the -u option.
sudo usermod -u 1010 newUserCopyUsing the id command with the -u option, you can see that our user’s ID has been updated correctly.
dev@pimylifeup:~$ id -u newUser
1002
dev@pimylifeup:~$ id -u newUser
1010Copy
Lock and Unlock User Account
You can lock and unlock an account using the usermod command. You need to use the -L or --lock options to lock an account. Alternatively, you will need to use -U or --unlock to unlock an account.
Locking an account using this method will change the password, so it has a ! in front of the encrypted password. This change results in the account being locked as the user will never be able to enter the correct password.
It is also recommended that you set the account’s expiration date to 1, as the -L option will only block access with a password. You can set the expiry using the -e or --expiredate option.
Below is an example of how you can use usermod and the -L or --lock option to lock a user account.
sudo usermod -L newUserCopyYou can use the -U or --unlock option with the command to unlock an account.
sudo usermod -U newUserCopyMore Help
If you require more information on the command and its options, you can use either the manual command or view the inbuilt help documents.
To view the Linux manual pages for the command, simply use the man command followed by usermod.
man usermodCopyYou can exit the manual pages by pressing the q key on your keyboard.
Alternatively, you can use the inbuilt help option by using the -h or --help option. You can also write the command without extra arguments for the same helpful information.
usermod --helpCopyEither of the above methods should give you more information on some of the options you can use. However, I hope this tutorial has given you enough information that you will not need to use these methods.
Conclusion
I hope by now you have a decent understanding of how to use the usermod command and its many options. We have taken you through most of the options you are likely to use, but there is always more to learn.
We have plenty more tutorials on different Linux commands that I highly recommend you take the time to read. They cover many Linux topics such as user administration, file management, security, and much more.
Please let us know if you notice a mistake or an important topic is missing from this guide.