In this tutorial, we will take you through everything you need to know about the wget command.
The wget command is a free utility that allows the downloading of files from the internet. It supports popular network protocols such as FTP, HTTP, and HTTPS. It can also handle HTTP proxies.
You should find that this command is preinstalled on your chosen Linux-based operating system. Otherwise, you can easily install it via the package manager.
The excellent feature set makes the wget command very useful in DIY projects, system administration, and much more. Below is a list of just some of the features.
- Download multiple files
- Bandwidth control
- Download and convert websites for offline viewing
- Resuming canceled downloads
- It can run on most operating systems
- Can set to run in the background
- Proxy support
- Support for recursive downloads
- Support for SSL/TLS encrypted downloads
Like most software, there are alternatives for getting the same job done. Another popular package is curl, and much like wget, it is also pretty straightforward to use. However, there are some significant differences between the two. For example, curl does not support recursive downloads.
It should go without saying, but only ever download files from trusted sources. If you are downloading a script, make sure you check it using a code editor to ensure that it does not contain malicious code.
Table of Contents
Installing the wget Package
Most Linux distributions will have wget preinstalled as a default package. However, some may not include it.
1. To check if the wget package exists, you can run the following command.
wget2. If it is already installed, you will get output similar to the example below.
wget: missing URL
Usage: wget [OPTION]... [URL]...

Try 'wget --help' for more options.
3. Otherwise, if it is not installed, you will get an output like below. Sometimes, it may offer packages with a similar name.
Command 'wget' not found4a. Luckily installing wget is super easy and can be installed using the command below if running Ubuntu or Debian. Other operating systems might be slightly different.
sudo apt install wget4b. If you are running CentOS or Fedora, the command below will work.
sudo yum install wget5. By now, you should have the wget package installed, and the command should now work correctly.
wget command Syntax
The wget command will accept options and will require a URL. You should structure the command like the example below.
wget [option]... [URL]...Options accept a large variety of different flags, which we will cover a few within this tutorial.
URL accepts a well-formed accessible URL.
Using the wget Command
Understanding and using the wget command is super easy as most options are not required for regular use.
In the following few sections, we will touch on some of the handy use cases of the wget command.
Don’t forget that you can use multiple options within the same command. Simply add them one after another.
Download a Single File
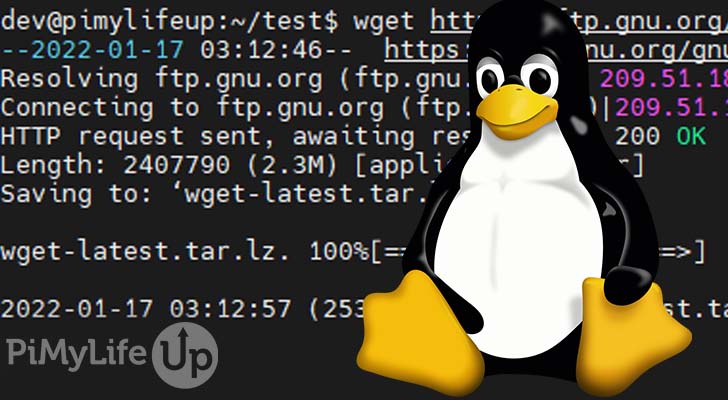
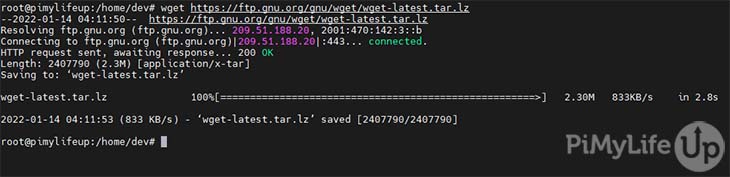
Without any options specified, wget is incredibly simple and will simply download the requested resource straight into the current working directory.
wget https://ftp.gnu.org/gnu/wget/wget-latest.tar.lzTo start, wget will resolve the domain name until it gets to the correct destination. It then connects and initiates the transfer. During the transfer, the terminal will display a progress bar, download size, file name, and a rough estimate on how long it will take to download.
Below is an example of the output of the command.
Use the -q or --quiet option to silence the output. It is the ideal option if you do not require any extra information about the progress or location of the file.
Download a File to a Different Directory
You may find yourself wanting to download a file to a specific directory but do not want to go through the steps to change to it manually using the cd command.
Luckily, you can easily specify the directory you wish to use by using the -P flag.
wget -P /home/dev/example/ https://ftp.gnu.org/gnu/wget/wget-latest.tar.lzIf you navigate to the example folder after running this command, you should locate the file. You may need to alter the command slightly to correct it for your setup.
Download a File as a Specific Name
There are a few scenarios when you might want to download and save the file with a specific name. For example, the file name is stupidly long or doesn’t correctly describe the file.
To have wget rename the file, you can simply use the -O option.
wget -O wget.tar.lz https://ftp.gnu.org/gnu/wget/wget-latest.tar.lzKeeping the downloaded file type the same is essential as changing it may make it unusable. You can always correct it using the mv command, but it is easier to get it right the first time. For example, I kept the file name with the extension .tar.lz.
Downloading Multiple Files
There may be times when you need to download multiple files without inputting them one by one into the wget command. Luckily you can achieve this by using a simple text document.
1. Firstly, create a text file using the nano text editor or your preferred text editor.
nano wget-multiple-files.txt2. In this file, store several links to different downloads. We have an example below which you can copy.
https://ftp.gnu.org/gnu/wget/wget-latest.tar.lz
https://www.nano-editor.org/dist/v6/nano-6.0.tar.xz
https://curl.se/download/curl-7.81.0.tar.gz
3. Exit and save the file by pressing CTRL+ X and then Y.
4. Now run the following line.
wget -i wget-multiple-files.txt5. You should now see each file download one by one onto your machine. In the end, wget will give you the time it took to download all the files.
Download a Mirror of a Website
It is possible to use wget to download a website for offline viewing. It is relatively easy to do using the -m option. Below is an example of mirroring the Little Big Byte website.
wget -m https://littlebigbyte.comYou may find the downloaded website a little broken, but there are a few more options that you can add to help ensure the best compatibility.
- -k will convert the links in the HTML and CSS to point locally rather than to the remote versions.
- -p will download all the images, CSS, and other files required to display the HTML page correctly offline.
wget -m -k -p https://littlebigbyte.comThe link conversion will only occur at the end of the download. So, if you stop the download midway through, the links will not get converted to local links.
Use this command carefully, as some websites may block or rate-limit your network if you appear to be sending a lot of requests.
Limiting the Download Speed
There may be times when you want to limit the download speed, so you do not congest your internet connection. You can easily limit the download speed by using the --limit-rate option.
The speed can be defined in kilobytes using k or megabytes using m. For example, --limit-rate 100k will limit the download to 100KB/s. In addition, you can use decimal values, such as --limit-rate 1.5m.
wget --limit-rate 100k https://ftp.gnu.org/gnu/wget/wget-latest.tar.lzUsing our example above, you will notice that the file takes considerably longer to download than normal as we have limited the bandwidth.
Resume Incomplete Downloads
You can resume an incomplete download which is very handy for large files. To do this, all you need to do is add the -c option when you download the file again. Without the -c option, wget will start the download from fresh.
wget -c https://downloads.raspberrypi.org/raspios_armhf/images/raspios_armhf-2021-11-08/2021-10-30-raspios-bullseye-armhf.zipTo test, simply start a large download using the standard wget command, and after a bit of progress, press CTRL+ C.
Now, enter the same command, but use the -c option as shown above. The download should start where you canceled it.
Downloading in the Background
By default, wget will lock up the command line until the download is complete. Luckily, there is a simple option that you can use so it will download in the background and that option is -b.
wget -b https://ftp.gnu.org/gnu/wget/wget-latest.tar.lzOnce the download has started, the output should look like the example below.
Continuing in background, pid 31534.
Output will be written to 'wget-log'.
The pid will come in handy if you need to cancel the download using the kill command. Also, the log file will contain all the information that is normally displayed when running the wget command.
Downloading Password Protected Files
Sometimes files will be protected by a username and password and must be entered to proceed. Luckily wget does not require separate options for different protocols.
When communicating with an FTP server or an HTTP server, you need to use the options --user= and --password=.
wget --user=example --password=yTAgq:3rQ ftp://ftp.example.com/exampleFile.tar.gzYou can also specify HTTP or FTP directly as an option. For example, --http-user=, --http-password=, --ftp-user=, or --ftp-password=.
Ignore SSL Certificate Check
There may be times where you want to ignore the SSL certificate as an invalid certificate will prevent the download from starting. Ensure that you only use this option if you are one hundred percent sure of the website’s trustworthiness.
To ignore the certificate and download the file, simply use the option --no-check-certificate. But, again, only do this if you trust the source.
wget --no-check-certificate https://ftp.gnu.org/gnu/wget/wget-latest.tar.lzMore Help
You can always get more information about this command and its options by using the manual tool. For example, to get the manual of wget, simply run the following command.
man wgetPressing Q will quit the manual page once you are finished reading.
You can also get help by using the commands inbuilt help docs. To do this, simply use the --help option. It will show you all the different options that you can use.
wget --helpAny of the above help documents should give you more than enough information to troubleshoot your issue.
Conclusion
I hope that this tutorial has been a massive help with understanding the wget command and how you can use it effectively. It is a command that I still use a considerable amount today.
If you want to learn more, be sure to check out our many other Linux tutorials. They will take you through all the basics of learning how to maintain and run a Linux-based distribution.
As I mentioned above, there are even more options for this command, but hopefully, I have covered the important ones for now. If you have anything that you would like to add or give feedback on regarding this guide, please do not hesitate to leave a comment below.