In this guide, we will be showing you how to use the cp command on a Linux-based distribution.
The cp command is ideal for copying files and directories on a Linux or Unix distribution. You will likely not need to use additional options for most tasks as the basic command will achieve most requirements.
This tutorial will take you through several use cases for using cp on a Linux distribution. For example, we cover copying single files, copying multiple files and directories, setting backups, copying recursively, and much more.
You need to be careful using cp to copy files as it will not prompt you on whether you want to overwrite existing files. Luckily, you can use the -i option to enable a prompt, but we will cover that in more detail further down the page.
Unlike the mv command, cp will not create missing directories in your destination path. Ensure the destination path exists before attempting to copy; otherwise, you will see an error.
Table of Contents
- cp Command Syntax
- cp Command Options
- Using the cp Command
- More Help
- Conclusion
cp Command Syntax
The cp command is easy to use, and the syntax is easy to understand. Even if you are new to Linux, you should be able to grasp how to use this command quickly.
Below is how you will typically structure a cp command. However, there may be specific options that will alter the layout slightly.
cp [OPTION] [SOURCE] [DESTINATION]CopyOPTION is where you specify the options that you wish to use with the command.
SOURCE is where you specify the file or directory that you wish to copy.
DESTINATION is the location where you want the source files or directories copied.
cp Command Options
There are quite a few options that you can use with the cp command. Luckily, it is unlikely that you will need to use the extra options.
Below are most of the options that you can use with the command. If you need all the options, refer to the manual pages.
--attributes-onlywill copy file attributes, but not the file data.--backup=will make a backup of each destination file and allows you to specify the backup type. The default suffix is~but can be changed. We go into more detail on the backup option further down this page.-bis similar to--backupbut does not accept an argument.-for--forcewill remove an existing file if it cannot be opened. Once removed, it will try to copy the source to the destination.-ior--interactivewill prompt you before overwriting a file.-nor--no-clobberwill stop cp from overwriting existing files. The-ioption will not work with this option.-ppreserves the ownership and timestamps. Important if you copy files that you do not wish to become owned by the current user.-R,-r,--recursivecopies recursively, a must when copying large folder structures.-sor--symbolic-linkcreates a symbolic link instead of copying the file.-S--suffix=overrides the default backup suffix.-tor--target-directory=allows you to set the directory where you want to copy all source arguments.-Tor--no-target-directorytreats the destination as a regular file.-uor--updatewill only copy when the source file is newer than the destination file. It will also copy the file if it does not exist.-vor--verboseoutputs the progress.--versionoutputs the version information and exits.
Backup Options
If you plan on using the --backup option, you may want to specify one of the following values.
noneoroffwill never make backups, even if it is specified.numberedortwill produce numbered backups. For example,file.bak.~1~.existingornilwill create numbered backups if they already exist. Otherwise, it will use simple.simpleorneverwill always make simple backups. This setting is the default, and only appends~to the backup file.
We discuss backups further down the page if you wish to see some of these options in action.
Using the cp Command
The cp command is pretty easy to use without a massive amount of knowledge of Linux. In this tutorial, we will touch on the most common ways you can use this command to copy files.
Below is a command that will copy and rename a file within the current working directory.
cp file1.txt file2.txtCopyUsing the ls command, you can see that both files now exist within our directory.
dev@pimylifeup:~$ ls
file1.txt  file2.txtCopy
Copy a Single File into a Directory
In this example, we will show you how to copy a single file into a directory. You do not need to use any options with the command to do this task.
If the directory is missing, you will get an error, so I suggest using mkdir to create the required directories.
cp file1.txt ./example/CopyIf you use ls to check inside the example folder, you should see our copied file.
dev@pimylifeup:~$ ls ./example/
file1.txtCopy
Copy Multiple Files into a Directory
You can specify multiple files to copy in a single command line. Below is an example of how you can specify multiple files.
cp file1.txt file2.txt ./example/CopyNow check inside the directory to see if the two files have been copied correctly. You can use ls to list all the files inside the directory, as we do in the example below.
dev@pimylifeup:~$ ls ./example/
file1.txt  file2.txtCopy
Using the * Wildcard
You can use the * wildcard to move multiple files and directories. For example, you may want to copy all the directory contents or a specific file type.
Below is an example of copying all the txt files from one directory to another.
cp *.txt ./example/CopyUsing the ls command, we can see if the example directory now includes all our txt files from the current working directory.
dev@pimylifeup:~$ ls ./example
file1.txt  file2.txt  file3.txtCopy
Copying a Directory
Copying a directory is the same as copying a file. The only difference is that you specify a directory you wish to copy and use the recursive -r option. Below is an example of copying a directory to another directory.
cp -r ./example ./testDirCopyWe can view all the files and directories inside the testDir directory using ls. You should see our copied example directory.
dev@pimylifeup:~$ ls testDir
exampleCopy
Copying Multiple Directories
You can specify multiple directories to copy using a similar command to the one above. You simply specify the directories you wish to copy and finish with the destination directory. Again, you need to use the -r option when working with directories.
cp -r ./example ./testDir ./newDirCopyUsing ls, we can see that the example and testDir have been successfully copied into our newDir directory.
dev@pimylifeup:~$ ls ./newDir
example  testDirCopy
Recursively Copying Files and Directories
If you wish to copy a large number of files and directories, you will want to use the recursive option. The recursive option will have the cp command copy and traverse directories while copying all the files inside.
In the following example, we copy the contents inside newDir into recDir. The newDir directory contains a couple of folders and files we copied in the previous topic.
cp -r ./newDir ./recDir/CopyIf we use ls we can check inside the recDir directory. It will have our directory called newDir.
dev@pimylifeup:~$ ls ./recDir
newDirCopy
Inside the newDir, it should have another set of directories.
dev@pimylifeup:~$ ls ./recDir/newDir
example  testDirCopy
Lastly, in our example directory, there will be two text files. As you can see, cp has copied all the files and directories recursively.
dev@pimylifeup:~$ ls ./recDir/newDir/example
file1.txt  file2.txt  file3.txtCopy
Prompt Before Overwriting
The cp command will not prompt when it overrides an existing file by default. To force a prompt to appear before an overwrite occurs, simply use the -i or --interactive option.
cp -i file1.txt ./example/CopyAs file1.txt already exists in our example directory, you should see a prompt appear, as shown in our example below.
dev@pimylifeup:~$ cp -i file1.txt ./example/
cp: overwrite './example/file1.txt'?Copy
Do not Overwrite Existing Files
If you do not wish to overwrite existing files and do not want a prompt, you can simply use the -n or --no-clobber option. Using this option will override the -i option.
cp -n file1.txt ./example/CopyYou can use the -v option to see if a file is copied. In this case, nothing was outputted by the command as no copy occurred because the file already existed.
Preserve File Attributes
When copying files on Linux, the user performing the copy will be the owner of the copied files. If you do not wish this to be the case, you can use the -p option to preserve the mode, ownership, and timestamps.
For example, we use a regular copy command as the root user, and you will notice the file is owned by the root user and not the dev user.
root@pimylifeup:/home/dev# ls -l
total 4
-rw-rw-r-- 1 dev  dev    13 Mar 11 03:29 file1.txt

root@pimylifeup:/home/dev# cp file1.txt ./permDir/file1.txt

root@pimylifeup:/home/dev# ls -l ./permDir
total 4
-rw-r--r-- 1 root root 13 Mar 11 04:17 file1.txtCopy
Using the -p option in our cp command, we can retain the original user ownership.
cp -p file1.txt ./permDir/file1.txtCopyAs you can see in our example below, the file retains the original owner (dev) rather than being owned by root.
root@pimylifeup:/home/dev# ls -l ./permDir
total 4
-rw-rw-r-- 1 dev dev 13 Mar 11 03:29 file1.txtCopy
Backing up Files with the cp Command
You can choose to create a backup if a destination file already exists. It is perfect if you want to keep copies whenever cp overwrites a file.
The easiest way to make backups is by using the -b option. It doesn’t require any arguments and will append ~ to any backup files. This method will only ever keep one backup of a file.
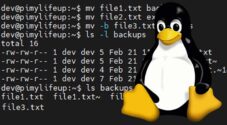
cp -b file1.txt ./backupsCopyIf we look inside our backups folder, we can see two files. The file with the ~ is the original, and the one without the ~ is the newly copied file.
dev@pimylifeup:~$ ls backups
file1.txt  file1.txt~Copy
Fine Tuning the Backup Option
To change the way backups work, you can use the --backup= option. Below are the settings you can use to control the output.
numberedortwill instruct cp to create multiple numbered backups. For example,file.bak.~1~.existingornilwill create numbered backups if they already exist. Otherwise, it will use the simple method.simpleorneverwill create simple backups, and this is the default setting.
For this tutorial, we will use numbered to produce an example. The command below will create numbered backups of the destination file if it already exists.
cp --backup=numbered file1.txt ./backupsCopyI ran the command above a few times, producing more than one backup. As you can see in the example below, our backups increment every time a new file of the same name is copied. The highest number is the newest backup.
dev@pimylifeup:~$ ls ./backups
file1.txt  file1.txt.~1~  file1.txt.~2~Copy
More Help
If you require more information on the cp command and its options, you can use several different methods. I quickly cover two of the easiest methods that you can do within your system.
Built into most Linux distributions is a manual command that can display manual pages for most commands. For example, to bring up the manual pages for the cp command, simply enter the following line into the terminal.
man cpCopyIf you need to quit out of the manual page, simply press Q.
Most commands also have inbuilt help options that will bring up more information. For example, the cp command has the --help option.
cp --helpCopyBoth methods are extremely useful for seeking more information on the options you can use with this command. However, I hope that this guide has covered the majority of the topics regarding copying files on Linux.
Conclusion
Hopefully, by now, you understand how to use the cp command to copy files on Linux or Unix distributions. I have covered most of the basics that will help you take advantage of this handy tool.
I highly recommend learning more Linux commands as they will help maintain a Linux distribution a lot easier.
If I have missed something or there is a topic that requires extra explaining in this tutorial, please let us know by leaving a comment below.