In this guide, we will be showing you how to use the mv command on a Linux-based distribution.

The mv command is one of the most basic and useful commands that you can use on a Linux or Unix distribution. You can use it to move multiple files and directories from one location to another. It is similar to the cp command, but mv does not create copies of a file.
This tutorial touches on using this command to move single or multiple files and directories, displaying a prompt before overwriting, renaming files and directories, and backing up files.
As I mentioned earlier, this command is an important one to understand so you can use it correctly. If you do any Linux administration, you will likely find yourself using this command quite a bit.
mv Command Syntax
The mv command is surprisingly simple to use, so as you would expect, the syntax is pretty simple.
Below is how you would typically structure the mv command. Specific options may alter the layout slightly, but not very often.
mv [OPTION] [SOURCE] [DESTINATION]CopyOPTION is where you define any options you want to be applied to the command.
SOURCE is where you specify the file or directory that you wish to move or rename.
DESTINATION is the location where you want the files or directories to be moved. You can also define a new name for a file or directory.
mv Command Options
Below are some of the options you are likely to use when using the mv command. We have not included them all, but it is the majority that most users may need to use.
--backup=[V_CONTROL]makes a backup of each file and allows you to specify the backup type. By default, the suffix is~. We explain how to use this option further down the page.-bwill make backups but does not accept any arguments.-for--forcedoes not prompt you when it goes to overwrite files.-ior--interactiveensures a prompt appears before overwriting a file.-nor--no-clobberensures mv will not overwrite files and the user will not see a prompt.--strip-trailing-slasheswill remove trailing slashes from the source argument.-Sor--suffix=SUFFIXallows you to specify a suffix that overrides the default.-tor--target-directory=DIRECTORYallows you to specify a destination directory for all the specified files and directories.-Tor--no-target-directorytreats the destination as a regular file.-uor--updatewill make the command only move a file when the source file is newer than the destination file. It will also move the file if it doesn’t exist in the destination.-vor--verboseenables text output of the actions being performed by the command.--versionoutputs the version of the software.
Please note that only the final option will take effect if you use -i, -f, or -n in the same command.
Backup Options
If you plan on using the --backup option, you may want to specify one of the following values.
noneoroffwill never make backups, even if it is specified.numberedortwill produce numbered backups. For example,file.bak.~1~.existingornilwill create numbered backups if they already exist. Otherwise, it will use simple.simpleorneverwill always make simple backups.
In this guide, we discuss backups further down the page if you wish to see some of these options in action.
Using the mv Command
The very basic usage of the mv command is super easy to understand. You will likely never need to use some of the more advanced options this command has to offer.
So to begin, we will first cover moving a single file.
Move a Single File into a Directory
You will most likely want to use this command to move files from one directory to another. The process is pretty straightforward and can be done using the following command.
mv file1.txt example/CopyYou can check that the file has been correctly moved to the new directory by using the following command.
dev@pimylifeup:~$ ls example
file1.txtCopy
Move Multiple Files into a Directory
Moving multiple files into a directory is very straightforward and can be achieved in a few different ways.
The first method is to list all the files you want to move, as shown in the example below.
mv file1.txt file2.txt file3.txt ~/exampleCopyUsing the ls command, we can see that the files have all been moved into the example directory.
dev@pimylifeup:~$ ls ~/example
file1.txt  file2.txt  file3.txtCopy
Using the * Wildcard
You can also move all files and directories within a folder using the * wildcard. For example, the following command will move everything from the example directory into our home directory (~).
mv example/* ~CopyAgain, you can check if all the files exist using the ls command.
dev@pimylifeup:~$ ls
example  file1.txt  file2.txt  file3.txtCopy
If you use the * wildcard inside the directory that contains the destination directory, you will get a warning similar to the one below. The command will still move the rest of the files.
mv: cannot move 'example' to a subdirectory of itself, 'example/example'CopyRename a File
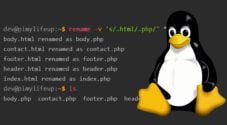
It is super easy to rename a file using the mv command. To rename a file, we will simply enter a different name in the destination argument. For example, below, we change file1.txt to file2.txt.
mv file1.txt file2.txtCopyUsing the ls command, you can see that our file is now called file2.txt.
dev@pimylifeup:~$ ls
file2.txtCopy
The same can be achieved even if you move it into a directory.
mv file1.txt /example/file2.txtCopyUsing ls, you can now see the file in the directory under the new file name.
dev@pimylifeup:~$ ls example
file2.txtCopy
Moving a Directory
Moving a directory using the mv command is essentially the same as moving a file. Below is an example of how to move a directory.
mv example ~/dir1CopyYou can check that the directory is now in dir1 using the ls command.
dev@pimylifeup:~$ ls ~/dir1
exampleCopy
Moving Multiple Directories
Moving multiple directories is done the same way you would move multiple files. You can specify both directories and files to be moved, but we will just use directories for this example.
As you can see below, we specify each directory we wish to move and the destination directory.
mv example1 example2 example3 ~/dir1CopySimply use the ls command to check that all the directories have been moved into dir1.
dev@pimylifeup:~$ ls ~/dir1
example1  example2  example3Copy
Creating Directories That Do Not Exist
Moving a file or directory into a directory that does not exist will have the mv command create the directory or directories.
We attempt to move example1 to a directory that does not exist in the example below.
mv example1 ~/newDir1CopyAs you can see in our output from the ls command below, a new directory has been created.
dev@pimylifeup:~$ ls ~/
newDir1Copy
Renaming a Directory
Renaming a directory is easy and can be achieved with the mv command. Simply enter the directory you wish to rename, followed by the new file name, as shown in the example below.
mv newdir1 newdir2CopyUsing ls, you can see the directory is now newdir2.
dev@pimylifeup:~$ ls
newdir2Copy
You can also rename the directory even when moving it to a different directory. The command below is a perfect example of achieving this task.
mv newdir1 ~/example/newdir2CopyIf we use ls to check inside the example directory, we should see our directory under the file name of newdir2.
dev@pimylifeup:~$ ls ~/example
newdir2Copy
Prompt Before Overwriting
If you would like the mv command to prompt you before overwriting a file, you will need to use the -i or --interactive option.
mv -i file1.txt exampleCopySince there is a file named file1.txt in the example directory, a prompt will appear asking whether to overwrite the file. You can enter yes or no. In our example, we write yes.
dev@pimylifeup:~$ mv -i file1.txt example
mv: overwrite 'example/file1.txt'? yesCopy
Do not Overwrite Existing Files
Using the mv command, you can use the -n or --no-clobber options to prevent existing files from being overwritten. For example, if I move a file to a directory that contains a file with the same name, it will not overwrite it.
Below is an example of how you can use this option.
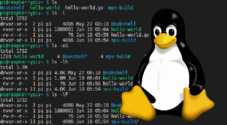
mv -n file1.txt exampleCopyYou can use ls -l to check the modified dates. If they do not match, the file has not been overwritten, as in our example below.
dev@pimylifeup:~$ ls -l
total 8
drwxrwxr-x 3 dev dev 4096 Feb 21 09:41 example
-rw-rw-r-- 1 dev dev    6 Feb 21 10:01 file1.txt

dev@pimylifeup:~$ ls -l example
total 8
-rw-rw-r-- 1 dev dev    5 Feb 21 09:38 file1.txt
drwxrwxr-x 2 dev dev 4096 Feb 21 09:30 newdir2Copy
Backing up Files
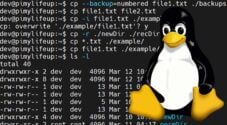
You can use the mv command to append files with extra characters, so existing files are not overwritten or deleted.
The most basic use of the backup option is by simply using the -b option.
mv -b file1.txt backupsCopyAs you can see below, there are now two file1.txt in our backups directory. By default, backup will only create one extra file with ~ extension, and any extra files will overwrite the ~ file.
dev@pimylifeup:~$ ls backups
file1.txt  file1.txt~Copy
Fine Tuning the Backup Option
You can use --backup for more control on how it creates the additional files. Below are some of the ways you can control the syntax.
noneoroffwill never make backups, even if it is specified.numberedortwill produce numbered backups. For example,file.bak.~1~.existingornilwill create numbered backups if they already exist. Otherwise, it will use simple.simpleorneverwill always make simple backups.
In our quick example, we will use the numbered setting.
mv --backup=numbered file1.txt backupsCopyAs you can see in our example below, the extra files are numbered. The number will continue to increment every time a new file of the same name is created. For example, the next file1.txt copy will be file1.txt.~2~.
dev@pimylifeup:~$ ls backups
file1.txt  file1.txt.~1~Copy
VERSION_CONTROL Environment Variable
You can use the VERSION_CONTROL environment variable to change how the regular backup option behaves. Below are different settings that you can define for backups.
noneoroffwill never make backups, even if it is specified.numberedortwill produce numbered backups. For example,file.bak.~1~.existingornilwill create numbered backups if they already exist. Otherwise, it will use simple.simpleorneverwill always make simple backups.
For example, in the following command, we set backups to numbered.
export VERSION_CONTROL=numberedCopyIf we use the mv command with the -b option, it will use the numbered setting instead of the default “simple“.
mv -b file1.txt backupsCopyUsing ls will show that it has created the file with numbering instead of just the ~.
dev@pimylifeup:~$ ls backups
file1.txt  file1.txt.~1~Copy
The environment variable will only work for the current session. You will need to set it again if you log out and log back into the operating system.
More Help
There are a few different ways to get more help with the mv command. Below I go into the two easiest methods for getting help within your operating system.
The first method is to use the man tool that is in most Linux distributions. For example, enter the following into the Linux terminal to bring up the man tool pages for mv.
man mvCopyIf you need to quit out of the manual page, simply press Q.
The other method is to use the --help option on the mv command itself.
mv --helpCopyBoth of the above methods will provide very helpful information on using this command effectively. However, I hope that our tutorial is sufficient that you do not need these help options.
Conclusion
I hope by now you have a good understanding of how to use the mv command effectively on Linux distributions. We have covered all the basics, but there is always more to learn.
If you want to learn more about the many commands that you can use on Linux operating systems, be sure to check out some of our other Linux command tutorials.
Please let us know if we have missed something in this article or there is a topic that we need to cover better.