This tutorial will take you through all you need to know about the grep command and how you can utilize it correctly.
The Linux command grep is a useful tool that allows you to scan files for a specific pattern of characters. The term grep stands for Global Regular Expression Print.
When grep returns a result, it will print the entire line where a match has occurred. It will also highlight the matched phrase. You will likely find this command very helpful when searching through large files containing thousands of text lines, such as log files.
This tutorial will take you through most of the basics for using the grep command effectively. Hopefully, by the end of the tutorial, you will have a good grasp of how to search files quickly on Linux or Unix distributions.
Table of Contents
- Installing the grep Package
- grep command Syntax
- Using the grep Command
- Searching a Single File
- Searching Multiple Files
- Search all Files Within a Directory
- Search Recursively
- List all the File Names with Matches
- Search for Whole Words
- Search for Multiple Words
- Ignore Case
- Invert Search
- Display the Lines Before and After a Match
- Limit the Number of Results
- Display Line Numbers
- Count Matches
- Using Regex Syntax
- More Help
- Conclusion
Installing the grep Package
Grep is installed on most Linux-based operating systems by default, so you shouldn’t need to install it. With that said, you can check that it is installed by running the following command.
grepIf the output is similar to the error message below, you will need to install it. Luckily, you can install it with a simple command line.
Command 'grep' not found1. Simply enter the following command to install the grep package on Ubuntu or Debian.
sudo apt install grep2. Alternatively, if you are running CentOS or Fedora, you need to run the command below.
sudo yum install grepYou should now have grep installed, and the command should now output the correct text. If the commands above didn’t work, double-check the operating system and adjust the commands, so they are correct for your system.
grep Command Syntax
The grep command accepts options, patterns, and the file you want to search. You will need to structure the command like the example below.
grep [OPTION]… PATTERNS [FILE]…Options will accept quite a few different flags. These flags can change how the grep command interprets the pattern and files.
Patterns will accept one or more patterns but must be separated by newline characters. You will need to quote the pattern as well. We will cover patterns a bit further on in this guide.
File is the file you wish to search. If you do not specify a file, the command will search the current working directory instead.
Using the grep Command
Grep is a powerful command that will come in handy when searching for files containing a specific pattern. It is a little more complicated than some of the other Linux commands, but it is very important to understand it.
Below are a few examples of using the grep command to make some tasks super easy. To fully take advantage of the command, you may also want to learn how to build regular expressions (regex).
1. If you wish to practice and follow each of these examples, download our example files. You can do this using the wget command.
wget https://files.pimylifeup.com/grep/grep-example.zip2. You will also need to unzip the files so you can search them using grep. You may need to install unzip by using sudo apt install unzip.
The command below will unzip our example zip file.
unzip grep-example.zip3. Now, change into our example directory using the cd command.
cd example4. Now, you can run through the examples below.
Searching a Single File
Searching a single file is the most basic command you can do with grep. In our example, we will search for pimylifeup in our test file named example.txt.
I generated the text inside the example file using a lorem ipsum generator and added a few random words such as pimylifeup.
To search the file for pimylifeup, simply use the command below.
grep "pimylifeup" example.txtAs you can see in the output below, it has found the word pimylifeup and highlighted it in red. It also has printed each of the matched lines on a separate output line. However, you will also notice it will do partial matches, such as pimylifeupipsum.

Searching Multiple Files
You can easily specify multiple files and search them by listing each file separated by a space. In our example, we will search across three different example text files.
Use the command below to search through three different files for the term pimylifeup.
grep "pimylifeup" example.txt example2.txt example3.txtThe output below shows that it found the term pimylifeup three times in two different files. The file’s name is listed at the front of each line, and the term is highlighted in red.

Search All Files Within a Directory
You may want to search all files within a directory rather than a specific set of files. It is very convenient if there are many files that you need to search.
Simply use the command below to search all the files within the current working directory.
grep "pimylifeup" *You should get a result like the one below if you use our sample set of files. The command searched through all three files and found any reference to our phrase pimylifeup.

Search Recursively
If you need to search a large number of folders and files, then the recursive option will make your life a lot easier. For example, using -r or --recursive, grep will search all files in each directory.
By default, grep will ignore symbolic links while traversing a directory. If you want it to follow symbolic links, use -R instead. Please note that if you pass a symbolic link as a parameter, grep will follow it.
The command below will search the files in the base example folder and the files in the subfolder.
grep -r "pimylifeup" *The output should look like our example below. The grep command was able to find our term several times in both the base folder and our subfolder.

List the File Names with Matches
If you only want to know the file’s name where grep has found a match, you can use the -l option. Using a capital -L will do the inverse and show you all the files without matches.
The command below will search all files within the current working folder and display the file names only.
grep -l "pimylifeup" *As you can see below, there are two files with a match. The subfolder was not searched as we did not use the -r option.

Search for Whole Words
If you wish to find whole words and ignore matches where the pattern is part of another word, you can use the -w or --wordregexp option. For example, use this option if you want to match pimylifeup but not pimylifeupipsum.
In order to match, the word will need to be either at the beginning of the line or have a non-word character before it. Also, it must be at the end of the line or have a non-word character after it. Word characters are letters, digits, and underscore.
The command below shows you how to use the -w option correctly.
grep -w "pimylifeup" *As you can see in the output example below, we now only have one match for the example.txt file instead of the usual two.

Below is an example of the output when we omit the -w option and allow grep to match anything.
Search for Multiple Patterns
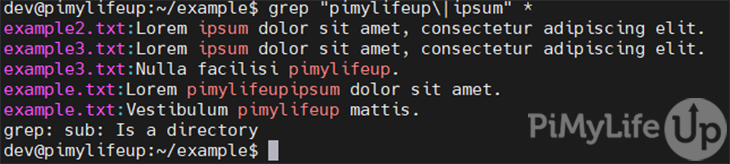
Sometimes you may find yourself wanting to search for more than one pattern. To do this, we will use some simple regex. Simply add a pipe symbol preceded by a backslash \| after the existing pattern, then enter your second pattern. For example, "pimylifeup\|ipsum".
A basic example of writing this as a command is below.
grep "pimylifeup\|ipsum" *As you can see below, our grep command has picked up all the lines containing either pimylifeup or ipsum. This example is a very basic implementation of regex, and there is much more you can do, but it is too complex to cover in this tutorial.
You can also use the -f [FILE] or --file=[FILE] option to use a file of patterns instead. You should enter one pattern per line.
Below is an example of how you may structure your patterns file.
pimylifeup
ipsum
mattis
To use the patterns file, you simply structure your grep command similar to the one below.
$grep –f patterns.txt *
Ignore Case
By default, grep searches are case sensitive which means it will miss anything that may contain a letter with a different case to your search. Luckily, you can make the search case insensitive by using the -i or --ignore-case option.
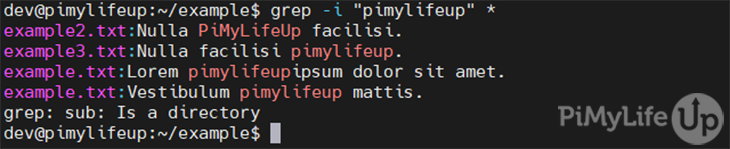
grep -i "pimylifeup" *As you can see from our output below, by ignoring whether characters are uppercase or lowercase, we have picked up another result, PiMyLifeUp.
Invert Search
Sometimes you may need to perform a search that finds lines that do not match the pattern. For example, it is very handy to find files that do not mention a particular phrase. To do an inverted search, you can simply use the -v or --invert-match option.
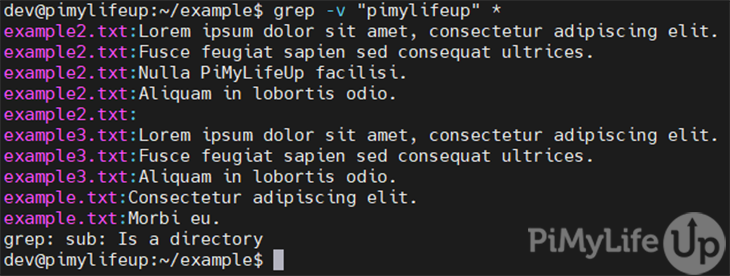
grep -v "pimylifeup" *The output below shows that it has picked up every line that does not contain our chosen phrase.
Display the Lines Before and After a Match
There may be times when you need to see the line before and after the match. There are three different options that you can use to achieve this functionality which I will quickly go through below.
1. The first option you can use is -A [num] or --after-context=[num] and will print the number of lines you specify after the match.
grep -A 2 "pimylifeup" *2. To print lines before the match, you can use either -B [num] or --before-context=[num] to print the number of lines required.
grep --before-context=2 "pimylifeup" *3. Lastly, if you want to view the lines before and after the match, you can use either -C [num] or --context=[num].
grep --context=2 "pimylifeup" *4. Below is an example of using the -A option to print one line after the match.
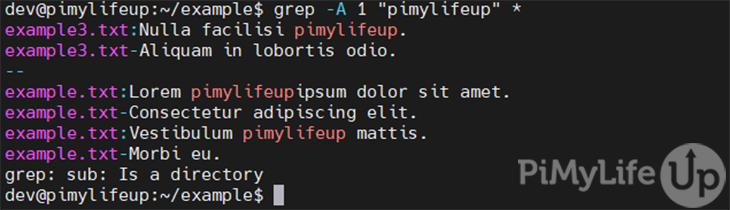
Limit the Number of Results
If you are searching through large files such as log files, you may want to limit the number of matches; otherwise, you may get hundreds of results.
By using the -m option, you can limit the result per file. So if you have multiple files, you will still get results for each of them but will be limited by the number you specify.
To limit the results, you can simply use -m [num] or --max-count=[num] options.
grep -m 1 "pimylifeup" example.txtAs you can see in our example below, we now only have one result from example.txt instead of two results.

Display Line Numbers
To make the results easier to read, you may want to display line numbers. The line number is the number of lines it takes to get to the match. So, for example, 4 would mean the match is on the fourth line of the document.
To have the line numbers display, simply use the -n option.
grep -n "pimylifeup" example.txtAs you can see in our output below, there is a match on line one and line three of the example document.

Count Matches
If you only need to see the number of times your pattern has had a match, you can use the -c or --count option.
The example below will check through multiple files but only display a count.
grep -c "pimylifeup" *In the example output below, example2.txt had zero matches, example3.txt had one match, and example.txt had two matches.

Using Regex Syntax
You can also use regex as a pattern with the grep command. However, understanding regex is quite complex and requires a full tutorial to cover most of the basics.
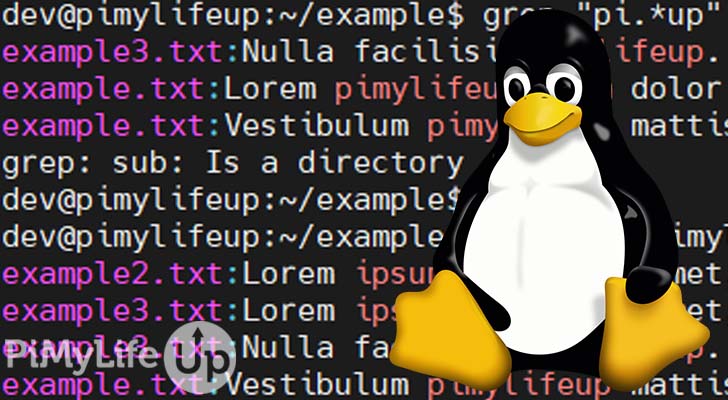
For this example, we are using a basic regex expression pi.*up. This expression will select everything between the phrase pi and up.
grep "pi.*up" *The above regex pattern should return a result similar to the output screenshot below.

More Help
There are a few other ways to get help with the grep command and its options. One of the easiest is by using the built-in Linux manual tool command.
man grepIf you need to exit the manual page, simply press the Q key.
Another way you can get help is by using the --help option.
grep --helpI hope that one of the options above helps with any extra queries you might have regarding the usage of this command.
Conclusion
Hopefully, this tutorial has covered all the basics of the grep command, and you now have a pretty good understanding of what you can do. In my opinion, it is a Linux command that you will need to know if you plan on using Linux distributions a lot.
If you are looking to learn more regarding Linux, check out some Linux tutorials. We are constantly adding more tutorials, so let us know if there is anything that you would like covered.
Please let us know in the comments section if you notice something that is not one hundred percent correct or needs updating.