In this guide, we will be showing you how to use the hostname command on Linux/Unix systems.

The hostname command can be used to retrieve and set the host, domain, or node name of the current system.
Hostnames are important as they are what is used by most networking programs to identify your machine.
Using unique hostnames, you will be able to identify and connect to machines within a network quickly.
Typically, a hostname like pimylifeup-raspberrypi will be easier to trace than a locally assigned IP address such as “192.168.0.175“.
It is also possible to use the hostname command to work out all the IP addresses that have been assigned to your machine.
Learning how to use this command can be useful when you are managing multiple Linux devices within a network.
Syntax of the hostname Command
The syntax of the hostname command is relatively simple to understand.
This command takes two entirely optional arguments.
hostname [OPTIONS] [HOSTNAME/FILENAME]The first argument is the options argument. These options allow you to control the behavior of hostname, such as using it to set the hostname or retrieving the IP addresses assigned to your Linux machine.
The second argument is only ever used to either specify a new hostname or a filename from which to retrieve a new hostname.
Retrieving the Current hostname
The easiest way to use the hostname command is to use it to retrieve the current hostname.
All you need to do is enter the command without specifying any arguments.
hostnameCopyFrom this command, you should see the hostname of your system printed to the terminal
$ hostname
pimylifeupCopy
As you can see, the hostname set on our system is set to pimylifeup.
Setting a New Hostname
Now that we know how to retrieve the hostname let us learn how to set a new one. To change the hostname of a system, you must have superuser privileges.
Luckily for us, the hostname command makes the process of setting the hostname reasonably straightforward.
All we need to do is specify a new hostname after the command.
hostname NEWHOSTNAMECopyFor example, if we wanted to change our systems hostname to “pimylifeupguide“, we can use the following command.
sudo hostname pimylifeupcommandguideCopyUsing a File to Set the Hostname
Using the hostname command, it is also possible to retrieve the hostname from a file. As we are setting the hostname, we will need to be the root user or have superuser privileges.
To achieve this, we will be making use of the file option (-F or --file). This option will tell the tool to expect a file to be inputted.
When the tool reads the file, it will look for a single line. It will ignore any lines that start with a hashtag (#).
hostname -F FILENAMECopyFor example, if we had a file called newhostnamefile with the text pimyhostname in it, we can use the following command.
sudo hostname -F newhostnamefileCopyThe hostname should now be set to the one defined within the file, which in our case would be pimyhostname.
Always Setting a hostname
By default, if you used the file option to set a hostname and that file contained no text, then an error would be thrown saying its an invalid hostname.
To stop this from occurring, you can use the boot option (-b or --boot).
hostname -b[-F] HOSTNAMECopyThis option will make the command use the default hostname if no valid one has been specified.
For example, if we tried to set an invalid hostname by using an empty file, the command will default to the last valid hostname.
hostname -bF exampleEmptyFileCopyRetrieving Assigned IP Addresses using the hostname Command
In this section, we will show you how you can use the hostname command to retrieve the IP addresses assigned to your device.
We use this method quite often within our Raspberry Pi projects, as it is typically faster than trying to find it through the interface of your router.
There are two different options that you can use to retrieve the IP addresses. These options behave quite differently, so ensure you use the one that best suits your needs.
Retrieving the IP for the Hostname
The first option we will be going through is the one used to resolve the IP addresses for the hostname.
This option is defined by the lowercase letter i (-i or --ip-address).
hostname -iCopyWhen used, the tool will automatically try to resolve where the hostname points to. If the system is unable to resolve the hostname, nothing will be returned.
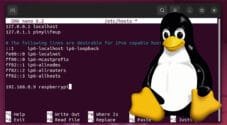
For example, if we were to run this on one of our Raspberry Pi’s, we will get back the loopback IP address.
$ hostname -i
127.0.0.1Copy
Retrieving All Assigned IP Addresses
We can also use the hostname command to retrieve all IP addresses that have been assigned to the systems network interfaces.
This second option is specified by an uppercase letter I (-I or --all-ip-addresses).
hostname -ICopyWhen you run the command with this option, it will perform a check on your system to retrieve the IP addresses that have been assigned to it and print them back out.
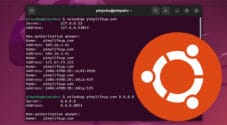
For example, running this on a local device on our network, we retrieved the following back.
$ hostname -I
192.168.0.115Copy
From this, we can see that we can access our device by using the local IP address 192.168.0.115.
Getting the Shortened Hostname
To retrieve the shortened hostname using this command we can use the short option (-s or --short).
hostname -sCopyThis option will return the hostname up until it reaches a dot (.) character.
If the hostname does not have a dot (.), it will print the entire hostname.
For example, if we had the hostname pimylifeup.hostname, we would get the short name pimylifeup back.
$ hostname -s
pimylifeupCopy
However, if we were to replace that dot (.) with a hyphen (-), we would get the name pimylifeup-hostname back from the command.
$ hostname -s
pimylifeup-hostnameCopy
Retrieving All Fully Qualified Domain Names
It is also possible for us to use the hostname command to retrieve all of the FQDNs (Fully Qualified Domain Names) assigned to our system.
An FQDN of a system is a name that the system’s resolver returns for the specified hostname. Typically, these names are the hostname followed by the DNS domain name.
For example, if we have the FDQN hostname.example.com, hostname would be our hostname, and .example.com would be our DNS domain name.
To retrieve these names, we are required to make use of the all FDQNs option (-A or --all-fdqns).
hostname -ACopyIf there is no FQDN for your system, you will receive a blank message as we have below.
$ hostname -A

Copy
Grabbing the DNS Domain
Another use of the hostname command on Linux/Unix systems it to retrieve the current DNS domain.
To grab this value, we need to utilize the domain option (-d or --domain).
hostname -dCopyThe DNS domain is the domain part of the fully qualified domain name.
For example, if we had the FDQN “pimylifeup.example.com” the DNS domain would be “example.com“.
Displaying the FDQN
The last option for the hostname command that we will be walking you through is the display fdqn option (-f, --fqdn or --long)
An FDQN consists of the short hostname alongside the DNS domain name. For example, “pimylifeup.example.com” is a fully qualified domain name.
hostname -fCopyHopefully, at this stage, you will now have an idea of how to use the hostname command on Linux/Unix based systems.
You can also check out our other great guide on some of the commands you can use in Linux systems.
If you feel like something is wrong or have any feedback at all, feel free to leave a comment below.