In this Linux guide, we will be walking you through the basics of the chown command.
chown stands for “Change Owner” and is a crucial command to learn when dealing with the Linux permission system.
In Linux, every file and directory has an associated owner user and owner group. These owners typically have the most access privileges.
By making use of the chown command, you can change both the owner and group of a file, directory, or symbolic link.
To make use of this command, you are required to have access to a user with superuser privileges. Regular users are not able make use of this command.
The chown Command Syntax
The chown command has a fairly straightforward syntax.
chown [OPTIONS] [USER][:GROUP] FILE(s)[OPTIONS]– Here, you will specify the options you want to use with the command. We will explore a couple of these options later on in the guide.[USER]– This is the name or UID of the user you want to give ownership of the file or directory to.[:GROUP]– This is for the name or UID of the group that you want to give ownership to. A group must always be specified with a colon (:) at the start of the name.FILE(s)– This is a list of files or directories which we should change the ownership of. Each file or directory should be separated by a space.
To use this command, you must always specify a user or group.
Below are the various ways in which you can specify the user or group you want to give ownership to.
USER– If only a user is specified, then that user will become the owner of the file/directory. No changes will be made to the group that owns the file.USER:– Specifying a user alongside a colon (:) with no group name will make the user owner of the file and change the group to the user’s group.USER:GROUP– If both a user and group are specified, then the ownership will be changed to them. The username and group name should be separated by a colon (:) with no spaces.:GROUP– When you only want to change the group of a file, you will still need to use the colon (:) at the start of the groups name.:– Using just a colon (:) will mean that the ownership of the specified file or directory will remain the same. This is the equivalent to not running the command.
Changing the Owner of a File using chown
In this section, we will be showing you how you can use the chown command to change the owner of a file without affecting the group.
Using the command in this scenario is rather simple.
All you need to do is specify the username followed by the list of files you want to modify, as shown below.
chown USER FILE(s)Example of Changing File Owner
Below are a couple of examples of how to change the owner of a file or directory.
Example 1
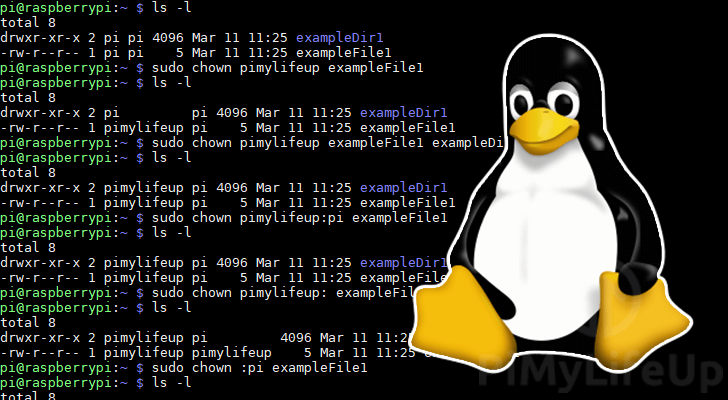
For our first example, we are going to use the chown command to change the ownership of a file called “exampleFile1” to a new owner called “pimylifeup“.
chown pimylifeup exampleFile1Example 2
In our second example, we are going to do something similar but change the ownership of a file and directory. The directory will be called “exampleDir1“.
chown pimylifeup exampleFile1 exampleDir1Changing the Owner and Group of a File with chown
In this section, we will be showing you how to change both the owner and group of a File/Directory using the chown command.
Below you can see the basic syntax for doing this.
chown USER:GROUP FILES(s)As you can see, when specifying a username and group, they must be separated by a colon (:) with no spaces between them.
If you accidentally leave a space, the chown command will think you are using that to specify the file name.
Example of Changing File Owner and Group
The following two examples should give you an idea of how to put the chown command into action by changing both the owner and group of a file or directory.
Example 1
With the following command, we will be changing the ownership of a file called “exampleFile1“.
For this file, we will be setting the owner to “pimylifeup” and the group to “raspberrypi“.
chown pimylifeup:raspberrypi exampleFile1Example 2
If you omit the name of the group after the colon (:), then the group of the defined file/directory is changed to the primary group of the user.
For example, let’s say that we are going to change ownership on a file called “exampleFile1” so that it matches the group of our “pimylifeup” user.
chown pimylifeup: exampleFile1Since no group was specified, the chown command will check the login group of our specified user and use that instead.
Changing the Group of a File with chown
You can also utilize the chown command so that it only modifies the group of a file/directory.
To do this, you need to utilize the colon (:) followed by the group name without specifying a username before it.
chown :GROUP FILES(s)Using the chown command like this is equivalent to using the chgrp command. The only difference is that the chgrp command can be used without needing to be a superuser.
Example of Changing the File/Directory Group
Changing the group of a file is an incredibly straightforward process.
For this example, we will be changing the group of a file called “exampleFile1” to “raspberrypi“.
chown :raspberrypi exampleFile1Recursively Changing File/Directory Ownership
It is also possible to use the chown command to recursively take ownership of files/directories within a specified location.
To do that, you will need to make use of the -R (Alternatively --recursive) option.
chown -R USER:GROUP DIRECTORYWith the option present, chown will change the ownership of all files and subdirectories within the specified directory.
Example of Changing the File/Directory Group
For this example, we are going to change ownership of all files and subdirectories within a directory called “/var/example” to our “pimylifeup” user and group.
chown -R pimylifeup: /var/exampleAs you can see, making use of the -R option is a relatively straightforward process. This option is great to use when you need to change the permissions on an entire directory of files.
Using chown on a Symbolic Link
By default, the chown command will not work on symbolic links (Symlinks).
When you use chown on a symbolic link, it will change the ownership of the target of the symbolic link rather than the link itself.
To change ownership of the link itself, you will need to make use of the -h (--no-dereference) option.
chown -h USER:GROUP FILE(s)This option can be combined with others, for example, the recursive option (-r).
chown -hR USER:GROUP FILE(s)Viewing the Owner and Group of a File
It is also possible to view the owner and group of a file or directory by making use of the following command.
ls -l [FILE/DIRECTORY]For example, if we wanted to check the owner and group of a file called “samplefile” we can use the command below.
ls -l samplefileUsing this command, you will get a result similar to what we have shown below.
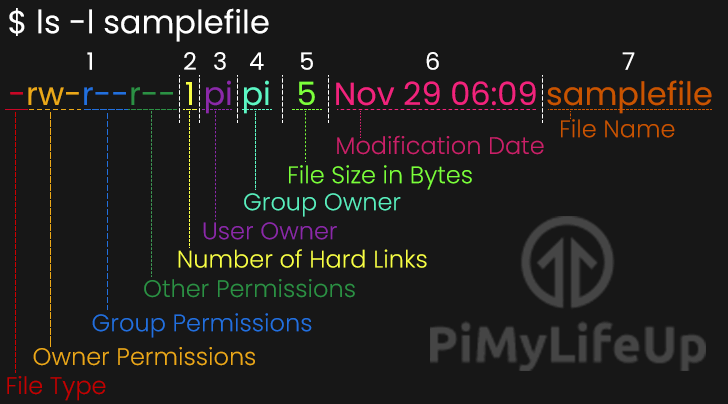
The 3rd column will show you the user that owns the file/directory.
The 4th column shows the group that has ownership of the file/directory.
Hopefully, at this point, you will now have an idea of how to make use of the chown command.
If you have run into any issues with using the command, then feel free to drop a comment below.


This is a good guide to learning and using the chown command. However I would like a explanation of the following use of the chown command;
chown -R $USER:$USER /var/www/mydomainnameI understand
-Rto be--recursiveI understand “
:” is used to specify a groupI do not understand $USER, why the $ sign and why is user and group in capital letters?
Thanks for your help
Ted Bailey
Hi Ted,
Glad that you have liked the tutorial.
In your example “
$USER” is actually a reference to a environment variable. On most Linux/Unix systems the “USER” environment variable will hold the name of the user you logged into the current session with.The dollar sign symbol (
$) at the front of the word “USER” tells the terminal interpreter to reference the value stored for a variable with the name “USER“.A simple way of showing this is to create a temporary variable yourself.
For example, creating a variable called “
HELLO” and assigning it the text “world” would be done with the following.You can then use echo to print the value stored in this new variable by referencing “HELLO” but ensuring we place the dollar sign in front of it.
An environment variable doesn’t particularly have to be in capital letters either, its just common practice to help identify them.
We have a guide that explores environment variables on Linux that may be worth exploring if you want to know more.
Please let me know if this helped at all or whether you need more clarifications.
Cheers,
Emmet