In this tutorial, we will take you through using the unzip command so you can extract data from zip archive files.
You have likely seen a zip archive before, as they are heavily used for archiving files and directories into a single compressed file.
A zip file usually has .zip as a file extension. Both Windows and MAC OS X support the file by default. Linux distributions typically have support, but sometimes additional software may need to be installed.
We have already covered the zip command, which is used to create zip files. This guide covers unzip, which is used to extract zip files. There are quite a few options that you can use to tweak the behavior of the unzip command.
If you have a tar archive, you will need to use the tar command to extract it. You can also use tar to create tar archives as well.
Table of Contents
- unzip Command Syntax
- unzip Command Options
- Installing the unzip Command
- Using the unzip Command
- More Help
- Conclusion
unzip Command Syntax
The unzip command syntax is pretty straightforward and should not take long to memorize. However, depending on the options you specify might slightly impact the structure of the command.
unzip [OPTIONS] [ARCHIVE] [-x EXCLUDE] [-d DIR]“OPTIONS” are where you enter any of the options you wish to apply to the command. The only exception is the -x or -d options, as they are at the end of the command.
ARCHIVE is where you specify the archive file name that you wish to extract.
EXCLUDE is an optional list of files that you do not want to extract. The list of files will need to be listed after the -x option.
DIR is the destination for the files extracted from the archive. The -d option will need to be declared first, followed by the directory you wish to use. If you do not use the -d option, the unzip command will extract the archive’s contents into the current working directory.
unzip Command Options
There are quite a few different options that you can use with the unzip command to alter its behavior. We will touch on a few common options that you might find handy when using this command.
-dis for specifying a directory where you want the extracted files stored.-fcan be used if you wish to freshen the files outside the archive. For example, it will only extract files that already exist outside the archive but are out of date. It will not copy over new files.-uis similar to freshen but will copy over new files and overwrite outdated files in the file system.-Pallows you to provide a password to unencrypt and extract protected zip archives. Be careful as providing a password as part of the command may make it viewable to other users. It is best to use the non-echoing prompt to enter the password.-jwill junk file paths and not recreate the archive directory structure. Unzip will dump all files into the extraction directory.-lwill list all the files inside the archive.-nstops the overwriting of existing files. If a file exists, the command will skip it and simply move on to the next file.-ooverwrites existing files without asking. Be careful using this option, as you may have critical files overwritten by accident.-qwill prevent output while the command performs its task. Using the-qqoption will suppress even more messages from displaying.-tcan be used to test the archive files.-vwill display diagnostic version information if no other parameters are defined. Otherwise, it will list the archive files with extra information.-xallows you to define a list of files you want to be excluded from the extraction process.
Installing the Unzip Command
To check whether the unzip command is already installed on your computer, simply enter unzip into the terminal. If you get a response similar to the example below, you will need to install it.
Command 'unzip' not found1. To install the unzip package for Ubuntu or Debian, simply enter the following command.
sudo apt install unzip2. If you are running CentOS or Fedora, you need to run the command below to install unzip.
sudo yum install unzip 3. Once you have successfully installed the unzip command, you should get some basic help information if you enter unzip into the terminal.
Using the unzip Command
Before we get started, let’s quickly download an example zip archive to use throughout this guide. Simply use the wget command to download the file.
wget https://files.pimylifeup.com/zipcommand/example.zip
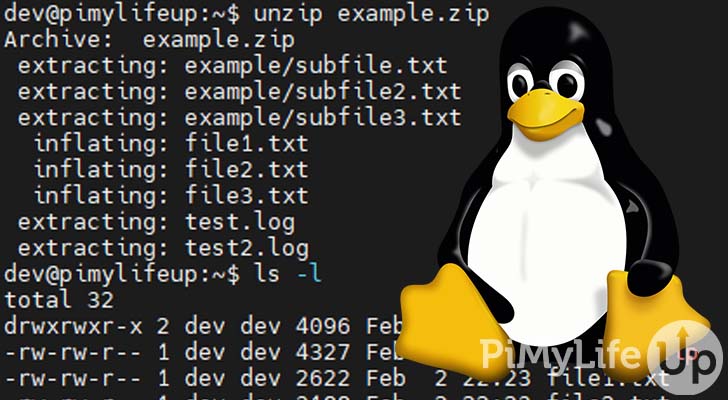
The basic usage of this command is pretty straightforward. You simply write unzip followed by the name of the archive you wish to extract. After pressing enter, unzip will extract the archive into your current working folder.
unzip example.zipAfter running the above command, you should get an output similar to below.
Archive:  example.zip
extracting: example/subfile.txt
extracting: example/subfile2.txt
extracting: example/subfile3.txt
inflating: file1.txt
inflating: file2.txt
inflating: file3.txt
extracting: test.log
extracting: test2.log
unzip to a Different Directory
You will likely want to extract a zip archive to a different directory from the one you are currently working in. To do this, simply use the -d option followed by the path. You will need to do this at the end of the command.
unzip example.zip -d ~/example/The above command will extract the files into an example destination directory located in our home directory. We created this directory using the mkdir command.
To check that the archive is extracted correctly, you can use the ls command
ls ~/example/You should see all the extracted files in the directory.
example file1.txt file2.txt file3.txt test2.log test.logExclude Specific Files from Extraction
It is possible to exclude specific files from being extracted from the archive. It is handy when you rather not extract a large set of files that you do not need, such as logs.
To exclude files from being extracted from a zip archive, simply use the -x option.
unzip example.zip -x *.logThe above command will exclude all log files and extract the rest into the current directory.
The output of the command should look similar to below.
Archive:  example.zip
extracting: example/subfile.txt
extracting: example/subfile2.txt
extracting: example/subfile3.txt
inflating: file1.txt
inflating: file2.txt
inflating: file3.txt
unzip a Password Protected Zip Archive
There may be times when you need to extract a password-protected zip archive. There are two ways to do this, and I will show you both.
If you need an example password-protected zip file, you can get one using the command below.
wget https://files.pimylifeup.com/zipcommand/exampleProtected.zipPassword Prompt
The first method is more secure but requires you to be at the computer to enter the password when you see the prompt. For example, If we enter the following line into the terminal, the zip will not immediately extract but instead prompt you to enter a password.
unzip exampleProtected.zipYou should now have a prompt asking you to enter a password to unlock the zip archive. The password for our example zip file is test.
[exampleProtected.zip] example/subfile3.txt password:
After entering the password, the zip file should extract without issue.
Password in the Command Line
The second method is not recommended as it is insecure as other users on the same system may be able to view the password. It is also suspectable to over the shoulder looking as the password is in plain text.
If you wish to specify the password in the command, simply use the -P option followed by the password. Below is an example of how to unlock our zip.
unzip -P test exampleProtected.zipAfter entering the command above, you should get the standard output for extracting a zip archive. If you enter the incorrect password, the output will let you know and refuse to extract any files.
Overwrite Existing Files
By default, whenever unzip needs to overwrite a file, it will prompt you with a few options. If you rather tell it from the outset to overwrite all existing files, you can use the -o option. However, it is recommended that you use this option carefully as it will irreversibly change data.
unzip -o example.zipDo Not Overwrite Existing Files
If you want unzip not to overwrite existing files, you can use the -n option. This option will be handy when you only want new files created and the old files left untouched.
The following command will unzip our file and not overwrite any existing files.
unzip -n example.zipFor example, we removed test.log from our folder, so it extracted the test.log file from our archive when we ran the command above.
Archive:  example.zip
extracting: test.log
Silence the Output
There will be times when you require the output of the unzip command to be suppressed. For example, running it in the background or as part of a script.
To silence the output, simply use the -q option.
unzip -q example.zipMore Help
This guide does not cover everything regarding the unzip command. You can use the manual pages or the inbuilt help option if you require further information.
To get the manual page for unzip, simply use the man command included in most Linux or Unix operating systems.
man unzipYou can use the Q key to exit the manual pages.
To get help from the unzip command itself, simply use the --help, -h, or -? options to get some more information.
unzip --helpI hope that the help documentation can provide you with the answers you require.
Conclusion
I hope that this guide has shown you how to use the unzip command effectively. As with most Linux commands, there is always more to learn.
Like the zip command, you will find unzip very handy for handling zip files. I find that the majority of online archive files use zip rather than tar, so understanding this command is a huge must.
If you want to learn more about Linux, be sure to look at our Linux tutorials. We are forever adding more tutorials, so be sure to keep coming back.
Please leave a comment below if I have missed an important topic, or there is something that needs further explaining.