In this tutorial, we cover the basics of using the tree command on a Linux-based distribution.
The tree command traverses a file structure and outputs the files and directories in a depth-indented formatted list. It is extremely useful for quickly investigating folder structures and the location of certain files.
Without any arguments, the tree command will list the files and directories found in the current working directory. In addition, you can specify options to change the command’s output. Lastly, you can specify a different directory you want tree to process.
For this tutorial, we will be focusing on the tree command found on Linux and Unix distributions. However, you will find that tree is also available on Windows operating systems.
Table of Contents
- tree Command Syntax
- tree Command Options
- Installing the tree Command
- Using the tree Command
- More Help
- Conclusion
tree Command Syntax
The syntax of the tree command is pretty straightforward and can be used with no extra arguments.
Below is how you will typically structure the tree command. However, some options may alter the layout slightly. You can also run the command without any parameters.
tree [Options] /Directory_PathCopy[Options] is where you specify any options that you would like applied to the command. You do not need to enter options for the command to run.
Directory_Path is the location of where you would like the tree command to run. If you do not specify a path, it will run in your current working directory.
tree Command Options
The tree command has quite a few additional options that you can use. Luckily, you will unlikely need to make use of them.
Below are the options you will most likely use when using the tree command. For a full list of options, check out our help section.
Listing Options
-alists all files and folders, including any that are hidden.-dwill list only directories. Files are excluded.-ltreats symbolic links like directories and will follow them.-fprints the full path for each file.-xwill stay within the current filesystem.-L [level]limits how deep tree will traverse. Replace[level]with the number of levels deep you would like to go.-Rwill have tree rerun once it reaches the max directory level.-P [pattern]limits the output, so files that match the specified pattern are shown.-I [pattern]limits the output, so files that do not match the specified pattern are shown.
File Options
-qwill output any non-printable characters as a?.-Noutputs non-printable characters without changing them.-Qencloses filenames with double-quotes.-pprints the permissions for each file.-uoutputs the file owner’s username or the UID if there is no username.-gprints the file group owner’s group name or GID if there is no group name.-swill print the size of each file in bytes.-hprints the file size in a human-readable format. It appends a size letter for kilobytes (K), megabytes (M), gigabytes (G), and so on.-Doutputs the date when the file was last modified.
Sorting Options
-vsorts the files alphanumerically by version.-twill sort the files by when they were last modified.-csorts the files by the last status change.-Uspecifies not to sort the files.-rwill reverse the order of the sort, for example, oldest to newest instead of newest to oldest.--sort [x]allows you to specify what to sort by. For example, name, version, size, mtime (modified time), and ctime (change time).
Output Options
-Xwill print out the tree in XML (Extensible Markup Language).-Jprints the tree out in JSON(JavaScript Object Notation) format.-H baseHREFwill print the tree in HTML (HyperText Markup Language). This option is helpful for FTP, and you should replacebaseHREFwith the base FTP location, for example,ftp://hostname.com.
As I mentioned before, these are not all the options available to the tree command. Please read the manual to view all the options.
Installing the tree command
You may need to install the tree package before you can use it, as not every Linux distribution includes it in the base install. Luckily, the process of installing tree is very easy.
To check whether the tree package is installed, simply enter tree into the terminal. If it is not installed, it will return an error message like the one below.
Command 'tree' not foundCopySimply enter the following command to install the tree package on either Ubuntu or Debian.
sudo apt install treeCopyAlternatively, you can run the following command to install the tree package on CentOS or Fedora.
sudo yum install treeCopyIf the tree command is successfully installed, you will see a tree structure if you enter the command into the terminal. Next, we detail on how you can use the command to get all the information you require.
Using the tree Command
The tree command is super simple to understand, so it should not take long to pick up all the basics.
In most use cases, you won’t require the use of any additional options. However, we will still touch on some of the most popular uses of options.
If you wish to store the output from the tree command in a file, you can do a simple redirection. The example below will store the results of the tree command in a file called tree.txt.
tree > tree.txtCopytree command with no options
Using tree is super simple, and you do not need to use any additional arguments.
Below is an example of running the tree command without any options.
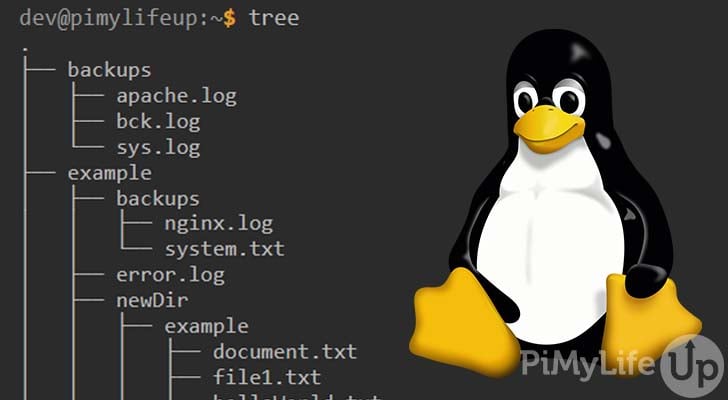
treeCopyThe output shows us an indented layout of our directory and folder structure starting from our current working directory. It is extremely helpful for navigating through large directory structures.
dev@pimylifeup:~$ tree
.
├── backups
│   ├── apache.log
│   ├── bck.log
│   └── sys.log
├── example
│   ├── backups
│   │   ├── nginx.log
│   │   └── system.txt
│   ├── error.log
│   ├── newDir
│   │   ├── example
│   │   │   ├── document.txt
│   │   │   ├── file1.txt
│   │   │   └── helloWorld.txt
│   │   └── testDir
│   │       └── example
│   │           ├── install.log
│   │           ├── install.py
│   │           └── setup.php
│   └── warning.log
├── ipsum.txt
├── newFile.txt
└── simpleWord.txt

7 directories, 16 files
Display All Files and Directories (Including Hidden)
By default, tree will not display any hidden files and directories. Luckily, you can use the -a option to have these displayed.
Simply use the following command to output a tree that shows all files and directories.
tree -aCopyIn the output below, you will notice that it includes hidden files and directories. The directories and files that starts with a . are hidden.
dev@pimylifeup:~$ tree -a
.
├── backups
│   ├── apache.log
│   ├── bck.log
│   └── sys.log
├── .bash_history
├── .bash_logout
├── .bashrc
├── .cache
│   └── motd.legal-displayed
├── example
│   ├── backups
│   │   ├── nginx.log
│   │   └── system.txt
│   ├── error.log
│   ├── newDir
│   │   ├── example
│   │   │   ├── document.txt
│   │   │   ├── file1.txt
│   │   │   └── helloWorld.txt
│   │   └── testDir
│   │       └── example
│   │           ├── install.log
│   │           ├── install.py
│   │           └── setup.php
│   └── warning.log
├── ipsum.txt
├── .local
│   └── share
│       └── nano
├── newFile.txt
├── .profile
├── simpleWord.txt
├── .sudo_as_admin_successful
├── .wget-hsts
└── .Xauthority

11 directories, 24 files
Use Pattern Matching
When using a pattern, there are a few different wildcard characters that you can use. I will quickly touch on some of the operators that you can use.
*will match zero or more characters.?matches any single character.[...]matches any single character listed between the brackets.[A-Z]you can use a dash between two characters to use a character range.[^...]will match any single character not listed in the brackets.|separates alternate patterns, allowing you to have multiple patterns.
Show all Files that match a Pattern
You can use the -P option to limit the results to a specific pattern rather than displaying all files.
Use the -a option if you wish to include hidden files as the pattern will ignore those by default.
To use the -P option, simply specify -P followed by the wildcard pattern you wish to use. The example below will match any file ending with .log.
tree -P "*.log"CopyAs you can see in the output below, log files and their directories are displayed. Every other type of file has been ignored, including empty directories.
dev@pimylifeup:~$ tree -P "*.log"
.
├── backups
│   ├── apache.log
│   ├── bck.log
│   └── sys.log
└── example
    ├── backups
    │   └── nginx.log
    ├── error.log
    ├── newDir
    │   ├── example
    │   └── testDir
    │       └── example
    │           └── install.log
    └── warning.log

7 directories, 7 files
Show all Files that do not match a Pattern
To do the opposite of the above example, you can use the -I option. This option will display all the files that do not match the specified pattern. It is excellent if you want to exclude a specific set of files from displaying.
In our example command below, we specify the option -I followed by our pattern. The pattern says to match any files that end with .log.
tree -I "*.log"CopyThe output below shows that our command has picked up all the files that do not end with .log.
dev@pimylifeup:~$ tree -I "*.log"
.
├── backups
├── example
│   ├── backups
│   │   └── system.txt
│   └── newDir
│       ├── example
│       │   ├── document.txt
│       │   ├── file1.txt
│       │   └── helloWorld.txt
│       └── testDir
│           └── example
│               ├── install.py
│               └── setup.php
├── ipsum.txt
├── newFile.txt
└── simpleWord.txt

7 directories, 9 files
Specify Max Depth
You can limit the number of directories the tree command will traverse by using the -L option. Limiting the depth is useful in super deep folder structures where you only need to the view the top few levels.
In our example below, we specify only keeping to a single level.
tree -L 1CopyThe output below shows that the tree command has returned only a single level.
dev@pimylifeup:~$ tree -L 1
.
├── backups
├── example
├── ipsum.txt
├── newFile.txt
└── simpleWord.txt

2 directories, 3 files
For this example, we indicate that we want to go two levels deep rather than a single level.
tree -L 2CopyAs you can see in the output below, the tree is now two levels deep rather than one.
dev@pimylifeup:~$ tree -L 2
.
├── backups
│   ├── apache.log
│   ├── bck.log
│   └── sys.log
├── example
│   ├── backups
│   ├── error.log
│   ├── newDir
│   └── warning.log
├── ipsum.txt
├── newFile.txt
└── simpleWord.txt

4 directories, 8 files
Display Complete Paths
To view the full path for each directory and file, you must use the -f option. This option will have the full path prefix appear on each file and directory name.
Below is an example of how to use the -f option with the tree command.
tree -fCopyBelow is an example of the output when the -f option is specified in the command.
dev@pimylifeup:~$ tree -f
.
├── ./backups
│   ├── ./backups/apache.log
│   ├── ./backups/bck.log
│   └── ./backups/sys.log
├── ./example
│   ├── ./example/backups
│   │   ├── ./example/backups/nginx.log
│   │   └── ./example/backups/system.txt
│   ├── ./example/error.log
│   ├── ./example/newDir
│   │   ├── ./example/newDir/example
│   │   │   ├── ./example/newDir/example/document.txt
│   │   │   ├── ./example/newDir/example/file1.txt
│   │   │   └── ./example/newDir/example/helloWorld.txt
│   │   └── ./example/newDir/testDir
│   │       └── ./example/newDir/testDir/example
│   │           ├── ./example/newDir/testDir/example/install.log
│   │           ├── ./example/newDir/testDir/example/install.py
│   │           └── ./example/newDir/testDir/example/setup.php
│   └── ./example/warning.log
├── ./ipsum.txt
├── ./newFile.txt
└── ./simpleWord.txt

7 directories, 16 files
Display Permissions
If you require that the files and directories permissions are displayed, you can use the -p option. Viewing the permissions in the tree helps diagnose permission errors quickly.
To display the permissions, simply add the -p option after tree.
tree -pCopyIn our example below, you can see the permissions for each directory and file. If you do not understand the permission syntax, I highly recommend that you take the time to learn it, as it’s essential for maintaining a Linux distribution.
dev@pimylifeup:~$ tree -p
.
├── [drwxrwxr-x]  backups
│   ├── [-rw-rw-r--]  apache.log
│   ├── [-rw-rw-r--]  bck.log
│   └── [-rw-rw-r--]  sys.log
├── [drwxrwxr-x]  example
│   ├── [drwxrwxr-x]  backups
│   │   ├── [-rw-rw-r--]  nginx.log
│   │   └── [-rw-rw-r--]  system.txt
│   ├── [-rw-rw-r--]  error.log
│   ├── [drwxrwxr-x]  newDir
│   │   ├── [drwxrwxr-x]  example
│   │   │   ├── [-rw-rw-r--]  document.txt
│   │   │   ├── [-rw-rw-r--]  file1.txt
│   │   │   └── [-rw-rw-r--]  helloWorld.txt
│   │   └── [drwxrwxr-x]  testDir
│   │       └── [drwxrwxr-x]  example
│   │           ├── [-rw-rw-r--]  install.log
│   │           ├── [-rw-rw-r--]  install.py
│   │           └── [-rw-rw-r--]  setup.php
│   └── [-rw-rw-r--]  warning.log
├── [-rw-rw-r--]  ipsum.txt
├── [-rw-rw-r--]  newFile.txt
└── [-rw-rw-r--]  simpleWord.txt

7 directories, 16 files
Output in XML, HTML or JSON
By default, tree outputs the data as text in the terminal. However, you can change it to output in HTML, XML, or JSON. These different file formats may be handy if you wish to use this data in a different tool.
The following options will change the output type.
-Xwill print out the tree in XML (Extensible Markup Language).-Jprints the tree out in JSON(JavaScript Object Notation) format.-H baseHREFwill print the tree in HTML (HyperText Markup Language). This option is helpful for FTP, so you should replacebaseHREFwith the base FTP location, for example,ftp://hostname.com. If you just want HTML output, you can simply use./to specify the current directory.
To demonstrate how the output changes, we will change tree to use the JSON format by using the -J option.
tree -JCopyYou can see the output is now in JSON format. You can redirect the output into a file if you wish to use it in another program.
dev@pimylifeup:~$ tree -J
[{"type":"directory","name": ".","contents":[
    {"type":"directory","name":"backups","contents":[
      {"type":"file","name":"apache.log"},
      {"type":"file","name":"bck.log"},
      {"type":"file","name":"sys.log"}
    ]},
    {"type":"directory","name":"example","contents":[
      {"type":"directory","name":"backups","contents":[
        {"type":"file","name":"nginx.log"},
        {"type":"file","name":"system.txt"}
      ]},
      {"type":"file","name":"error.log"},
      {"type":"directory","name":"newDir","contents":[
        {"type":"directory","name":"example","contents":[
          {"type":"file","name":"document.txt"},
          {"type":"file","name":"file1.txt"},
          {"type":"file","name":"helloWorld.txt"}
        ]},
        {"type":"directory","name":"testDir","contents":[
          {"type":"directory","name":"example","contents":[
            {"type":"file","name":"install.log"},
            {"type":"file","name":"install.py"},
            {"type":"file","name":"setup.php"}
          ]}
        ]}
      ]},
      {"type":"file","name":"warning.log"}
    ]},
    {"type":"file","name":"ipsum.txt"},
    {"type":"file","name":"newFile.txt"},
    {"type":"file","name":"simpleWord.txt"}
  ]},
  {"type":"report","directories":7,"files":16}
]Copy
Sort the Output
Our last topic is sorting the output, so finding what you are looking for within the tree is easier. There are several options for changing how the data is sorted, and those options are right below.
-vsorts the files alphanumerically by version.-twill sort the files by when they were last modified.-csorts the files by the last status change.-Uspecifies not to sort the files.-rwill reverse the order of the sort, for example, oldest to newest instead of newest to oldest.--sort [x]allows you to specify what to sort by. For example, name, version, size, mtime (modified time), and ctime (change time).
The command below will sort the files from Z-A as we have used the -r and -v options.
tree -vrCopyBelow you can see that by using the -r and -v options we have sorted our files and directories in reverse alphabetical order. You can easily change the options to get the desired sorted output.
dev@pimylifeup:~$ tree -vr
.
├── simpleWord.txt
├── newFile.txt
├── ipsum.txt
├── example
│   ├── warning.log
│   ├── newDir
│   │   ├── testDir
│   │   │   └── example
│   │   │       ├── setup.php
│   │   │       ├── install.py
│   │   │       └── install.log
│   │   └── example
│   │       ├── helloWorld.txt
│   │       ├── file1.txt
│   │       └── document.txt
│   ├── error.log
│   └── backups
│       ├── system.txt
│       └── nginx.log
└── backups
    ├── sys.log
    ├── bck.log
    └── apache.log

7 directories, 16 files
More Help
There are several ways to get more help for the tree command, and both are super easy to do.
The first method is to use the man command to bring up the manual pages for the tree command. To do this, simply enter the following line into the terminal.
man treeCopyOnce you are done reading the manual page, you can simply press q to exit.
Alternatively, you can simply use the --help option to bring up a summary of tree and its options. For example, the following line should return the help data.
tree --helpCopyI hope that the above two commands help with seeking any additional information that you might require.
Conclusion
Hopefully, by now you have a good understanding of how you can utilize the tree command on a Linux or Unix distribution. We have covered most of the basics with using tree.
There are plenty more Linux commands that I highly recommend that you take the time to learn as they will make maintaining a Linux distribution a lot easier.
Please let us know if you notice a mistake or an important topic is missing from this guide.