For this project, we will be showing you how to setup and configure a Raspberry Pi NextCloud Server. This server can act as your own personal "cloud" storage system.
As time goes on the protection of your own privacy with 3rd party companies becomes harder and harder. This is where software like Nextcloud comes in hand, as it gives you full control over your files with no 3rd party controller.
It is important to remember that since your data will be stored on your local network you will end up using a lot of bandwidth when uploading and downloading files from outside your local network. If your internet connection is not great then you may not get the best experience if you plan on using it outside your local network.
If this looks familiar then that’s because it likely is, Nextcloud is an actively maintained fork of the owncloud software that I have previously covered. The longer it’s in development the more different these two software packages will likely become, I suggest looking into both and then deciding on which one to go with.
If you want to learn more about Nextcloud, you can check out the Nextcloud website.
Note: The USB ports on a Raspberry Pi are typically unable to power an external hard drive. If you find this the case and your hard drive doesn’t use an external power supply, then I recommend looking into buying a powered USB hub for the Pi.
Equipment List
You can find all the bits and pieces that I used/recommend for this Raspberry Pi Nextcloud tutorial right below.
Recommended
- Raspberry Pi Amazon
- Micro SD Card Amazon
- Power Supply Amazon
- Ethernet Cable Amazon or Wi-Fi Amazon
- External Hard Drive Amazon or USB Drive Amazon
Optional
Installing Apache and PHP
To run Nextcloud on the Raspberry Pi we will first need to install and setup Apache and PHP.
We won’t be going too in-depth into installing these as they are a minor components to this tutorial.
If you want to learn more about setting up a Web Server, then be sure to follow our tutorial on how to do this.
For the best performance I recommend using Raspbian lite but just normal Raspbian will also work just as well.
If you need information on how to set this all up check out the guide in the Pi operating systems section.
For this tutorial, we will make use of the latest available version of PHP 8.
1. To get started let’s first update our package repositories with the following command:
sudo apt update
sudo apt upgradeCopy
2. With that done, let’s now install apache with the following command:
sudo apt install apache2CopyYou can check to make sure Apache2 is successfully up and running by going to your Pi’s IP address, this should load a default Apache Page.
If you are unsure on what your Raspberry Pi’s local IP address is then type in hostname -I into the terminal.
3. For this tutorial, we will be using PHP 8.4 as at the time of writing that is the recommended version for Nextlcoud.
To gain access to this version of PHP you will need to add a third-party PHP repository by following our guide.
4. With Apache2 now installed onto the Raspberry Pi, we just need to install PHP and several of its packages.
To install PHP and the packages we need, run the following command.
sudo apt install -y php8.4 php8.4-gd php8.4-sqlite3 php8.4-curl php8.4-zip php8.4-xml php8.4-mbstring php8.4-mysql php8.4-bz2 php8.4-intl php8.4-smbclient php8.4-gmp php8.4-bcmath libapache2-mod-php8.4Copy5. With Apache and PHP now installed, there is one final thing we need to do, and that is to restart Apache.
You can do this no,w making use of the following command:
sudo service apache2 restartCopySetting up a MySQL Database and User for Nextcloud
In this section, we will be showing you how to set up a user and database for Nextcloud to use to store its data.
1. Before we can continue with setting up Nextcloud on our Raspberry Pi, we will need to install a database server for it to store all of its data.
For this guide, we will rely on MariaDB (an alternative to MySQL). Follow our guide on installing MariaDB on your Raspberry Pi before continuing.
https://pimylifeup.com/raspberry-pi-mysql/2. With the MySQL server now installed on our Raspberry Pi, we will now want to launch its command line interface by running the following command.
We will use this command-line tool to create a user and database for Nextcloud to store its data.
sudo mysql -u rootCopy3. Once you have logged in to the tool, we can start by creating a database.
We will be creating this database called “nextclouddb” by running the following command.
CREATE DATABASE nextclouddb;Copy4. Our next step is to create a user that we will be using to interact with our new database.
We will be creating a user called “nextclouduser” by running the command below. Make sure that you replace “<PASSWORD>” with a secure password and make note of it for later.
CREATE USER 'nextclouduser'@'localhost' IDENTIFIED BY '<PASSWORD>';CopyFor example, if you were to create this user with the password “pimylifeup“, the command would look like what we have shown below.
CREATE USER 'nextclouduser'@'localhost' IDENTIFIED BY 'pimylifeup';Copy5. With our user created we need to now give it permissions to interact with our database.
We can do that by running the following command.
GRANT ALL PRIVILEGES ON nextclouddb.* TO 'nextclouduser'@'localhost';CopyThis command grants the user “nextclouduser ” all privileges on the “nextclouddb” database and all of its tables.
6. Our final task is to flush the privilege table.
To flush the privileges all we need to do is run the following command.
FLUSH PRIVILEGES;Copy7. With this done, we can now proceed to install Nextcloud on our Raspberry Pi.
Quit out of the MySQL comamnd line interface by using the command below within the terminal.
exitCopyDownloading Nextcloud on your Raspberry Pi
Getting Nextcloud on your the Raspberry Pi is quite simple, it mainly involves downloading the zip file from their website, extracting it and then making some .
1. To get started let’s first move to our html directory with the following change directory command.
cd /var/www/Copy2. Now we can download the latest version of Nextcloud to our device.
To do this we will use wget to download the latest release to the current folder.
sudo wget https://download.nextcloud.com/server/releases/latest.tar.bz2Copy3. With Nextcloud now downloaded to our Raspberry Pi, let us extract the archive.
To extract the archive using “tar” we need to use the command below.
sudo tar -xvf latest.tar.bz2Copy4. We now need to create a data directory for Nextcloud to operate in, for the initial setup of Nextcloud we must make this folder in our “/var/www/” directory.
Create the directory by using the mkdir command as shown below:
sudo mkdir -p /var/www/nextcloud/dataCopy5. Now let’s give the correct user and group control over the entire Nextcloud folder and everything inside it by running the following chown command.
sudo chown -R www-data:www-data /var/www/nextcloud/Copy6. Finally we need to give it the right permissions, again run the following chmod command.
sudo chmod 750 /var/www/nextcloud/dataCopyConfiguring Apache for Nextcloud
Next, we need to deal with the “.htaccess” file for Nextcloud.
Since we installed Nextcloud into the default Apache2 directory “/var/www/“, we will need to change some settings in Apache2 to allow the “.htaccess” file to override settings.
To handle this just for the Nextcloud directory we will be creating a new configuration file for Apache.
1. To get started let’s create a file which will store our configuration changes for Nextcloud.
You can begin to write this config file by using the following command in the terminal. Here we are using Nano as it is one of the easiest to use.
sudo nano /etc/apache2/sites-available/nextcloud.confCopy2. Now before you proceed any further you will need to decide whether you want Nextcloud to run under the “/nextcloud” directory or on its own domain or subdomain.
Running Under a Directory
If you want NextCloud to be accessible whenever someone goes to “/nextcloud” then all you need to do is type in the following lines into the file.
This configuration is simple and means whenever someone goes to your Pi’s IP address, followed by “/nextcloud” they will be greeted with its interface.
Alias /nextcloud "/var/www/nextcloud/"

<Directory /var/www/nextcloud/>
  Require all granted
  AllowOverride All
  Options FollowSymLinks MultiViews

  <IfModule mod_dav.c>
    Dav off
  </IfModule>

</Directory>Copy
Running NextCloud on its own domain
If you would prefer Nextcloud to be run under a separate domain name or a subdomain, then you need to create a virtual host as shown below.
When typing in these configuration lines make sure you replace “<DOMAINNAME>” with the domain name you plan on using. For example, we would replace this with “nextcloud.pimylifeup.com“.
<VirtualHost *:80>
  DocumentRoot /var/www/nextcloud/
  ServerName  <DOMAINNAME>

  <Directory /var/www/nextcloud/>
    Require all granted
    AllowOverride All
    Options FollowSymLinks MultiViews

    <IfModule mod_dav.c>
      Dav off
    </IfModule>
  </Directory>
</VirtualHost>Copy
3. These lines basically tell Apache2 how to handle itself within the “/var/www/nextcloud/” folder.
These changes will allow Apache2 to read and utilize the “.htaccess” files within the Nextcloud directory.
4. Now we can save and quit out of the file by pressing CTRL + X then pressing Y and then ENTER.
5. With the file created we now need to tell Apache to make use of it.
We can do this by utilizing the a2ensite command followed by “nextcloud.conf“.
sudo a2ensite nextcloud.confCopy6. Now we need to restart Apache2 to force it to read in the updated configuration file. We can do that easily with the following command:
sudo systemctl reload apache2CopyWith that done you can now move on to setting up the Nextcloud software within its web interface.
Nextcloud Initial Setup
1. Now that we have finished with that, we can now finally go to Nextcloud itself and begin its installation process.
To begin go to your Raspberry Pi’s IP address followed by the path “/nextcloud“. If you don’t know the IP address of your Pi, the hostname command is a great way to retrieve it.
Remember to replace “<IPADDRESS>” with that of your Raspberry Pi’s.
http://<IPADDRESS>/nextcloudPlease note, if you are running this under a domain name you will need to go to that instead of what we have shown above.
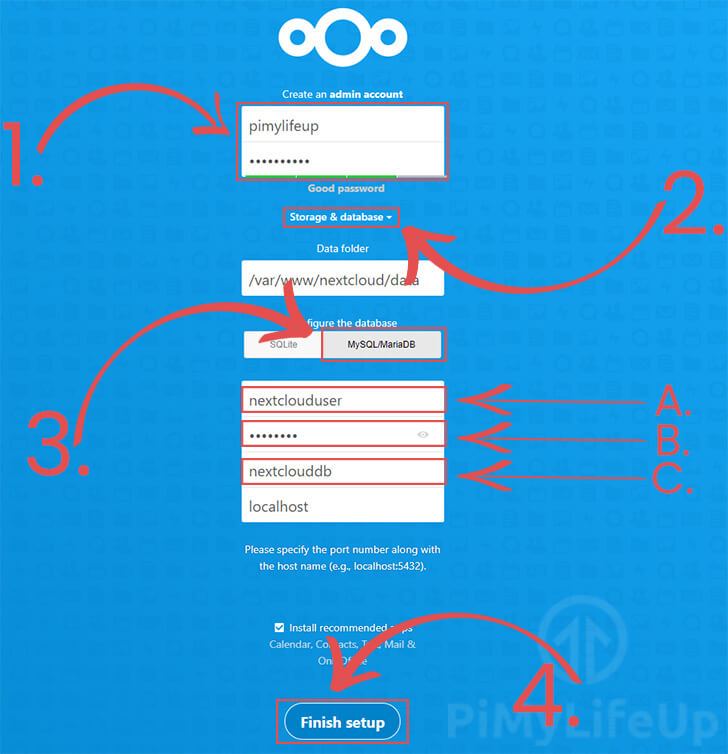
2. You will now be greeted with the following screen.
Here you will need to type in the Username and Password (1.) that you intend to use for your admin account.
If you plan on allowing your Nextcloud file service to be accessible from outside your network, make sure that you use a long and secure password.
Next, we need to specify the details for our database server. To get to these options you will need to click the “Storage & Datbase” option (2.).
Now you need to slect the type of database we want to use. As we are using an SQL server click the “MySQL/MariaDB” (3.) option.
Finally we need to enter the details for our database server. There are three bits of information that we will need to enter.
- The username for the user that will interact with our database server. (A.) If you are using the same information we used, this setting should be set to
nextclouduser. - The password that you set for the above user. (B.)
- The final option you will need to set is the database name. (C.) If you have been following our guide this will be
nextclouddb.
Once you are happy with this, press the “Finish Setup” button (4.), please note this can take some time to complete as it finalises your setup.
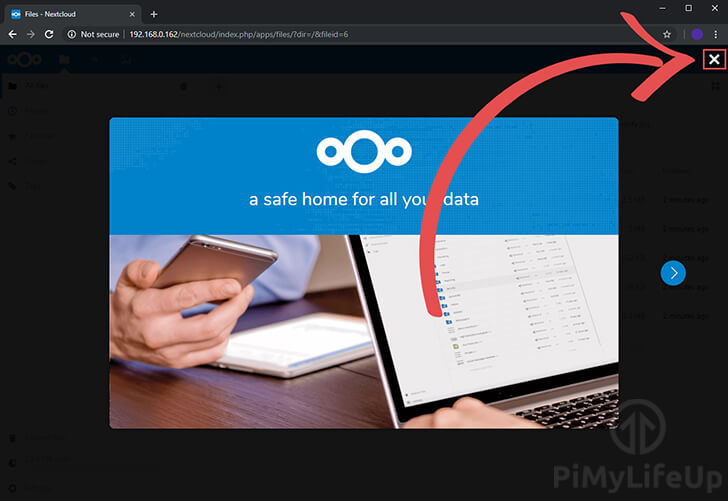
3. After this you should now be greeted with the following welcome screen, this just lays out the various programs you can use to connect with your Nextcloud installation.
Just click the X button in the top right corner to continue.
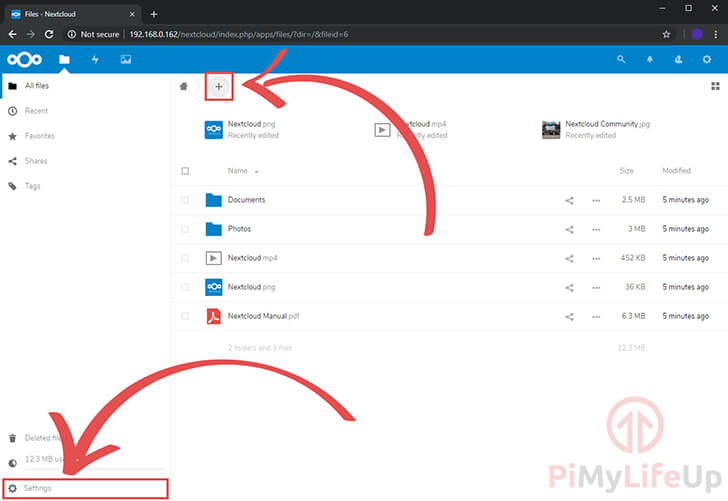
4. Now you can finally see the interface of the Raspberry Pi Nextcloud, you should take some time to familiarize yourself with all the functionality of Nextcloud’s interface.
We won’t go too in depth on how to use the Nextcloud interface, if you need more information then I recommend checking out the support section on nextcloud.
We have however highlighted some of the key areas to check out in the screenshot below.
Moving Nextcloud’s Data Folder
With Nextcloud now safely installed we can now tweak the setup to both be more secure and a bit more useable. One of the first things we should do is move the data directory so it does not sit in our web accessible directory.
This is also the same way you would move your Nextcloud data directory onto a larger external hard drive rather than putting increased load onto the Raspberry Pi’s SD Card.
1. To get started let’s make our new directory for where we will store our data files.
To make it easy we will make a new folder at “/var/nextcloud” and move our data folder into there.
Create the folder by running the following command:
sudo mkdir -p /var/nextcloudCopy2. With our new folder we created we will now move our data directory into it, this is easy to do thanks to the mv command.
Please note that your Nextcloud system will be out of action while we move the file then adjust the configuration file.
To begin the move type in the following command:
sudo mv -v /var/www/nextcloud/data /var/nextcloud/dataCopy3. Now with the files moved over we can now modify the “datadirectory” configuration to point to our new directory.
First, let’s change to the config directory for Nextcloud with the following command.
cd /var/www/nextcloud/configCopy4. We can now copy the config file to make a backup of the file, we can do this with the following command:
sudo cp -p config.php config.php.bkCopy5. Finally let’s open up the “config.php” file for editing using nano.
sudo nano config.phpCopy6. Within this file we need to change the following line:
'datadirectory' => '/var/www/nextcloud/data',CopyTo
'datadirectory' => '/var/nextcloud/data',Copy7. Now we can save and quit out of the file by pressing CTRL + X then Y and then ENTER.
8. As one last precuation we should make sure that the “www-data” user still has ownerships over our new folder.
sudo chown -R www-data:www-data /var/nextcloud/dataCopyYou should be able to now refresh your web browser and all your files should be showing exactly as they were previously.
Increasing Nextcloud’s Max Upload Size
By default, PHP has a very low upload limit, so low it’s only 2 MB. To change this, we need to modify the “php.ini” file and increase the limit. A cloud storage system wouldn’t be very useful if you could only ever upload 2mb files.
1. To get started we need to begin editing the configuration file with the following command:
sudo nano /etc/php/8.4/apache2/php.iniCopy2. Now we need to find and replace the following two lines.
post_max_size = 8M
upload_max_filesize = 2MCopy
To
post_max_size = 1024M
upload_max_filesize = 1024MCopy
Of course, you can set the file size limits to something that is much higher than 20M, so feel free to change that number to whatever you think is the maximum size file you will upload to your Nextcloud.
3. Now we can save and quit out of the file by pressing CTRL + X then pressing Y and then ENTER.
Now we need to restart Apache2 to force it to read in the updated configuration file. We can do that easily with the following command:
sudo service apache2 restartCopy4. You should now be able to restart your web browser and begin a new upload to see that the maximum upload size has been increased successfully.
Setting up SSL for Nextcloud
Now we should really work on setting up your Raspberry Pi Nextcloud server so that it runs through HTTPS and not plain HTTP.
For this tutorial, we will assume that you do not have a domain name, so we will be generating our own self signed certificate and not utilizing one from a free service such as Letsencrypt.
1. Before we go modifying our Apache2 configuration we will first generate the self-signed certificate, luckily, we can do this all in one command thanks to OpenSSL.
Remember that a self-signed certificate will throw errors in your web browser and is not as secure as a properly signed certificate but it is better than nothing. It is also the only option if you’re not utilizing a domain name.
Before we generate the certificate, let’s first make a directory to store it.
sudo mkdir -p /etc/apache2/sslCopy2. Now let’s generate the certificate itself by running the following command in the terminal:
sudo openssl req -x509 -nodes -days 365 -newkey rsa:4096 -keyout /etc/apache2/ssl/apache.key -out /etc/apache2/ssl/apache.crtCopyIf you want to know exactly what these command arguments do, then read our little description below.
req: This specifies a subcommand for X.509 certificate signing request (CSR) management.
-x509: This option specifies that we want to make a self-signed certificate file instead of generating a certificate request.
-nodes: This tells the OpenSSL application that we don’t want to specify a passphrase, a passphrase will require us to enter it every time Apache is restarted which is painful to deal with.
-days 365: This specifies the amount of days we want the certificate to remain valid for, after this amount of days you will have to generate a new certificate.
-newkey rsa:4096: This will create the certificate request and a new private key at the same time. You will need to do this since we didn’t create a private key in advance. The rsa:4096 tells OpenSSL to generate an RSA key that is 2048 bits long.
-keyout: This parameter names the output file for the private key file that is being created.
-out: This option names the output file for the certificate that we are generating.
After pressing enter you will be presented with the following options to fill out.
Country Name (2 letter code) [AU]:
State or Province Name (full name) [Some-State]:
Locality Name (eg, city) []:
Organization Name (eg, company) [Internet Widgits Pty Ltd]:
Organizational Unit Name (eg, section) []:
Common Name (e.g. server FQDN or YOUR name) []:
Email Address []:
3. Once you have filled out all that information we can then proceed on with setting up Apache2 to run SSL and to also utilize our newly generated certificate. This is a simple process but an important one.
First let’s enable the SSL module for Apache with the following command:
sudo a2enmod sslCopy4. Now we need to modify the “default-ssl.conf” file so it will utilize our new certificates and not the default ones that are generated by OpenSSL on installation.
To begin modifying this file run the following command:
sudo nano /etc/apache2/sites-available/default-ssl.confCopy5. Within this file we need to change the two lines below to point to our new certificates we generated into our “/etc/apache2/ssl” folder.
Change
SSLCertificateFile /etc/ssl/certs/ssl-cert-snakeoil.pem
SSLCertificateKeyFile /etc/ssl/private/ssl-cert-snakeoil.keyCopy
To
SSLCertificateFile /etc/apache2/ssl/apache.crt
SSLCertificateKeyFile /etc/apache2/ssl/apache.keyCopy
6. Now we can save and quit out of the file by pressing CTRL + X then pressing Y and then Enter.
7. We can now enable the default-ssl configuration and restart Apache to load in our new configuration. We can do this with the following two commands.
sudo a2ensite default-ssl.conf
sudo service apache2 restartCopy
8. You can test to make sure this is working by going to your Raspberry Pi’s IP address with “https://” in front of it. It will give you a warning about it potentially being an invalid certificate. This is normal as it is an unsigned certificate.
For instance to make sure my own copy of Nextcloud is now running behind SSL I would go to the following.
https://192.168.1.105/nextcloudSteps 9, 10, 11 and 12 are all optional and don’t need to be completed.
9. An optional extra step to ensure that you have the best security for your Nextcloud setup is to enforce SSL so no connection can be made over HTTP, if a connection is made it will redirect you to HTTPS.
We can do this by making some changes to our apache configuration, to begin let’s edit the default file with the following command:
sudo nano /etc/apache2/sites-available/000-default.confCopy10. Replace all the text in this file with the code below. This will basically redirect all HTTP traffic to its HTTPs equivalent.
Ensure that you replace “<EMAIL>” with an email address you can be contacted on. This will be displayed whenever an error occurs.
<VirtualHost *:80>
   ServerAdmin <EMAIL>

   RewriteEngine On
   RewriteCond %{HTTPS} off
   RewriteRule ^(.*)$ https://%{HTTP_HOST}$1 [R=301,L]
</VirtualHost>Copy
11. Now we can save and quit out of the file by pressing CTRL + X then pressing Y and then ENTER.
12. Now before this will work we need to enable the redirect module and restart apache. We can easily achieve this by running the following two commands:
sudo a2enmod rewrite
sudo service apache2 restartCopy
Now going to your Raspberry Pi on HTTP should automatically redirect to the HTTPS version. For example, if I go to “http://192.168.1.105” it will redirect to “https://192.168.1.105“
Port Forwarding Nextcloud
Finally, onto the section about port forwarding Nextcloud. We won’t go into too much depth on the ins and outs of port forwarding for your router but we will tell you what ports need forwarding. We will also mention what changes need to be made to Nextcloud for this to work.
Before we get started with this section you need to know that Nextcloud will only operate under specifically specified trusted domains. Which means you will need to either specify a domain name that you want to use for your connection or use your public IP address.
Since most home public IP addresses are dynamic you will need to look into setting up a dynamic DNS service, you will find our tutorial on how to setup a dynamic DNS service for your Raspberry Pi very handy.
1. To add your domain/IP we need to modify NextCloud’s configuration file, we can do that by running the following command:
sudo nano /var/www/nextcloud/config/config.phpCopy2. Within this file you will see a block of text like below. This is an array of all trusted domains that you allow Nextcloud to operate through.
For now, it should only include your Raspberry Pi’s local IP address. We will add our new domain/IP onto the end of this array.
'trusted_domains' =>
array (
    0 => '192.168.1.105',
),
Copy
For our example, we will be adding “nextcloud.pimylifeup.com” to the array. This means we need to increment the array ID and add the domain name. Once you have added a new one it should look something like below. Repeat this procedure for any new IP’s or domains you want Nextcloud to be able to operate through.
'trusted_domains' =>
array (
    0 => '192.168.1.105',
    1 => 'nextcloud.pimylifeup.com',
),Copy
3. Now we can save and quit out of the file by pressing CTRL + X then pressing Y and then ENTER.
4. Finally, you will need to port forward two ports to finally have Nextcloud up and running. These two ports being Port 80 and Port 443. The protocol required for these is TCP.
Conclusion
Hopefully by now you should have a fully operational Raspberry Pi Nextcloud Server.
If you come across any issues or have some feedback related to this tutorial, then please don’t hesitate to leave a comment below.
Please don’t hesitate to leave a comment below if you have had any issues or have some feedback related to this tutorial.
If you liked this guide, we highly recommend taking some time to explore some of our many other Raspberry Pi projects.


Great tutorial, although I didnt try it so far!
Will it be updated regulary? e.g. AFAIK the chapter “Nextcloud Initial Setup” does not work with Trixie, but only on the command line.
Hi mopperle,
We try to always keep this tutorial (and all our tutorials here on pimylifeup.com) to the latest steps. From my understanding the Nextcloud steps should all still contiune to work? Unless they have recently removed the web frontend.
Kind regards,
Emmet
Thank you for this guide. Challenging project but worth it. I wanted to build a website with a login button for my team, when pressed it would take them to the nextcloud instance. So far this works for me, thanks again.
Moin,
step 1 and 2 of section setting up data base and user for nextcloud are not working on raspberrypi 5
with actual system
sudo mysql -u root -p
CREATE DATABASE nextclouddb;
Norbert
Hi Norbert,
Sorry to see that you are having issues with this guide, is there any particular error that you are running into? I quickly tested the database setup and I didn’t run into any issues so will need more information to look further into it.
Kind regards,
Emmet
norbert@Raspi:~ $ sudo service apache2 restart
norbert@Raspi:~ $ sudo mysql -u root
sudo: mysql: Befehl nicht gefunden (couldn`t find order)
norbert@Raspi:~ $ CREATE DATABASE nextclouddb;
bash: CREATE: Kommando nicht gefunden. (didn`t find order)
norbert@Raspi:~ $
thats what is responded
Thanks for help
Hi Norbert,
You will need to follow our MySQL on the Raspberry Pi tutorial first; this will get you to install the missing MySQL database server. You only need to follow the “Setting up MYSQL on a Raspberry Pi” section.
I will update the steps to make this clearer for future readers.
Kind regards,
Emmet
This was an awesome tutorial. It was very thorough and well explained.
Installing the LAMP stack brought me back to my early days in web. I actually used this to install NextCloud on an old Intel MacBook Pro. I do get all sorts of warnings that MacOs is not supported but I got it up and running.
As of 1/6/2026, I needed the most recent PHP packages installed, so this helped:
sudo apt install php8.4-gd php8.4-sqlite3 php8.4-curl php8.4-zip \
php8.4-xml php8.4-mbstring php8.4-mysql php8.4-bz2 php8.4-intl \
php8.4-smbclient php8.4-gmp php8.4-bcmath libapache2-mod-php8.4 -y
Hi ProphesierC,
I much appreciate your comment! I have quickly gone through and updated our guide to now use PHP 8.4 as well.
Kind regards,
Emmet
Hi Emmet
This is a brilliant tutorial without which I wouldn’t stand a chance of success. I have followed instructions carefully I believe but seemed to have fallen at the last hurdle!
On entering this command: http://192.168.1.215/nextcloud
I get this: (tried to enter the whole script but was blocked)
This is part of it:
If you can suggest where I have gone wrong it would be appreciated
Thanks
Richard
Hi Richard,
This is definitely an unsual issue but it would be getting caused by Apache not loading in PHP for some reason. Let us try and work out exactly what is happening.
1. First, you will need to verify that the libapache2-mod-php8.2 package was actually installed.
If it exists you should see something the “libapache2-mod-php” package be output by this. If it isn’t, run “
sudo apt install libapache2-mod-php8.2“.2. If the package does exist, Apache must be not loading in the module so lets try and enable it.
3. Once enabled, restart the apache service and then try Nextcloud again.
Please let me know if you continue to run into issues.
Kind regards,
Emmet
Hello Emmet
Thanks for your reply, I believe PHP is running but still end up with the script. I have gone through your reply very carefully.
Obviously I’m at a loss, I would add that I am trying this out on a pi model 3B so realise it is none too powerful, so could this be the problem?
If all else fails I see you have a tutorial using Docker Compose, is it worth trying that?
Thanks for your help.
Richard
Hi Richard,
HMm that is unsual that you are continuing to see that issue, can you verify that you are using Apache?
Using a Raspberry Pi 3 isn’t the problem here. FOr some reason, Apache isn’t using PHP when it should be which is why you are seeing the raw script. Its thinking its just serving them as a HTML page rather then processing the script.
Yes if you are having issues I would definitely recommend using the Docker Compose solution for hosting Nextcloud. There is also the NextcloudPi images but we don’t have a guide on that.
Kind regards,
Emmet
Great step-by-step tutorial, but I’m having some issues.
My Pi5 (8 Mb RAM) is running NGINX instead of Apache2. I was able to download and install NextCloud, create a DB and user, etc. However in my browser I get a 404 page (192.168.68.74/nextcloud). Restarting NGINX and rebooting the Pi did not help.
Can someone provide some assistance for this NGINX setup ? Thanks !
Hi Dirk,
Unfortunately the steps here will not work with Nginx. You would need to set up your own virtual host for this to work properly.
As Nginx is not supported by the Nextcloud team, I would personally recommend sticking with Apache for this particular project. If using Nginx is a must, there is a simpler work around that would enable Nextcloud to still use Apache and you to use Nginx.
What you would want to do is install Apache, but reconfigure the virtual host to use a different port, something like 8080 or something. YOu would then set up nginx to work as a reverse proxy for the software.
Kind regards,
Emmet
I was getting a little confused with respect to use of “double” and ‘single’ quotes as presented in this tutorial, trying to figure if they were/are intended content that belongs in the command lines or mysql interface as part of intended syntax versus if they were your way of flagging variables. I personally like the color coding that you have used in much of the tutorial but was confused with the single/double quotes ‘ ” and in some cases brackets[ ].
Hi Andrew,
I have gone over the tutorial to hopefully make it more clear. The important thing to pay attention to is how things are written within the code blocks themselves.
We often use double quotes within the explanation text to help bring up important variables you want to pay attention to. We use the square brackets or greater than and less than signs as ways of displaying text that needs to be replaced.
Please let me know if you need any further clarification.
Kind regards,
Emmet
Can you elaborate on what we should have in the field for “example@example”? Is this more or less a “username@localhost” thing?
I really like what you did in the Nextcloud Initial Setup step 2 picture with the 1.2.3. and A.B.C. field identification. I’ve followed lots and lots of NC tutorials and it’s always confusing as to what all of these fields mean.
Hi Andrew,
In regard to the “
example@example” field (I’m assuming you mean in the “Setting up SSL for Nextcloud” section). This needs to be an email address. Basically, if an error is thrown, Apache displays a page with this email address so a user could contact you about the error.I have updated the tutorial to hopefully make this more clear.
Kind regards,
Emmet
Hello,
Very useful tutorial and I’m sure with a bit of advice with the issue below, I’l be up and running soon.
However, I cannot get the following script to create the user as I continually get an error.
I am sure it is me getting the syntax wrong but, as an example, if my password was abc, what should the script below look like exactly (eg: brackets and or quotation marks removed?).
CREATE USER ‘nextclouduser’@’localhost’ IDENTIFIED BY ‘[PASSWORD]’;
Thanks in advance
Hi Andrew,
I’m sorry to hear that you have been having issues with this guide. I have updated the guide to try and be clearer about what a valid version of the CREATE USER command should look like.
With your example using the password “abc” the command should look like what we have shown below.
Kind regards,
Emmet
Could you be more specific about the version of operating system needed. I tried installing this on bookworm with a raspberry pi 5 and it was a no go, turns out bookworm isn’t supported yet. Other than that great tutorial.
Hi Jim
Did you run into any errors in particular? There is no reason I can think of that this tutorial shouldn’t work on Raspberry Pi OS Bookworm.
Kind regards,
Emmet
The best and more detailed guide that i’ve ever read. Thank you!!
PHP 8.1 install fails.
E: Unable to locate package php8.1
E: Couldn’t find any package by glob ‘php8.1’
Hi Dani,
Please follow our guide on adding the third-party PHP package repository and try again.
Cheers,
Emmet
Great guide thanks,
PHP install command needs change…php-smbclient to php8.1-smbclient or else latest 8.2 gets installed and breaks OCC commands
Hi Laperb,
Thank you for pointing that out. I have corrected the guide to make sure we are installing a specific version of the smbclient module.
Cheers,
Emmet
Step 3 of installing PHP doesn’t work with Bullseye 64bit Lite – is there an update at all?
When using 32-bit lite it works fine, but when finished and running, Nextcloud reports 32-bit support is ending on next release.
great guide though!
Hi Mattb,
Having a quick look into it, it appears that Bullseye 64-bit is providing PHP 7.4 rather than the 8.0 version we are installing within this guide. The easiest way to work around this issue is to add the alternative PHP repository that provides these builds.
I have made a couple of adjustments to the tutorial so that we are now using 8.1 as recommended by Nextcloud. We also now point you to our guide that gets you to add the alternative repository that will give you access to newer releases of PHP.
Please follow these updated steps and let me know if it solves your issue.
Cheers,
Emmet
Really a great tutorial! Thank you very much.