In this guide, I will take you through on how to setup Raspberry Pi port forwarding on the router and also setting up Raspberry Pi Dynamic DNS. Both of these complement each other, but port forwarding is very important if you want web applications accessible over the internet.

I have prepared a video further down the page that takes you through everything you need to know about setting up both of these.
It’s important to remember that opening up ports will have an increased security risk. Tools such as Fail2ban will help protect your Raspberry Pi from intrusion. Also, make sure you pick strong, secure passwords.
If you enjoy this tutorial, then please subscribe so you can stay up to date on all the latest awesome Raspberry Pi projects, guides and much more.
Video
It’s important to know that the video goes through an older method than the text version provided below does.
Both methods will work just fine but if you’re looking for the latest, then be sure to check out the full-text version.
Setting Up Raspberry Pi Port Forwarding
Raspberry Pi port forwarding is a method where can allow external access to the Pi. To do this, we will need to change some settings on the router.
All routers are different but I will try and make this as generic as possible however there could still be a lot of differences between these instructions and your router. The router I am using for this tutorial is the TP-Link AC1750 wireless dual band gigabit router.
1. On a computer that is connected to the local network, connect to the router admin page via a web browser.
A router IP typically is 192.168.1.1 or 192.168.1.254
2. Enter the username and password for the router. By default, this is typically admin & admin.
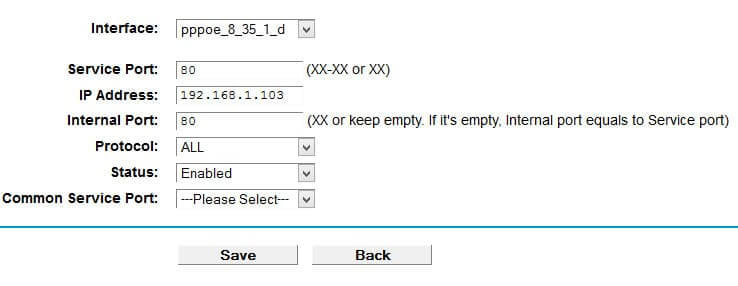
3. In the router admin page head to forwarding->virtual server.
4. On this page enter the following
- Service Port: This is the external port.
- IP Address: This is the IP of the Pi.
- Internal Port: Set this to Pi’s application port. (A web server runs on port 80 for example)
- Protocol: Set this to ALL unless specified.
- Status: Set this to enabled.
5. These settings will route traffic destined for the port specified to the port on the Raspberry Pi.
6. You should now be able to connect to the application on the Raspberry Pi outside your network.
The best way to check if you have port forwarded correctly would be to either get a friend to connect or go somewhere outside your local network (A VPN could achieve this).
Below is an example of setting up access to a web server that is running on port 80 with the Raspberry Pi having an IP of 192.168.1.103.
Troubleshooting
There are a few issues that might occur when attempting to set up your Pi for external access. Below are just a few issues you might come into when setting up Raspberry Pi port forwarding.
- Double check your router settings and confirm they are correct.
- Check that your external IP hasn’t changed. ISP’s will provide you with a dynamic IP rather than a static IP.
- Restarting the router might clear problems.
- Restarting the Raspberry Pi might also clear any problems.
Setting up Raspberry Pi Dynamic DNS
If your ISP supplies you with a dynamic IP (An IP that changes often), then it will probably be worth setting up the Raspberry Pi dynamic DNS (Sometimes Routers has this feature in them). This method means you will always be able to connect to the application on the Pi even if your external IP changes.
To get started we will need to install the DDclient, and it’s a pretty straightforward process that won’t take too long to get installed.
1. To begin, run the following lines to install the DDclient. Please note, just skip through the install, we will override these settings.
sudo apt update
sudo apt install ddclient libjson-any-perl libdata-validate-ip-perlCopy
2. After all of that, we will now need to replace that version of DDclient with a more recent one. This newer version will enable better support for services such as Cloudflare.
To download the latest version, enter the following wget and tar commands.
wget https://files.pimylifeup.com/portforwarding/ddclient-3.9.1.tar.gz
tar -zxvf ddclient-3.9.1.tar.gzCopy
3. Once that has finished downloading and extracting, we will make use of the newer binary by copying it over the current one using the following command:
sudo cp -f ddclient-3.9.1/ddclient /usr/sbin/ddclientCopy4. Due to changes made in the most recent version of DDclient, the location of the configuration file has moved. We will use the following commands to reposition the one that came with the first install.
sudo mkdir /etc/ddclient
sudo mv /etc/ddclient.conf /etc/ddclientCopy
5. Once the ddclient has completed installing, we will now go and directly edit the configuration file to make a few crucial changes. Use the command below to launch an editor for the file.
sudo nano /etc/ddclient/ddclient.confCopy6. We will need to add a few lines to this file, and we will use these same lines throughout every different configuration. They define whether to use SSL and how to obtain the external IP address of the Raspberry Pi.
7. Add the following to below the commented header in the file, also remove anything else in the file.
We will add more to the file later on with our guides on using No-IP or Cloudflare.
use=web, web=checkip.dyndns.com/, web-skip='IP Address'
ssl=yesCopy
8. OK, now that this is done we can proceed to the next couple of steps on how to setup ddclient with a Dynamic DNS provider.
Just to quickly point out that the main difference between CloudFlare and No-IP is that you need to own a domain name to make use of CloudFlare. No-IP However offers free subdomains, meaning it’s a costless service to use.
It’s important to note that while Cloudflare isn’t truly a Dynamic DNS provider, we can use it the same way thanks to its API. Cloudflare also offers more protection such as free SSL, anonymized IP, DDOS protection and more. You can turn off the Cloudflare features and just use it as a DNS provider if you want. You may find that you need to do this anyway.
Dynamic DNS using Cloudflare
1. Before you start using Cloudflare as a Dynamic DNS provider, you will need to purchase a domain name. If you have a domain name already, you can skip ahead to the next step in this guide. Otherwise, you can purchase a domain name from somewhere such as NameCheap.
2. Now you will need to sign up to Cloudflare, don’t worry as it won’t cost you anything.
3. Sign up and follow the steps given for updating your domain name to point towards Cloudflare’s DNS (Domain Name Servers).
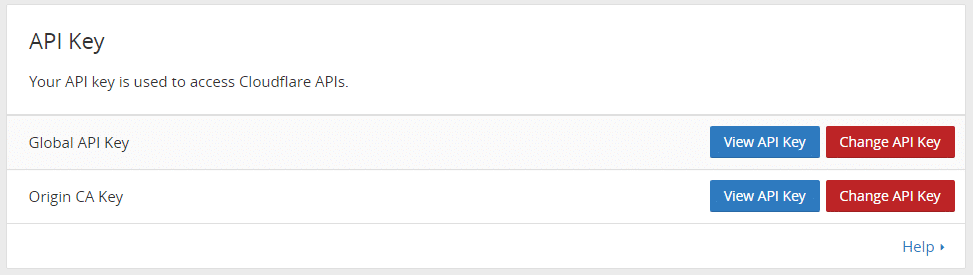
4. Next, you will need the Cloudflare API-key that you’re able to find on the account page. You want the global API key, copy and paste this somewhere safe for now.
5. Now we need to enter the Cloudflare details into the DDclient configuration file. Open it by running the following command.
sudo nano /etc/ddclient/ddclient.confCopy6. Update or add the following lines to the bottom of the file, making sure to replace the username, api-key, zone and the hostname with the ones you used to setup your Cloudflare account.
The zone is the domain name itself and then underneath is the record/domain you wish to update. Either enter a subdomain or the primary domain itself. Make sure the record exists within Cloudflare on the DNS page, it will need to be an “a” record.
protocol=cloudflare
server=api.cloudflare.com/client/v4
login=your_email
password=your_api-key
zone=your_domain.com
anything.your_domain.comCopy
7. Once you have updated the file, you can save and quit by using CTRL + X.
8. Now, all we need to do is restart DDclient, as long as you have entered the correct information in step 3. everything should work correctly. Use the following command to restart the dynamic DNS client. (Sometimes you need to restart twice for the changes to take place)
sudo /etc/init.d/ddclient restartCopy9. The IP should now be updated within Cloudflare, and you should now be able to use your chosen domain name to connect to your Raspberry Pi. You may need to turn off the Cloudflare proxy for it to work, you can do this by going to the DNS page within Cloudflare and clicking the cloud next to the domain record, so it becomes grey.

You will now want to continue to the “Running ddclient as a Daemon” section of this guide so that you can have the IP automatically update otherwise you will need to restart the ddclient manually every time you want to update the IP.
Dynamic DNS using NOIP
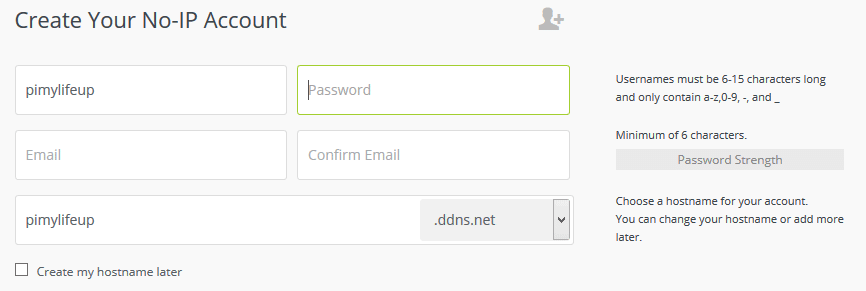
1. To setup Raspberry Pi Dynamic DNS with NOIP, you will need to create a free account over at their website. Make sure you keep note of the username, password and the hostname that you pick as we will need them in the next step.
2. After you have finished creating your account, it’s time to enter these into the DDclient configuration file. You can open up the config file by running the following command.
sudo nano /etc/ddclient/ddclient.confCopy3. Now, either update or add the following lines to the bottom of the file, making sure to replace the username, password and the hostname with the ones you used to create your No-IP account.
protocol=dyndns2
server=dynupdate.no-ip.com
login=your_username
password=your_password
your_domain.comCopy
4. Once you have updated this file, save it and quit by using CTRL + X.
5. Now, all we need to do is restart ddclient, as long as you have entered the correct information in step 3. everything should work just fine. Use the following command to restart the client.
sudo /etc/init.d/ddclient restartCopy6. Your IP address should now be updated, and you will be able to use your chosen domain name to connect to your Raspberry Pi given that the correct ports are open.
Continue the tutorial below to ensure that the ddclient automatically updates the IP.
Running ddclient as a Daemon
Since we don’t just want the IP address to update once, we still need to setup ddclient to run as a daemon so it can check for a change of IP address periodically and notify the chosen dynamic DNS provider if necessary.
1. To make DDclient runs as a Daemon, we need to make a change to a configuration file. Run the following command to begin editing the file.
sudo nano /etc/default/ddclientCopy2. In the file, you will need to change run_daemon so that it matches the line below.
This change basically tells it to run ddclient in daemon mode.
run_daemon="true"Copy3. You will also need to check two other lines in this file to make sure that they are false. Otherwise, ddclient will not run in daemon mode correctly.
Ensure the following two lines are matching, if they are set to true then change them to false.
run_dhclient="false"
run_ipup="false"Copy
4. Press CTRL + X and then Y to save the changes to the configuration file.
5. Now enter the following command to startup ddclient as a service.
sudo service ddclient startCopy6. To ensure the service has properly started, you can use the following command to check its status.
sudo service ddclient statusCopy7. Some dynamic DNS providers require you to update your IP address quite frequently. We can help ensure that you don’t get timed out by forcing ddclient to update your IP address once a week. We achieve this by first opening up the weekly crontab by using the following command.
sudo nano /etc/cron.weekly/ddclientCopy8. To that file, add the following lines.
#!/bin/sh
/usr/sbin/ddclient -forceCopy
9. Save the changes by pressing CTRL + X and then Y to accept the changes.
10. Lastly, we need to allow our new script to execute, and we can do this quickly by doing the following.
sudo chmod +x /etc/cron.weekly/ddclientCopy11. ddclient should now be successfully running as a daemon, use the following command to make sure that it is running correctly.
sudo service ddclient statusCopy12. That should be all you need to do to have everything running smoothly.
If you find that something isn’t working correctly, then the following line is great for debugging. It will spit a ton of lines just look for anything that might look like an error or a hint at why it is not working.
sudo ddclient -daemon=0 -debug -verbose -noquietCopyAs long as you have Raspberry Pi port forwarding setup correctly, you should now be able to access your Pi outside your local network using a domain name. If the above instructions do not work for you, then you can always try out the old method which is detailed below.
Setting up Dynamic DNS (Old Method)
This next part is an old process that I replaced with the method above. It should still work, but the one above should be much easier to get up and running.
1. First, you will need to create an account over at No-IP (Make sure “create a hostname later” is unticked)
2. Now on the Raspberry Pi enter the following commands
sudo bash
cd /usr/local/src/
wget http://www.no-ip.com/client/linux/noip-duc-linux.tar.gz
tar xf noip-duc-linux.tar.gz
cd noip-2.1.9-1/
make installCopy- You will be now presented with a few settings you will need to set.
- Enter the email and password for the account you wish to connect the Pi to.
- Next set the update interval with the default being 30 minutes. (This checks to see if the IP has changed)
- You can now also set something to run whenever the IP updates.
3. Now add a new line into the rc.local file just before the last line exit 0 this ensures that no-ip will automatically start on reboot.To do this enter the following commands:
nano /etc/rc.localCopy4. Enter the following line right above the exit 0 line.
/usr/local/bin/noip2Copy5. Use CTRL + X to exit (Make sure you save)
6. You can start no-ip with the following command:
sudo /usr/local/bin/noip2Copy7. Check the status with the following command:
sudo /usr/local/bin/noip2 -SCopy8. You can close it using the following command. Replace pid with the pid from the -S command.
sudo /usr/local/bin/noip2 -K 'pid'Copy9. You’re able to recreate the default config file if required by entering the following command:
sudo /usr/local/bin/noip2 -CCopyNow you should have a Raspberry Pi dynamic DNS server setup and be able to connect with a domain name rather than an IP. This name will remain the same even if your IP address changes.
This setup means you will always be able to connect to the Pi or other home network devices without needing to find out your new external IP.
If you’re looking for a project that requires access to the internet, then you should check out either the Raspberry Pi Web Server, mumble server or even the webcam server.


If there is somebody who tries to setup the dynamic dns nowadays, if found you need to install additional perl package (this is indicated in the output at step 12):
sudo apt-get install libio-socket-ssl-perlThen restart the ddclient service:
sudo service ddclient restartMan, I followed so many other instructions and just could not get it to go, and yours worked like a trick, thank you. (Except for moving ddclient.conf to /etc/ddclient; I had to move it back to /etc.)
Best tutorial ever! Just a quick notice, before even buying RPI as a web hosting service, make sure you won’t run into CGNAT problem (firewall layer outside of your modem firewall, that covers certain area). To check it, login to your router configuration, and check WAN address, if it starts with 10x.x, you are, as me, f***ed 🙂 If any other, you should be fine (I hope)
Hi,
first thank you very much for the tutorial. I am very new to this, so I probably have done something bad or missed something, however, I followed the https://pimylifeup.com/raspberry-pi-owncloud/ and this tutorial twice, and I am getting the same messagewhen accessing my domain, either from home or outside:
2021 Copyright. All Rights Reserved.The Sponsored Listings displayed above are served automatically by a third party. Neither Parkingcrew nor the domain owner maintain any relationship with the advertisers.
Privacy Policy
Probably this is the expected result for this tutorial, but I was expecting to access directly onwcloud with the domain. Could you please help me here?
Thank you!!
JJ
Hi JJ,
Make sure that when you set up port forwarding that you are forwarding port 80 and 443 from your router to the Raspberry Pi.
One of the problems you may find when doing this is that both of these ports are blocked by a lot of internet providers.
Additionally you need to make sure your DNS settings is pointing to your Pi’s IP address, or you are using a dynamic DNS service.
Cheers,
Emmet
Thank you so much for your tutorial. I set up my RPi git server with a NOIP DNS and it is working perfectly, when I am not home.
However, when I am home, I have trouble accessing the server (sometimes git appears to not exist, or difficultly pull/push/clone), and also have incredible lag accessing the RPi via putty. These problems only happen when using the DNS. When I am at home the only way I can access the Pi/git server without problem is using its local IP address. I want to avoid needing to switch the URL of git to either local or DNS.
Is there a setting my router or Pi or git server I need to enable to allow me to access it reliably either at home or not?
Thank you,
I think this is something called hairpinning but I am no expert.
Hello,
after execute the wget command I got this message and I can’t continue with the rest of steps.
Any help please?
Hi Raul,
You have mistyped the URL for the wget call.
You wrote
ddclinet-3.9.1.tar.gz, instead ofddclient-3.9.1.tar.gzCheers,
Emmet
i cannot access outside my home network. What is the problem? I configured with no-ip. Port forwarding port 80 with my router. Ip address of raspberry pi is 192.168.0.200. DDclient up and running. But cannot access outside network
Hi Azhagappan,
There is a chance that your ISP is blocking connections through port 80.
Many ISP’s block a few of these ports to try and improve network security.
Cheers,
Emmet
For the love of god, I can’t make it start after a reboot. Everything works without a glitch after I start it manually (service ddclient start).
Hi ContV,
Have you tried enabling the service as well.
Let me know if that works.
Cheers,
Emmet
apt-get install libdata-validate-ip-perl
fixed the problem
Hello,
I ran into a roadblock while following this tutorial and running this command:
wget https://files.pimylifeup.com/portforwarding/ddclient-3.9.0.tar.gztar -zxvf ddclient-3.9.0.tar.gz
then this was what I get back:
wget: invalid option -- 'z'
wget: invalid option -- 'f'
Usage: wget [OPTION]... [URL]...
Try `wget --help' for more options.
Is there something stupid that I am doing or missed?
Make sure you run wget and tar as separate commands. So, enter the wget line first, and once that has completed, enter the tar command.
Rereading the error and command after your comment, I can see my mistake now. I knew it was something really stupid. Thanks Gus!
A good and easy way to check if your ports are open is to go to a website called canyouseeme.org just type in the port you want to check and you will either get a heart warming success or a crushing failed!
just remember if the service/application/device you are trying to setup isn’t running or present on the network then the ports will appear to be shut as there is nothing for them to connect too. i.e. if you had a minecraft server running on port 1234 and you turned the server off when you check the port on canyouseeme it would appear closed.
Looks like Cloudflare may have stopped forwarding API requests hitting
www.cloudflare.comto the correct place.Removing the “server=” line, (And thus using the cloudflare protocol default “server=api.cloudflare.com/client/v4”), appears to have allowed everything to work as expected
Just in case
ddclinet 3.9.0 is available
https://sourceforge.net/projects/ddclient/files/ddclient/ddclient-3.9.0/ddclient-3.9.0.zip/
Hi Oleh,
Thank you for notifying us of the update to ddclient!
We have gone ahead and changed the wget to retrieve the latest available version.
Cheers,
Emmet
I tried to port forward for my Minecraft server on my Pi, and theoretically it should be working, I have it going to port 25565 but when my friends try to join they can’t. Any idea why it might not be working.
Hello,
I am attempting to set up DDNS for a minecraft server hosted by my Raspberry Pi. The server works just fine on my local network but I am unable to access it over the internet. I tried both of the methods above (new and old) using NoIP. All indications from my Raspberry Pi indicate that the host is setup correctly but I am unable to connect through minecraft. I am a little stuck and would appreciate any advice on how to proceed.
Thanks in advance.
Connor
I thought I installed everything correctly, using noip for my ddns. However, when I check the status with “sudo service ddclient status”, I get this:
ddclient.service - LSB: Update dynamic domain name service entriesLoaded: loaded (/etc/init.d/ddclient)
Active: active (running) since Fri 2017-06-02 23:40:22 UTC; 5h 58min ago
Process: 4585 ExecStop=/etc/init.d/ddclient stop (code=exited, status=0/SUCCESS)
Process: 4592 ExecStart=/etc/init.d/ddclient start (code=exited, status=0/SUCCESS)
CGroup: /system.slice/ddclient.service
└─4601 ddclient - sleeping for 110 seconds
Jun 03 04:25:23 raspberrypi ddclient[5739]: WARNING: file /etc/ddclient.con...)
Jun 03 05:35:24 raspberrypi ddclient[6163]: WARNING: file /etc/ddclient.con...)
Hint: Some lines were ellipsized, use -l to show in full.
What do all the warnings mean? Will they affect the functionality of my ddns?
Thank you very much for your Tutorials firstly.
I want to use my Raspberry in a Field in my village, to watch my garden from the city where i live.
i will use a usb 3g dongle to have internet there. My question is, if i make the all changes and config above at my place with my router and internet in city, would everything work with putting usb 3g dongle in the village?
ddclient would recognize the changed ip adress right? changing a router to 3g wouldnt make any problem?