In this Raspberry Pi Apache project, we will be showing you how to install and setup an Apache web server on the Raspberry Pi.
By itself, Apache can serve HTML files over the HTTP and HTTPS web protocols. Alongside additional modules such as PHP, Apache is also able to serve dynamic content.
Apache is one of the most popular web servers available for the Raspberry Pi. Apache alone accounts for roughly 27% of all web servers in the world.
An alternative to Apache is an Nginx web server and is considered to be much faster than Apache at certain tasks. It’s entirely up to you on which technology you want to proceed with using.
Within this Raspberry Pi Apache tutorial, we will be walking you through the steps to setting up Apache, installing PHP, and also creating your first basic Apache VirtualHost file.
In this tutorial, we touch on all the basics of Apache, however, do not touch on setting up MYSQL and PHPMyAdmin. We also don’t cover setting up WordPress on the Raspberry Pi. These are all topics covered in separate tutorials.
Equipment List
Below are all the bits and pieces that I used for this Raspberry Pi Apache web server tutorial.
Recommended
Optional
We last tested this tutorial on a Raspberry Pi 5 running the latest version of Raspberry Pi OS (Bookworm).
Video
The video below touches on all the topics mentioned in this tutorial. I set up the Apache web server, install PHP, and briefly touch on virtual hosts. It’s the perfect visual way to follow this tutorial. If you prefer text, keep following the tutorial immediately below the video.
How to Install the Apache Web Server on the Raspberry Pi
1. Before we install Apache to our Raspberry Pi, we must first ensure the package list is up to date by running the following two commands.
sudo apt update
sudo apt upgradeCopy
2. First, we will need to install the Apache2 package on our Raspberry Pi.
For those who don’t know what Apache is, it is a server software that serves the HTML files from a computer to the web browser.
To install apache2 on your Raspberry Pi, enter the following command into the terminal.
sudo apt install apache2 -yCopy3. With Apache2 installed to our Raspberry Pi, we now have an extremely basic web server up and running. The server will be able to provide non-dynamic content such as HTML files.
In the next section, we will be extending this basic Apache web server by installing PHP to the Raspberry Pi.
To check that Apache is up and running on your Raspberry Pi, you can enter the Raspberry Pi’s IP address into a web browser. The server should return a webpage with some simple text on it.
If you do not know the IP, you can enter the hostname command into the terminal to retrieve it.
hostname -ICopy4. In a web browser, enter your Raspberry Pi’s IP Address, it should connect and load a page like the one below.
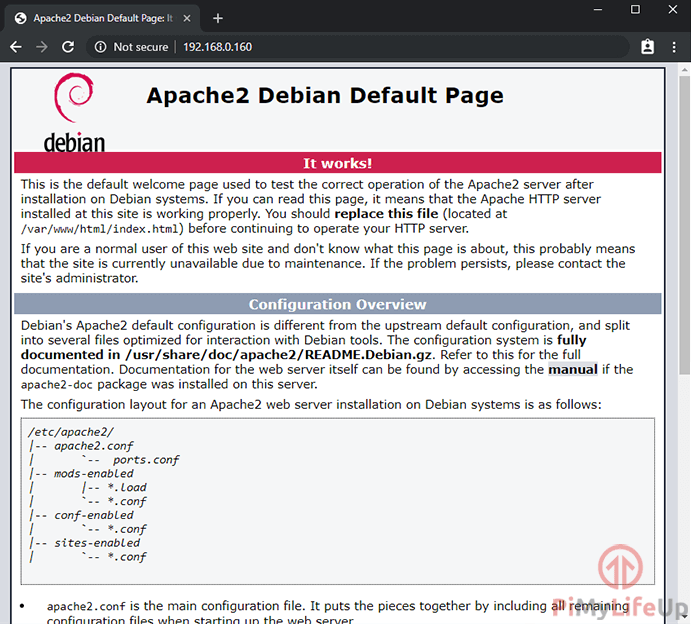
5. To be able to make changes to the files within the /var/www/html without using root we need to setup some permissions.
Firstly, we add the user $USER (our current user) to the www-data group, the default group for Apache2.
Secondly, we give ownership to all the files and folders in the /var/www/html directory to the www-data group.
sudo usermod -a -G www-data $USER
sudo chown -R -f www-data:www-data /var/www/html
sudo chmod -R 770 /var/www/htmlCopy
Once you have run that command, you will need to logout and then log back in for the changes to take effect. We recommend rebooting, as it will help ensure that you don’t run into issues.
sudo rebootCopy6. You can now make changes to the default web page by running the following command.
This command will use the nano text editor to modify the index.html file.
The web server will serve all files within the /var/www/html/ directory.
nano /var/www/html/index.htmlCopyApache is a basic web server and is great if you want to learn HTML, JS, or CSS.
However, if you are after PHP (Used for dynamic web pages) then continue to the next section of our Raspberry Pi Apache tutorial.
Setting up PHP for Apache
1. Please note that before you start this section, you should be running at least Raspberry Pi OS Bullseye. You can learn how to upgrade to Raspberry Pi OS Bullseye in our guide.
To start this section, we will need to go ahead and install PHP 8.2 and several other packages to our Raspberry Pi. The additional packages we are installing are ones that are commonly used by PHP applications.
Run the following command to install all the PHP packages to your Raspberry Pi.
sudo apt install php8.2 libapache2-mod-php8.2 php8.2-mbstring php8.2-mysql php8.2-curl php8.2-gd php8.2-zip -yCopyIf you run into a “package not found” error, please follow our guide that covers adding a third-party PHP repository. This repository should give you access to newer releases of PHP.
2. Now that PHP is installed to our Raspberry Pi, we can test it to make sure it’s working.
We don’t have to worry about modifying any configuration files as this is automatically done when Apache is detected.
We can test to see PHP is working by creating a PHP file within the /var/www/html/ directory. Creating a file in this directory will allow it to be processed and displayed when you open it in a web browser.
For our example, we will be creating a PHP file called example.php. We can create this file by issuing the following command.
nano /var/www/html/example.phpCopy3. In this file, we need to add the following lines on PHP code.
<?php
echo "Today's date is ".date('Y-m-d H:i:s');
The code above is just an incredibly simple PHP script that prints out today’s date retrieved using PHP’s date() function. It will be enough to tell us that PHP is, in fact, up and running.
4. Now save the file by pressing CTRL + X then pressing Y and hitting ENTER.
5. In your web browser, go to http://192.168.1.103/example.php.
Make sure you replace 192.168.1.103 with your Raspberry Pi’s IP Address.
Going to the following URL should display something like the following.
Today's date is 2019-06-28 21:30:45CopySetting up an Apache Virtual Host
Virtual hosts are an essential part of the way Apache works. Apache uses these Virtualhost files so that it knows how to handle an individual site.
Within this section, we will show you how to create a basic virtual host file on your Raspberry Pi Apache web server. Virtual hosts are Apache’s way of handling multiple websites with each Virtual Host file setting up and configuring a particular domain.
1. Begin by running the following command to create a basic virtual host file called example.com.conf within the /etc/apache2/sites-available folder.
If you plan on using this for an actual domain name, make sure you swap out example.com with the domain name.
sudo nano /etc/apache2/sites-available/example.com.confCopy2. Within this file, enter the following text.
We will explain each part of the virtual host file as we go along so you can have an idea on how to set up a very basic virtual host.
<VirtualHost *:80>CopyThis line designates the start of the virtual host and that this virtual host should listen on port 80.
For those who do not know port 80 is the default port for http. Likewise, the port utilized for https is 443.
ServerName example.com
ServerAlias www.example.comCopy
Here we add two directives to our virtual host. The first of these directives called ServerName designates the base domain. This server name is used to match the VirtualHost to a domain name.
The second directive, ServerAlias, defines additional domain names that will be matched as if they were the base domain name.
This directive is useful for matching additional names such as a www. subdomain.
DocumentRoot /var/www/example.com/public_htmlCopyThe DocumentRoot directive defines the directory where all the files will be served from by Apache.
ErrorLog ${APACHE_LOG_DIR}/example.com_error.log
CustomLog ${APACHE_LOG_DIR}/example.com_access.log combinedCopy
In these final two directives ErrorLog and CustomLog we specify the locations where we want that log files to be kept.
</VirtualHost>CopyFinally, we close off the VirtualHost section.
3. With everything complete, the code should end up looking like what we have below. Of course, using your domain name and not example.com.
<VirtualHost *:80>
      ServerName example.com
      ServerAlias www.example.com
      DocumentRoot /var/www/example.com/public_html
      ErrorLog ${APACHE_LOG_DIR}/example.com_error.log
      CustomLog ${APACHE_LOG_DIR}/example.com_access.log combined
</VirtualHost>Copy
Once done, save the file by pressing CTRL + X followed by Y then ENTER.
4. Let’s now create the folder where we will be storing our HTML files. We will take ownership of this folder for the www-data group as well.
Run the following command to create the folder we need and take ownership of it.
sudo mkdir -p /var/www/example.com/public_html
sudo chown -R www-data:www-data /var/www/example.com/public_html
sudo chmod -R 770 /var/www/example.com/public_htmlCopy
5. Now that we have created our VirtualHost and the folder for it, let’s go ahead and now activate it by running the following command.
This command creates a symlink for our config file between the /etc/apache2/sites-available/ and /etc/apache2/sites-enabled/ directories.
sudo a2ensite example.com.confCopy6. Finally, for our new virtual host file to be loaded in, we need to tell the Apache2 service to reload its configuration.
This can be done simply by running the command below.
sudo systemctl reload apache2CopyYou can now point a domain name server (DNS) to the Raspberry Pi’s public IP and have it serving files for the requested domain name. You will need to setup port forwarding to have this work correctly.
Conclusion
By now you should have the Apache web server running on your Raspberry Pi. You should also have a decent idea on how to setup PHP and virtual hosts on Apache.
If you have any feedback, questions, tips or anything else then please don’t hesitate to leave a comment below.


This setup worked perfectly on a Chromebook (Linux container) as well. Thanks!
Following your instructions made it very simple, Thanks.
Running this on a raspberry pi 2B for reference. At point 6 if fails the reload.
So I put in the command:
sudo systemctl status apache2.service
Got this in the result:
Process: 10380 ExecReload=/user/sbin/apachectl graceful (code=exited, status=1/FAILURE)
Any ideas?
Hi Ryan,
Sadly that part of the status isn’t helpful on telling why Apache failed to start on your Raspberry Pi.
There should be some additional text outputted when running that command, potentially it could contain the actual error that occurred for Apache2 to not launch.
If possible please provide more information about the issue you are running into.
Cheers,
Emmet
Great instructions but “How to Install the Apache Web Server on the Raspberry Pi” point 6 is wrong – you need to use sudo! Can you update please?
Hi Gez,
Thank you for the heads up, I have now corrected that part of the tutorial.
Cheers,
Emmet
Very quick installation, thanks to the very clear instructions.
Thanks
Gene
Best article I have read on this topic. As a senior citizen I enjoy/drive myself mad playing with computers. If I had found this earlier i would have enjoyed myself sooner.
A model of clarity for an old duffer
Is it possible to put WordPress on this installation
Hi John,
You can definitely use this installation to run WordPress on your Raspberry Pi.
In fact we even have a guide on doing just that.
Cheers,
Emmet
This is great! Clear, simple straight forward. I’m currently working through the port forwarding and Fail2Ban tutorials now.
It would be nice to see a full tutorial (or string of tutorials) on how to go from “Pi in a box” to “Hello world displayed on your public website”.
LOVE this website!
After entering the ownership commands and rebooting, I still can’t edit the “index.html” file without sudo.
Hi Erik,
That is correct, as we are giving ownership of files to the
www-datauser not thepiuser.Cheers,
Emmet
Great Tutorial
Is the double reference to php7.3-curl correct ?
Hi Peter,
Thanks for pointing that out! It’s not correct, so I have removed the second reference.
Hey, I need to thank you for giving this tutorial it really help me. But I have a problem, I couldn’t run the command “sudo apt install php7.3 php7.3-mbstring php7.3-mysql php7.3-curl php7.3-gd php7.3-curl php7.3-zip -y”. It’s said these information :
E: Unable to locate package php7.3
[SNIPPED]
Could you solve it ?
Best Regards,
Dewa
Hi Dewa,
Make sure that you are running Raspbian Buster or newer.
Cheers,
Emmet