Find out a few straightforward ways of getting your Raspberry Pi’s IP Address.

You will need the IP address of your Raspberry Pi for any task where you need to connect to the device remotely.
For example, you will use an IP address to connect using SSH or to view a web interface for a project like OctoPrint.
It is also possible to make your Pi use a static IP address, so you don’t have to worry about the IP your router will assign it.
In this guide, we will be showing you a couple of ways of finding out the IP address of your Raspberry Pi.
Equipment List
Here is a list of the equipment we recommend for this Raspberry Pi IP Address tutorial.
Recommended
Optional
We tested this tutorial using a Raspberry Pi 4 running Raspbian Buster. If you are running an older version of Raspbian, you can follow our guide to upgrade to Buster.
These steps should work on older versions of Raspbian as well as on other Linux like operating systems.
Finding the IP address on the Raspberry Pi
If you have physical access to your Raspberry Pi and have a display, then the process of finding your IP address is straightforward.
1. All you need to find out the IP address of your Raspberry Pi is to run the following command in the terminal.
hostname -IMake sure that the I is capitalized to retrieve the IP addresses for all hostnames. If you use a lowercase i you will be grabbing the hostname instead.
2. This command will return something similar to what we have shown below.
192.168.0.115You should now be able to connect to your Raspberry Pi using the IP address shown by the command.
Retrieving your Raspberry Pi’s IP Address from another device
If you want to obtain your Pi’s IP address from another device, things get a little bit more complicated.
There are a few different ways you can get the IP address, and we will be walking through a couple of them.
Router Devices List
One of the easiest ways of finding the IP address of your Raspberry Pi is to check your router’s device list.
1. Typically your router will sit on http://192.168.1.1. Browse to this address in your favorite web browser.
Some routers can use a different local address. You may need to search up your router on the internet to find the address to connect to.
2. You will now need to log in to your router. Enter your login details to proceed.
If you don’t know your login details, you will need to use an alternative method.
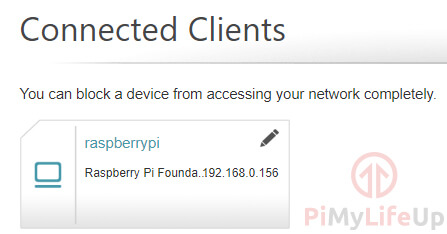
3. Once you are within your routers page, search for a list of connected devices.
4. You should eventually find a page that lists out all the devices connected to the router.
On this list, you should see a device using “raspberrypi” as its hostname.
Use the IP Address listed for that device.
Using the ping command
Next, if you don’t have access to your router you can try using the ping command.
Almost every system has access to the ping command within the terminal.
All we will be doing with this command is pinging a hostname to see if we can get a response with the IP address.
There is a big chance this won’t work, but it is easier to try than having to resort to nmap
We will be trying two different common hostnames for the Raspberry Pi.
If any of these commands work successfully, you should see the IP address of your Raspberry Pi appear in the response.
Use the following command to see if the raspberrypi hostname responds to the ping command.
ping raspberrypiThe Raspbian operating system uses this hostname.
If you are using the RetroPie operating system, we can try pinging the retropie hostname.
ping retropieIf neither of these returned an IP address, then we will have to result to using nmap to find the Pi’s IP.
Using a network mapper
If the ping command isn’t finding your Pi, it is also possible to make use of a network mapper to find it.
A network mapper works by scanning for other devices within a specific subnet.
For this section, we will be making use of the tool called nmap as it is available on Linux, Windows, and macOS.
1. The first step of this guide is to install nmap to your device.
Linux
With most Linux distributions such as Raspbian, installing nmap should be as simple as running the following command.
sudo apt install nmapWindows & macOS
You can obtain binaries for Windows and macOS systems by going directly to nmap’s download page.
Once you have installed nmap to your device, you can proceed with this guide.
2. Now to be able to use nmap, we need to find out what subnet our router is using.
Most networks are setup in a way that the subnet range is from 192.168.1.0 to 192.168.1.255.
To verify the set up of your network, you need to retrieve the local IP address of your current computer.
Linux
On Linux, retrieving your IP address is as simple as using the following command in the terminal.
hostname -IThis command will tell you the local IP address of your Pi.
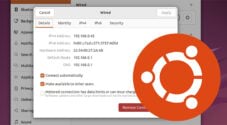
macOS
On a mac device go to “System Preferences“.
Then go to “Network.”
Within this page select the active network connection
Now click “View status of this connection” to see the IP address for your device.
Windows
On a Windows 10 device, go to “Windows Settings“.
Then click “Network & Internet“.
Within this menu, click “Change connection properties“.
Scroll down to the bottom of this page to find the “Properties” section.
You should see your devices IP address located next to “IPv4 address:“.
3. Now that we have the IP address of your current device, we can work out the subnet.
If your IP address is 192.168.1.45, for example, we know that the subnet range is 192.168.1.0/24
Just swap out the last number with 0/24 to get your subnet range. Using 0/24 is the equivalent to saying from 1 to 255.
4. Now with the subnet range in hand, we can go and run the nmap tool using the following command.
Make sure you swap out the subnet range with your own.
sudo nmap -sn 192.168.1.0/24By using the -sn flag, we are telling the nmap tool to ping every address on that subnet but do not scan for open ports.
5. From this command, you should start seeing the IP addresses of each device that responds to the ping.
pi@raspberrypi:~ $ sudo nmap -sn 192.168.0.0/24
Starting Nmap 7.70 ( https://nmap.org ) at 2019-12-31 05:01 GMT
Nmap scan report for dlinkrouter (192.168.0.1)
Host is up (0.00029s latency).
MAC Address: E4:6F:13:F6:50:28 (D-Link International)
Nmap scan report for 192.168.0.112
Host is up (2.2s latency).
MAC Address: B8:27:EB:EA:E0:D4 (Raspberry Pi Foundation)
Nmap scan report for 192.168.0.174
Host is up (0.00019s latency).
Nmap done: 256 IP addresses (8 hosts up) scanned in 4.20 seconds
Here you can see that the nmap tool found our Raspberry Pi.
MAC Address: B8:27:EB:EA:E0:D4 (Raspberry Pi Foundation)
Nmap scan report for 192.168.0.174
From this, we can see that the IP address for our Raspberry Pi is 192.168.0.174.
Hopefully, by now, you have a basic idea of how to find the IP Address of your Raspberry Pi.
If you have run into any issues while following this guide, feel free to drop a comment below.