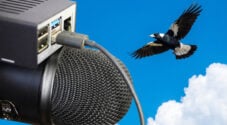
In this project, I will set up a Raspberry Pi security camera network using the motionEye software. You can use the standard Pi camera, such as the one I used in the time-lapse tutorial.
This project is a cost-effective way of getting a security camera network up and running. You can view the cameras over the network and have them record based on motion.
Remember, the Raspberry Pi isn’t a powerhouse, so performance will degrade if you try to do too much, such as adding too many high-definition cameras.
This tutorial previously used MotionEye OS, but as it is no longer maintained, we have updated it to use the underlying MotionEye software on the default Raspberry Pi OS.
If you want to use the Raspberry Pi camera, follow our webcam guide before starting this tutorial. The process is relatively simple but does require a bit of tweaking.
Other security camera software that is compatible with the Raspberry Pi and worth looking at is Frigate or ZoneMinder,
With all that said, motionEye still an excellent way of building an affordable camera network. So, let’s get to it.
Equipment
You will need the following equipment to complete this Raspberry Pi security camera project.
Recommended
- Raspberry Pi Amazon
- Raspberry Pi Camera Amazon or USB WebCam Amazon
- Power Supply Amazon
- Micro SD Card Amazon
- Ethernet Cable Amazon (Recommended) or Wi-Fi Amazon
Optional
- Raspberry Pi Case Amazon
This tutorial was last tested on the Raspberry Pi 5, running the latest version of Raspberry Pi OS Bookworm.
Installing MotionEye on the Raspberry Pi
For this tutorial, we will be installing motionEye on Raspberry Pi OS. I settled on using MotionEye as it is an all-in-one solution that fits my requirements, and it also didn’t involve as much fiddling around to get it to work.
It is best to install this software on a clean version of the Raspberry Pi OS. If you are installing on an existing operating system, you may run into conflicts with other software.
1. First, update the packages on the Raspberry Pi to the latest version by running the following commands.
sudo apt update
sudo apt upgradeCopy
2. First, we must install the required packages for the motionEye software to work. Enter the following command to install the packages.
sudo apt --no-install-recommends install ca-certificates curl python3 python3-dev libcurl4-openssl-dev gcc libssl-devCopy3. The Python package manager pip software should already be installed. You can check if pip is installed by entering the following command.
pip --versionCopyIf pip is installed, you should get a response like the one below.
pi@gusdevpi:~ $ pip --version
pip 23.0.1 from /usr/lib/python3/dist-packages/pip (python 3.11)Copy
If pip is not installed, you will see an error message. To install pip, run the command below.
sudo apt install python3-pip -yCopy4. Due to the requirements of MotionEye, you will need to update the settings to allow Python packages to be installed outside a virtual environment when using pip. You can read more about the pip external environment changes.
The command below will allow these packages to be installed without encountering the “Externally Managed Environment” error. Also, the command below will make the change systemwide as motionEye requires it.
sudo python3 -m pip config set global.break-system-packages trueCopy5. Prepare MotionEye for installation by running the following Python command.
sudo python3 -m pip install --pre motioneyeCopyYou will see warnings about not using a virtual environment. You can safely ignore these warnings. If you see an error about mismatching hashes, run sudo apt update and sudo apt upgrade and try running the command again.
6. The installation process will take a while.
Once done, enter the following command to install and start MotionEye.
sudo motioneye_initCopy7. You can now check to see if motionEye successfully started by running the following command.
systemctl status motioneyeCopyYou should see some output indicating the service is active and running without errors.
8. Now get the IP of the Raspberry Pi so you can access the web interface of motionEye. To do this, use the hostname command.
hostname -ICopyConfiguring MotionEye on the Raspberry Pi
Now we are ready to configure the software and connect to our cameras. We will need to communicate to the Raspberry Pi over the network rather than directly as I have done in most of the previous tutorials.
Logging into motionEye
1. First, we will need the IP of the Raspberry Pi. Once you have the IP, enter it into your favorite web browser. You will need to use the port 8765.
For example, I access my instance using the following IP.
http://192.168.0.16:8765/Copy2. You should be greeted with a login page. The username is admin, and the password is blank. The password should be updated once you have logged into the admin.
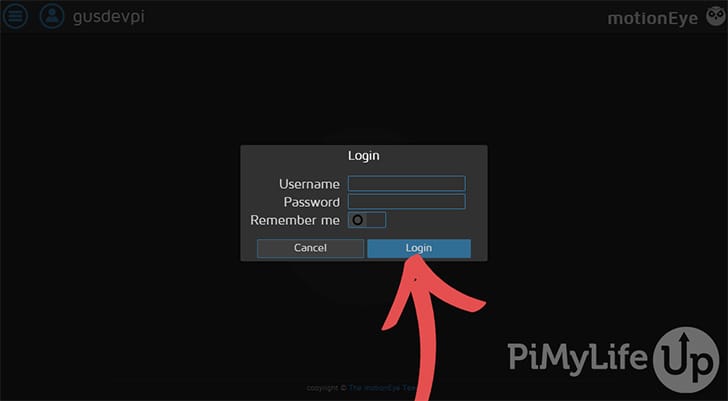
3. Once logged in, you can access all the settings for the camera streams. If you want to alter these settings, keep reading, and I will explain them as much as possible below. Now, we should have a working security hub that we can configure.
How to Set Up Multiple Network Security Cameras
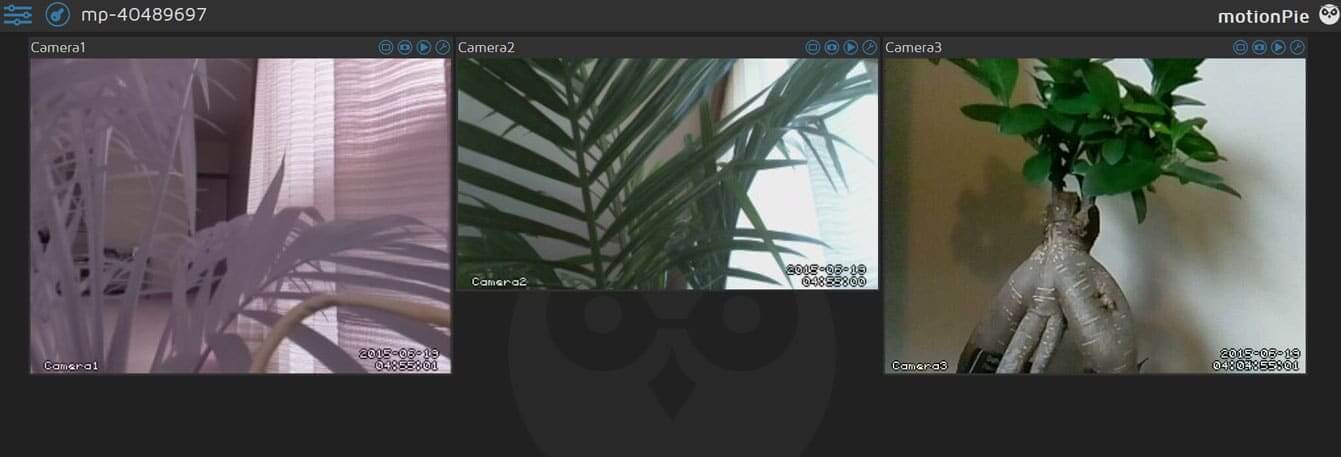
In this section, we go through how to set up multiple cameras within motionEye. You can view all the camera feeds within a single web interface.
You can even add a stream that has been set up using the Raspberry Pi Webcam server tutorial.
1. First, click on the three vertical lines in the upper left-hand corner.
2. Under the general settings tab, you can update the password to something more secure. Once you update the password, you will need to log in again with the new details.
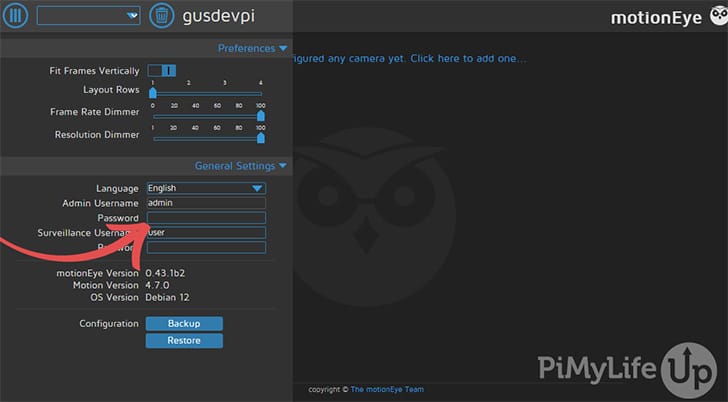
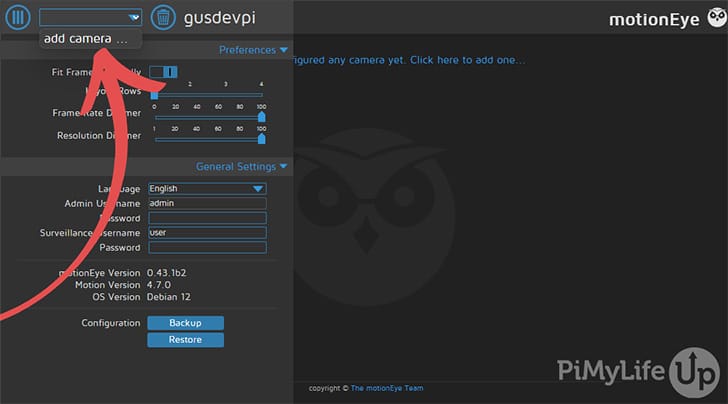
3. Click the three lines in the top left-hand corner of the screen to open the settings.
Next, in the top left-hand corner, click the drop-down box and select “add camera“.
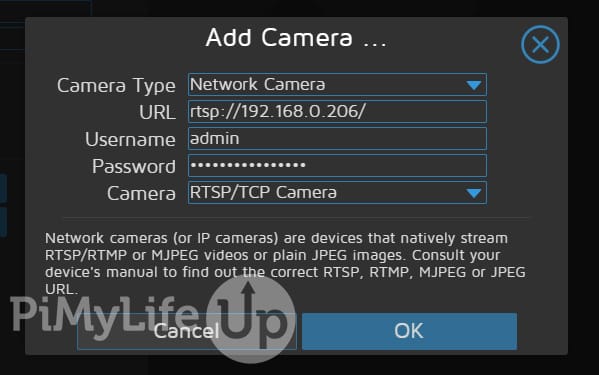
4. In the pop-up, you have five settings to configure.
- Camera Type: This allows you to select the camera type you wish to connect.
- URL: This is the URL to the other network camera. E.g.
http://othercamera:8080 - Username: This is the username of the camera device. If no username/password is required, then leave the fields blank.
- Password: This is the password for the username chosen above.
- Camera: Select the camera you wish to add.
Below is an example of adding a Reolink network camera with RTSP enabled.
In the example below, camera1 (Pi Camera) and camera2 (USB WebCam) are connected to the Raspberry Pi running MotionEye. At the same time, camera3 comes from a different Raspberry Pi set up using our webcam server tutorial.
This method is great for setting up a strong Raspberry Pi security camera network.
Configuring the Settings in MotionEye
You can configure a vast range of settings within MotionEye. I will briefly go through them in this section.
General Settings
You can set the administrator username and password in the general settings tab. This account will have access to all the settings you see at the moment.
A surveillance username and password can be set in here. This can be used to access the camera interface.
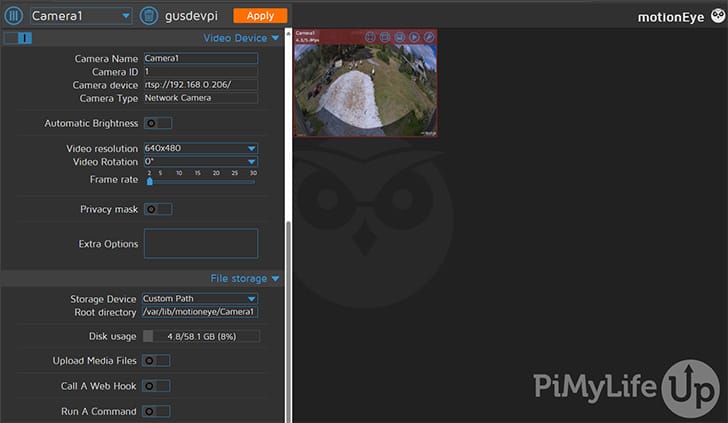
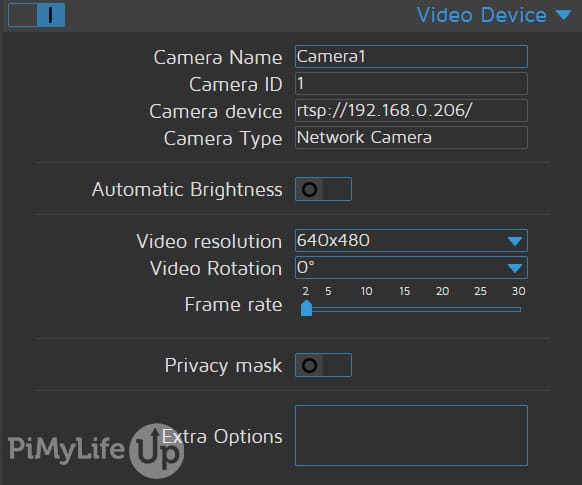
Video Device
Under this menu, you are able to set certain settings regarding the cameras.
- Camera Name: Set this to whatever you want the camera to be named. For example, the name kitchen would work well for a camera in a kitchen.
- Camera Device: You’re unable to edit this one, but this is the device name of the camera.
- Automatic Brightness: This will enable automatic software brightness, which means the software will adjust for the brightness. You do not need to activate this if your camera already handles it. In here, you change the brightness, contrast, and saturation of the camera’s video.
- Video Resolution: Here, you can set the camera’s video resolution. The higher the resolution, the more room it will take up and the more bandwidth it will need to use to stream the footage. I set mine to 1280×800, and that seems to work perfectly fine.
- Video Rotation: You can rotate your video if it faces the wrong way.
- Frame Rate: This sets the number of frames that will be sent every second. The higher this is, the smoother the video, but again, this will increase the storage and bandwidth used.
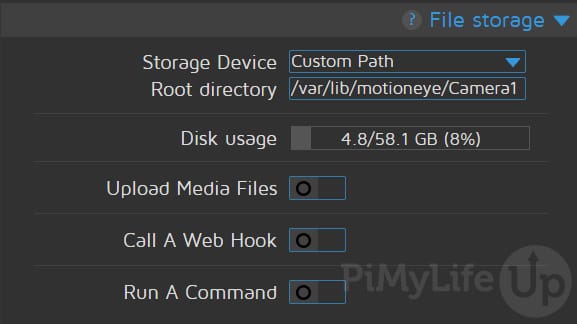
File Storage
Under this menu, you can specify where you would like the files stored for the Raspberry Pi security camera network.
This location can be a custom path on the Pi, the predetermined path, or the network path.
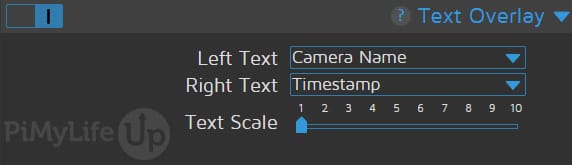
Text Overlay
Within the text overlay tab, you can set the text overlay on the camera’s output.
By default, the left text displays the camera name, and the right text displays the time stamp (Today’s date and current time).
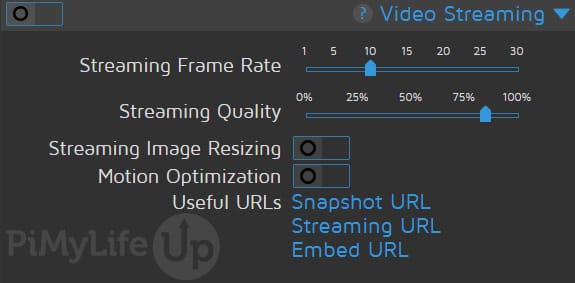
Video Streaming
In this menu, you can set the video streaming options. This is the video stream you see in the browser.
- Streaming Frame Rate: This is the same as mentioned above under video device.
- Streaming Quality: This setting is good to reduce if you need to access the camera on a low bandwidth device often.
- Streaming Image Resizing: Enable this if you want MotionEye to resize the images before sending them to a browser.
- Streaming Port: This is the port that the device will listen to for connections looking to view the stream. Eg.
http://192.168.0.16:8081 - Authentication mode
- Motion Optimization: This will reduce the frame rate whenever no motion is detected. This setting will save you bandwidth.
You can also see three URLs that can be used to access different footage.
These URLs are very important if you have multiple cameras per Pi as each camera will have a unique port that you listen to the stream.
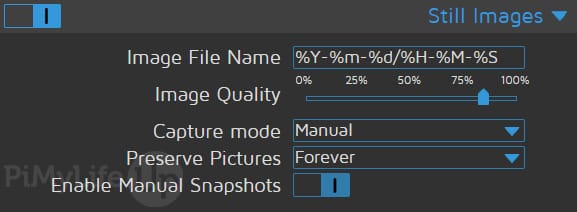
Still Images
In this tab, you can set the Raspberry Pi security camera network to take still images whenever motion is triggered, during specific intervals, or all the time.
Movies
Within this section, you can set the software to record movies whenever motion is detected. There are several settings you can change, such as the movie quality, file name, and more.

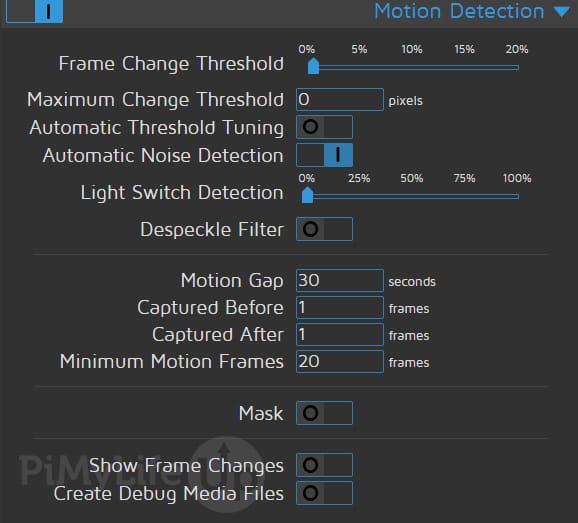
Motion Detection
In here, you can activate the security camera motion detection that is included in the software.
You can make adjustments to the settings here to get better motion detection.
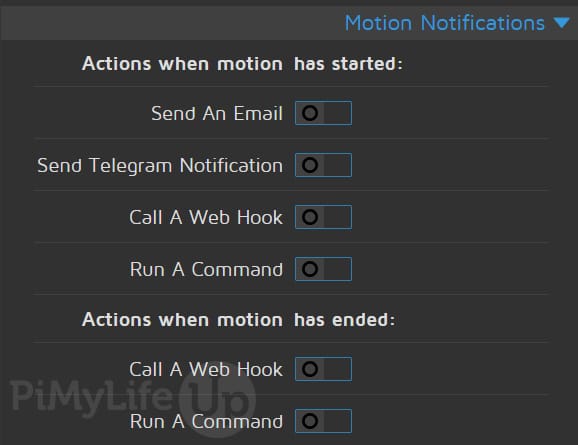
Motion Notifications
You can set up email notifications, webhook notifications, or even run a command whenever motion is detected.
This option will notify you whenever activity is detected on the cameras, perfect if they are monitoring areas with low traffic.
Working Schedule
Here, you can set the days and the hours of operation you would like the system to be monitoring (If you leave this off, then it is 24/7).
This option is perfect if you only need it running during specific hours.

Connecting to the Surveillance Outside Your Network
Now that you have your Raspberry Pi security cameras set up it might be worth considering allowing access to the central Pi so you can monitor your cameras elsewhere.
To do this, head over to our guide on how to set up port forwarding and dynamic DNS. You can find the guide at Raspberry Pi Dynamic DNS & Port Forwarding.
You will need some important information to set up the port forwarding.
- The IP of your Raspberry Pi. For example, mine is
192.168.0.16 - The internal port is
8765.
Ensure you also have set up passwords on both the admin and the surveillance user to help avoid unwanted visitors.
Once set up, you should now be able to connect using your external IP address such as XXX.XXX.XXX.XXX:8765.
Summary
The Raspberry Pi security camera system is a great way to have multiple cameras hooked up locally and over a network.
All the extra settings MotionEye provides allow you to have a strong functioning security hub for your home, office, or wherever you are setting this up.
I hope this tutorial has helped you in creating a fantastic Raspberry Pi security camera network.
If you have had any problems, want to provide feedback, or have a great setup you would like to share, please feel free to comment below.
If you’re after more great Raspberry Pi projects, check out many other great tutorials.

Brilliant software! Just one request – could you extend the Frame Change Threshold to considerably more than 20 per cent? I use a telephoto lens with a circular field of view so don’t use all the rectangle’s pixels. This makes 20% not enough for motion detection.
Thanks – keep up the good work.
I’m getting rainbow screen after deploying the ISO. I have a raspberry pi B+ model. Image which I downloaded is motionpie-raspberrypi2-20150719.img.gz.
I have already tried options [boot_delay=1] but no luck.
Can anyone help?
You need to load the Pi image not the Pi B+
I have some problems with the motion notifications. I have tried to make it send gmail notifications but when I check my gmail there is not any.
Any suggestions?
Hi, I have little problem, that I want so save picture every 5 second. I set everything how it should be but it is resaving same file again and again. Why it is not doing new copy with another name like photo, photo(1), photo(2). Thanks, BTW your site is great, thanks fot projects that you are making!
Stymied at the first hurdle – github is down – so can’t get the motion pi image, please suggest a mirror
Seems to be working.
https://github.com/ccrisan/motionPie/releases
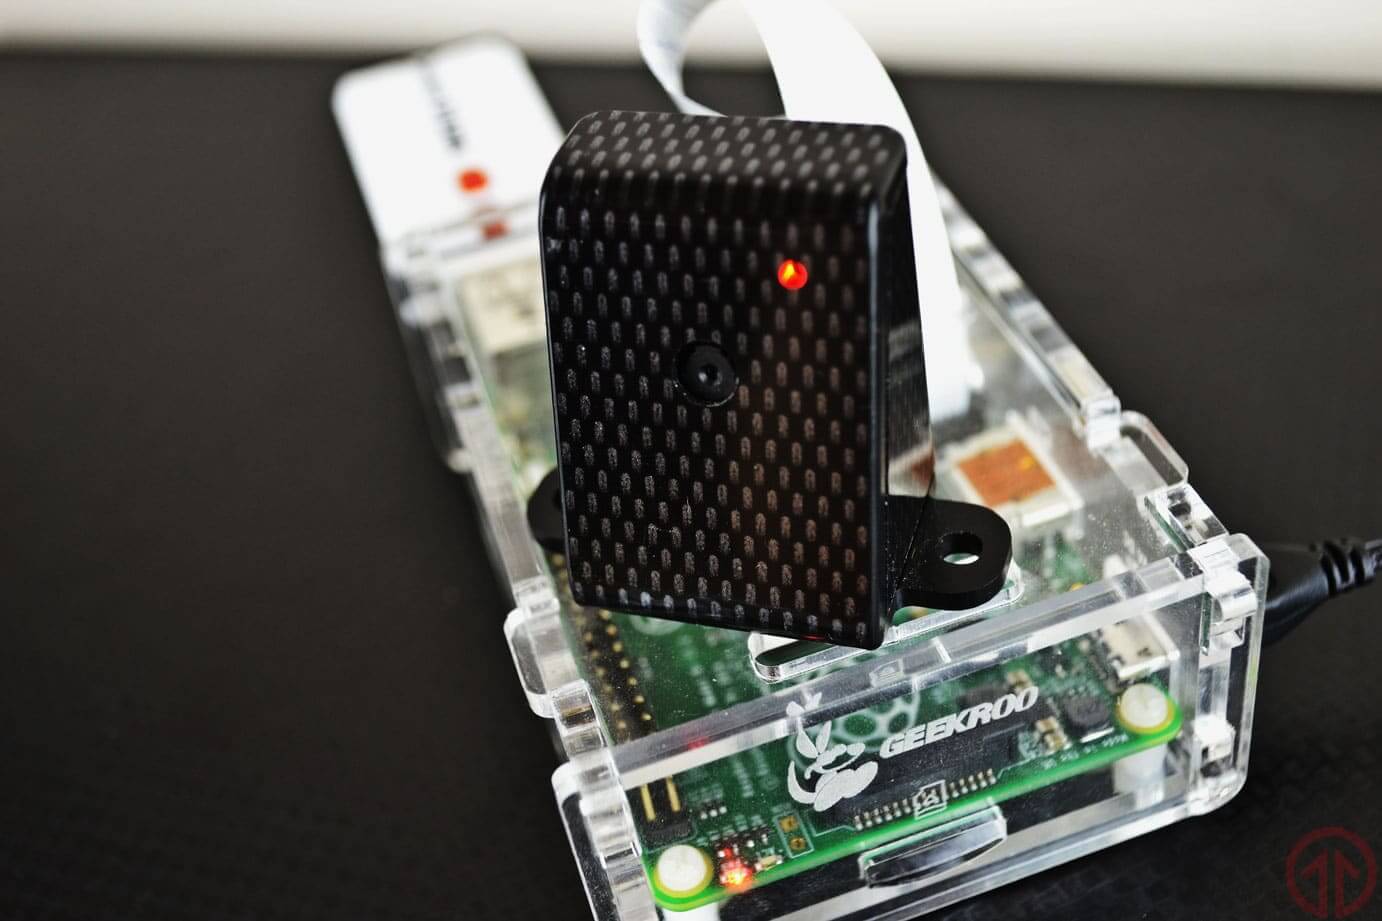
What is the case for the RPI Camera that is featured in the main photo. It looks like a great case. Whats the name/where can it be bought? Or are there STL files for 3D printing for it? The only one I have found is http://www.thingiverse.com/thing:792444 for use with: http://tindie.com/products/freto/pi-camera-hdmi-cable-extension/
Russell I have used several cases from Built To Spec the link is: http://builttospecstore.storenvy.com/collections/13701-all-products/products/10957125-raspberry-pi-b-2-camera-case.
These cases will fit the Pi camera and your Pi neatly in the same case.
Hope this helps.
Danny
How big SD card can I use?
Im using 32GB, need more space for video etc.
Will a 64GB work? Or even larger?
Regards
Bjorn
Really having a hard time with this…. My OS for setting all of this up is Windows 7 X64
Using build 20150719
Am downloading motionpie-raspberrypi-20150719.img.gz
Renaming it to motionpie-raspberrypi-20150719.img
Format the SD card using the SD card tool
Install the image using Win32DiskImager
So the Pi i’m using is the Model B with 512MB. The early rev 2. I got 4 of them spare so might as well put them to good use.
Power up and nothing happens. I’ve tried the image again and again, new downloads. With and without the .gz nothing.
Any ideas at all?
Hi please help
Ive followed your instructions and get as far as installing camera. When I add my URL for my IP camera it leaves the red exclmation mark in, as if its not recognized. It is a wansvew ( Foscam copy ) camera. If I use the URL in my browser it connects without issue.
What do you think could be wrong?
You need to unzip the file first. The extension *.gz is a Linux zipped file (gnu-zip). If you are using Windows then you can download 7-Zip which can unzip the *.gz file, once unzipped/uncompressed the file will have the *.img extension (image file). You can then write the *.img file to the SD card with Win32DiskImager. That should get you working.
Hi,
This is great, I’ve been trying RPI CAM Web for a while but this will better suit my needs.
I have a few questions.
After setting up the still images are not uploaded to a network share.
Uploading the files with SCP is successful and it looks like motion is not detecting.
With kind regards,
Yrbo
Just installed the most current build on a pi2
I noticed that the file system on my image is set to read only. As a result I can not edit config.txt, even though i am logged in as root.
Can anyone help me to make the file system read/writeable
Hello,
First I’d like to thank you for share this tutorial with us.
Secondly, I have a doubt and I need your advice, please.
I’m trying to build a ROV – Remoted Underwater Operated Vehicle – and I intend build a CCTV system on it. Well, searching a solution for this I bumped into this tutorial and I strongly start to think using a Raspberry Pi 2 to help me in this adventure.
Just to clarify, the ROV CCTV system will help me in navegation and operation underwater and it’s extremely necessary that the Pi handles at least 4 cameras constantly recording videos keeping them at 30 FPS and sending it over ethernet through a 20m cable to the surface where there’ll be a camputer comunicating with Pi using this MotionPi to get the cameras visualization.
As a said the enviroment requires a good frame rate, without any possible delay between what happens in real and what appears on monitor.
Considering all mentioned, my questions is: Can I accomplish that with Raspberry Pi 2 and good IP or USB cameras?
Best regards!
I’ve tried a few other images and this is by far my favorite! Great write up and fantastic job on software. One question, is there a way to control the red light that turns on when the camera is powered up?
Hi Micah,
You can disable the RED led on the PI camera by opening the following file:
sudo nano /boot/config.txtThen adding the following line into it.
disable_camera_led=1When i use”sudo nano /boot/config.txt
i get a message that sudo isn’t installed.
How can i install sudo?
Or how can i ssh ad root in motionpie?
I had a similar question. Perhaps the author has made the system more robust by making the partition mounted on /boot be read-only, because although I was able to ssh in as root (or even just use the console, with a keyboard and monitor attached to my Raspberry Pi 3), I couldn’t edit the file because the filesystem had been mounted read-only. That’s a good thing, but it made editing the file a little trickier. In the version of the software that I have, and in my configuration, there is no password on root or admin at the moment. To get around the read-only /boot/config.txt , I remounted the /boot partition as read/write. Below is a record showing what I did. I found out the name of the device that is mounted on /boot. I then remounted that partition read/write (with the same mount point), used sed to edit the file (you can use nano or vi, or just copy my sed command), remounted it as read-only, and rebooted. The remount as read-only is not necessary, as it will revert to what /etc/fstab specifies on reboot.
```

Script started on Tue Mar 29 23:32:22 2016

hbash-3.2$ ssh 10.11.12.166 -l root

Welcome to meye-467ecdf3!

[root@meye-467ecdf3 ~]# mount | grep boot

/dev/mmcblk0p1 on /boot type vfat (ro,relatime,fmask=0022,dmask=0022,codepage=437,iocharset=ascii,shortname=mixed,errors=remount-ro)

[root@meye-467ecdf3 ~]# mount -o remount,rw /dev/mmcblk0p1 /boot

[root@meye-467ecdf3 ~]# grep led /boot/config.txt

disable_camera_led=0

[root@meye-467ecdf3 ~]# sed -i "s/disable_camera_led=0/disable_camera_led=1/" /boot/config.txt

[root@meye-467ecdf3 ~]# grep led /boot/config.txt

disable_camera_led=1

[root@meye-467ecdf3 ~]# mount -o remount,ro /dev/mmcblk0p1 /boot

[root@meye-467ecdf3 ~]# exit

logout

Connection to 10.11.12.166 closed.

bash-3.2$ exit

exit
Script done on Tue Mar 29 23:50:47 2016
```
This is an awesome project. thanks for sharing.
How many cameras can Pi support. Just wondering if I can have one Pi running 3 or 4 USB cams? or even use a usb video input receiver and hook up regular security cams to it? can this setup handle such a configuration?
I want to create several “IP” cameras using this tutorial. With one of them being the “server”. But my main question is what did you use to secure the Raspberry Pi Camera?
Guy,
Nice project.
But would it also be possible to let move the cam.
User admin but when I hit enter for password it fails. I tried to type blank also but still failed to continue I am using pi2
following above comments I used the last portion of the devices ID for the password which gave me a reply [root@mp-ab72f34c ~]#
I need some suggestions on how to get the program to run properaly thanks
First up mr PIMYLIFEUP. thank you so much for the awesome Raspberry pi cctv system. it is just off the rail, and have now introduced it to my friends and family in south Africa and Canada, who is going to set theirs up as well. they are truly amazed.
I am running two pi’s, a B with a web cam, and a B+ with a pi cam module.
Its so easy to ad the second pi on the first pi’s stream. IE view two pi feeds on once window. awesome.
I am a total noob at the pi stuff so like things that i can just drop into place and they work.
I have an idea/request if your looking for anything to do next.
with Halloween coming up I was looking for a way to use the pi as a scare controller.
I once came across a similar thing called the HAUNTBOX. It is a simple device where you can just set inputs and outputs and drop in mp3 sound files etc.
any chance you could looking into, or put together something like this?
https://www.youtube.com/watch?v=iEx8xT4j3B4
anyway thanks again for your tutorials and every things els surely makes a noob like me feel like a master.
regards
is it possible to Add PTZ on this camera .
Example!
4 pins can be out and we can take output for our servo motors , on page we can click buttons and turn webcam around ,
Or can we use ssh for get output for our servo motors ?
And your Project are amazing 🙂 I didn’t know the pi are useful like this .
Thank you for all .
Awesome tutorial! Quick question. Is it easy to trigger some sort of noise/alarm off of the motion that motionpie detects? In an ideal world, I’d like it to occur simultaneously, so that images are stored, and those on the premises are alerted to any movement as well.
Hi Gus,
Just a quick question. Been having recent issues with my setup. Every time I log on to MotionPie I can see all the camera views and then the views are replaced with the “no camera” picture. I have also noticed that some times the camera view comes back and then goes away. Any suggestions as to what might be causing this? I notice the same scenario whether I am using the site on IE or Firefox or even on my phone.
Thanks,
Danny