This Raspberry Pi project will show you how to install the digital signage software called Screenly OSE.
Screenly OSE (Open Source Edition) is a digital signage software that has been built to make the most of the Raspberry Pi’s limited hardware.
This software package allows you to easily manage and display webpages, videos, images, and more.
For every asset you add to your screen, you can specify the dates you want it to run on and how long you want it displayed on your screen.
All of these settings are easily configurable through Screenly’s simple web interface.
The Raspberry Pi is one of the best digital signage devices thanks to its decent specs and low power usage. Screenly is an excellent alternative to a Raspberry Pi kiosk if you want to display images or movies on to a screen.
Please note that this is the free, open-source edition of Screenly, not the paid Screenly Pro.
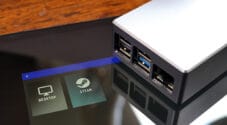
Equipment List
Below you can check out the equipment we used in this Raspberry Pi project to set up Screenly.
Recommended
- Raspberry Pi Amazon
- Micro SD Card Amazon
- Ethernet Cable Amazon or Wi-Fi Amazon
- Power Supply Amazon
- HDMI Cable Amazon
Optional
We tested this guide on a Raspberry Pi 4 running the Lite edition of Raspberry Pi OS Buster.
Installing Screenly to your Raspberry Pi
In this section, we will walk you through the straightforward steps to installing Screenly OSE to your Raspberry Pi.
We recommend that you use the lite edition of the Raspberry Pi OS. The reason for this is that you don’t need the full operating system GUI, as you will be using a web interface to manage Screenly.
Before proceeding, we recommend that you look into enabling SSH on your Raspberry Pi so that you can remotely manage your device easier.
1. Before we install Screenly, we need to make sure our operating system is up to date.
Updating your Pi’s operating system is a straightforward process and requires you to enter the following two commands.
sudo apt update
sudo apt full-upgrade
2. The Screenly OSE team has made the installation process relatively simple by providing a script that handles everything for us.
To run this script, we can run the following command.
bash <(curl -sL https://www.screenly.io/install-ose.sh)This command will download the install script from the Screenly website and pass it directly to bash
Typically, you should avoid running scripts from a website without verifying its contents.
You can verify the contents of this script by going to the URL mentioned in the command above.
3. During installation, you will be asked a series of questions.
The first of these is whether you want to continue. You will be warned that the standard desktop environment, if available, will no longer work after installation.
Type Y to continue with the Screenly installation process on your Raspberry Pi.
      / ___/_____________  ___  ____  / /_  __   / __ \/ ___// ____/
      \__ \/ ___/ ___/ _ \/ _ \/ __ \/ / / / /  / / / /\__ \/ __/
     ___/ / /__/ /  /  __/  __/ / / / / /_/ /  / /_/ /___/ / /___
    /____/\___/_/   \___/\___/_/ /_/_/\__, /   \____//____/_____/
                                     /____/
Screenly OSE requires a dedicated Raspberry Pi / SD card.
You will not be able to use the regular desktop environment once installed.

Do you still want to continue? (y/N)
4. Next, you will be asked if you want to use the experimental branch of Screenly.
Typically, experimental features will be unstable. Unless you know why you are choosing experimental, type in N to continue.
Would you like to use the experimental branch? It contains the last major changes, such as the new browser and migrating to Docker (y/N)5. This question asks if you want to use the latest code from the master branch.
While the latest non-experimental code, this branch can be potentially unstable as it’s code isn’t as tested.
However, for this Raspberry Pi project, we will be using the latest master branch. The reason for this is that we ran into issues with the standard branch when running it on the Raspberry Pi.
Type in Y then press the ENTER key to continue.
Would you like to use the development (master) branch? You will get the latest features, but things may break. (y/N)6. You will now be asked if you want to install the WoTT agent to your device.
WoTT is a security management tool that can be used to manage your credentials for Screenly.
Unless you have already set up WoTT and know how to use it, type in N to continue.
Would you like to install the WoTT agent to help you manage security of your Raspberry Pi? (y/N)7. Next, you will be asked if you want Screenly to manage your Raspberry Pi’s network.
It is recommended that you enable this as it allows you to manage your network through Screenly’s web interface. Type in Y to continue with the installation process.
Do you want Screenly to manage your network? This is recommended for most users because this adds features to manage your network. (Y/n)8. Finally, you will be asked if you want to perform a full system upgrade.
As we updated our operating system in step 1 of this guide, we can skip this by typing in N.
Would you like to perform a full system upgrade as well? (y/N)9. Screenly will now be installed on your Raspberry Pi.
On older Raspberry Pi’s, the installation process can take over an hour.
10. Before the setup of Screenly is completed, you will be required to change the pi user’s password.
First, enter the current password for your pi user. By default, this password should be “raspberry“.
You will then need to enter the new password twice. Make sure whatever password you set is something secure.
Current password:
New password:
Retype new password:
11. Finally, you will be asked to restart your Raspberry Pi to complete the installation of Screenly.
To this question, you need to type in Y then press ENTER.
You need to reboot the system for the installation to complete. Would you like to reboot now? (y/N)You may have to enter the new password you set for the pi user.
Accessing the Screenly Web interface
Now that we have installed Screenly to our Raspberry Pi, we can now access its web interface.
This web interface is what will allow you to configure your digital signage with relative ease.
1. To access the Screenly web interface, you need to know your Raspberry Pi’s local IP Address.
The easiest way to retrieve this is by using the “hostname -I” command on the device.
2. With the IP address in hand, go to it in your favorite web browser.
For example, with an IP address of “192.168.0.115“, we would go to the following URL.
http://192.168.0.1153. Once you go to that address, you will be greeted by the Screenly OSE interface.
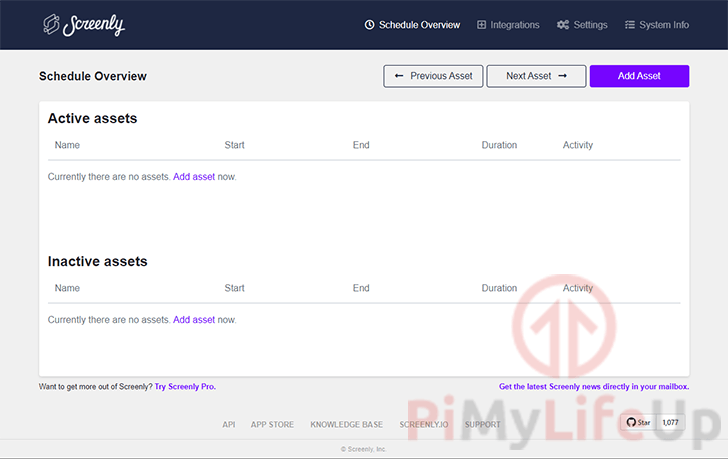
You will soon see how easy it is to use this interface to add assets to display on your signage.
Adding an Asset to your Raspberry Pi Digital Signage
Thanks to Screenly’s web interface, adding an asset to display is a straightforward process.
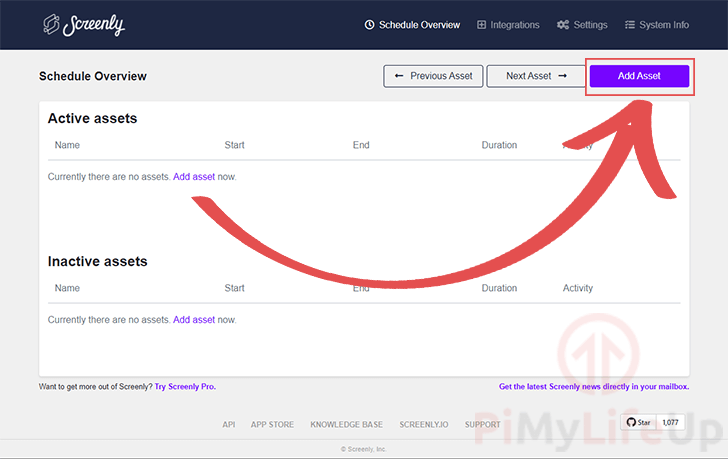
1. While on the homepage of the Screenly OSE web interface, click the “Add Asset” button.
Clicking the button will bring up a dialog that will allow us to add assets to our Raspberry Pi to display.
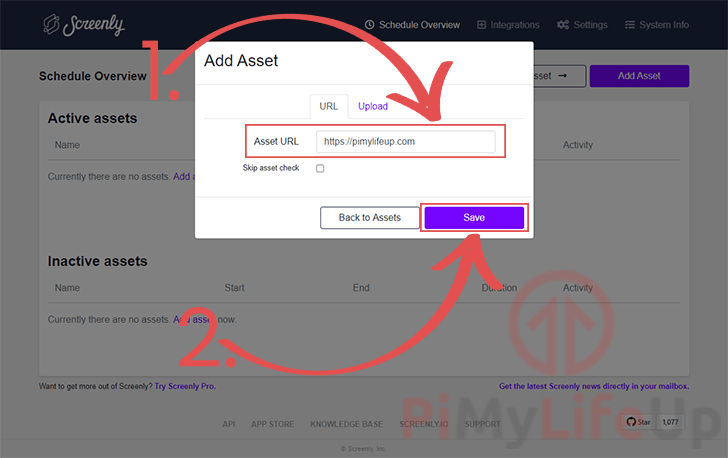
2. With the add asset dialog now on the screen, there are two ways we use it.
Screenly gives you two separate ways of adding assets to its schedule.
The first is adding a URL asset. This URL can be a media file or a webpage.
Screenly will stream assets from the provided URL, so make sure you have a reliable internet connection when using this feature.
The second way allows you to upload a file directly to Screenly. Screenly will automatically verify what filetype
Adding a URL Asset
When adding a source as a URL (1.), Screenly will try to automatically check what type of asset it is and handle it correctly.
You can use this method to link to images, webpages, or video files.
Once you have entered a URL, you will need to click the “Save” button (2.).
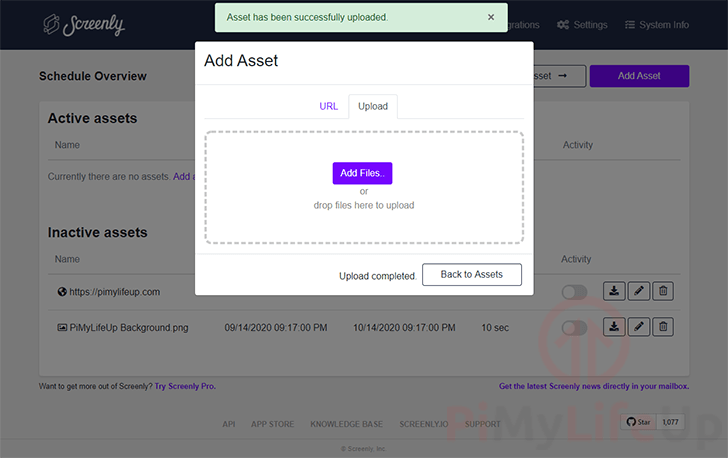
Uploading an Asset
Additionally, you can upload files to your Raspberry Pi itself to display. This feature is useful if you will not have internet access from your device or don’t want the assets publicly available.
To upload a file, you can either drag and drop it onto the provided area or click the “Add Files...” button.
When a file is uploaded, it will automatically be analyzed and added as an available asset.
Editing an Asset within Screenly
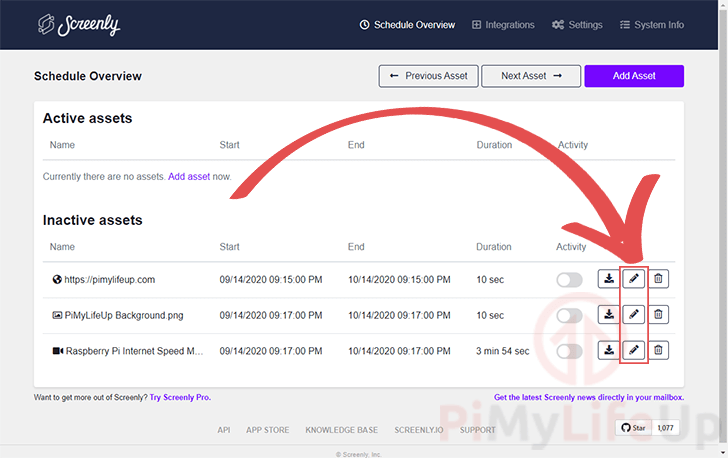
1. Once you have added some assets, they will appear within your schedule overview.
You can edit your assets by clicking the little pencil icon button next to them.
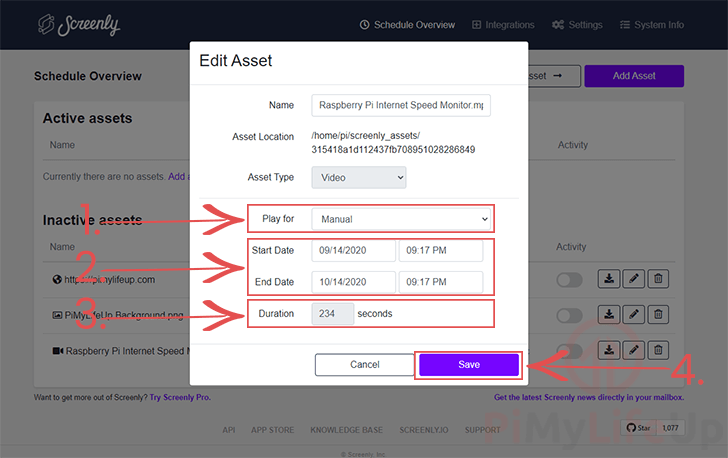
2. Within the asset editor, you can adjust how long you want the asset to be played before moving on to the next one.
To control when an asset is displayed can use a preset option by using the “Play for” dropdown (1.)
This dropdown allows you to select presets such as 1 week, 1 month, 1 year, or forever.
Alternatively, you can manually select the start and end dates for the asset. The asset will only be displayed on your Raspberry Pi’s signage during the specified dates and time. (2.)
Finally, you can select how long you want that asset to be displayed on the screen. (3.) If this asset is a video, the duration will automatically be set to the video’s length.
Once you have made your changes, you can confirm them by clicking the “Save” button (4.).
Activating an Asset using Screenly
1. Before the Screenly software can start displaying stuff to your Raspberry Pi’s screen, you will need to turn your assets on.
Toggling your assets on is a relatively simple process. Next to each asset, you should notice a toggle.
To activate an asset, click the toggle. When activated, it should move to the top of the screen and turn green.
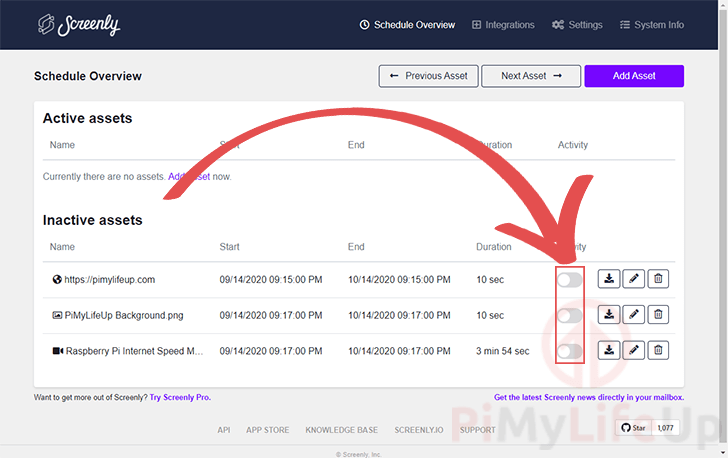
2. At this point, you should now have successfully added some assets to your Screenly signage.
They will automatically be displayed on your connected screen within the specified start and end dates.
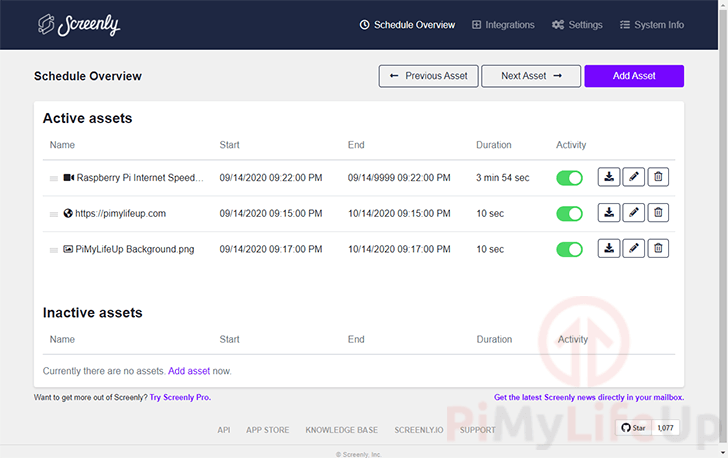
If you ever want to disable an asset, all you need to do is click the toggle again.
Please note that the asset will not disappear immediately. You will have to wait for the duration to pass before it stops showing.
Configuring Screenly on your Raspberry Pi
Configuring the Screenly software on your Raspberry Pi is made quite simple through the web interface.
Using this, we can control what audio outputs we are using and adjust the durations assets are displayed as well as some other options.
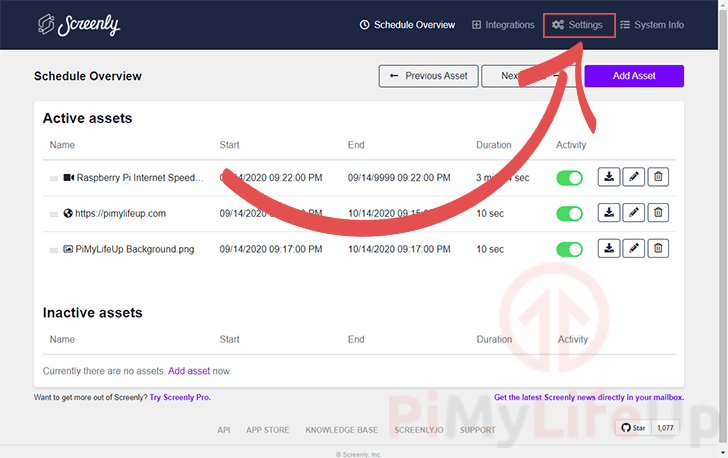
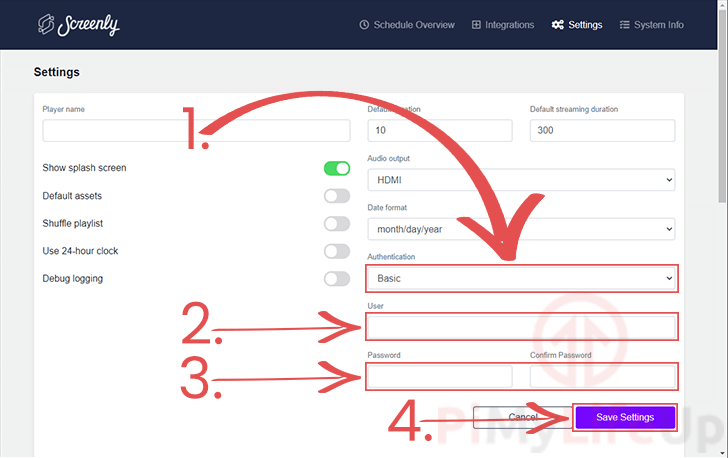
1. Getting to the settings page is simple.
In the main menu bar at the top of the website, click the “Settings” option.
2. On this page, you will find many options. We will split this into two sections so we can explain the options better.
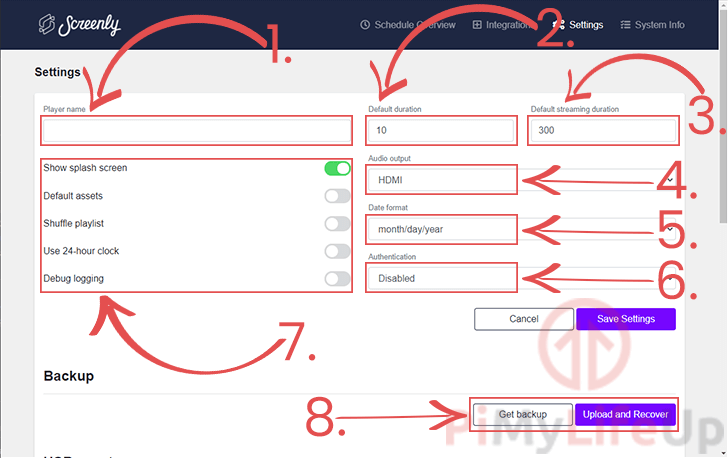
1. You can use the “Player name” option to define a name for your current Raspberry Pi running Screenly.
2. You can use this option to adjust the default duration for non-video assets.
This number is measured in seconds, with the default being 10 seconds.
3. The default streaming duration is the time in seconds that a video should be streamed for
Typically, Screenly will automatically try and determine the length of a video.
4. You can use this configuration page to control the “Audio output” device.
By default, this will be set to the HDMI cable. However, you can change this to the 3.5mm jack with ease using this option.
5. Setting the date format can be very useful as countries can differ substantially in their standards.
For example, the default is “month/day/year“, but here in Australia, we use “day/month/year“.
6. Using the “Authentication” option, you can lockdown your Screenly web administrator screen.
The only available option for this is to enable “Basic” authentication.
7. In this section, we highlight a bunch of options that you can easily toggle on and off.
The two most useful options here will be disabling the splash screen or shuffling the playlist.
You will only need to enable the debug mode if you run into issues with the Screenly software on your Raspberry Pi.
8. Finally, in this section, you can easily use Screenly to generate a backup of all your assets and settings.
Use the “Get backup” button to download a backup of your settings. The “Upload and Recover” button is used to upload your backup back to the server.
3. If you scroll down further, you will find a few more features that you can utilize within the settings page.
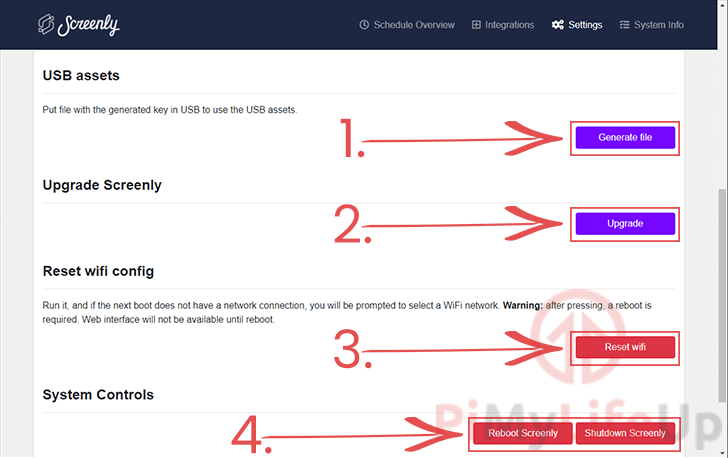
1. The “USB assets” feature allows you to load assets from a USB device.
For Screenly to load in files from your USB, it will need to find the file generated by this option.
Screenly will not load any assets from a USB if it cannot find the provided file. This is to stop people from placing a random USB into the device and loading up malicious assets.
2. It is possible to upgrade Screenly and your underlying Raspberry Pi’s operating system with ease.
Within this interface, click the “Upgrade” button and follow the prompts.
3. If you are having issues with your Wi-Fi, you can utilize the settings page to wipe the config settings.
Upon rebooting, you will need to physically interact with your Pi to select the Wi-Fi network you want to connect to.
4. Finally, the last two buttons available are the system controls.
Using these buttons, you can reboot or shut down your Raspberry Pi with ease.
4. You should now understand how to use the Screenly web interface to configure your digital signage on your Raspberry Pi.
Before you finish setting up your Raspberry Pi, we recommend that you enable basic authentication for Screenly.
Activating Authentication for Screenly
Screenly has built-in support for basic HTTP authentication. This means that you will be asked to enter a username and password when you try to access your Raspberry Pi’s Screenly web interface.
Even though its a rather primitive way of adding security to your device, it is still effective.
1. First, make sure that you are on the settings page within the web interface.
2. On this page, look for the “Authentication” select box and change this from “None” to “Basic” (1.).
Selecting “Basic” will bring up three new text boxes that you need to fill in.
3. The first textbox you need to fill out is the user one.
In this textbox, enter the username you want to use when logging in to your Screenly web interface (2.).
3. Finally, you will need to enter the password you want people to use when accessing the web interface (3.).
Make sure that you enter something secure for the password. If someone manages to guess this easily, they could potentially gain access to the Screenly admin interface.
4. Once you have set a username and password, click the “Save Settings” button.
5. Next time you access the Screenly web interface on your Raspberry Pi, you will be required to enter your newly set username and password.
To further improve your digital signage’s security, be sure to check out our guide on improving the security of your Raspberry Pi.
At this point in the project, you should now have the Screenly digital signage software successfully setup on your Raspberry Pi.
If you have run into any issues with getting the software to work, please leave a comment below.


Can I use a Pi Zero instead of a regular Pi for this project?
Hi Ike,
Unfortunately, I don’t have a Pi Zero to test it myself, but I believe it should work. At a quick glance I don’t believe they are doing anything that shouldn’t work but I might be wrong.
Kind regards,
Emmet
I discovered that Screenly has not updated their install script to work with the latest Raspbian Bullseye release. I had to download the Raspberry Pi OS Lite (Legacy) BUSTER release for these instructions to work. After I did that, Screenly installs and works quite well.