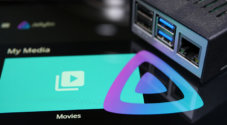
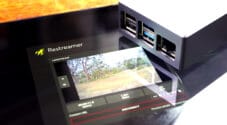
In this project, we will show you how to Install Frigate NVR on your Raspberry Pi.
Frigate is an open-source and free network video recorder that can process your camera streams in real-time.
While the Raspberry Pi isn’t the most powerful device, it can handle a couple of cameras on Frigate. Additionally, combining the Pi with a Coral accelerator can even run AI models on your streams.
Frigate will integrate nicely with Home Assistant if you have that and MQTT installed on your Raspberry Pi.
Over the following sections, we will show you how to install Frigate on your Raspberry Pi and configure it to utilize hardware acceleration.
For the best experience with Frigate, we highly recommend using a Raspberry Pi 4 or newer. It is highly recommended that you invest in a Coral TPU, as that will substantially improve the performance of Frigate on your Pi.
Before continuing with this tutorial, be sure to taper your expectations. The Raspberry Pi will only be able to handle a couple of cameras if they use the H264 codec. H265 will cause significant slowdowns as there is no hardware acceleration for that codec on the Pi.
Please note that the Frigate NVR requires a 64-bit operating system. This means it will not work on the Pi 3 and older. You will also need to ensure you are not using the 32-bit release of Raspberry Pi OS.
If you are unsure on whether you are running a 32-bit or 64-bit system we recommend our guide that shows you how to verify this,
Equipment
Below is the equipment we used to set up Frigate NVR on our Raspberry Pi.
Recommended
Optional
This tutorial was tested on a Raspberry Pi 400, running the latest version of Raspberry Pi OS Bookworm 64-bit.
Installing Frigate NVR on the Raspberry Pi
In the following section, you will learn how to install Frigate NVR and get it to run on your Raspberry Pi.
Installing the software will is a relatively straightforward process. However, configuring Frigate NVR takes some time and reading.
Preparing your Raspberry Pi for Frigate
1. Our first step is to ensure we have an up-to-date system to work off.
You can upgrade all existing packages and update the package list by using the following two commands.
sudo apt update
sudo apt upgrade -yCopy
2. Next, follow our guide on installing Docker on the Raspberry Pi.
Docker makes running Frigate a super straightforward process. You can install Docker by running the following command.
3. Once you have Docker installed, you can continue with this guide.
Creating Directories for Frigate NVR
4. Our next step is to create a directory to store our docker-compose file for Frigate on our Raspberry Pi.
We will be creating this directory by using the mkdir command. It will be called “frigate-nvr” and stored within the “/opt/stacks/frigate-nvr” folder.
sudo mkdir -p /opt/stacks/frigate-nvrCopy5. Next, we will create a directory for Frigate NVR to store its data on our Raspberry Pi.
If you want your data to be stored on a mounted drive or a network drive, mount it before continuing with this guide and note the mount point.
sudo mkdir -p /opt/stacks/frigate-nvr/storageCopyWriting a Basic Config File for Frigate NVR On your Raspberry Pi
6. For Frigate NVR to run on your Raspberry Pi, it does require a basic configuration file to be created. You will need your camera to be set up and with a readable input stream.
We can begin writing this configuration file by using the command below.
sudo nano /opt/stacks/frigate-nvr/config.ymlCopy7. Within this file, you will want to start with a basic configuration you can add to as you grow your NVR setup. We won’t be delving too much into this as it can get complicated and is out of the scope of this install guide.
We have included the “hwaccel” tag so that Frigate NVR on your Raspberry Pi will use hardware acceleration when dealing with h264 streams.
If you want to learn more about configuring Frigate NVR, check out their official guides. Particular cameras will require additional settings to work within Frigate.
mqtt:
  enabled: False

ffmpeg:
  hwaccel_args: preset-rpi-64-h264 #Enable Hardware Acceleration

cameras:
  name_of_your_camera: #Name for your comment
    ffmpeg:
      inputs:
        - path: rtsp://10.0.10.10:554/rtsp #The Stream you want to monitor
          roles:
            - detect
    detect:
      enabled: False # Detection is disabled
      width: 1280 # The Cameras resolution
      height: 720 # The Cameras resolutionCopy
8. Once you have filled out this configuration file, save and quit by pressing CTRL + X, then Y, followed by the ENTER key.
Setting up the Docker Compose File
9. Our next step is to write a compose file for Docker to manage Frigate NVR on the Raspberry Pi.
Begin writing this file by using the following command in the terminal.
sudo nano /opt/stacks/frigate-nvr/docker-compose.ymlCopy10. Within this file, type out the following lines.
Ensure that you replace “<USERNAME>” with the name of your user. Additionally, you will want to replace “<PASSWORD>” with a password of your choosing.
Also, you can change “./storage” to point to where you want Frigate to store its recordings on your Raspberry Pi.
services:
  frigate:
    container_name: frigate
    privileged: true # this may not be necessary for all setups
    restart: unless-stopped
    image: ghcr.io/blakeblackshear/frigate:0.14.1-standard-arm64
    shm_size: "64mb"
    devices:
      - /dev/bus/usb:/dev/bus/usb #Used for Coral if Available
      - /dev/video10 #Map the Pi hardware acceleration
    volumes:
      - /etc/localtime:/etc/localtime:ro
      - ./config.yml:/config/config.yml
      - ./storage:/media/frigate
      - type: tmpfs #Remove this if using a Pi with 2GB or Less RAM
        target: /tmp/cache
        tmpfs:
          size: 1000000000
    ports:
      - "8971:8971"
      - "8554:8554" # RTSP feeds
      - "8555:8555/tcp" # WebRTC over tcp
      - "8555:8555/udp" # WebRTC over udp
    environment:
      FRIGATE_RTSP_PASSWORD: "<PASSWORD>"Copy
11. With the file filled out, save and quit by pressing CTRL + X, followed by Y, then the ENTER key.
Launching Frigate NVR On your Raspberry Pi
12. We now need to ensure that we are in the directory where we wrote the Docker compose file earlier.
To change to this directory, use the following command.
cd /opt/stacks/frigate-nvrCopy13. Now that we are in the right place, we can bring Frigate NVR online on our Raspberry Pi by using the command below.
After running this command, Docker will download Frigate’s container and start it up immediately.
docker compose up -dCopyBy using the “-d” option we are telling Docker to start the application detached. If for some reason Frigate didn’t launch, try removing this option to view the logs from Frigate.
Getting your Login Details for Frigate NVR
14. Frigate will automatically generate a password for your admin account during startup. This typically ends up buried within the log files, but luckily, we can easily use it with a bit of grep magic.
Use the following command to print out the logs of your Frigate Docker container and have it processed by grep. With this grep command, we are simply grabbing any line that contains “Password:“.
docker compose logs | grep Password:CopyIf everything has worked properly, you should see something like what we have shown below. The default password for your admin account is shown after the “Password:” text.
From the example below, you can see the password generated for our account is “23399f47adcdf1b376b214e83f62afe0“.
[2024-11-15 14:55:47] frigate.app INFO : *** Password: 23399f47adcdf1b376b214e83f62afe0 ***Accessing the Frigate NVR Web Interface
15. You will now have Frigate NVR up and running on your Raspberry Pi.
You will now want to access its web interface by going to the following address in your web browser. Ensure you replace “<RASPBERRYPIIP>” with the IP of your device.
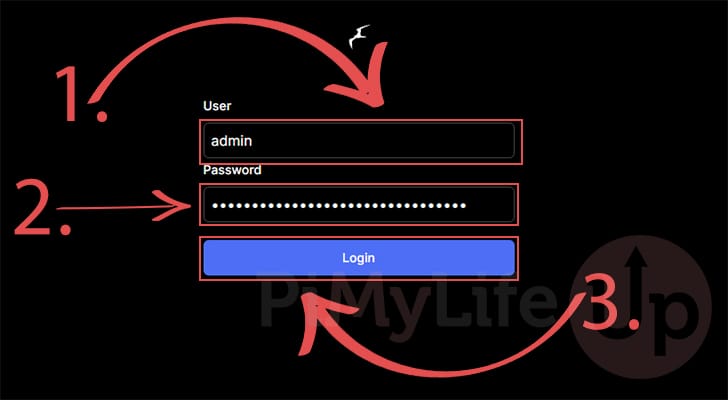
https://<RASPBERRYPIIP>:897116. Upon accessing the Frigate web interface, you must log in to your admin account.
By default, the username for this account is always “admin” (1.). However, the password is automatically generated and will differ for every installation (2.). You should have got this value from the previous step.
After entering your username and password, press the ENTER key to log in to Frigate.
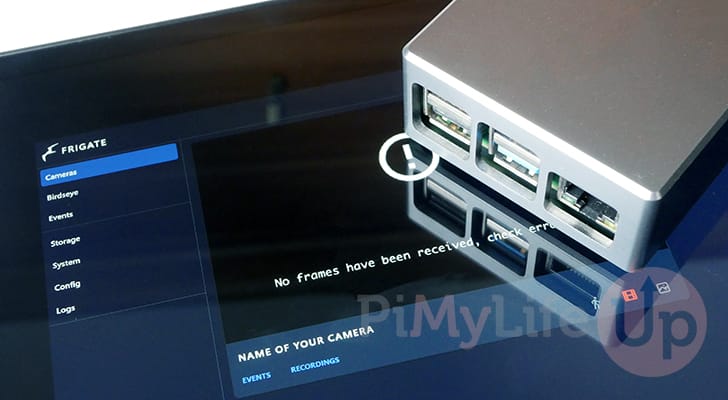
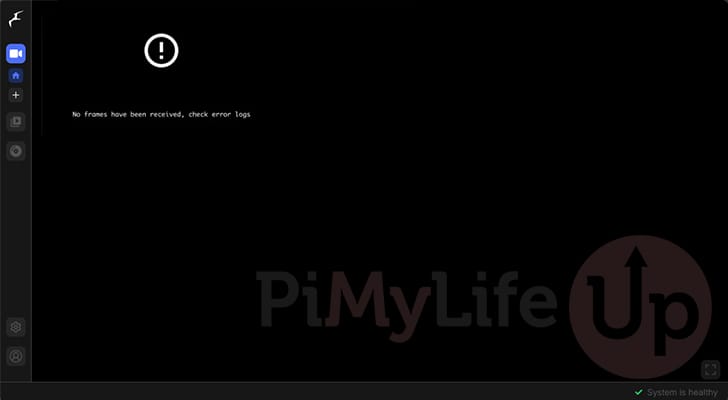
17. You should now see a screen similar to the one below.
As the black screen indicates, we haven’t configured our camera correctly yet. If you see something similar, you will need to adjust your settings.
Conclusion
You should now have Frigate NVR on the Raspberry Pi at this point in the tutorial.
While the Raspberry Pi can’t process too many video feeds, it is helpful if you only need to manage a couple of cameras. Pairing the Pi with a Coral Accelerator will even let you perform AI detections on a video feed.
Please comment below if you have questions about getting Frigate NVR to run on your device.
If you found this tutorial useful, be sure to check out our many other Raspberry Pi projects.


Apologies in advance, but where can I get a coral TPU from or specifically which version would I need? I see different distributions/types recently. Any instructions on how to work this TPU into the RPi 4/5 would be much appreciated also. Thanks for the continued articles. Rich
The Coral USB version will work best with the Raspberry Pi. The Coral website lists a range of different stockists, but stock levels vary heavily.
There are also official instructions for setting up the TPU on the Raspberry Pi via the Coral Website. We don’t currently have a tutorial that covers this process.
Tutorial was amazing! Thanks so much. Was awesome to test this on a pi before buying more expensive hardware.
I struggled getting my tupo C120 stream going. But after some debugging got it working. I have no clue what I’m doing, but putting my config in case it helps someone. The Cam username + password in the config is from the tapo Camera Account Username/Password that I setup on the app.
When I try to install I get this error:
On a raspberry I succeeded installing frigate following your instructions, but on A HP thin client something is wrong.
How to solve this ?
By the way. I think you create outstanding tutorials for noobs like me
Hi Johan,
While this particular tutorial focuses on installing Frigate on to the Raspberry Pi, you can adapt it for a x86/x64 device with a slight change.
The problem happening here is that we are pulling a version specifically built for ARM64 devices like the modern Raspberry Pi’s.
Within the Docker Compose file you will want to find the following line.
Replace that with the following.
Kind regards,
Emmet
Hello, will this work on the Raspberry Pi OS Lite?
Hi David,
Yes, this definitely will.
Kind regards,
Emmet
Had to do https not http
Does detect work out of the box or do I need additional software/config?
Hi James,
It does work but you need to configure it per video camera source. Additionally for decent speeds on the Raspberry Pi you will want to use something like the Coral TPU.
Kind regards,
Emmet
This didn’t work for me.
When I go to the pi web address I get 400 Bad Request The plain HTTP request was sent to HTTPS port
Hi Paul,
Apologies for that. I mindlessly corrected the protocol when I tested the tutorial without updating the tutorial to reference HTTPS as well.
I have now corrected the tutorial to tell the user to user HTTPS.
Kind regards,
Emmet
Great article. I followed the process and it looks like it’s working. But I can’t login on the web page. Where are the username and password specified?
Hi David,
I’ve delved into this a bit further and it turns out that Frigate now automatically generates the admin password during its first start up.
I have updated the tutorial to reflect this change as well as an easy way to grab this password after first starting the container.
In addition to the password changes I have updated the tutorial to use the “/opt/stacks/frigate-nvr” pathing rather than placing everything into the current users home directory. This should make it a bit more portable and stops us from dumping everything into your users home.
Please let me know if you continue to run into issues.
Kind regards,
Emmet
Hi, followed all the steps and it worked perfectly up until the final step where I connect to it on my browser. When I put in the address with the correct port on the end it fails to connect to it. The Pi is statically assigned. Any suggestions?
Hi Dan,
It looks like the port the web UI operates on has changed. I updated the tutorial to use this different port.
Will look into this problem more if problems continue.
Kind regards,
Emmet
I followed the steps to the letter, using a Pi4 and Bullseye OS.
But when I get to this command and get this error…
How do I fix this please?
Hi Stuart,
The error you are running into would indicate that you are running a 32-bit operating system. You must be using a 64-bit operating system to be able to utilize Frigate. I have updated the tutorial to reflect this requirement.
Kind regards,
Emmet
Thanks. I now have it working. The docker compose up -d command does the pulls, extracting, etc. It now says frigate is running.
However, the url http://:5000 does not work. I get page not found.
Any ideas?
Thank you.
Hi Stuart,
I have made some adjustments to the “docker compose” file. According to the official documentation the port has changed from “
5000:5000” to “8971:8971“.Can you please try re-adjusting the ports within your own Compose file and then running “docker compose up -d”.
You should then hopefully be able to load up the web interface using port “8971” instead.
Kind regards,
Emmet
You are awesome. Thanks!
I can get to the UI via the URL, however, now i cannot log in. Is the user my user name on the Pi? and password what I set in the docker-compose.yml file?
Or did I miss something?
Hi Stuart,
I have looked into this further and it turns out Frigate NVR now automatically generates the admin password during its initial setup.
Hopefully the password is still within the logs and you should be able to get it by following from step 14.
Please let me know if this sorts out the issue.
Kind regards,
Emmet
in step 10
uncomment line: version: “3.9”
modify line:
image: ghcr.io/blakeblackshear/frigate:stable
into:
ghcr.io/blakeblackshear/frigate:0.14.1-standard-arm64
due to recent release update for Frigate
Hi Rene,
Thank you for pointing this out. I have updated the tutorial to point to the latest release at the time of writing. It’s a bit of a a frustrating change on there part.
Kind regards,
Emmet
Hi, on my RPi 4B 4GB there is no option to set GPU Memory Allocation and I’m not sure what to do.
Hi Yusuf,
Due to changes with the Raspberry Pi and its operating system, that option is no longer relevant, and I have removed the steps from the tutorial.
Kind regards,
Emmet
Another question sorry, if I use an old laptop such as Dell XPS15 would I still need something like the Coral TPU, or is that mainly for RPis?
How is it like on a Pi5? Or shall I get a mini pc for this, what spec and I looking for exactly? I don’t need a powerful graphics card right?
Hi Alex,
You can definitely get away with a Raspberry Pi 5 but if you want to use AI detections something like the Coral TPU is a must.
On the case of wanting to use your old laptop instead, I would still highly recommend a Coral TPU as it significantly reduces the processing requirement when dealing with AI detections.
Please let me know if that helps answer your question.
Kind regards,
Emmet
Worked like a charm! is there a linke where I can buy you a coffee or beer or something?
thanks again, have a good one!
Hi Galo,
Glad to hear that this worked perfectly for you. If you are interested in supporting us we do offer a “Premium” which gives you ad-free access to the website.
Kind regards,
Emmet