In this tutorial, we will show you how to install ZoneMinder on the Raspberry Pi.

ZoneMinder is free, open-source software that allows you to monitor your CCTV feeds from one location. Best of all, thanks to being open-source software, it has support for most analog or IP cameras.
The Raspberry Pi makes an excellent pick for running ZoneMinder, especially when you don’t have many cameras since it is relatively low-powered and can be left running 24/7.
To make the most of ZoneMinder, you will need to know your cameras’ IPs and how to connect to them. Thanks to ZoneMinders popularity, you can often search for your camera brand name followed by “ZoneMinder” and find connection guides.
Over the following sections, we will cover how to install all of the software required to get ZoneMinder running on a Raspberry Pi.
Equipment
Below is a list of the equipment we used to set up ZoneMinder on the Raspberry Pi.
Recommended
Optional
This tutorial was tested on a Raspberry Pi 5 running the latest version of Raspberry Pi OS Bookworm (64-bit).
Installing ZoneMinder to the Raspberry Pi
This section will show you how to install and prepare ZoneMinder on the Raspberry Pi. These steps involve us installing and setting up other elements, such as the MySQL server and the Apache web server.
The following sections will be entirely within the command line. If you are using Raspberry Pi OS Desktop, you can open the terminal by pressing CTRL + ALT + T on your keyboard.
Installing Any Required Packages
1. Before installing ZoneMinder and its dependencies on our Raspberry Pi, we need to update the package list cache.
You can update this list cache by using the following command in the terminal.
sudo apt updateCopy2. Once the package list update completes, we can move on to installing all of the software we require.
You can install, Apache2, MariaDB, and lsb_release by using the following command within the terminal.
sudo apt install apache2 mariadb-serverCopy3. After installing the database server, you should run the MySQL secure installation script.
This script helps remove weak security settings from the database server.
sudo mysql_secure_installationCopy- When prompted to enter the password for the root user, leave it blank and press the ENTER key.
- Since the root user is configured by default to use “
unix_socket” authentication. Type in “n” then press the ENTER key. - You will then be prompted to change the root password. Since “
unix_socket” is being used, type “n” then press ENTER. - For the rest of the options you are presented with, type in “
Y“, then press the ENTER key. The rest of the options will improve the security of your database server.
Installing ZoneMinder from the Official Repository
4. To be able to install ZoneMinder from the official repository to our Raspberry Pi we need to first save the GPG key. The advantage of using the official repository is that you will get the latest release.
You can save and store the GPG key to your system by using the following command.
curl -L https://zmrepo.zoneminder.com/debian/archive-keyring.gpg | gpg --dearmor | sudo tee /usr/share/keyrings/zoneminder-archive-keyring.gpg >/dev/nullCopy5. With the GPG key saved, we can proceed to add the ZoneMinder repository to the sources list.
To add this repository, use the command below within the terminal.
echo "deb [signed-by=/usr/share/keyrings/zoneminder-archive-keyring.gpg] https://zmrepo.zoneminder.com/debian/master $(lsb_release -cs)/" | sudo tee /etc/apt/sources.list.d/zoneminder.listCopy6. Since we have made changes to our sources, we will need to perform an update of the package list cache.
You can update that cache by using the following command.
sudo apt updateCopy7. With the repository added, you can now install ZoneMinder to your Raspberry Pi by using the following command.
During installation this package will set up the vast majority of things it requires. This includes automatically creating the databases that ZoneMinder uses.
sudo apt install zoneminderCopyCorrecting your Raspberry Pi’s Timezone
7. The Zoneminder software requires you to have your Raspberry Pi’s time zone configured. This must be configured for the device itself and PHP.
Let us start by setting the Pi’s timezone using the Raspberry Pi configuration tool. You can open this tool by using the following command.
sudo raspi-configCopy8. Within the tool, navigate to “Localisation Options“, then to “Timezone“, and follow the prompts to set the time zone.
You can navigate this menu using the ARROW keys to move up and down, then the ENTER key to select an option.
9. Our next step is to modify the PHP timezone by adjusting the configuration files.
Since the default version of PHP can change depending on the OS, we can grab the version number by using the following line
PHP_VERSION=$(php -v | head -n 1 | tail -n 1 | cut -d " " -f 2 | cut -c 1-3)Copy10. Now that we have the PHP version stored in an environment variable, we can easily edit the correct configuration file.
Begin modifying PHP’s configuration file by using the following command.
sudo nano /etc/php/$PHP_VERSION/apache2/php.iniCopy11. Within this file, you will want to find the following line. Since we are using the nano text editor, you can search using CTRL + W.
;date.timezone =CopyOnce found, you want to set this value to your time zone and remove the semicolon (;). You can find the correct value for your time zone by using PHP’s list of supported timezones.
For example, we would use the following line to set the time zone to Hobart, Australia.
date.timezone = Australia/HobartCopy12. Once done, you can save and quit by pressing CTRL + X, followed by Y, then the ENTER key.
Giving ZoneMinder Access to Attached Video Cameras
13. For ZoneMinder to be able to access any cameras that are attached to your Raspberry Pi we will need to add the “www-data” user to the “video” group.
The “video” group is used to give users access to attached devices like a webcam.
Add the “www-data” user to the “video” group by using the following command.
sudo usermod -aG video www-dataCopyEnabling the ZoneMinder Apache Configuration
14. We are finally at the point that we can safely enable the ZoneMinder Apache configuration.
ZoneMinder automatically created the correct config files during installation on our Raspberry Pi. We simply need to enable them.
To enable the ZoneMinder Apache configuration, run the command below.
sudo a2enconf zoneminderCopy15. While we are setting up our Apache configuration, we must enable four modules that ZoneMinder requires to function on your Raspberry Pi.
We can enable all of these required modules by running the following three commands within the terminal.
sudo a2enmod rewrite
sudo a2enmod headers
sudo a2enmod expires
sudo a2enmod cgiCopy
16. Our next task is to restart Apache2, which can be done by simply using the following command.
sudo systemctl restart apache2CopyStarting the ZoneMinder Service on the Raspberry Pi
17. We almost have ZoneMinder entirely up and running on our Raspberry Pi.
Our next few steps will involve enabling the service so that it starts at boot, then finally starting the software itself.
Run the command below to enable ZoneMinder to automatically start when your device boots.
sudo systemctl enable zoneminderCopy18. Now, use the following command to start the ZoneMinder camera monitor software.
sudo systemctl start zoneminderCopy19. At this point, you finally have ZoneMinder running on your Raspberry Pi. It can now be put to use to monitor your various cameras.
Accessing the ZoneMinder Web Interface
With ZoneMinder finally installed on our Raspberry Pi, it is now basically driven entirely through its web interface.
This section will show you how to access its web interface and point you toward adding cameras.
1. To access the web interface, you will need to know the IP address of your Raspberry Pi.
One of the easiest ways of getting the IP address is to utilize the hostname command.
hostname -ICopy2. Once you know the IP address of your device, you will want to go to the following address in your favourite web browser.
Replace “<IPADDRESS>” with the IP address of your Raspberry Pi.
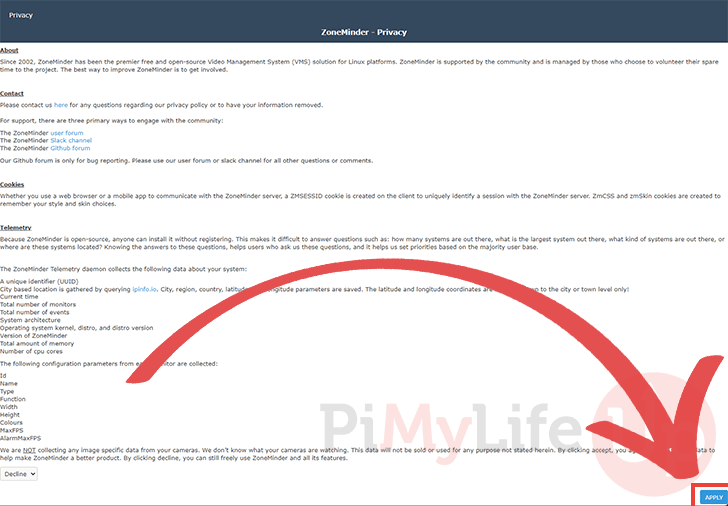
http://<IPADDRESS>/zm3. When you first visit the ZoneMinder web interface, you will be asked to agree to a privacy policy.
Read through the text, and if you agree, click the “APPLY” button in the screen’s bottom-left.
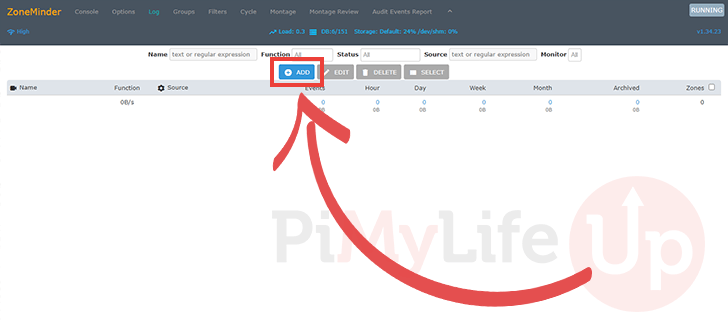
4. You will now be greeted by your Raspberry Pi’s ZoneMinder dashboard. This dashboard is where you will see all of your available cameras after adding them to ZoneMinder.
To add a camera to ZoneMinder, you will want to click the “ADD” button.
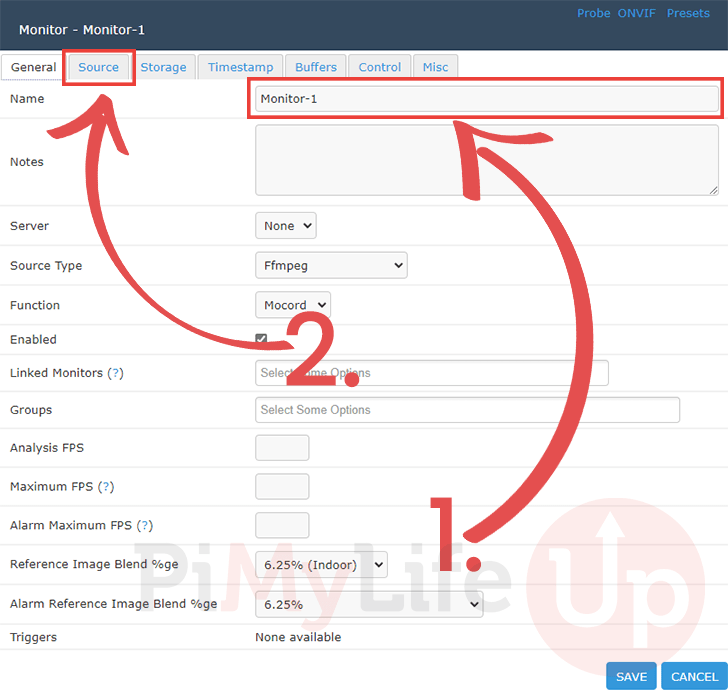
5. We won’t be diving into how exactly to add a camera to ZoneMinder we will cover the basic settings you will need to set.
On the first page, you will want to give a name to your camera (1.), so you can easier identify it within the interface.
After that, the other main settings you will want to adjust are within the “Source” tab (2.).
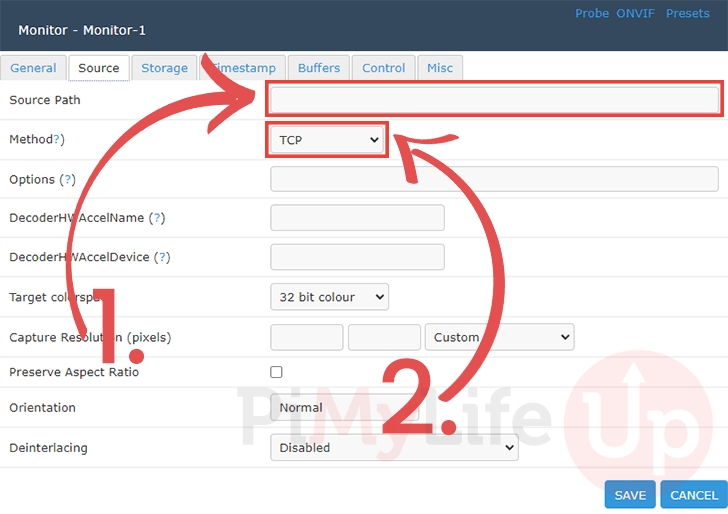
6. The source tab allows you to set how ZoneMinder will interact with your cameras.
The source path (1.) is where you will specify the path to where ZoneMinder can access your camera. If you are using an IP camera, this is highly likely an RTSP link. You can Google your camera to find out exactly how it works.
The other thing you might need to change is the “Method” (2.). Select the method that matches the connection type.
Conclusion
At this point in the tutorial, you should now have ZoneMinder running on your Raspberry Pi.
ZoneMinder is a powerful application that can monitor and record footage from numerous cameras. While we haven’t covered adding cameras within the web interface, you can check the official documentation.
Please comment below if you have any issues with installing ZoneMinder on your device.
Be sure to check out our many other Raspberry Pi projects, such as our guide on setting up a webcam server.


Guess I am not smart enuff for this?? I am 78 but no whiz kid on Linux!
I’ve tried it 3x now from loading Bookworm 64 lite on the SD card and then following your instructions to a “T”, however I never get to the point of logging in or showing the web interface??
My one thought is, has it ever been installed on a Raspberry Pi 5, yet?
Hi Norm,
Quite a few things had changes since I last ran through this tutorial. The guide has now been updated to reflect the installation process for the newest versions of ZoneMinder.
Please try using the updated steps.
Kind regards,
Emmet
Thank you very much, Emmet!
It worked like a charm!
Again, Thks, Norm
Thanks for the great writeup. And especially good that you are keeping it up to date.
What does “…ZoneMinder does not provide ARM64 builds, so the package will be tr” mean? specifically “tr”? As it stands now, this article has you install zoneminder twice. once from the raspian repository, then once again from ZoneMinders repository. Is that because of the arm64 issue? or is that a mistake?
Hi CJ,
Thank you for pointing out those mistakes. Both of the issues have now been corrected in the tutorial. Additionally, it looks like ZoneMinder now provides builds for Arm64 as well so that mistyped line has been removed completely.
Cheers,
Emmet
Beautiful! Best lookin guide for this. Thank you. Just got on to use it 🙂
For anyone following this tutorial, there is a minor error here. In step no. 19 of first part, you need to search for date.timezone instead of data.timezone.
Also, Zoneminder requires rewrite mod enabled for Apache2. If not done so, step no. 27 will fail. So before restarting apache, run the following command:
sudo a2enmod rewrite
If using a USB webcam, you’ll also need to ensure that user www-data has access to the camera. To do this, you need to run the command
sudo usermod -aG video www-data
Hi Gourav,
Thank you for your suggestions to improve this tutorial. I have fixed that mistake you mentioned while also adding the steps to enable mod rewrite and adding the “www-data” user to the “video” group.
Cheers,
Emmet
Maybe today I will get off my butt and setup a 64bit build server pi…
Nice Issac !!!
Im trying to install 1.36 version in my Pi4, butt without success.
Hi Luciano,
If you are running a 32-bit release of Raspberry Pi OS, our tutorial should work with installing the latest release of ZoneMinder (1.37).
Cheers,
Emmet
Packages of 1.36.31 for 64bit Raspbian are now available on https://zmrepo.zoneminder.com
Excellent tutorial, just one thing, speaking as the main ZoneMinder developer:
Raspbian doesn’t come with the latest version of ZoneMinder. There are many bugs fixes and fixed security vulnerabilities in more recent versions. We build up to date packages for raspbian and other distributions at https://zmrepo.zoneminder.com
Hi Isaac,
Thank you for the heads up about the official repository. Only downside of the repository you provide is that it doesn’t seem to provide ARM64 builds.
I will work on moving the tutorial to utilize the official ZoneMinder repository and just add a note about the ARM64 builds will be from an older release.
Cheers,
Emmet