In this guide, you will be learning how to install and run qBittorent on the Raspberry Pi.

qBittorent is one of the most popular torrent clients that you can use on the Pi.
It has become known for its relatively stable platform and good feature set that works well on limited-resource devices like the Raspberry Pi.
It is a perfect alternative to other torrent clients such as Deluge or Transmission.
In addition to showing you how to install qBittorrent, we will also show you how you can set up and configure its web interface.
Setting up the web interface allows you to control your Raspberry Pi’s qBittorrent from another device easily.
Thanks to the web interface, you can easily use this client on a headless Raspberry Pi. Headless is a device that does not have a monitor, keyboard, or mouse.
Equipment
Below you can view all of the equipment we used for running qBittorrent on the Raspberry Pi.
Recommended
Optional
This tutorial was tested on a Raspberry Pi 4 running the latest version of Raspberry Pi OS.
Installing qBittorent on the Raspberry Pi
Before we can use qBittorrent, we need to show you how to install the torrent client on your Raspberry Pi.
Installing this torrent client is a fairly straightforward process, so you will have the software up and running in no time.
1. Before installing qBittorrent, let us make sure our Raspberry Pi uses up-to-date packages.
Doing this ensures that we are less likely to run into issues when we install the client.
To perform an upgrade of packages, you will need to use the following two commands.
sudo apt update
sudo apt full-upgrade
2. Next, we can install qBittorrent onto our Raspberry Pi.
In this case, we have two separate commands that we can use to install the software.
The version you want to use depends entirely on how you are using your Raspberry Pi.
qBittorrent for the Desktop Raspberry Pi
The first command is for those who want to use the full desktop version of the software.
This version of qBittorent is heavier and cannot be used for those running a headless Raspberry Pi.
sudo apt install qbittorrentqBittorrent for a Headless Raspberry Pi
The second command will allow you to install a command-line version of qBittorrent.
This version is ideal for those running a headless environment, as it gives you easy access to the web interface.
sudo apt install qbittorrent-nox3 At this point, you should now have the qBittorrent software installed on your Raspberry Pi.
We can now show you how to set up qBittorrent on both the desktop and command-line interfaces.
Setting up qBittorent using the Desktop Interface
In this section, we will show you various things, including how to open qBittorrent on your Raspberry Pi and how to enable the web interface.
For this section, you will need to have a mouse and keyboard attached to your Raspberry Pi.
If you are using a headless setup, be sure to skip to our next setup section.
Opening qBittorrent on the Raspberry Pi
Before we can configure qBittorrent, we need to first open up the software on our Raspberry Pi.
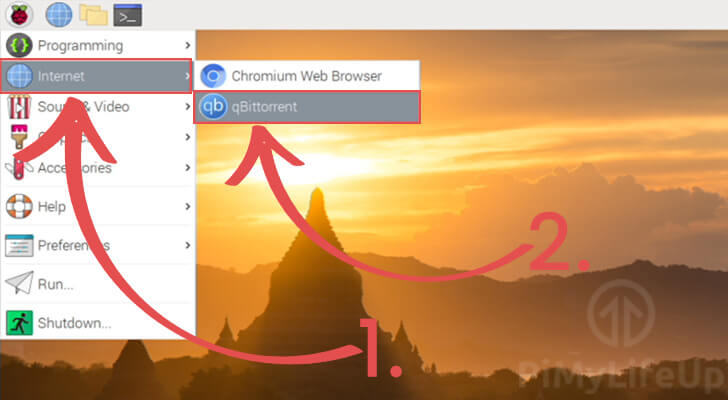
1. On the Raspberry Pi interface, you need to click the icon in the screen’s top-left corner.
Clicking this icon will bring up the start menu on your screen.

2. Within the start menu, you will need to hover over the “Internet” option (1.).
Hovering over this option will expose a couple of applications. In the drop-down menu, identify “qBittorrent” then click it (2.).
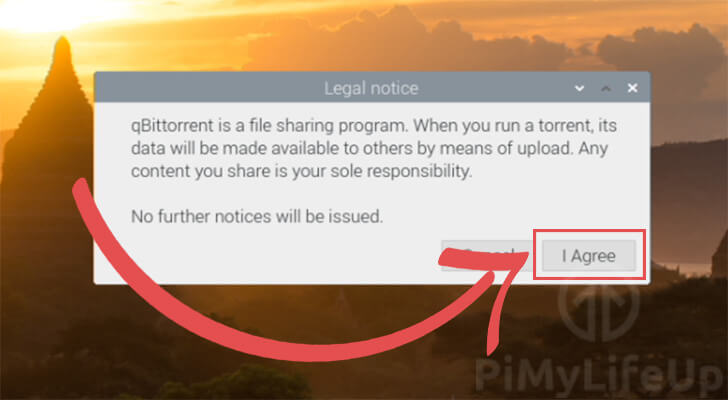
3. When you first run qBittorrent on your Raspberry Pi, you will see a legal notice that you need to read before continuing.
If you are fine with what is mentioned in the legal notice, click the “I Agree” button to continue.
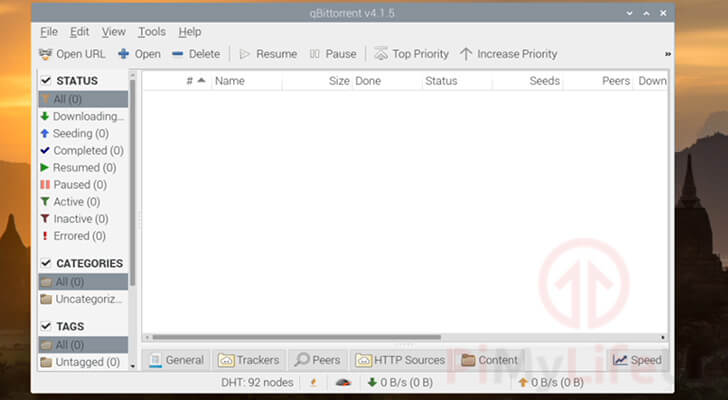
4. You should now have the qBittorrent client running on your Raspberry Pi.
You can now proceed to add your torrents and download them from your device.
If you would like to manage your torrents remotely, it is possible to make use of the software’s web UI.
Enabling the Web UI through the Client Software
This section will show you how to use the qBittorrent client’s interface to enable its web interface.
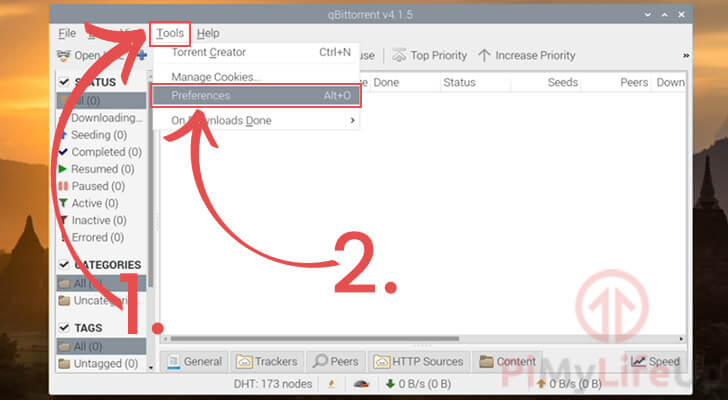
1. With the qBittorrent software opened on your Raspberry Pi, click the “Tools” option in the top toolbar (1.).
In the dropdown box, click the “Preferences” option (2.)
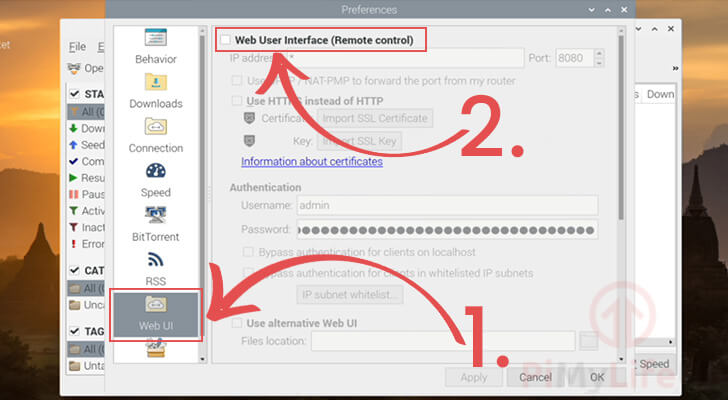
2. Within the “Preferences” menu, we need to change to the “Web UI” tab by clicking the icon in the left sidebar (1.).
Once you have switched to the Web UI menu, click the “Web User Interface” checkbox to enable it (2.).
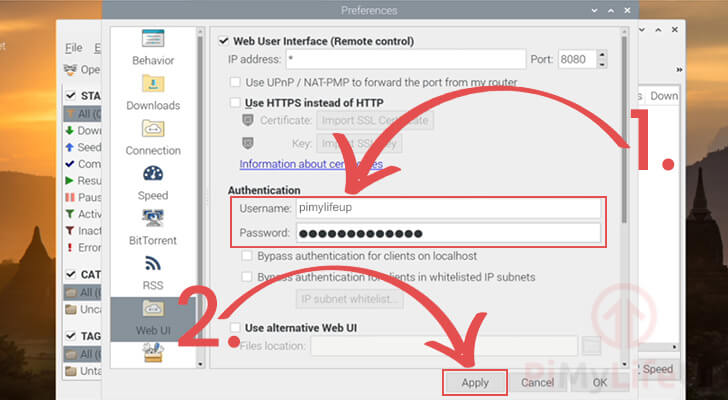
3. After you have enabled the web user interface, you will be able to modify it’s settings.
You should change the username and password you will use to login into the interface (1.).
Once you have set your authentication details, click the “Apply” button to finalize your setup (2.).
To learn how to access and use this web interface you can check out the “Using the qBittorrent Web Interface” section below
Setting up qBittorent using the Command-Line
Using qBittorrent from the Raspberry Pi’s command line is a reasonably straightforward process, thanks to the Nox client we are using.
In this section, we are going to show you several things. First is how to run the torrent client from the Raspberry Pi’s terminal.
Then we will show you how to set up a service so that qBittorent will start at boot. Finally, we will introduce you to the web interface.
Before we start, one thing to note is that the command-line version of qBittorrent is mainly designed to be configured through its web interface and not the command line itself.
Starting qBittorrent using the Raspberry Pi’s Terminal
In this section, you will see how simple it is to start the web interface only version of qBittorrent on your Raspberry Pi.
1. To launch the command line version of qBittorrent on your Raspberry Pi, all you need to do is run the following command.
qbittorrent-nox2. Upon running qBittorrent from the command line, you will be met with the following message.
This message tells you that you need to control the torrent client from the web interface and not your Raspberry Pi’s command-line.
It will also tell you the currently defined user name for the web UI administrator. By default, this username will be admin.
******** Information ********
To control qBittorrent, access the Web UI at http://localhost:8080
The Web UI administrator user name is: admin
3. The current problem with how we are running qBittorrent on the Raspberry Pi is that as soon as the current terminal session is closed, the client will close as well.
To get around this, we will create a service that will handle the operation of the client.
You can quit out of the torrent client by pressing CTRL + C.
Running qBittorrent as a Service
In this next section, we will create a service that will run and manage the qBittorrent client on the Raspberry Pi.
1. Before creating the service, we should first create a user for the client to operate under.
The main reason we are going to do this comes down to improving the Raspberry Pi’s security.
Let us use the following useradd command to create our new user. For this guide, we are going to call this new user qbittorrent.
sudo useradd -r -m qbittorrentWith the command, you will notice that we use the “-r” (--system) argument. This argument tells the command that it should make this user a system user.
Additionally, we use the “-m” argument to tell the command that it should create a home directory for the user.
This means that the user can’t be logged in to and acts as a system only user.
2. To ensure that we can access the files created by our new “qbittorrent” user, we will add the “pi” user to its group.
To do this, we will make use of the usermod command. Run the following command on your Raspberry Pi to add the pi user to the qbittorrent group.
sudo usermod -a -G qbittorrent piThe “-a” argument tells the command we want to add a new attribute to a user. The “-G” argument says that we are adding a group.
3. Finally, we can move on to creating the service itself.
For writing this service on our Raspberry Pi for the qBittorrent software, we will make use of the nano text editor.
sudo nano /etc/systemd/system/qbittorrent.service4. Within this file, we want to enter the following lines of text.
These lines dictate how the service manager runs qBittorrent.
[Unit]
Description=qBittorrent
After=network.target

[Service]
Type=forking
User=qbittorrent
Group=qbittorrent
UMask=002
ExecStart=/usr/bin/qbittorrent-nox -d --webui-port=8080
Restart=on-failure

[Install]
WantedBy=multi-user.target
There is a couple of things that we should point out with this service that we have created.
First is that the qBittorrent software will be run under the user and group that we created earlier.
Additionally, we apply a “UMask” to the user so that all files created by this user will hold the following Linux permission, “rw-rw-r--“.
This permission means that the owner and group can read and write all files created by this user.
Lastly, we pass in the path to the qBittorrent executable with a few arguments.
The first is “-d“, which tells the program we want to run it as a “daemon”.
Secondly, we use the “--webui-port” argument to pass in the port that we want the Web UI to be available through.
5. With everything entered, save the file by pressing CTRL + X, then Y, followed by the ENTER key.
6. Now that we have created the file, we can now start our newly created qBittorrent service.
sudo systemctl start qbittorrent7. We can verify that qBittorrent is now running on our Raspberry Pi by using the following command.
sudo systemctl status qbittorrentIf the torrent client is running as intended, you should see the following text appear from this command.
Active: active (running)8. Finally, now that we know that the qBittorrent service works, we can make it start when our Raspberry Pi boots.
You can enable the bootup functionality by running the following command on your device.
sudo systemctl enable qbittorrentUsing the qBittorrent Web Interface
In this section, we will show you how to access the qBittorrent web interface as well as where to find its option page
For those running a headless Raspberry Pi setup, this is the only way of managing your torrents.
Accessing the Web Interface for qBittorrent
Accessing qBittorrent’s web UI is a fairly straightforward process. All you need is a web browser and the IP address of your Raspberry Pi.
1. At this point, you should have the qBittorrent web interface enabled, whether through the desktop client or by using the command-line version of qBittorrent.
To get to the interface, you need to go to the following address in your favorite web browser.
Make sure you replace “[YOUR IP ADDRESS]” with the local IP address of your Raspberry Pi.
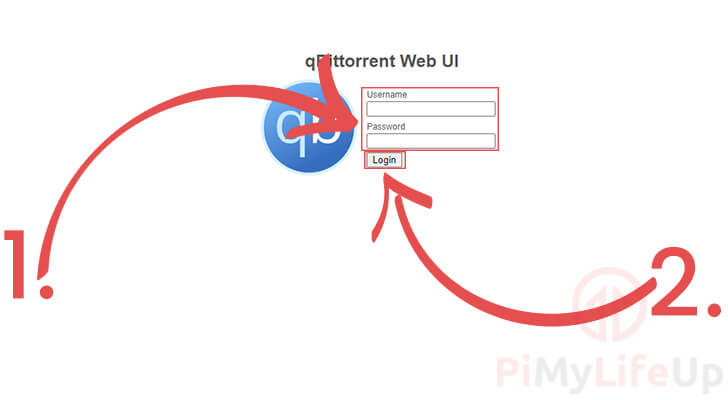
http://[YOUR IP ADDRESS]:80802. When accessing your qBittorrent web interface, you will need to login (1.).
If you haven’t changed the authentication details, the default username for this interface is “admin“, and the default password is “adminadmin“.
Once you have entered the correct details, you can click the “Login button (2.).
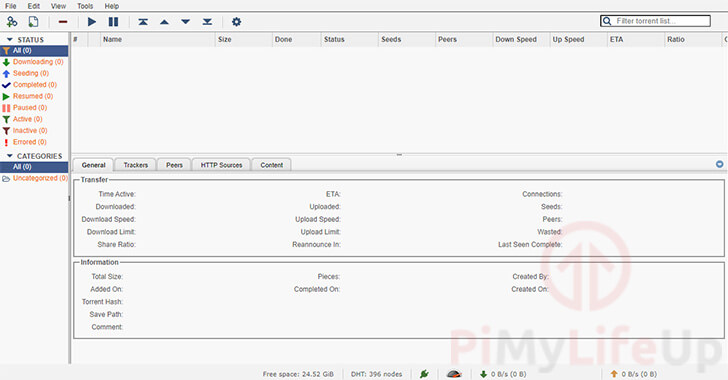
3. You can now use the web interface to manage both the torrent client itself and your torrents.
Configuring qBittorrent through the Web Interface
Luckily configuring qBittorrent its quite a simple process, especially through its web interface.
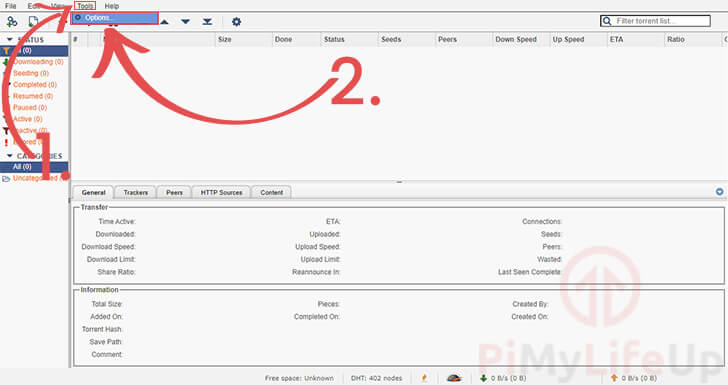
1. To get to the options, you need to click the “Tools” button in the top toolbar (1.).
In the dropdown box, click the “Options” button to open up the dialog box (2.).
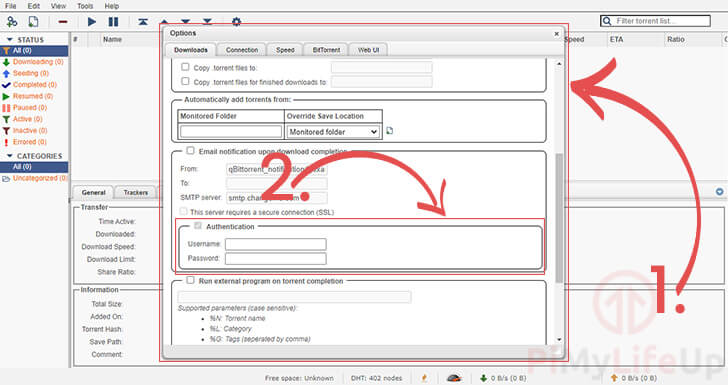
2. Using the options dialog box (1.), you can configure almost every element of qBittorrent.
One of the first things you should configure with this interface is your username and password (2.).
Conclusion
Hopefully, at this point, you will have successfully set up qBittorrent on your Raspberry Pi.
It is one of the best torrent clients for the Raspberry Pi and is perfect for a headless setup, thanks to its excellent web interface.
If you have run into any issues with this guide or feel like something is missing, please leave a comment below.
Also, check out some of our other great Raspberry Pi projects to see what else you can do with your device.


I would love to enable “Email notification upon download completion”. I have already set up a Gmail app password for sendmail, and can send email from my Pi to my Yahoo address through my Gmail address. But I can’t get this feature to work in qBittorrent.
I even created a new app password in Gmail, but I still can’t get it working. I’m sure I just haven’t hit the right combination of userid, password, etc.
Can you help?
Hi WDixon,
I don’t personally use this functionality myself, but looking it up the SMTP server needs to be set “smtp.gmail.com”. The username must be your full email, for example “example@gmail.com”. And finally if you are using two factor authentication, the password should be an application password for your Gmail account.
If you are doing all of that, I’m not entirely sure what could be going wrong here, unless your connection is being blocked by the email server.
Kind regards,
Emmet
Hi, I am on v4.2.5 on raspberrypi 4b. How do I update it to the latest version
Hi Angel,
Unfortunately 4.25 is the latest version that is available through the Raspberry Pi OS package repository.
You will need to compile a new version to get it on the Pi.
Cheers,
Emmet
Dear,
do You have any tutorial when we can compile qbittorent to latest version 4.5.5 ?
Hi Skillfresh,
At this stage we do not have a tutorial that covers compiling qBittorrent on the Raspberry Pi. I believe Debian Bookworm will use qBittorrent 4.5.2 so I’m not sure if its worth the effort of writing up a tutorial for that.
Cheers,
Emmet
Great guides! this, Tranmission and Plex have saved me a few times! Huge thanks for making these!
Guides in this site are perfect! Thank you so much!
Which version of Raspbian should I install on the Pi? Lite, Desktop, or Desktop Full?
Hi Will,
It mainly depends on your use case, but if you are just running qBittorrent I would personally go with “Lite”.
qBittorrent gives you a web interface that is fairly straightforward to use. However, if you prefer using a desktop interface you are free to use the other two flavors of Raspberry Pi OS.
Cheers,
Emmet
Thank you so much, this was a brilliant explanation!
This was a really well written guide and I appreciate that you took the time to explain what each command did. Thanks!
The application can’t access the download location. Try to copy a file from your home directory to that location or use nano editor to save a file to that location. Alternatively, change the destination saving downloads to “~”, your home Diectory. If that works then troubleshoot the external storage device you are trying to save to. Likely a permissions issue with the file system.
Thank you so much! That pointed me in the right direction to fix my problem: it was permissions, after all!
I ran two chmod commands to give the :qbittorrent group read and write access to /media/pi/Torrents (torrent folder in the automatic mount point for USB HDDs).
(I can’t remember them off the top of my head, so will try to append them here later)
I followed the guide, and it seems to work initially, but the download speed drops down to 0, and the torrents stop. I’m not sure what setting I might need to change to fix this, though 🙁 I’ve tried limiting torrents, connections, speeds, without success. Can anyone help me?
I’m having the same issue. Did you find a resolution?
Hi, is it possible to do this with Raspberry Pi Zero instead of Raspberry Pi 4 and external hdd for large torrent files ?
Hi Han,
Yes it should be possible. There isn’t anything that should stop you from doing this.
However, as the Raspberry Pi Zero is a weaker device, it is best to not overload it with to many torrents.
Cheers,
Emmet
Hi,
Thanks for this awesome tutorial. However I noticed a small issue at the end of it. The screenshot referring to change username and/or password isn’t correct as it shows the proxy user/password options. One should select the last tab (Web UI) and change the values at the Authentication section.
Regards,
László
sorry, change “proxy” to “email notification”
Thank you for the guide.
I’ve successfully started the qBitTorrent as a service.
I’m able to save torrent downloads to the default location.
I would like to download torrents to external drive.
The HDD is mounted to /media/sda1/
But when I’m trying to save torrent there, its getting queued seconds after the start.
Do I need some access rights for qbittorrent user to same to /media/sda1/ ?
Hi there thank you for the guide. Quick question – if I were to delete the user ‘qbittorrent’ afterwards, what would be the best way to do it?
If you want to remove the user, you will need to run the following command.
userdel -r -f qbittorrenthow do you use a vpn such as nordvpn
Hi Sparsh,
We actually have a guide on showing you how to connect to NordVPN from your Raspberry Pi.
By following that you will set up the OpenVPN software you need, while the VPN remains active your traffic should be routed through it.
Cheers,
Emmet
What is the security benefit of creating a separate user for the service?
Hi Farid,
It all has to do with the Linux permission system.
If you allowed the service to run under the pi user for example it would have access to all files owned by that user.
By separating it out to a new user we isolate qBittorrent from accessing files that our other users might own.
Cheers,
Emmet
Thanks for the explanation for system user Emmet!
how do you change the port used ? tia
Hi ade,
I’m assuming you are asking about changing the web interface port? If so, the following steps should work.
If you are running the desktop version of qBittorrent you can do this through its interface, it is the textbox next to the IP address at the top of the “Web UI” setting panel.
However, if you are using the command line version you can pass through the port you want qBittorrent to use by making use of the “
--webui-port [PORT]” option. Just make sure you replace “[PORT]” with the port you want to use.Likewise you will also need to modify the service file, replacing the port “
8080” with the port that you want to connect to the web interface through.Cheers,
Emmet