In this tutorial, we will be showing you how to install the qBittorrent client on Ubuntu.
qBittorrent is a popular torrent client and is considered one of the best alternatives to BitTorrent. It is fast, open-source, and lightweight, making it one of the best clients you can use on Ubuntu.
This client has many features that you will find very useful quickly. One of its best features is its web interface that allows you to manage almost all aspects of the torrent client remotely.
Best of all, qBittorrent supports all current versions of Ubuntu. These supported versions include Ubuntu 22.04, 21.10, 21.04, 20.04, 20.10, and 18.04.
In this tutorial, you will install the latest version of qBittorrent to your Ubuntu system by utilizing the team’s PPA.
The initial configuration and installation steps will require you to utilize your Ubuntu systems terminal.
Table of Contents
- Preparing your Ubuntu System for qBittorrent
- How to Install qBittorrent on Ubuntu
- Setting Up qBittorrent Desktop on Ubuntu
- Configuring qBittorrent Nox using the Terminal
- Using the qBittorrent Web Interface
- Conclusion
Preparing your Ubuntu System for qBittorrent
Before we proceed, let us add the official package repository for qBittorrent to our Ubuntu system. Adding this repository will allow us to install the latest version of this torrent client.
Typically the version that is made available through Ubuntu’s repository is out of date.
This is a simple process that we will complete in a couple of steps. First, if you are using the desktop flavor of Ubuntu, you can open the terminal by pressing CTRL + ALT + T.
1. For this section, we only have a single step, and this step only requires us to run a single command.
Running the command below will add the official qBittorrent repository to the Ubuntu device.
sudo add-apt-repository ppa:qbittorrent-team/qbittorrent-stableCopy2. When prompted, you will need to press the ENTER key to confirm the addition of the new repository.
The “Description:” should read something like what we have shown below.
Packages for the stable series of qBittorrentHow to Install qBittorrent on Ubuntu
With the official package repository added, we can now install the qBittorrent client on your Ubuntu system.
Before continuing, you need to decide whether you want to use the desktop or web interface.
You can still use the web interface of qBittorrent on Ubuntu when using the desktop interface.
Installing the Desktop qBittorrent Client
With this section, we will be installing the desktop client of qBittorrent to our Raspberry Pi.
1. We can install this version by running the following command on your device. This will install the torrent client using the apt package manager.
sudo apt install qbittorrentCopy2. After the install process has been completed, you can skip to “Setting Up qBittorrent Desktop on Ubuntu“.
Installing the Web Interface Only version of qBittorrent
The web interface only version of qBittorrent goes by the name “qBittorrent-nox“. This torrent client is available as a separate package for those who don’t want or need the desktop interface.
1. To install qBittorrent-nox to your Ubuntu device, use the following command in the terminal.
sudo apt install qbittorrent-noxCopy2. Once the web interface version of qBittorrent has finished installing, proceed to the “Configuring qBittorrent Nox using the Terminal” section.
Setting Up qBittorrent Desktop on Ubuntu
This section will show you how to open the qBittorrent interface on your Ubuntu device. We will also show you how to enable the clients’ web interface.
Opening qBittorrent on Ubuntu
To use the qBittorrent desktop client, you will need to open it. This part of the guide will show you one of the ways to open the torrent client on Ubuntu.
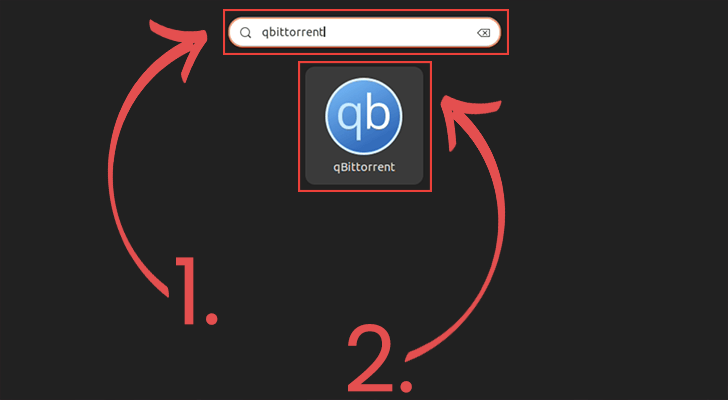
1. Start by opening up the “Applications” screen within Ubuntu.
You can open this screen can by clicking the icon with nine dots in the screen’s bottom-left.

2. Within the “Applications” screen open, use the search box at the top (1.) to look for “qBittorrent“.
You should see the application “qBitttorrent” appear on this screen. Click this application to continue (2.).
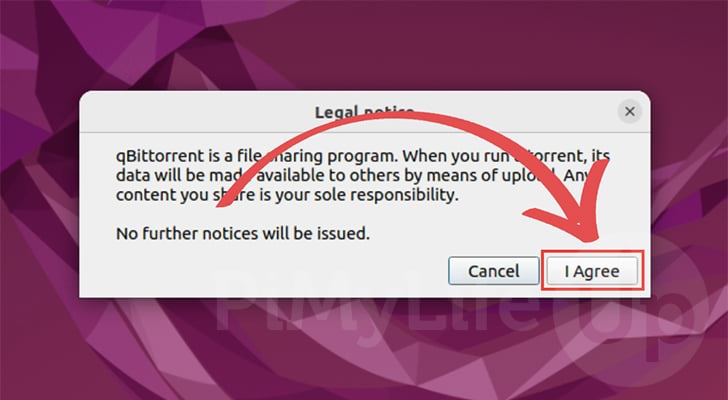
3. When you first open qBittorrent on Ubuntu, you will see a prompt warning that this is a file-sharing program.
Read the notice, and if you agree, click the “I Agree” button to continue.
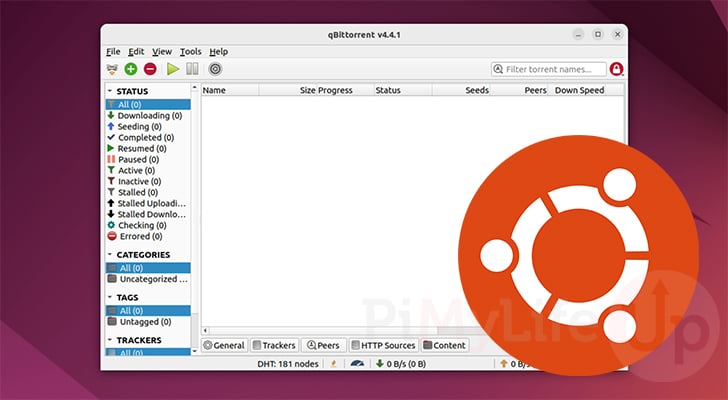
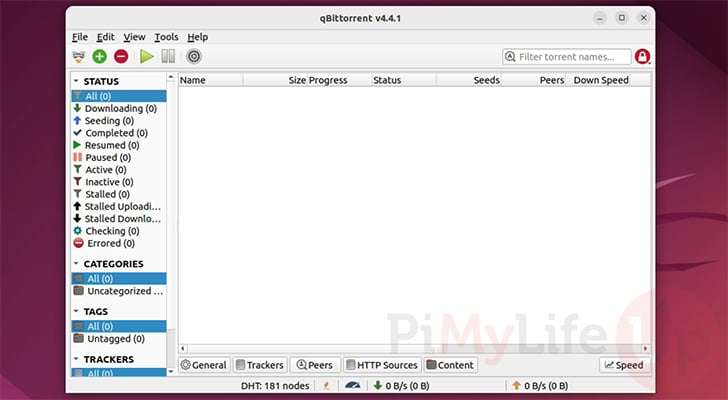
4. You should now have qBittorrent open on your device, and it is now ready for use.
If you want to enable the web interface, the next section will cover it.
Enabling the Torrent Client’s Web Interface
With qBittorrent open on your Ubuntu device, you can enable its web interface with a few simple clicks.
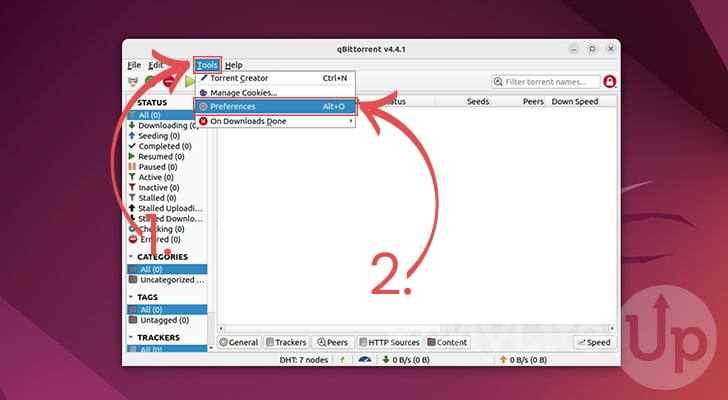
1. In the toolbar, find and click the “Tools” option (1.)
You will find the option labeled “Preferences” (2.), within this menu. Click this option to proceed.
Alternatively, you can open the preferences screen by pressing ALT + O.
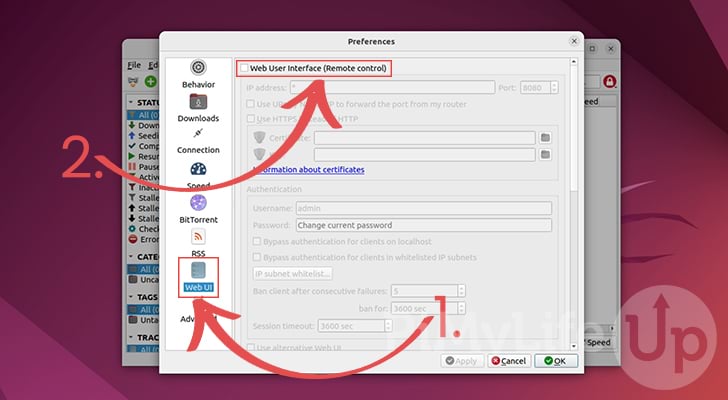
2. Within the preferences screen, you will want to first change to the “Web UI” tab (1.).
Once you are in the “Web UI” tab, you can enable the web user interface by clicking the checkbox (2.) located at the top of the screen.
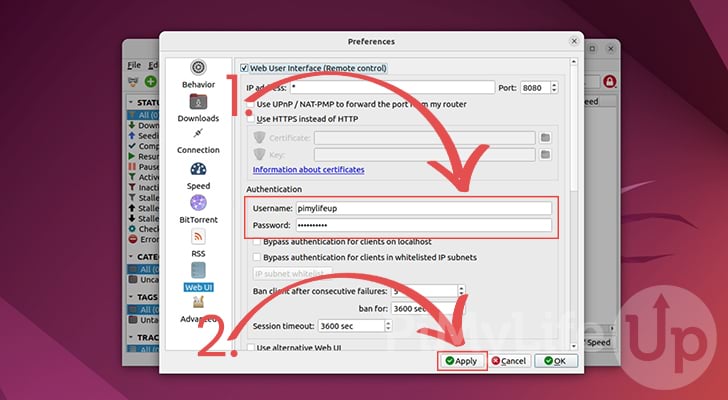
3. Now that the web interface is enabled, you will want to set the username and password (1.).
You will use this username and password to log in to the web interface when away from your desktop.
Once you have typed in a username and password, you can click the “Apply” button (2.) or the “OK” button to apply these settings.
4. If you use the default IP Address and port options, you can now access the web interface using the following steps.
You can access this on your Ubuntu device by going to the following address.
http://localhost:8080Alternatively, you can access it remotely by going to your device’s IP address. You can get the device’s local IP address by utilizing the hostname command within the terminal
http://IPADDRESS:8080Configuring qBittorrent Nox using the Terminal
The “Nox” version of qBittorrent requires a few additional steps that we will be going over shortly.
They are not necessarily complicated steps but are needed to configure qBittorrent on Ubuntu.
Before proceeding any further, please note that most of the configuration for qBittorrent-Nox is handled through its web interface and not the command line.
We will need to use the command line to start the software for the first time and write a simple service file to launch qBittorrent at boot.
Starting qBittorrent Nox on Ubuntu from the Terminal
Let us show you how you can launch qBittorrent Nox on Ubuntu purely through the terminal.
This allows you to get the web interface up and running and generate any initial configuration files that you might need.
1. Launching the torrent server through the terminal on your Ubuntu device is extremely straightforward.
You need to use the following command in the terminal to launch qBittorrent Nox.
qbittorrent-noxCopy2. When running qBittorrent from the command line, you will see a message similar to what we have shown below.
This message indicates that the software is now available while notifying you where to access the web interface.
The username to access the web interface is also specified in the message. By default, the user will be called “admin“, and the default password for qBittorrent will be “adminadmin“.
******** Information ********
To control qBittorrent, access the Web UI at http://localhost:8080
The Web UI administrator user name is: admin
3. The problem with running qBittorrent from the command line is that it will only remain running while the current session is running. While you can run it as a daemon directly, you will have zero control.
We can work around this by writing a simple service file that will run qBittorrent in the background. Additionally, it will allow us to stop and start the torrent client quickly.
To continue with this guide, stop qBittorrent-nox by pressing CTRL + C.
Running qBittorrent as a Service
Now that we know that the qBittorrent-nox server runs on our Ubuntu device, we can create a service.
1. To run qBittorrent safely as a service, we should create a user under which qBittorrent will run it. This will help isolate the client from other programs running on your system.
You can create this user on Ubuntu by using the useradd command as shown below.
sudo useradd -r -m qbittorrentCopyWe use two options that help ensure other users can’t misuse it.
First, we use the “-r” option. This option tells the system to create this user as a “system user“. Simply put, you won’t be able to log in as this user.
Secondly, we use the “-m” option. Using this option, the useradd command will create a home directory for the new user.
2. For your current user to access files saved within our new user’s home directory, we will need to add our user to the “qbittorrent” group.
For this, we can utilize the usermod command. Make sure you replace “YOURUSER” with the username for your user.
sudo usermod -a -G qbittorrent YOURUSERNAMECopyThe “-a” option tells the command that we want to add a new attribute. The “-G” option tells usermod we want to add a new group to our user.
3. With the new user created, let us write the qBittorrent service for our Ubuntu system.
We can begin writing the service file by using the following command. We will be using the nano text editor, but you can choose whichever text editor you want.
sudo nano /etc/systemd/system/qbittorrent.serviceCopy4. Within this file, you will want to write the following lines.
These lines set up how Ubuntu will handle the qBittorrent service.
[Unit]
Description=qBittorrent
After=network.target

[Service]
Type=forking
User=qbittorrent
Group=qbittorrent
UMask=002
ExecStart=/usr/bin/qbittorrent-nox -d --webui-port=8080
Restart=on-failure

[Install]
WantedBy=multi-user.targetCopy
This service file does a few different things. First, we configure the service so that it should only start qBittorrent once the network becomes available.
Next, we set up various service elements, including telling it that the service should use the “qbittorrent” user and group.
We also set a UMask so that any files created under this user will utilize the Linux permissions “rw-rw-r--“. So basically, everyone can read the files, but only the user and group can write to them.
The final important part of this file is where we specify the command we want to use to run qBittorrent.
We use the “-d” option to launch the server in its daemon mode, then finally we use the “--webui-port” option to set the access port to 8080.
5. Once you have made these changes to the file, save and quit by pressing CTRL + X, then Y, followed by the ENTER key.
6. Now that we have created the qBittorrent service on our Ubuntu device, we can start it.
To start the service, we will utilize systemctl as shown below.
sudo systemctl start qbittorrentCopy7. You can verify the status of our new qBittorrent status by utilizing the following command.
This command tells the system manager to check the status of the service.
sudo systemctl status qbittorrentCopyYou should see the following message if the torrent software is now running on your Ubuntu device.
Active active (running)8. If everything is running fine, it should be safe to enable the service. By enabling the service, it will automatically start qBittorrent when Ubuntu starts.
All we need to do to enable the service is to run the following command.
sudo systemctl enable qbittorrentCopy9. With everything now configured, we can now move on to accessing and using the qBittorrent web interface.
Using the qBittorrent Web Interface
This section will explore how you can access and use qBittorrent’s web interface. This is crucial for those running the torrent client’s headless version.
The web interface is super straightforward to use and is basically like interacting with the desktop interface.
Accessing the Ubuntu qBittorrent Web Interface
To access the qBittorrent web interface, you will need is a web browser. This web browser can be running on your Ubuntu device or another separate device.
If you are running this on a separate device, you will need to know the local IP address belonging to your Ubuntu device.
1. To get to the web interface, all you need to know is the IP address of your Ubuntu device.
If you are accessing the interface on the same device, you can use “localhost” instead of the IP address.
http://IPADDRESS:80802. Before you can use qBittorrents web interface, you must login by entering your username and password (1.).
The default username is “admin“, and the default password is “adminadmin“.
Once you have typed in your login details, click the “Login” button to continue (2.).

3. You now have full access to the qBittorrent web interface. You can manage your torrents without accessing your Ubuntu device.
Before using this interface, you should change the default username and password.
Changing the Default Username and Password
It would be best to change the default username and password before you start using your Ubuntu qBittorrent web interface. This is especially true if someone else has a chance to access the interface.
Changing the username and password is all handled within the simple web interface.
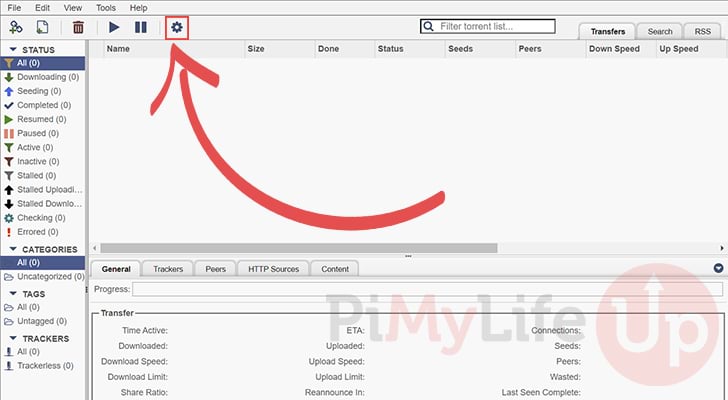
1. To open up the options within the web interface, you need to find and click the “cog” icon.
You will find this icon in the toolbar of the web interface.
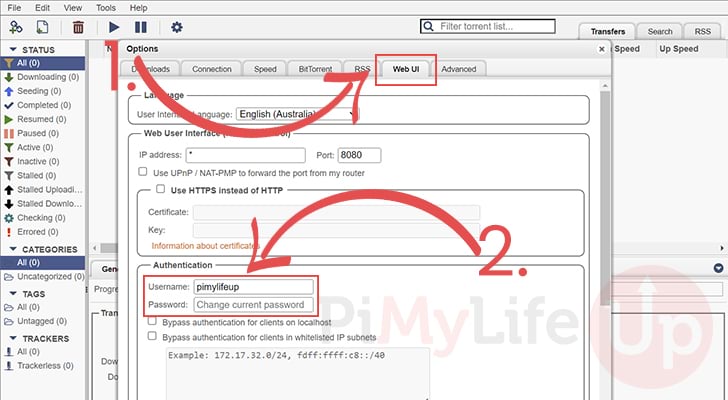
2. Within the options interface you will want to change to the “Web UI” tab (1.).
While within this tab, you can set both the username and password (2.).
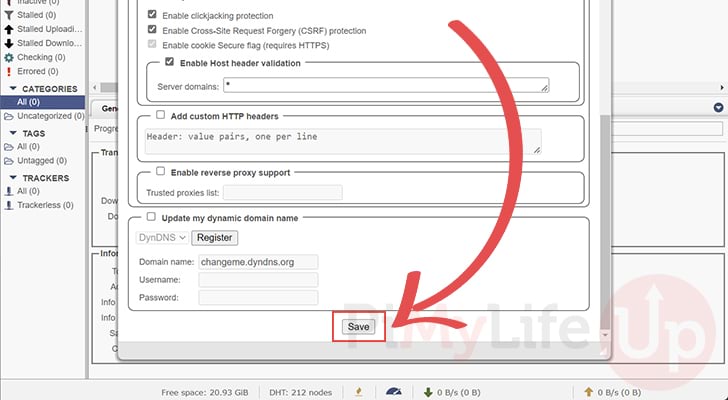
3. Once you have made all of the changes you want, you can save by scrolling to the bottom of the page.
At the bottom, click the “Save” button to finish the configuration.
Conclusion
This tutorial showed you how to install and configure the qBittorrent torrent client on Ubuntu.
As a lightweight, performance-friendly torrent client, it is often the go-to choice for many users. It even features a feature-packed web interface.
If you have any questions about setting up qBittorrent, please comment below.
Be sure to check out our other Ubuntu guides or our many Linux tutorials.


This is an awesome guide and I found it super helpful. The only recent addition that throws a kink in it is that qbittorrent-nox generates a random password now that displays in stdout. With my user, it was easy enough to see, but with the service, I couldn’t see it at all in journalctl or /var/log/syslog.
I ended working around it by changing the service to use my personal user, logging in, changing the password and settings, then copying everything from ~/.config/qBittorrent/ into the qBittorrent user’s .config folder. Changing the user back to qbittorent’s user in the qbittorrent.service. Then reloading with systemctl daemon-reload, and starting the service again. I hope this helps someone else!
Thanks again for the guide!
Ran into the same issue. Followed your advice and fixed it easily.
Thank you!
in the last step when you have to enable the service, there’s a typo. It says “qbittorrentt” there are 2 ‘t’s. <3
Hi Saladface3,
Thank you for pointing out that typo, it has now been corrected!
Cheers,
Emmet
You are so super duper fuper multi-uper awesome! I always use your this guide to setup qB-nox on all my servers. Thanks a ton m’dude!