This project will show you how to install File Browser on your Raspberry Pi.
File Browser is an incredibly simple-to-use file manager that you can utilize entirely from your web browser. This web interface allows you to upload, download, and delete files and folders from your file system.
This software can be great to run on your Raspberry Pi if you want to manage files remotely without needing any specialized software.
Best of all, File Browser is easy to set up and requires minimal configuration to work on a Raspberry Pi.
To make using this web-based file manager even simpler, we will install and run it using Docker. While the software is a single executable, Docker makes it easier to keep it isolated and running.
By the end of this guide, you can access your desired files and folders directly from a web browser.
Equipment
Below is a list of the equipment we used when setting up File Browser on a Raspberry Pi.
Recommended
Optional
This tutorial was last tested on a Raspberry Pi 5 running the latest version of Raspberry Pi OS Bookworm 64-bit.
Installing the File Browser Web Interface on the Raspberry Pi
In the following sections, we will walk you through the process of setting up File Browser on your Raspberry Pi.
Preparing your Raspberry Pi
1. Before installing and running the File Browser software on our Raspberry Pi, we should ensure that the operating system is up to date.
Update the package list cache and upgrade any out-of-date packages using the following two commands.
sudo apt update
sudo apt upgrade -yCopy
2. Once your Raspberry Pi is updated, you can move on to installing Docker. You will need the Docker runtime to set up File Browser.
Luckily, we have a guide that shows you how to install Docker on your Raspberry Pi. Follow this guide, and then return to this tutorial.
https://pimylifeup.com/raspberry-pi-docker/3. With Docker installed, our next step is to create a directory to store File Browser’s Docker Compose file and its database and configuration file.
You can create this directory by using the following command within the terminal.
sudo mkdir -p /opt/stacks/filebrowserCopy4. With the directory created, we must change into it by using the cd command.
cd /opt/stacks/filebrowserCopySetting up Needed Files for File Browser
5. To get File Browser to work on the Raspberry Pi, we need to make two additional directories.
- The first is the “
data” folder, where we will store the database file. - The second is the “
config” directory, which we use to store the configuration file.
You can use the mkdir command to create both of these directories.
sudo mkdir data configCopy6. The File Browser Docker container expects our Raspberry Pi to have an empty “database” file to write into.
The container itself doesn’t attempt to generate this file. We can create this empty file by using the touch command.
sudo touch ./data/database.dbCopy7. In addition to the database file, we must write a super simple configuration file.
You can begin writing this config file by using the following command.
sudo nano ./config/filebrowser.jsonCopy8. Within this file, you will want to enter the following lines. The only options you might want to adjust with this file are the “baseURL” and the “address“.
{
  "port": 80,
  "baseURL": "",
  "address": "",
  "log": "stdout",
  "database": "/database.db",
  "root": "/srv"
}Copy
9. Once you have filled out the configuration file, you can save and quit by pressing CTRL + X, Y, and then ENTER.
10. Due to how File Browser works, you must ensure that your user owns these new files and directories.
You can take ownership of these files and directories using the chown command.
By using the “$USER” environment variable we are automatically inserting your current user’s name. If you want this to run under a different user, replace this with their username.
sudo chown -R $USER:$USER ./config ./dataCopyWriting a Docker Compose File to Handle File Browser on the Raspberry Pi
11. We are now at the point where we can write the Compose file for File Browser on your Raspberry Pi.
A Compose file is a set of instructions for Docker to follow when setting up and running your container.
sudo nano compose.yamlCopyIf you want to manage your Docker Compose files more effectively, we highly recommend setting up Dockge on your Pi.
12. Within this Compose file you will want to enter the following lines.
While filling out this file, you will want to replace three placeholders.
<USERID>: Replace this with the ID of the user that you want File Browser to run under. The files you share through this software must be accessible by this user.
For example, for the default user on Raspberry Pi OS, you would use the ID “1000“.<GROUPID>: Use this value to specify the group under which service should run. Typically, a user has a group using the same ID, so you can use the same value as you did for your user.
For example, if you are using your default user on Raspberry Pi OS, you can replace this with “1000“<DIRECTORY>: The final value you need to replace lets you specify what directories should be available through the File Browser web interface.
For example, if you wanted to give access to your entire system you could use a single forward slash “/“. However, this is really something we would recommend against this.
Instead, replacing this with a specific directory would be best. For example, to share a user named “pi” home directory, we would use the value “/home/pi/“
services:
  filebrowser:
    image: filebrowser/filebrowser
    user: "<USERID>:<GROUPID>"
    ports:
      - 8080:80
    volumes:
      - <strong><DIRECTORY></strong>:/srv
      - /opt/stacks/filebrowser/data/database.db:/database.db
      - /opt/stacks/filebrowser/config/filebrowser.json:/.filebrowser.json
    restart: alwaysCopy
13. Once you have finished filling out the Docker Compose file, save and quit by pressing CTRL + X, Y, and then ENTER.
Starting the File Browser Container
14. With the Compose file now written, starting up the File Browser software on your Raspberry Pi is as easy as using the following command.
The password you will use to access the web interface is displayed during the initial setup process, so please pay attention.
docker compose upCopy15. Now, during startup, you should see a line looking a bit like the following. Copy down the password specified here, as that is what you will use to access Filebrowser.
You will not be able to see this password again.
filebrowser-1 | 2025/07/28 04:16:45 User 'admin' initialized with randomly generated password: ElDotpWrfVqE3krD16. Once you have copied down the password, stop the container by pressing CTRL + C.
17. Finally, start up File Browser again on your Raspberry Pi by using the following command.
You will see that this time we are using the “-d” option. This option enables Docker to detach from the terminal once it has started up the software.
docker compose up -dCopyAccessing the File Browser Web Interface
18. With File Browser now running on your Raspberry Pi, you will likely want to know how to access its web interface.
First, you will need the IP address of your Raspberry Pi. If you don’t know the IP, you can always use the hostname command as shown below.
hostname -ICopy19. Go to the following address in your favorite web browser.
Ensure that you replace “<IPADDRESS>” with the IP of your Pi.
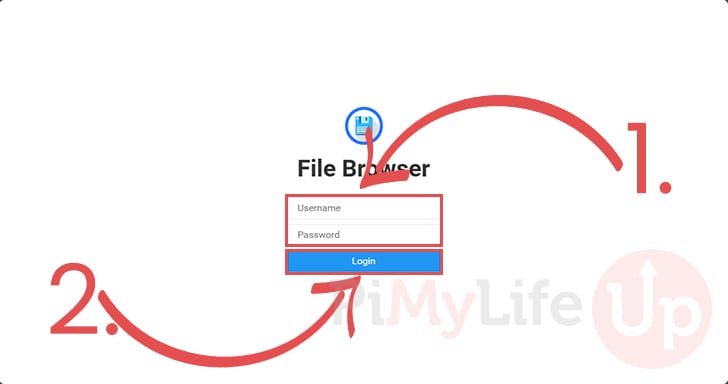
http://<IPADDRESS>:808020. When you access File Browser, you will be greeted with the following login screen.
You will need to log in using the default username and password. Fill out “admin” for the username and then use the password that was generated during the startup of File Browser.
Once you have filled out the default details, click the “Login” button (2.).
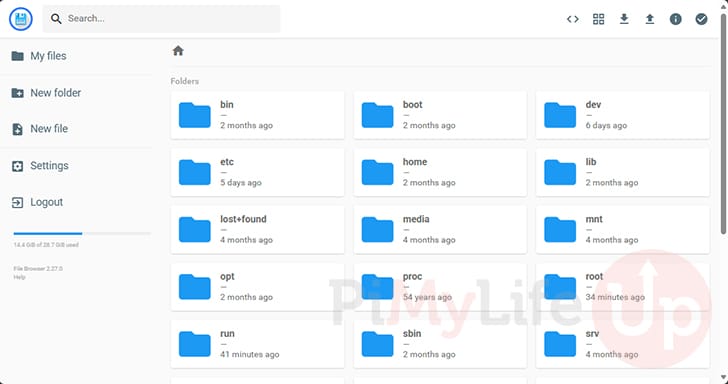
21. After logging in to File Browser, you will have full access to the files and folders on your Raspberry Pi.
You can use this interface to download and create new files on your system.
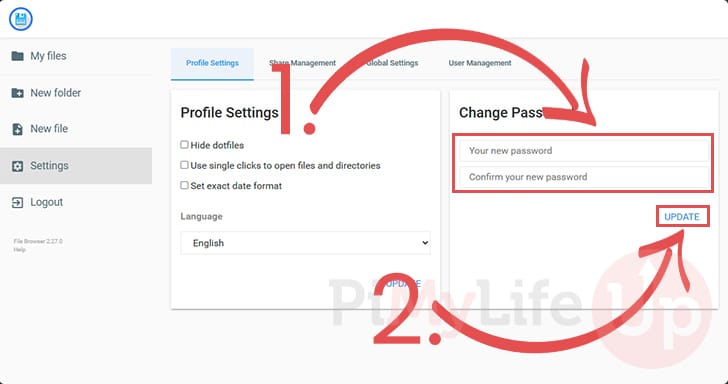
Changing the Default Password
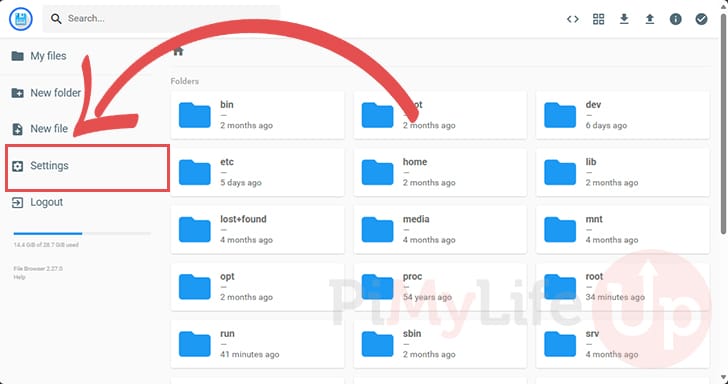
22. One massive risk of using File Browser out of the box is that the admin user’s username and password are incredibly simple. Luckily, updating this password is a pretty simple process.
Use the sidebar on the left side of the screen to change to the “Settings” menu.
23. Under the “Change Password” heading, enter a new secure password for the admin user (1.).
After filling out the new password, click the “Update” button to confirm the new password (2.).
Updating to the Latest Version of File Browser
An advantage of using Docker to run File Browser on your Raspberry Pi is that updating is easy.
This section will show you the quick steps to update to the latest release of File Browser.
1. Within the terminal, you will want to use the following command to change to the directory where you wrote the Docker Compose file.
You will need to be in this directory to update File Browser.
cd /opt/stacks/filebrowserCopy2. We can now use Docker to pull the latest version of the File Browser image by running the command below.
docker compose pullCopy3. Once a new version has been downloaded, we can use the following command to update the currently running container to it.
Docker will detect the new version, stop the running container, and then start using the new version.
docker compose up -dCopyConclusion
Hopefully, you will have successfully gotten the File Browser container up and running on your Raspberry Pi.
This software is super neat and allows you to manage the files on your system through an easy-to-use web interface. To further improve its usefulness, you may want to look into software such as Tailscale.
Please feel free to comment below if you need help getting this file browser to work.
If you enjoyed this tutorial, we recommend checking out our many other Raspberry Pi projects.


After installation, the app file browser with the userID “admin”, keeps asking for a password. But I do not recall that I had to set it up or what the password should be.
Hi Cor,
It looks like the initial set up procedure of File Browser has changed since we last run through the guide. The password you need is now generated during the initial startup of the software.
I have updated the guide to reference the new method that requires you to grab the password during startup.
Kind regards,
Emmet
Hi,
All went fine (i have smb service also on my raspberry). But when i want to reach the webpage i can see only a 3 dots loading and is not loading into login page. Seems it’s not blocked, as site title is File Browser and it’s doing something, but loading into eternity. Reboot not helping
Hi Adam,
That is definietely something not right there, did you make any changes to the “filebrowser.json” during the configuration steps?
Otherwise, you can bring up your browsers debug console by pressing F12 and then switching to the “Console” tab. There is a chance there might be a useful log printed there that might point us in the direction of what is going wrong. You may need to refresh the page to see the error pop up.
Kind regards,
Emmet