This tutorial will show you how to install the Jellyfin media server to the Raspberry Pi.

Jellyfin is a media server much like Plex and Emby. The software is designed to stream the media off of your Raspberry Pi to various clients.
Where Jellyfin differs itself is in its licensing, the software is open source and completely free-to-use.
All of the media server’s features and apps are not locked behind any paywall like its alternatives making Jellyfin a solid choice for the Raspberry Pi.
It has many of the same features that software like Plex and Emby have. Such as an inbuilt DVR and live TV functionality.
Jellyfin started as a fork of the Emby project after the Emby team moved to be proprietary software.
The biggest downside to using the Jellyfin media server on your Raspberry Pi is that it doesn’t have as much client software available.
However, it still features a client for most major operating systems, including Fire TV, Roku, Kodi, Android TV, Android, and iOS.
The Jellyfin team is working on expanding the support to the major game consoles as and LG’s and Samsung’s TV operating systems.
To get the best performance out of the Jellyfin media server we recommend using the Raspberry Pi 4 or newer. While the Pi 3 can run Jellyfin, it will start to come undone once transcoding is heavily used.
Equipment
Below is a list of the equipment we used for installing the Jellyfin media server to the Raspberry Pi.
Recommended
Optional
We tested this tutorial on the Raspberry Pi 5 using the latest release of Raspberry Pi OS Bookworm.
Video
Below we have embedded a video on how you can set up a Jellyfin media server on the Raspberry Pi. If you prefer to continue at your own pace, scroll passed and follow our written instructions instead.
Preparing your Raspberry Pi for Jellyfin
Before installing the Jellyfin media server to our Raspberry Pi, we need to do some essential preparatory work.
As Jellyfin is available through its repository, we will need to add it for our package manager to install Jellyfin.
1. Before we proceed, let us start by ensuring we are running an updated operating system.
As long as you are running a Debian operating system such as Ubuntu or Raspberry Pi OS, the following steps will work fine for you.
Update your Raspberry Pi’s operating system by using the following two commands.
sudo apt update
sudo apt upgrade -yCopy
2. With our Raspberry Pi up to date, we need to install some packages to access the Jellyfin package repository.
Out of the box, the apt package manager does not have support for repositories running behind HTTPS.
To work around this, we can install the apt-transport-https package by running the following command.
sudo apt install apt-transport-https lsb-releaseCopyThis package adds support for the HTTPS transport protocol to the apt package manager.
3. Next, we need to import the GPG signing key to our Pi.
We can use the following command to pipe the key directly to our package manager’s key chain.
curl https://repo.jellyfin.org/debian/jellyfin_team.gpg.key | gpg --dearmor | sudo tee /usr/share/keyrings/jellyfin-archive-keyring.gpg >/dev/nullCopyGPG Keys are an essential part of how package repositories remain secure. The keys help ensure that only software signed by the repository will be installed.
4. Now that we have the GPG key added, we can finally add the Jellyfin repository to our Raspberry Pi.
We can use a handy one-liner that will automatically generate the correct line for the sources file.
echo "deb [signed-by=/usr/share/keyrings/jellyfin-archive-keyring.gpg arch=$( dpkg --print-architecture )] https://repo.jellyfin.org/debian $( lsb_release -c -s ) main" | sudo tee /etc/apt/sources.list.d/jellyfin.listCopyThis line automatically grabs the current systems architecture and its current release and fills in the blanks.
5. Lastly, we need to update our Pi’s package list.
You can update the package list by using the following command on your device.
sudo apt updateCopyWhen you make a change to the sources file, you need to update the package list. Without updating, the package manager won’t be aware of the changes.
6. Before continuing you should consider setting your Raspberry Pi to use a static IP address.
This will make it easier to connect to the Jellyfin media server when your device restarts.
Installing Jellyfin to the Raspberry Pi
With the package repository added, we can now install the Jellyfin media server on our Raspberry Pi.
Thanks to all the work we did in the previous section, this step is very straightforward.
1. On your Raspberry Pi, all you need to do is run the following command to install Jellyfin.
sudo apt install jellyfinCopyThis command will download and install Jellyfin from the package repository we added.
2. During the installation process Jellyfin will set up a few things on our Raspberry Pi.
The first thing it does is create a new user called “jellyfin“. This user is used to run the software on your Raspberry Pi and is also the user who will need to access your files.
Secondly, it also creates a service for Jellyfin. This service will start the media server automatically at boot and allow you to start, stop, and restart the service easily.
Accessing Jellyfin’s Web Interface
Now that you have installed the Jellyfin media server to your Raspberry Pi, you will want to access its web interface.
The web interface is straightforward to use and supports most major web browsers.
1. To access the Jellyifn web interface, you will need to know your Raspberry Pi’s IP address.
The quickest way of getting your Pi’s local IP address is to use the hostname command as we have below.
hostname -ICopy2. With the IP address handy, you need to go to the following address in your web browser.
Make sure you include the Jellyfin port (8096) at the end of the URL.
http://[IPADDRESS]:8096You need to replace “[IPADDRESS]” with the IP you got in this section’s first step.
First Setup Experience of Jellyfin
Before you can start using Jellyfin, you will need to run through its first setup experience.
Don’t worry, as the setup experience is a reasonably straightforward process.
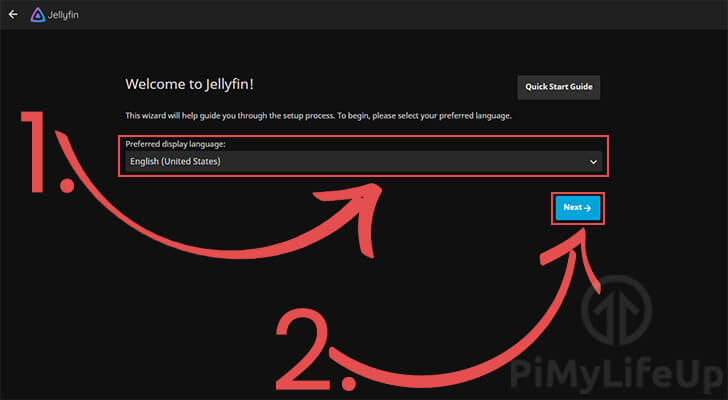
1. When you first use Jellyfin, you will need to configure the media server.
The first step is to select the display language that you want to use (1.).
Once you have the language you want set, click the “Next ->” button (2.) to continue.
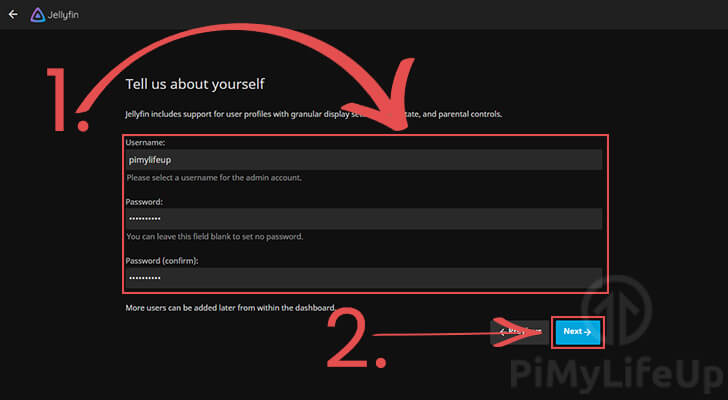
2. Now, we need to create an admin user for accessing Jellyfin.
Use the interface to set a username and password for your account (1.).
When you have filled out the required information, click the “Next ->” button (2.) to set the user details.
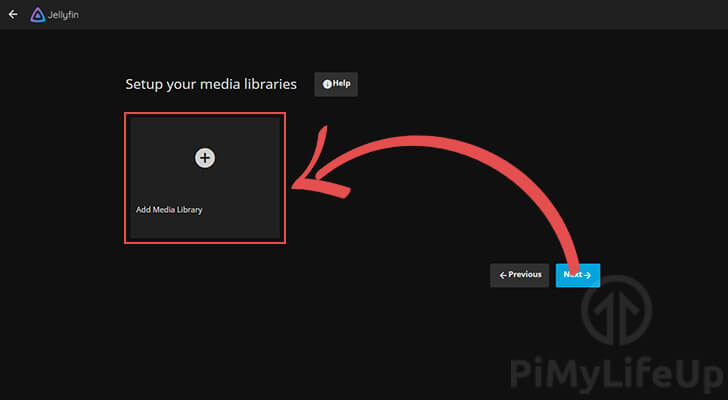
3. On this step, you can now add media libraries to your Jellyfin media server.
To add your first media folder, click the “Add Media Library” button.
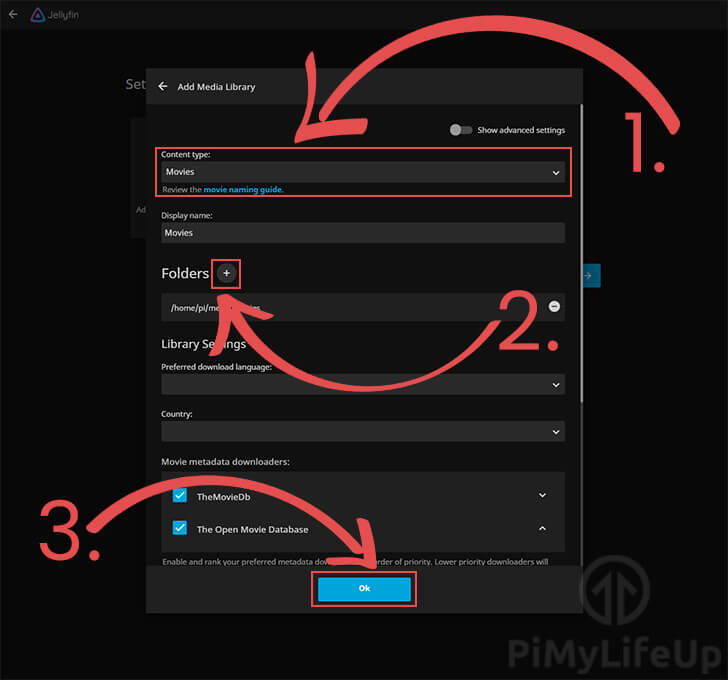
4. The first thing you need to do is select a content type (1.).
The content type is what dictates how Jellyfin will retrieve information about these files.
Next, you need to add the folders where your media files are located. You can start this process by clicking the plus symbol (+) next to “Folders” (2.).
Once you have folders added, click the “Ok” button located at the bottom of this screen (3.).
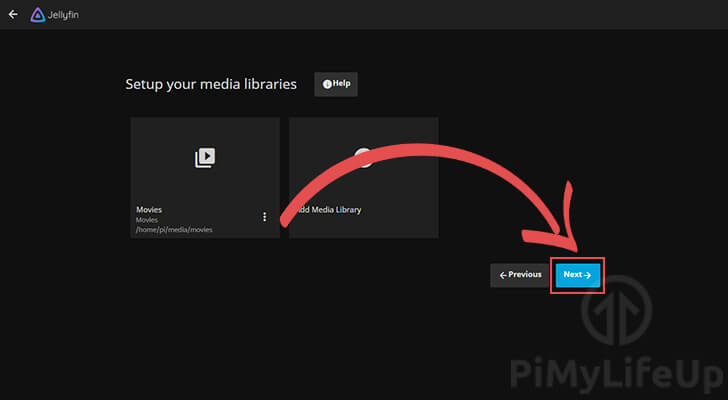
5. You can now add additional media folders if you want.
For this guide, we will be sticking with our “Movies” folder.
Click the “Next ->” button to proceed.
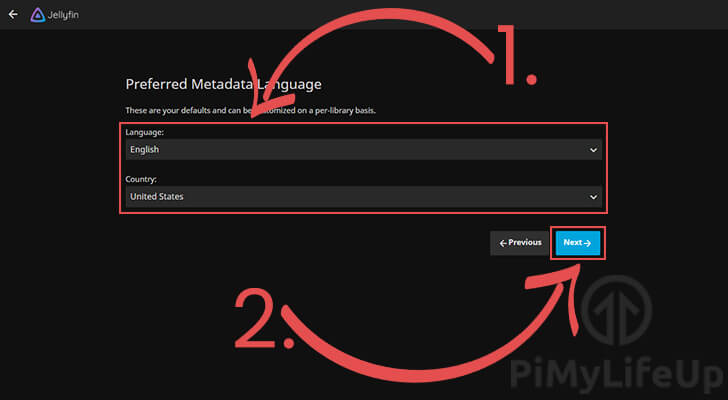
6. We can now set the default language Jellyfin will use to fetch metadata (1.).
When Jellyfin connects to services such as TVDB, it can fetch episode names and other information in your local language if it is available.
Once you have set the language, click the “Next ->” button to continue (2.).
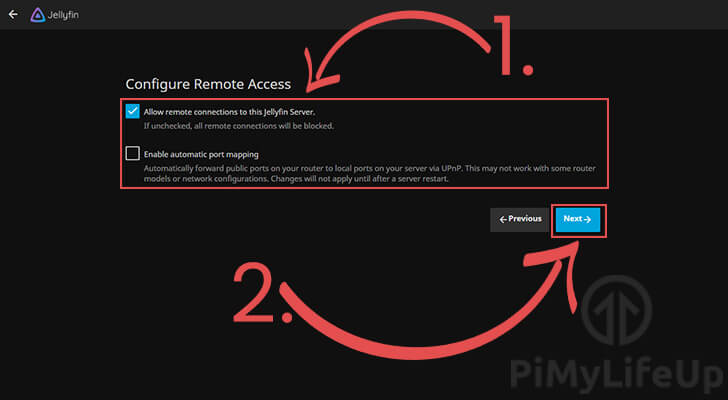
7. During the initial setup experience, you can configure remote access for your Jellyfin media server (1.).
Use these options to block outside access to your Jellyfin server or to get itself to auto-forward access through your router.
Once set, click the “Next ->” button to confirm your settings (2.).
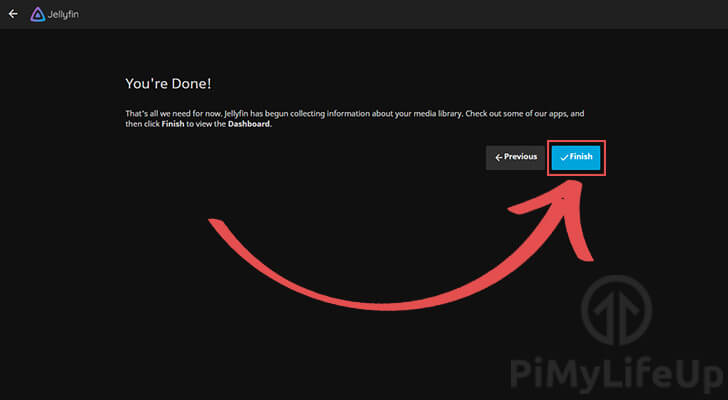
8. You have now finished the initial setup experience for the Jellyfin media server on your Raspberry Pi.
You can click the “Finish” button to finalize the setup.
Logging in to Jellyfin
Before accessing your Raspberry Pi’s Jellyfin web interface, you will need to log in.
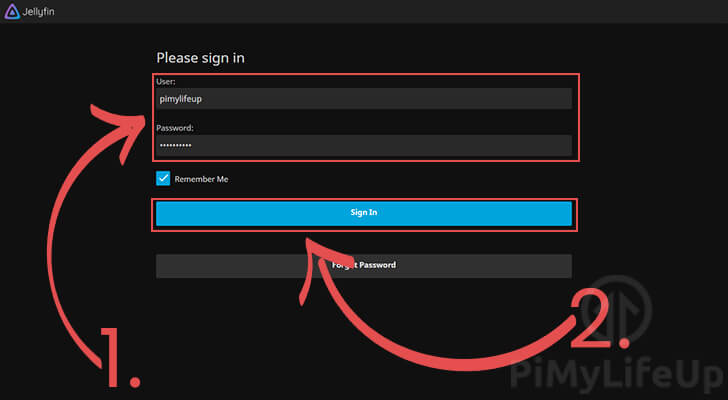
1. Logging in to Jellyfin is a fairly straightforward process.
All you need is a username and password (1.). Both of these you should have created during the Jellyfin initial setup experience.
With your login details entered, click the “Sign In” button (2.) to log in to the web interface.
2. You should now be able to watch your media through the Jellyfin media server.
Be sure to explore the interface to see how you can configure Jellyfin to best suit your needs.

Enabling Hardware Acceleration for Jellyfin
To help improve your experience with Jellyfin on the Raspberry Pi, you should enable hardware acceleration. These steps will require you to do things on both the Raspberry Pi and the Jellyfin web interface.
For the optimum experience, you should also ensure your Raspberry Pi is adequately cooled.
Please note that while this still works for now, this functionality has been deprecated for the Raspberry Pi. Future releases will remove this function entirely.
Configuring your Raspberry Pi for Hardware Acceleration
We must configure a few things on our Raspberry Pi using the terminal before it will be able to utilize hardware acceleration.
1. We need to start by adding the “jellyfin” user to the “video” group.
The video group is a special system group with access to features such as the Raspberry Pi’s GPU.
The following usermod command will allow us to add the jellyfin user to the video group.elow.
sudo usermod -aG video jellyfinCopyThe -a argument says that we want to add an attribute to a user. The capital G tells usermod that we want to add the video group to jellyfin.
2. To ensure that the Jellyfin media server knows that it can now access the video group you will want to restart your Raspberry Pi.
Restarting your Pi is as straightforward as running the command below.
sudo rebootCopyTelling Jellyfin to use Hardware Acceleration
With our Raspberry Pi now better configured for Jellyfin’s hardware acceleration, we now need to reconfigure the media server. For this process, you will need to have access to Jellyfin’s web interface.
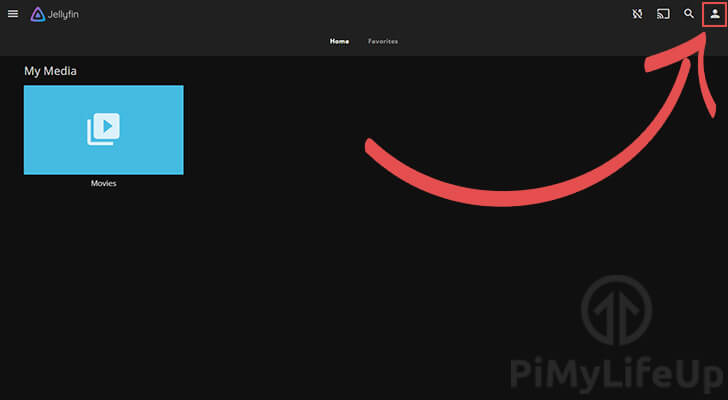
1. While on the web interface’s front page, you need to change to the user settings page.
You can get to the user settings by clicking the person icon in the window’s top-left corner.
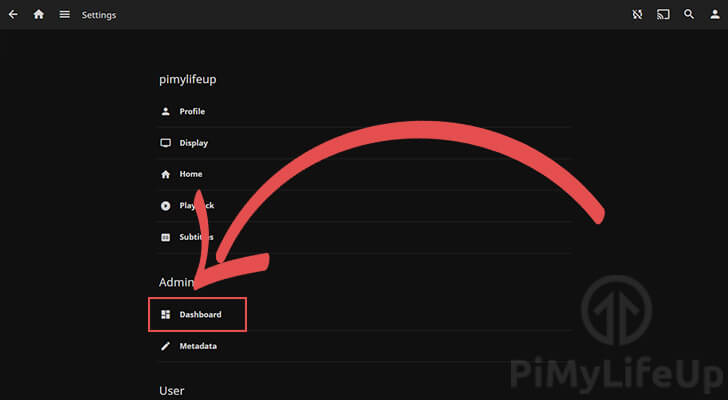
2. Within the user settings, we need to change to the media servers dashboard.
To change to the dashboard, click the “Dashboard” option.
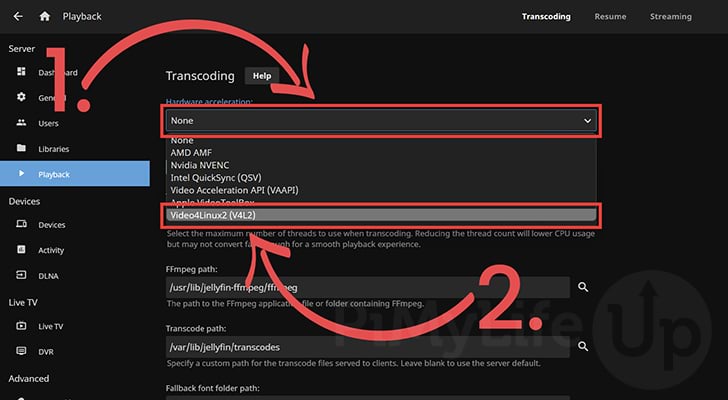
3. Now that we are in our Raspberry Pi’s Jellyfin dashboard, we need to change to the “Playback” tab.
You can find this option in the left-hand sidebar.
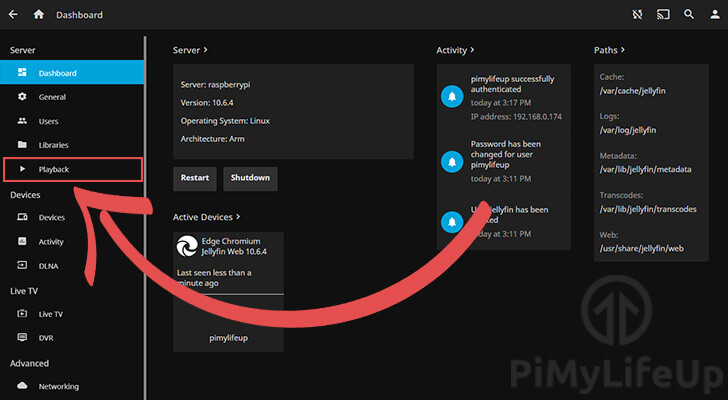
The “Playback” tab is where we can control how files are played from our Raspberry Pi to the Jellyfin clients.
4. Under the “Hardware acceleration” heading, you should see a select box (1.).
Click this box, then select the “Video4Linux2(V4L2)” option (2.).
V4L2 is the only one of these options that have built-in support for the Raspberry Pi’s hardware.
5. Now, the final thing you need to do is scroll down to the bottom of the window.
At the bottom, you can save the settings by clicking the “Save” button.
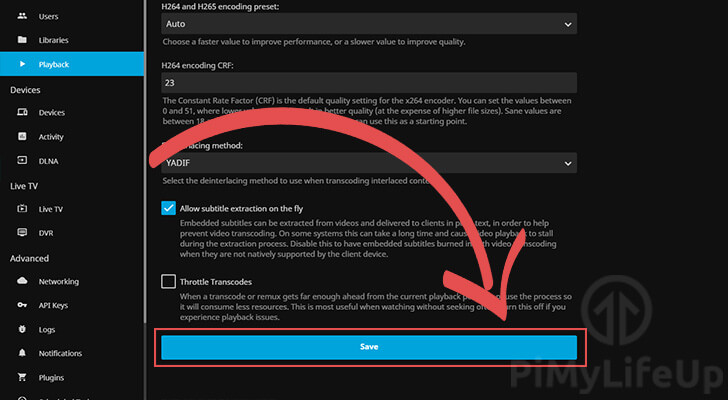
6. You should now have successfully enabled Jellyfin hardware acceleration on your Raspberry Pi.
Dealing with Permission Issues
One problem you may encounter when dealing with a media server such as Jellyfin is potential permission issues.
The Linux permission system can sometimes be a bit picky, especially when dealing with mounted drives.
In this section, we will show you how to set the permissions for an ext4 based drive.
Alternative drive format types such as NTFS or FAT will require you to adjust how you are mounting the drive. These drive format types were never designed with the Linux permission system in mind.
1. First, work out the directory where you are storing your media files.
You will need to know the exact path so the script knows what directory it needs to modify permissions for.
For our example we will use a directory such as “/home/pi/media/movies“.
2. For the commands that we will use, we need to be utilizing the superuser.
We can change to the superuser by running the following command on your device.
sudo suCopy3. With a directory path handy, we can now utilize two special commands.
Run the following two commands on your device. Make sure that you replace “[YOURDRIVEPATH]” with the path you want to try correcting the permissions on.
find <strong>[YOURDRIVEPATH]</strong> -type d -exec chmod 755 {} \;
find <strong>[YOURDRIVEPATH]</strong> -type f -exec chmod 644 {} \;Copy
These commands will loop through your files and directories and re-adjust the permissions so that our jellyfin user should be able to read the media files within it.
4. Once you have run the previous two commands, we should exit out of the superuser.
To exit, all you need to do is run the following command on your Raspberry Pi.
exitCopyConclusion
You should now have the Jellyfin media server installed on your Raspberry Pi.
We have shown you how to install the software, do the initial setup experience, and even enable hardware acceleration.
Jellyfin is a strong alternative to Plex and Emby that offers an entirely open-source and free experience.
The media server sports many of the paid features of software such as Plex, including hardware acceleration and live TV support.
If you have had any issues with the steps provided in our guide, feel free to leave a comment below.
Be sure to check out some of our other Raspberry Pi media projects to find out what else you can do with your device.


Great tutorial!!! Can you show us how to secure the remote access over https? Thanks a million!
Hey Star,
The best / easiest way is to use something like an Nginx based reverse proxy (Something we do personally). Using something like Nginx proxy manager greatly simplifies this process.
If you can’t port forward or are stuck behind CGNAT you could even do something like setting up Tailscale, and then setting up a cheap DO droplet as an endpoint with the proxy running on that. That would allow you to get your Jellyfin traffic out of your network, and then still allow you to access it without you having to run Tailscale on every device.
I can try and explaion that a bit better if you want.
Kind regards,
Emmet
Thanks Emmet for following up, I went with caddy, similar reverse proxy concept.
interestingly enough if you look at the Jellyfin website, they say don’t use the raspberry pi, even the pi 5. It says single board computers are not powerful enough. I ran though this with tutorial using a pi 4 anyway and it works great. I even run two to three clients at a time and the experience is great! granted, its all local network. I haven’t tried remote connections but I assume that would be more reliant on other factors such as ISP upload speed and client network/Internet speeds
Worked fine. Thank you very much
Will this work in the Raspberry Pi OS Lite? I have a pi5 with 8gb of ram. I currently have openmediavualt and plex server installed on it.
Hi Luis,
Yes it will definitely work on Raspberry Pi OS Lite, and it would be the operating system I would recommend for anyone starting fresh.
Kind regards,
Emmet
Might add that hardware acceleration using V4L2 has been deprecated in newer releases of Jellyfin.
https://jellyfin.org/docs/general/administration/hardware-acceleration/#raspberry-pi-hardware-acceleration-support-deprecation
Hi,
Thank you for pointing that out that the functionality has been deprecated. I added a note to our section about hardware acceleration about the upcoming removal of this feature.
Kind regards,
Emmet
nicely done!!! Great documentation, thanks for sharing
On the hardware acceleration step, it says to allocate 256 memory on pi 3, and 320 on pi 4, but i was wondering how much i should allocate on a pi 5?
Hi Flippings808,
With recent changes to the Raspberry Pi and the way its GPU driver now works, this option is no longer relevant and has no effect on the Raspberry Pi.
I have removed those steps to prevent future confusion.
Kind regards,
Emmet
I’m running into a problem very early in the process. When I get to step 4, sudo apt update, I get the following error:
Hi Carl,
Did you try following any other tutorials before following this one. That error is indicating that you already have an entry for Jellyfin which is causing a conflict as they are pointing to different keyrings.
I quickly tested this on my Pi and couldn’t reproduce the issue.
Kind regards,
Emmet
Why can’t jellyfin find any of my USB devices that store the my content?
Hi Michael,
Typically, this is caused by permission issues. You will need to ensure that the “jellyfin” user has at least read permissions on your USB devices.
Kind regards,
Emmet
Came here just to say thank you for awesome tutorial. Everything worked and it is super easy to setup.
This was extremely helpful.Thank you!
hi there, i was just wondering: i have an rpi4 running samba and transmission. can i add also jellyfin and still use samba?
Hi Jstmblaz,
Off the top of my head, you should be fine using Jellyfin alongside both of those. However, it is not something I’ve personally tested.
Cheers,
Emmet
This is a great and detailed article. I’m hitting problems at the early stages if anyone has any ideas.
The following packages have unmet dependencies:
jellyfin : Depends: jellyfin-ffmpeg5 (>= 5.0.0) but it is not installable
E: Unable to correct problems, you have held broken packages.
Hi Joe,
This is a strange issue, can you check the contents of the “/etc/apt/sources.list.d/jellyfin.list” file.
You can output the line using the “cat” command as shown below.
If you are using Raspberry Pi OS Bullseye it should look like what we have shown below.
Cheers,
Emmet
Awesome guide, just one thing that needs a little updating concerns the hardware acceleration portion as OpenMAX OMX was recently dropped from Jellyfin – their latest doc mentions that they have migrated to V4L2 with a fallback on software de/encoding whenever it wouldn’t work.
Hi Julian,
Thank you for mentioning this issue. I haven updated that part of the guide so it now points to Video4Linux instead.
Cheers,
Emmet
This is the best guide available. Thank you!!!
Per https://github.com/jellyfin/jellyfin/issues/2832, since the pi may be running ubuntu rather than debian, a better command for step 3 of “Preparing your Raspberry Pi for Jellyfin” is:
echo "deb [arch=$( dpkg --print-architecture )] https://repo.jellyfin.org/$( awk -F'=' '/^ID=/{ print $NF }' /etc/os-release ) $( awk -F'=' '/^VERSION_CODENAME=/{ print $NF }' /etc/os-release ) main" | sudo tee /etc/apt/sources.list.d/jellyfin.listHi Dobber,
Thank you for the suggestion, however, in the case of this tutorial it won’t really work.
The reason for this is that for Raspberry Pi OS we need to be using “Debian” as the ID. However the “ID” from the “
/etc/os-release” file reports this as being Raspbian, so in that case this tutorial would broke.They have the alternative
ID_LIKE, but that value for both Ubuntu and Raspbian references “Debian”.Cheers,
Emmet