In this project, we will walk you through setting up the NGINX reverse proxy manager on your Raspberry Pi.

The NGINX proxy manager is a useful tool that simplifies the process of setting up a reverse proxy on your Raspberry Pi.
There are various reasons why you might want to set up a reverse proxy on your Raspberry Pi. The number one reason would be to expose a service to the internet and allow you to quickly implement HTTPS.
For example, if you set up a service that doesn’t support HTTP, you can make it route through the NGINX reverse proxy instead. This reverse proxy can then accept HTTPS requests, which are then forwarded to the less secure program.
Setting up a reverse proxy on your Raspberry Pi also makes running multiple applications simpler.
Over the following sections, we will show you how to get the NGINX reverse proxy manager running on your Raspberry Pi using Docker.
Equipment
Below is a list of the equipment we used to set up the NGINX Proxy Manager on the Raspberry Pi.
Recommended
Optional
This tutorial was last tested on a Raspberry Pi 400 running the latest version of Raspberry Pi OS Bullseye 64-bit.
Installing the NGINX Proxy Manager on the Raspberry Pi
This section will cover all of the steps required to get your Raspberry Pi working as a reverse proxy. We will be achieving this by using a piece of software called the NGINX proxy manager.
We chose this software as it allows you to set up multiple reverse proxies on your Pi easily.
These initial steps will be run entirely within the terminal, so ensure you have that open before continuing. If you are using a desktop flavor of Raspberry Pi OS, you can bring this up by pressing CTRL + ALT + T on your keyboard.
Preparing your Raspberry Pi to run the NGINX Reverse Proxy Manager
1. Before we get started, we must ensure that our Raspberry Pi is set up to run the NGINX proxy manager.
Our first step in this process is to ensure our package list is up-to-date and any out-of-date packages are upgraded.
You can achieve both tasks by using the following command in the terminal.
sudo apt update
sudo apt upgrade -yCopy
2. After the upgrade is complete, your next step will be to install Docker to the Raspberry Pi.
Please follow the guide we linked above before continuing with this tutorial. Our Docker guide will get the software running correctly on your device.
3. Once you have Docker installed, we can continue with the next few steps.
We now must create a folder to store the Docker compose file. Create a directory named “nginxproxymanager” on your Raspberry Pi by using the following mkdir command.
sudo mkdir -p /opt/stacks/nginxproxymanagerCopy4. After creating the new directory, you should change into it using the cd command.
cd /opt/stacks/nginxproxymanagerCopyWriting a Docker Compose File for the NGINX Proxy Manager
5. We can now proceed with installing the NGINX proxy manager.
Since we will be running this reverse proxy service on our Raspberry Pi using Docker, we will want to create a Docker Compose file. A compose file is like a set of instructions for Docker so that it knows how to start up the specified container.
Begin writing this file using the nano text editor by using the command below in the terminal.
nano compose.ymlCopy6. Within this file, type in the following lines.
While you can also set up a MariaDB or MySQL server alongside the NGINX Proxy Manager, we will rely on SQLite. SQLite doesn’t require a separate server and should be fast enough for most people’s needs.
services:
  app:
    image: 'jc21/nginx-proxy-manager:latest'
    restart: unless-stopped
    ports:
      - '80:80'
      - '81:81'
      - '443:443'
    volumes:
      - ./data:/data
      - ./letsencrypt:/etc/letsencryptCopy
7. After adding the above lines, you can save and quit by pressing CTRL + X, followed by Y, then ENTER.
Starting the NGINX Proxy Manager on your Raspberry Pi
8. We can now start the reverse proxy manager on the Raspberry Pi using the following command.
By using the “-d” option, we are tell Docker that it should from the current terminal session when it launches the container.
docker compose up -dCopyThis process may take a few minutes to complete as it needs to download all of the components of the container.
Using the NGINX Proxy Manager on the Raspberry Pi
Now that we finally have the NGINX Proxy manager running on the Raspberry Pi, let us put it to use.
Thanks to this software, you will soon see how simple it is to set up a reverse proxy on your Raspberry Pi.
Accessing the NGINX Proxy Manager Web Interface
1. The NGINX Proxy manager is configured entirely through its web interface. To access this interface, you must first know the IP address of your Raspberry Pi.
The easiest way to get your Raspberry Pi’s IP address is to use the hostname command.
hostname -ICopy2. Once you know your Pi’s IP, go to the following address in your favourite web browser.
Ensure you replace “<YOURIPADDRESS>" with the IP for your Raspberry Pi.
http://<YOURIPADDRESS>:81/Initial Setup Experience
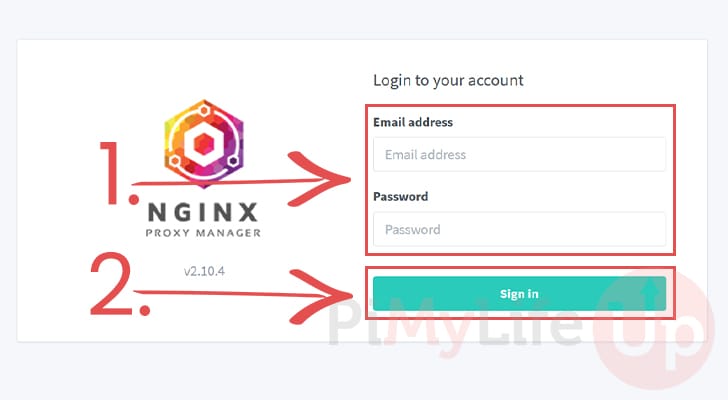
3. You will be greeted by the following screen asking you to login. NGINX Proxy Manager has a default login you must use for your initial login.
For the username, type in “admin@example.com“. For the password, type in ” changeme” (1.).
After filling out the default password, click the “Sign In” button (2.).
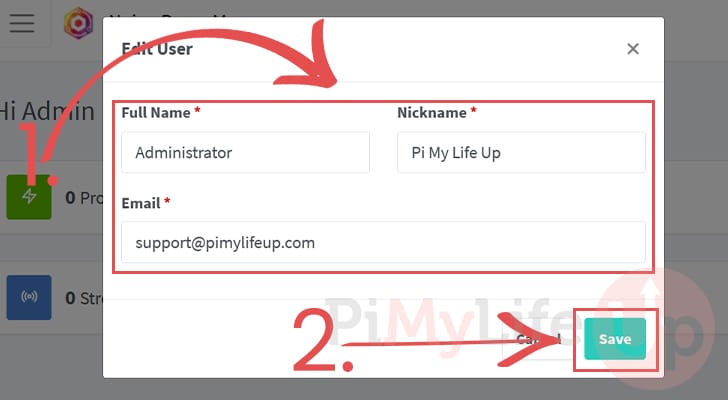
4. Upon logging on for the first time, you must fill out the details for your new user (1.).
After updating the details, click the “Save” button (2.).
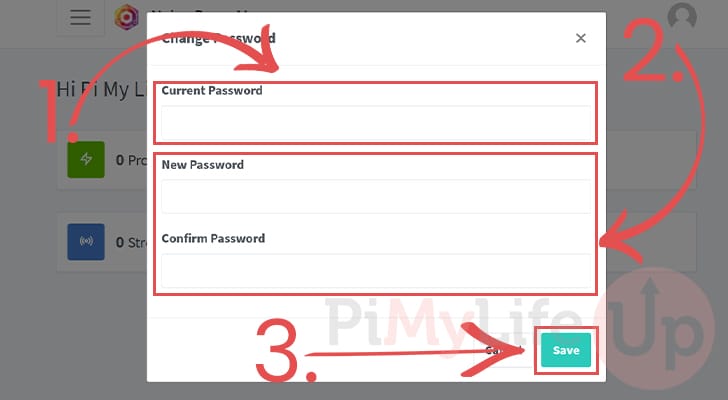
5. Next, you must set a new password for your account. Start by entering the current password (1.), which will still be “changeme“.
You will then get to fill out a new password for your account (2.).
To confirm your new password, click the “Save” button (3.).
Creating your First Reverse Proxy on the Raspberry Pi
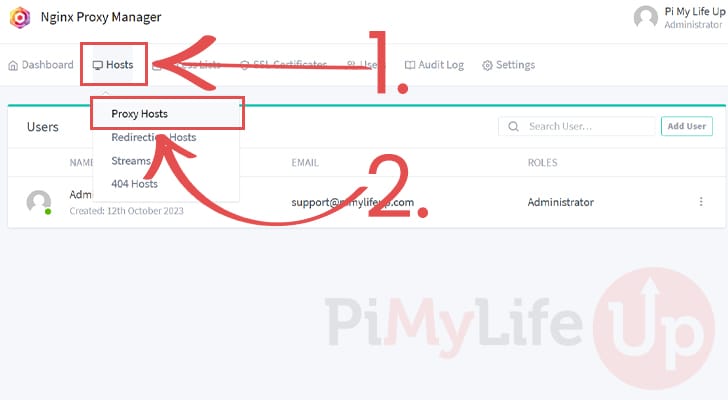
6. You now have the NGINX reverse proxy manager running on your Raspberry Pi. While we won’t be covering the exact steps of setting up a reverse proxy, let us show you where to find the option.
In the top menu, you must click the “Hosts” button (1.). This will bring up a drop-down box listing the different types of proxies you can set up on the Pi. To proceed, click the “Proxy Hosts” option (2.).
7. You will now be on the proxy hosts page. Currently, there will be nothing here. Click the “Add Proxy Host” button to proceed.

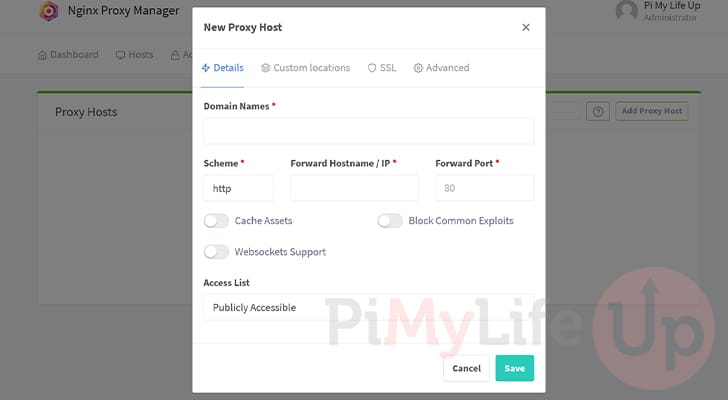
8. You can now use this dialog box to set up all of the details for the reverse proxy on your Raspberry Pi.
This allow you to set the domain name or names, the HTTP scheme, hostname/IP, and the port you are pushing through your proxy.
When filling out the domain name, you will need to press ENTER to confirm it every time. The reason for this is that the form enables you to reigster multiple domain names for the one proxy.
You can also tell the NGINX Proxy Manager to generate an SSL certificate for your domain name using this same dialog.
Once you are happy, click the “Save” button to proceed.
Conclusion
Hopefully at this point you will now have the NGINX Proxy Manager set up and running on your Raspberry Pi.
This software makes running reverse proxies on your Raspberry Pi a far simpler process. A reverse proxy can help set up faster and more secure access to software on your device.
Please leave a comment below if you need help getting this software to run.
If you found this tutorial useful, check out our many other Raspberry Pi projects.


The one flaw in the pimylifeup.com setup of Docker, Nginx, Portainer install on a Raspberry Pi, is you didn’t mention: after typing the domain name in the Add Proxy Host dialogue box, you MUST hit “ENTER”! Otherwise the domain name disappears.
This one thing meant it took 4 days to set up the first time but less than 2 hours from starting the Raspberry Pi Imager to having set up 6 proxy hosts and 4 Redirection Hosts for another domain name now.
Hi Mark,
Sorry that it took you so long the first time round, that textbox can definitely be a little confusing if you hadn’t had to deal with them very often! I have added a bit of extra text about needing to press ENTER to confirm each of the domain names you enter.
I will also need to re-do the screenshots so might try and make it even clearer when I get around to doing that.
Kind regards,
Emmet
The tutorial worked great. Unfortunately I cannot reach the container. I am getting a 522 error so it looks like the containers are not communicating. I have tried them on the bridge network and also on a dedicated network:
services:
networks:
– nginx-reverse-proxy
networks:
nginx-reverse-proxy:
external: true
Any suggestions?
Hi Neal,
That is definitely an unsual issue and not something I’ve actually run into before with the NGINX proxy manager. Is your issue with using the NGINX proxy manager itself? or routing software to run through the manager?
Kind regards,
Emmet
I believe it is getting the software/containers to talk to the manager. If there is a better place to ask for assistance please advise. Thanks!
Hi Neal,
If you are able to access the proxy managers web interface, then I would recommend trying to not use a Docker network to start with. So you would export the ports on your other Docker services, and then set up the proxy routes using your devices public IP address to them if that makes sense? So you would proxy something like
http://192.168.0.123:2323instead ofhttp://CONTAINERNAME:2323I would need to see how you have set up your Docker Compose files, as well as how you configured that proxy within the proxy managers web interface to give any suggestions as to why it might not be working.
Kind regards,
Emmet
Thank you for this and other detailed guides. I was able to setup this and route my domain to my Pi’s IP address. However, after hitting my domain name, it automatically exposes my Pi’s IP address. How do I conceal this? Please advise.
Hi Nelson,
That is kind of just the way the domain name system works. You could run your domain through cloudflare and use there proxy service. They also offer there cloudflare tunnel that would make it significantly harder for someone to get you public IP. (We have a guide that shows you how to set up the cloudflare tunnel)
The other option is to set up your own proxy on a VPS and route through that. While not perfect, they do make it harder for someone to get your IP.
Let me know if that helps you at all. I can try to explain things a bit better if you need.
Kind regards,
Emmet
Any suggestions for alternate ports? I already have 8080 & 8443 allocated and need to keep 80 free for the router.
Hi Joe,
While ideally you would use something like Nginx proxy manager on ports 80 and 443, you could get away with any ports, like 3000 and 3001, as long as no other service is sitting on it, it should be fine.
Kind regards,
Emmet
Hello. A question:
In the docker-compose.yml file, where is the SQLite database? Or is it not necessary to include it?
Thank you
Hey JLuis,
SQLite is serverless so it’s all within the one container. The SQLite database file will be stored within the mounted “./data” directory.
Cheers,
Emmet