In this quick tutorial, we will be showing you how to set up Duck DNS on your Raspberry Pi.
Duck DNS is a very simple-to-use and completely free Dynamic DNS provider. It enables you to create free subdomains on their website and dynamically point them to your IP address.
This service is excellent for those who don’t want to fork out money for their own domain name like you would with Cloudflare. The subdomains are all for the domain “duckdns.org“. So, if you used the subdomain “pimylifeup” the full address would end up being “pimylifeup.duckdns.org“.
While this provider doesn’t charge anything for their service, you should consider donating to their Patreon if you use it.
The advantage of using a Dynamic DNS provider is having a domain name that continually points to your IP address. Most internet providers do not issue dedicated IP addresses, and when they do, it comes at an additional cost.
Running a service such as Duck DNS on your Raspberry Pi means you can continue to run stuff such as a Minecraft server or Plex server without having to stress every time your internet provider changes your IP address.
Best of all, Duck DNS has an incredibly simple API, so you don’t have to rely on tools like ddclient to update your IP. All we need to do is send a simple curl request alongside a token you get during sign-up.
Equipment
Below you will find a list of equipment we used when setting up Duck DNS on our Raspberry Pi.
Recommended
Optional
This tutorial was last tested on a Raspberry Pi 400 running the latest version of Raspberry Pi OS 64-bit.
Setting up Duck DNS for your Raspberry Pi
Over the following steps, we will walk you through setting up Duck DNS on your Raspberry Pi.
By the end, your IP address will be automatically updated every five minutes with this Dynamic DNS service.
Getting your Duck DNS Token
1. We must generate an API token before we can set up our Raspberry Pi to utilize the Duck DNS service.
To get this token, you must go to the Duck DNS website using the following address.
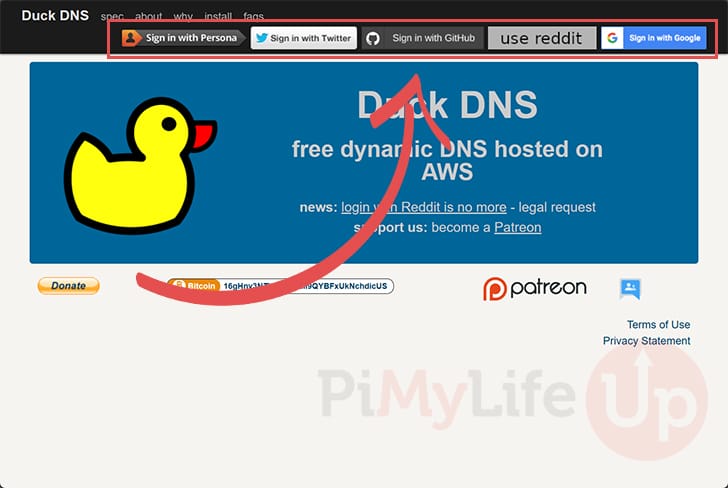
https://www.duckdns.orgOnce you open the Duck DNS homepage, use one of the supported single sign-on providers to log in to the web interface. We are using our Gmail account, but you can use any of these.
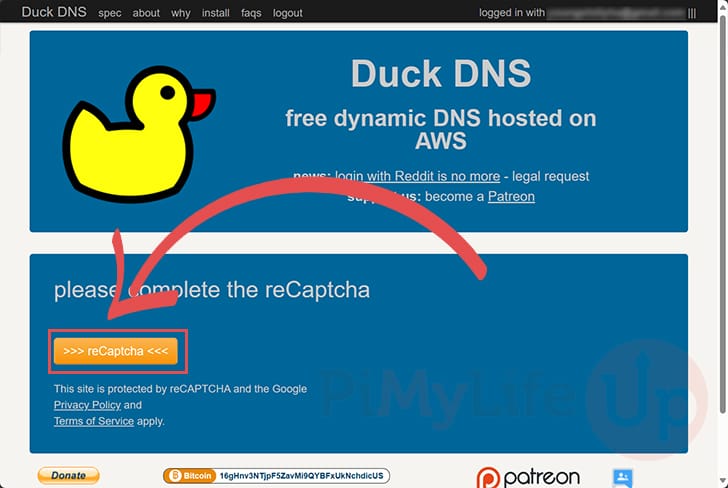
2. When you first sign up to Duck DNS, you must complete a captcha. This captcha is to stop bots from abusing the free service.
Click the “reCatpcha” button to proceed.
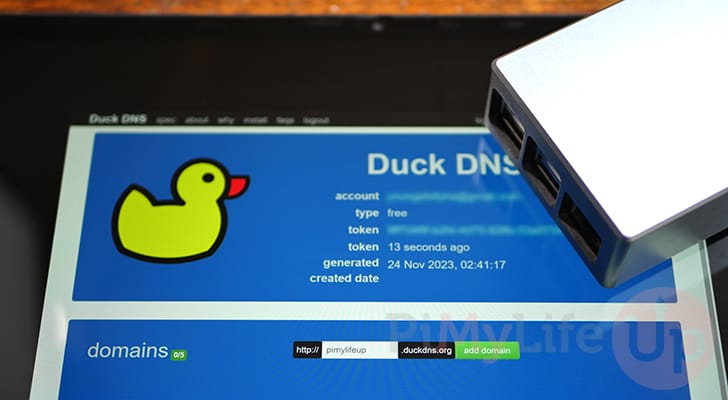
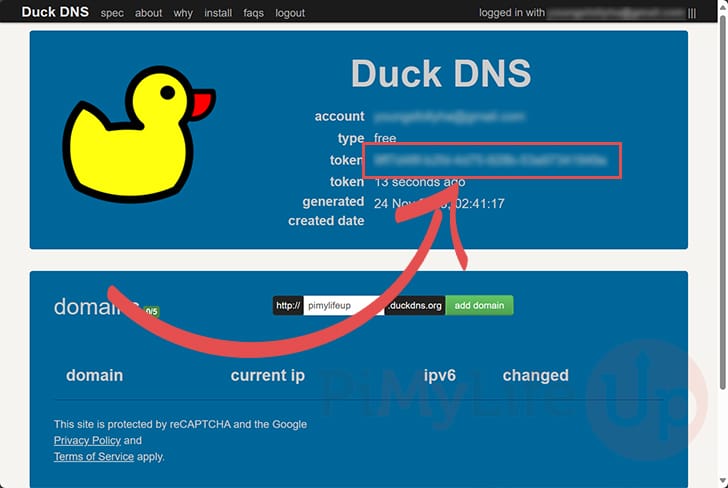
3. You can now copy the token for Duck DNS.
You will use this token from your Raspberry Pi to update your IP address.
Creating a Domain for Duck DNS
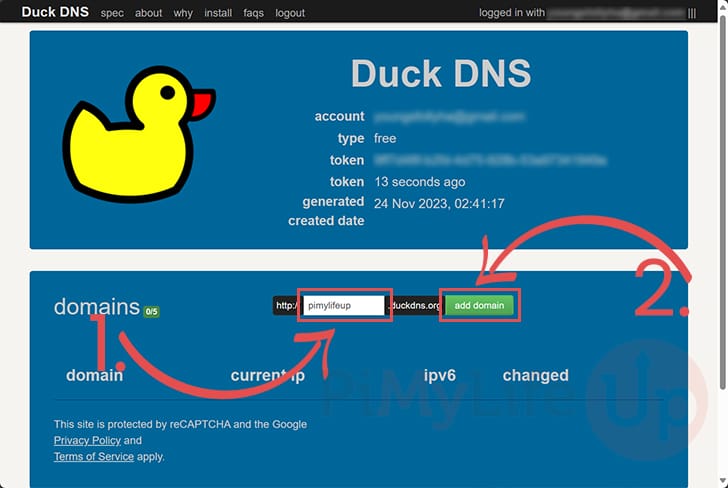
4. After getting the token to utilize the Duck DNS service, you must create your first domain.
Use the text box to type in your domain (1.) and click the “add domain” button (2.) to add it to your Duck DNS account.
Make a note of this domain, as you will need it when setting up the Duck DNS service on your Pi.
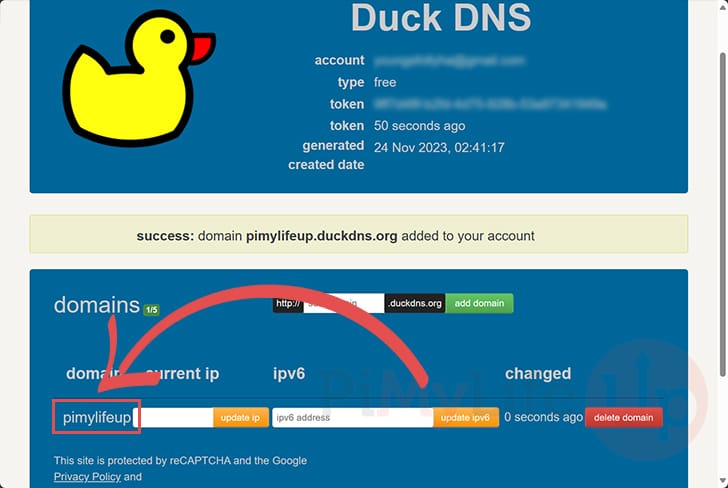
5. Below, you can see we have added our first domain name to Duck DNS. It will also show your current IP address.
Preparing your Raspberry Pi for Ducks DNS
6. Once you have created your Duck DNS account, got a token, and created your first domain name, we can set up our Raspberry Pi to continually update the IP address.
Before we do this, let us ensure everything is up to date by using the following two commands.
sudo apt update
sudo apt upgrade -yCopy
7. After you have finished updating your Pi, we need to ensure the curl package is installed. Typically, this package is pre-installed on Raspberry Pi OS.
We will use curl to send a request to Duck DNS, which updates your IP address.
sudo apt install curlCopy8. Let us now create a directory where we will keep the Duck DNS script on our Raspberry Pi.
You can create this directory by using the mkdir command.
sudo mkdir /opt/duckdns/Copy9. We also need a directory where its logs can be kept. Create this directory by using the command below.
sudo mkdir /var/log/duckdns/CopyWriting the Script to Auto Update Duck DNS
10. We must write a bash script to auto-update your Raspberry Pi’s IP Address with the Duck DNS service.
Begin writing this script by running the following command in the terminal.
sudo nano /opt/duckdns/duck.shCopy11. This next step is one of the most important. This script uses curl to send a request to Duck DNS. Duck DNS uses this request to update your domains current IP with your Raspberry Pi’s IP Address.
Ensure you replace “<DOMAIN>” with your domain name and “<TOKEN>” with the token you retrieved from the Duck DNS interface.
echo url="https://www.duckdns.org/update?domains=<DOMAIN>&token=<TOKEN>&ip=" | curl -k -o /var/log/duckdns/duck.log -K -Copy12. After adding these lines, save and quit by pressing CTRL + X, Y, and then the ENTER key.
13. Before running this script, let us modify the script’s permissions so only the file’s owner can edit, view, or execute the file.
Considering this file contains the token, we don’t want anyone else to see it.
sudo chmod 700 /opt/duckdns/duck.shCopySetting up a Cron Job to Update Duck DNS from the Raspberry Pi
14. Our next step is modifying the crontab to run the Duck DNS script we wrote periodically.
This ensures our Raspberry Pi will continually update our IP Address with the Duck DNS service.
sudo crontab -eCopyIf you are prompted to pick the text editor you want to use, select “nano” as it is one of the easiest to use.
15. To the bottom of this file, add the following line.
This line will execute the duck bash script every 5 minutes.
*/5 * * * * /opt/duckdns/duck.sh >/dev/null 2>&116. After adding the above line, save and quit by pressing CTRL + X, Y, and then the ENTER key.
17. Wait five minutes, then check the Duck DNS interface to see whether the IP address has been set correctly.
It should automatically update every 5 minutes, ensuring that your IP is always the latest.
Conclusion
Hopefully, you will now have your Raspberry Pi working with the Duck DNS service.
Your Raspberry Pi will automatically update your IP address with Duck DNS every 5 minutes. This basically should ensure that the IP is always up to date.
Please feel free to comment below if you have any issues using this dynamic DNS service on your Pi.
If you found this tutorial to be useful, please check out our other Raspberry Pi tutorials.