In this tutorial, we will show you how to run TeslaMate on your Raspberry Pi.
TeslaMate is a data logger that allows you to track numerous details about a Tesla car. It achieves this by polling the Tesla API and logging the data it returns to a PostgreSQL database running on your Raspberry Pi.
This software is excellent for those who own a Tesla and are interested in keeping track of data returned by it. You can even integrate this data with software like Home Automation to automate various features of your car.
The Raspberry Pi makes a perfect companion with TeslaMate as it is a low-powered device that isn’t expensive to run 24/7.
To make the process of running Teslamate on your Raspberry Pi significantly simpler, we will be running it through a Docker container. This saves us from having to install and configure several different pieces of software.
Equipment
Below is a list of the equipment we used when setting up our Raspberry Pi to run TeslaMate.
Recommended
Optional
This tutorial was last tested on a Raspberry Pi 400 using the latest version of Raspberry Pi OS Bullseye 64-bit.
Preparing the Raspberry Pi to Run TeslaMate
Before we can install and run TeslaMate on our Raspberry Pi, we need to go through some initial set-up steps.
Over the next few steps, we will update the Raspberry Pi and ensure that you have Docker compose installed.
1. Before continuing any further, we should update the available list of packages and upgrade any out-of-date packages.
We can perform both tasks by using the following command within the terminal.
sudo apt update
sudo apt upgradeCopy
2. Next, you must follow our guide on installing Docker on your Raspberry Pi.
Docker will make running TeslaMate on your Raspberry Pi significantly more straightforward.
https://pimylifeup.com/raspberry-pi-docker/Installing TeslaMate to your Raspberry Pi
Now that we are prepared, it is safe to install TeslaMate to your Raspberry Pi.
For these steps, we will be creating a Docker Compose script that will set up all the services we require to run TeslaMate.
3. Before installing TeslaMate to our Raspberry Pi, we need to create a directory within our home directory called “teslamate“.
You can use the mkdir command to create this folder by running the command below.
mkdir ~/teslamateCopy4. Now that we have created our new directory, we need to use the cd command to move change to it.
cd ~/teslamateCopy5. We can begin writing our “docker-compose” file by using the following command within the terminal.
This compose file will set up four different services on our Raspberry Pi.
- The first app it sets up is TeslaMate itself.
- Next is the database service that TeslaMate needs to store its data. In this case, it will be PostgreSQL.
- Additionally, Grafana will be set up within a Docker container as well. Grafana is how you will view all the data that TeslaMate gathers on your Raspberry Pi.
- The final Docker container that will be installed to the system is the Mosquitto broker. This broker is what allows other services like HomeAssistant to interact with TeslaMate.
nano compose.ymlCopy6. Within this file, you will want to enter the following lines into the file.
While entering these configuration files into the file, you must replace the following two elements.
[REPLACEWITHENCRYPTKEY]– This key is essential as it is used to encrypt the Tesla API keys while they sit on your Raspberry Pi.
Ensure you set a long random key for this key.[REPLACEWITHDBPASSWORD]– Next, you must specify a password for the PostgreSQL database. There are three occurrences of this within the file.
This database is where TeslaMate will store all of its data while it runs on your Raspberry Pi.
services:
  teslamate:
    image: teslamate/teslamate:latest
    restart: always
    environment:
      - ENCRYPTION_KEY=[REPLACEWITHENCRYPTKEY]
      - DATABASE_USER=teslamate
      - DATABASE_PASS=[REPLACEWITHDBPASSWORD]
      - DATABASE_NAME=teslamate
      - DATABASE_HOST=database
      - MQTT_HOST=mosquitto
    ports:
      - 4000:4000
    volumes:
      - ./import:/opt/app/import
    cap_drop:
      - all

  database:
    image: postgres:17.3
    restart: always
    environment:
      - POSTGRES_USER=teslamate
      - POSTGRES_PASSWORD=[REPLACEWITHDBPASSWORD]
      - POSTGRES_DB=teslamate
    volumes:
      - teslamate-db:/var/lib/postgresql/data

  grafana:
    image: teslamate/grafana:latest
    restart: always
    environment:
      - DATABASE_USER=teslamate
      - DATABASE_PASS=[REPLACEWITHDBPASSWORD]
      - DATABASE_NAME=teslamate
      - DATABASE_HOST=database
    ports:
      - 3000:3000
    volumes:
      - teslamate-grafana-data:/var/lib/grafana

  mosquitto:
    image: eclipse-mosquitto:2
    restart: always
    command: mosquitto -c /mosquitto-no-auth.conf
    # ports:
    #   - 1883:1883
    volumes:
      - mosquitto-conf:/mosquitto/config
      - mosquitto-data:/mosquitto/data

volumes:
  teslamate-db:
  teslamate-grafana-data:
  mosquitto-conf:
  mosquitto-data:
Copy
7. With this done, you can save and quit by pressing CTRL + X, followed by Y, and then the ENTER key.
8. At this point, we can finally start TeslaMate on your Raspberry Pi by using the command within the terminal.
During the first start-up, Docker will download the latest version of the TeslaMate container alongside other software such as Grafana, Postgres and Mosquitto.
docker compose up -dCopySetting the API for TeslaMate
9. To be able to use TeslaMate, you will need to retrieve the API keys for your Tesla account.
This is probably the most complicated part of the whole process, as Tesla does not make these easy to get.
Below you can find the three options recommended by the TeslaMate team. You will need the “Access Token” and the “Refresh Token” these tools provide.
- Windows/Linux/macOS: Tesla Auth by Adriankumpf
- Android: Tesla Tokens by Denouche Company
- iOS/macOS: Auth app for Tesla by Kim Hansen
10. You will now want to go to the following address in your favourite web browser.
Ensure that you replace “YOURIPADDRESS” with the IP of your Raspberry Pi.
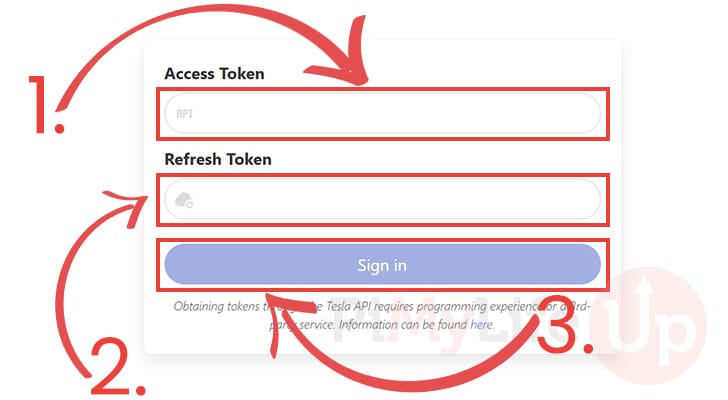
http://YOURPIIPADDRESS:400011. Before TeslaMate can start working on your Raspberry Pi, you must specify some details.
First, specify the “Access Token” (1.). The access token gives TeslaMate access to the API.
Next, you need the “Refresh Token” (2.). This token allows TeslaMate to update the access token when needed automatically.
Once you have both of these tokens, you must click the “Sign in” button (3.) to proceed. TeslaMate requires these tokens to be able to interact with the Tesla API.
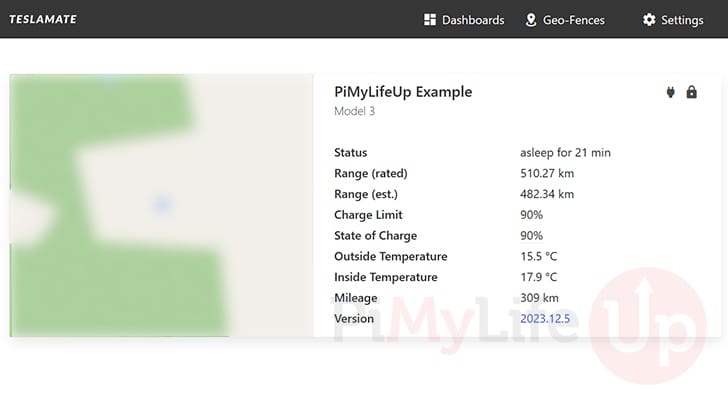
12. You now have access to TeslaMate running on your Raspberry Pi. It will immediately grab information through the Tesla API and log it to its database.
As TeslaMate can’t grab historical data, it will take a little while before its database becomes filled with meaningful data.
Viewing the TeslaMate Grafana Dashboard on the Raspberry Pi
13. Now that you have TeslaMate running on your Raspberry Pi, you can view the data it is logging by accessing its Grafana dashboards.
As you may have noticed earlier, we included Grafana within our Docker compose file. You can access this web interface by going to the following address.
Make that you replace “<YOURIPADDRESS>” with the IP of your Raspberry Pi.
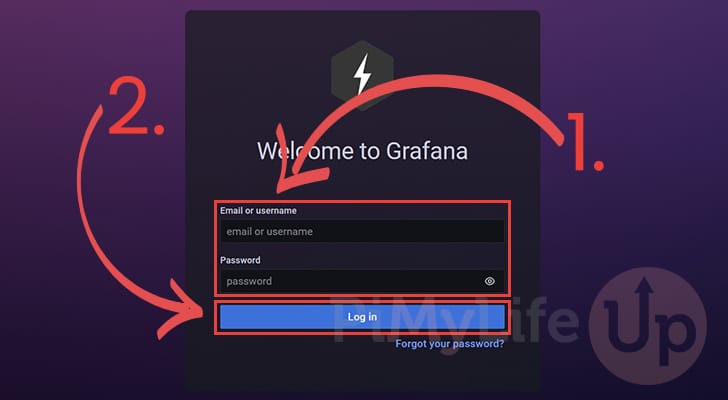
http://<YOURIPADDRESS>:300014. When you first open Grafana you will be required to log in to its web interface.
The default username and password is “admin” (1.).
Once you have entered the default username and password, click the “Log in” button (2.).
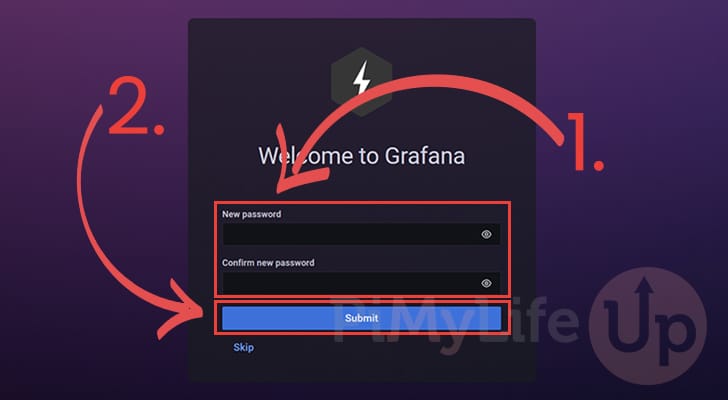
15. Next, you will be asked to set a new, more secure password for Grafana. Type in a new password in the provided boxes (1.).
When you are happy with the new password you are setting, click the “Submit” button (2.).
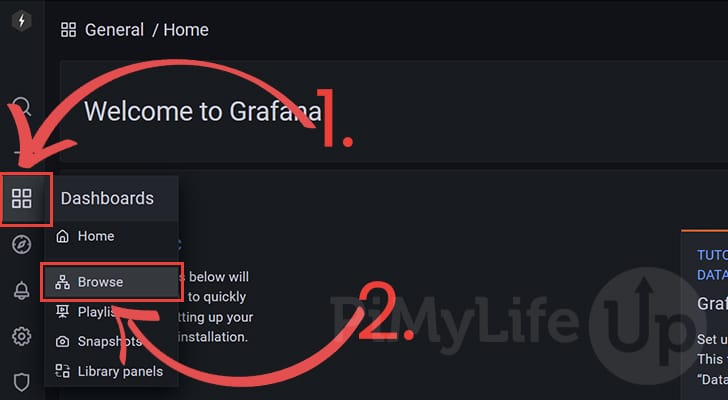
16. As we now have Grafana opened on your device, we can now browse a list of the dashboards.
First, click the table icon in the left sidebar, as shown in the screenshot below (1.).
This will bring up a submenu. You must click the “Browse” button to continue (2.).
17. You can now see a list of the TeslaMate dashboards available to you on your Raspberry Pi.
To open this list, click the “TeslaMate” heading (1.).
Next, find the dashboard for which you want to view the data and click it to proceed (2.). For our example, we will open the “Charging Stats” dashboard.

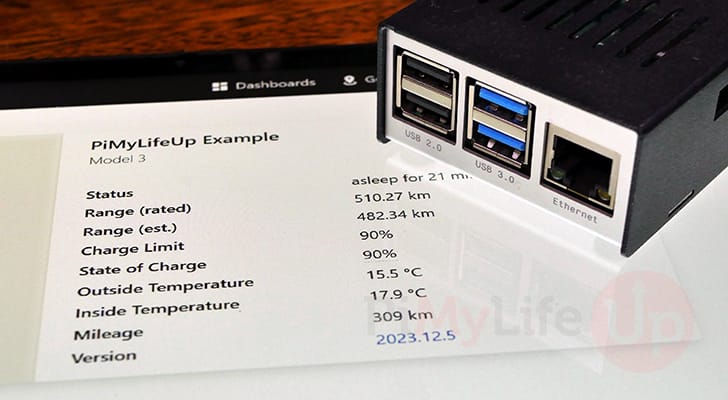
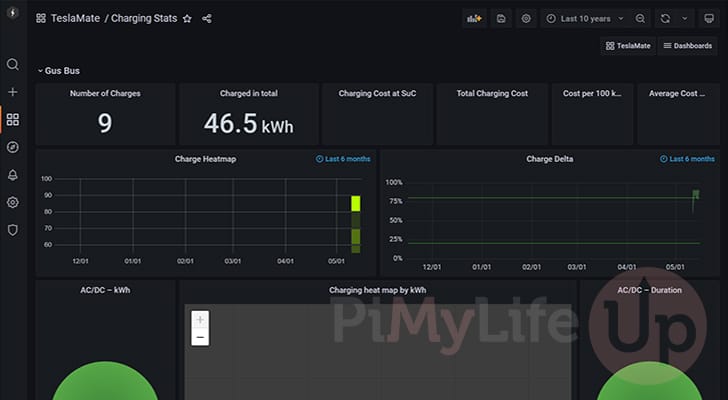
18. Below, you can find all the charging stats that TeslaMate has gathered while running on your Raspberry Pi.
It will continue to process this data as long as your Raspberry Pi is running and has a connection to your car.
Conclusion
At this point, you should hopefully now have TeslaMate up and running on your Raspberry Pi.
TeslaMate is a data logger that gathers data on your Tesla by polling its API. This data is saved in a PostgreSQL database and presented through a Grafana database.
Please comment below if you have experienced any issues running TeslaMate on your device.If you found this tutorial helpful, be sure to check out our many other Raspberry Pi projects.


I successfully installed this sometime last year and everything worked fine (Thanks for your excellent work! It is very much appreciated). I had to reimage my machine and am attempting to reinstall per these instructions. The web server does not seem to be starting on port 4000 (ie.
http://YOURPIIPADDRESS:4000). What part of the install process is supposed to get this going? I did a reboot after assigning the group in the container setup (hopefully I didn’t mess something up). There is a web server running on port 3000 but not 4000.How do I get this going?
The database version should now be 17.3 so it’s image: postgres:17.3
Thank you, we have updated the tutorial.
Thx (a lot) for this good step-by-step-article!
Its for installing docker-compose and not docker compose v2 – right?
How to upgrade easily?
Hi Chrrrr,
I have updated the guide so that it points to our Docker installation tutorial rather than directly installing the older “docker-compose”.
The Docker Compose file should be fine as it was originally written, I have, however, removed the “version” option as it is deprecated.
Kind regards,
Emmet
Thank you for this tutorial. It is very easy to follow and I got it up an running in the first shot. I have absolutely no experience with docker etc.
Great tutorial! Thanks.
Thank you for this incredible explanation. Very easy to follow and very helpful!
Thank you for writing this. It was very easy for me to follow (I am a complete raspberry pi noob).
Awesome stuff. Got it working in no time.
I could set it up and had it running but then, last week, before going on a trip, I happened to switch off my raspberry Pi. Is there any way to fetch the data for the trip that I made while my PI was powered off ?
Hi Joe,
Unfortunately with the way that Teslamate has to work, I don’t believe its possible to fetch data while its not running as the Tesla API does not provide historical data.
Kind regards,
Emmet