In this guide, we will show you how to install Portainer to your Raspberry Pi.
Portainer is a lightweight and open-source container management tool.
Using this tool, you can create, manage and delete your Docker containers running on your Raspberry Pi with ease.
Not only is the software straightforward to use, but it is also dead easy to install as it runs entirely within a Docker container.
As Portainer is built to have relatively low overhead, there isn’t much of a performance impact to using the software.
It is a perfect way of managing your docker containers without having to fiddle around with the command line.
If you want an easier to use alternative to Portainer, we highly recommend checking out Dockge. It offers a simple interface and is very easy to use for beginners.
Equipment
You can use our list of parts below to see what we used when setting up Portainer on our Raspberry Pi.
Recommended
Optional
This tutorial on setting up Portainer was tested on the Raspberry Pi 5 running on the latest available release of Raspberry Pi OS Bookworm.
There project can be done on a headless Raspberry Pi. This means that you can do all of the following steps by using a SSH connection to your Raspberry Pi.
Video
Below you can find a video that will walk you through the steps of installing Portainer on to your Raspberry Pi.
If you prefer our written content, be sure to continue on to the next section.
Preparing your Raspberry Pi for Portainer
There are a few tasks we need to complete to prepare your Raspberry Pi to run Portainer.
While the software is straightforward to get up and running, you just can’t run it on a brand new clean installation.
1. Your first task is to install Docker to your Raspberry Pi.
Our guide shows you how to install Docker and how to configure it correctly for the Raspberry Pi.
Once you have Docker installed, you can safely continue to the next step.
2. If you already have Docker installed, let us make sure our Pi is entirely up to date.
You can run the following two commands on your device to update both the package list and the packages themselves.
sudo apt update
sudo apt upgradeCopy
Once the upgrade completes, we can move on to getting Portainer to run on the Raspberry Pi.
Installing Portainer on to the Raspberry Pi
Now that we have prepared our Raspberry Pi, we can finally install the Portainer software.
Luckily for us, this is a very simple process as Portainer runs within a Docker container.
1. With Docker set up and configured, we can use it to install Portainer to our Raspberry Pi.
As Portainer is available as a Docker container on the official Docker hub, we can pull the latest version using the following command.
docker pull portainer/portainer-ce:latestCopyThis command will download the docker image to your device, which will allow us to run it.
Using “:latest” at the end of the pull request, we explicitly ask for it to download the latest version of the container.
2. Once Docker has downloaded the Portainer image to your Raspberry Pi, we will now want to create a Docker volume called “portainer_data” by running the command below.
This volume is where all of your Portainer data will be stored on your device. There are some advantages to using a named volume like we are here, mainly these are to do with performance.
docker volume create portainer_dataCopy3. After the Docker volume has been created, we can now start up Portainer by running the following command in the terminal.
This command tells Docker to start up the Portainer container we downloaded previously using the data we have provided to it.
If you are interested in what these options do, be sure to read through our quick list below, otherwise just run the command on your Raspberry Pi to get Portainer up and running.
-d: This option tells Docker to detach from the command line and run in the background once Portainer is up and running on your Raspberry Pi.- –
p 8000:8000: This opens up port 8000 from the software. The software uses this for setting up an SSH tunnel between Portainer and its edge agents. -p 9443:9443: With this option, we are exposing port 9443. This particular port is used by Portainers web interface and is the port you will need to use when accing the software.--restart=always: By using this option, you can ensure Docker will automatically restart Portainer if it ever crashes on your Raspberry Pi-v /var/run/docker.sock:/var/run/docker.sock: This mounts your host machines Docker socket so that Portainer can interact with it. This is what Portainer will use to manage your containers.-v portainer_data:/data: With this option we are mapping the named volume we created earlier called “portainer_data” to the path “/data” within the container.portainer/portainer-ce:latest:With this final line we tell Docker the image we want to use to launch Portainer on our Pi.
docker run -d -p 8000:8000 -p 9443:9443 --name=portainer --restart=always -v /var/run/docker.sock:/var/run/docker.sock -v portainer_data:/data portainer/portainer-ce:latestCopyUsing Portainer’s Web User Interface
This section will show you how you can access the Portainer web interface that is running on your Raspberry Pi.
We will also show you how to complete the initial setup experience of the software.
Accessing the Web Interface
Before we can do anything with the software, you will need to connect to its web interface.
To do this, you will need a web browser of your choice and know your Raspberry Pi’s IP address.
1. If you don’t know your Raspberry Pi’s local IP address, it is relatively straightforward to retrieve it.
By using the hostname command, we can have it print out the local IP assigned to our Pi.
hostname -ICopyMake sure to use a capital I when using this command.
2. Now, all you need to do to access Portainer is to go to the following in your browser.
You can see that in this address, we have referenced the port “:9443” at the end. This is the port that Portainer makes itself available at.
https://[PIIPADDRESS]:9443Make sure that you replace “[PIIPADDRESS]” with the local IP of your Raspberry Pi. You should have retrieved this IP in the previous step.
Configuring Portainer on your Raspberry Pi
When you first connect to the Portainer web interface, you will need to do some initial setup steps.
Don’t worry, as these are incredibly straightforward to follow and helps ensure it will run as we want it to.
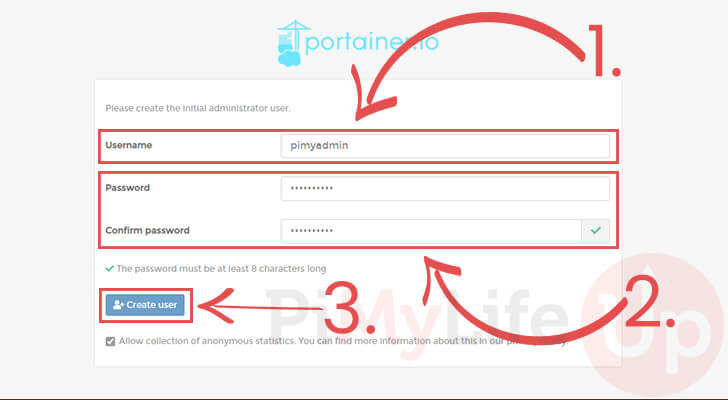
1. Upon first launching Portainer’s web interface, you will need to create an admin account.
To create this admin account, you need to give it a username (1.).
Next, you will need to assign this new account a password (2.). Portainer requires you to have passwords that are at least 12 characters long.
Once you have set the username and password you want, click the “Create user” button to finalize its creation.
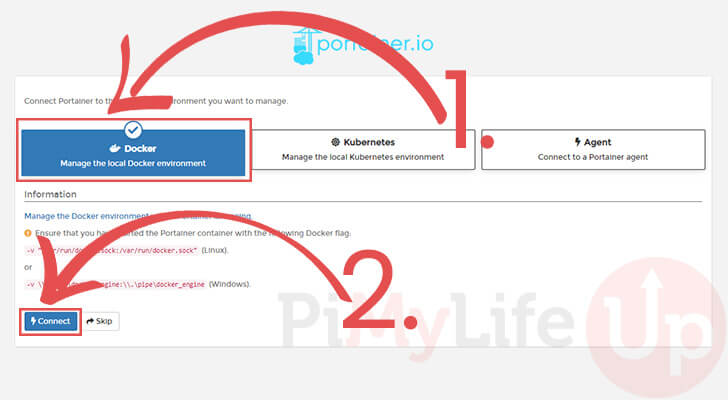
2. We now need to select what sort of container environment we want Portainer to manage.
In our case, we need to select the Docker option (1.).
Once you have this option selected, click the Connect button (2.).
3. You should now successfully have Portainer up and running on your Raspberry Pi.
You can now use it to manage the Docker containers running on your device.
Basic Usage of the Portainer UI
This section will show the basics of using the Portainer UI to create a new Docker container.
By following these steps, Portainer will download the container image to your Raspberry Pi and set it up.
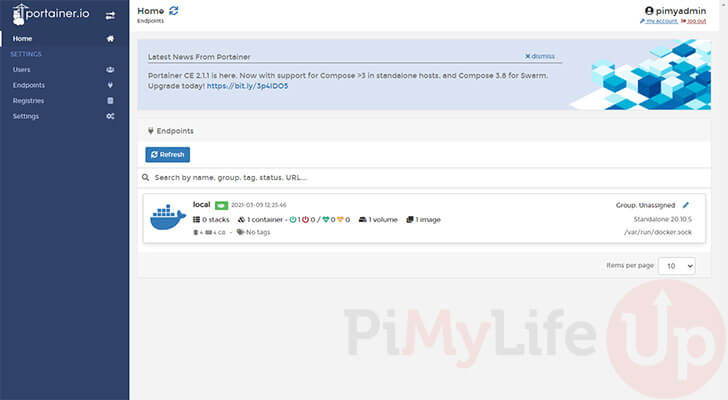
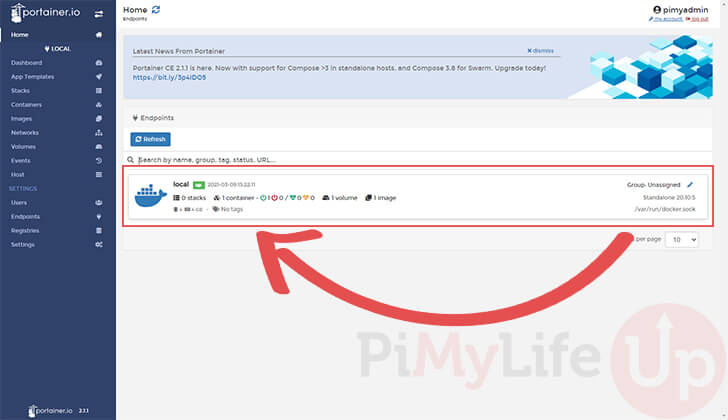
1. When you access the Portainer interface, you should see a screen like below.
You can see that our Raspberry Pi Docker installation is listed as a Portainer endpoint. Click this endpoint to open its settings.
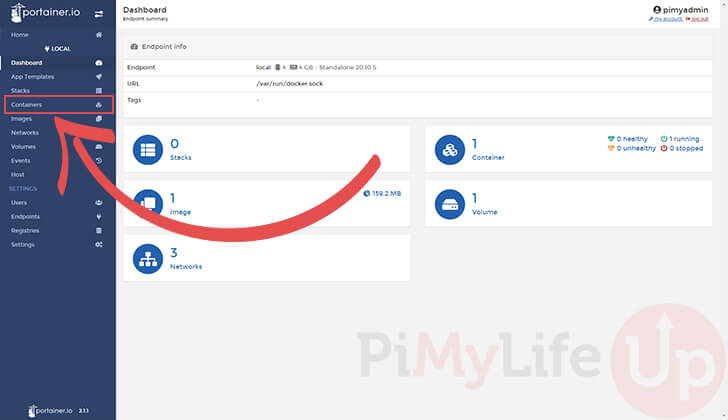
2. Here, you will see a quick overview of Docker running on your system.
This screen will list the number of containers, volumes, images, and networks on your system.
To see what containers are running on your Raspberry Pi, click the “Containers” option in the sidebar.
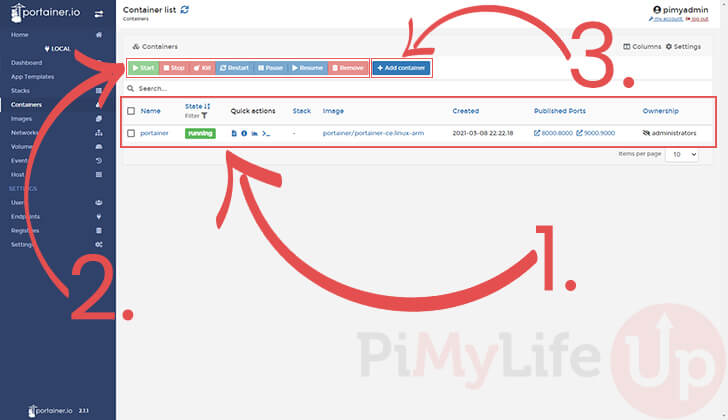
3. Portainer will now be presented with a list of containers currently set up on your device (1.).
When you select a container, you will be able to control it by choosing whether you want to start, stop, kill the container (2.).
If you want to add a brand new container, you can click the “Add container” button (3.).
3. Finally, this screen is the one that will let you create new containers within Portainer.
Using this option, you can choose a variety of settings.
First, you must define the name that you want to give this container (1.).
Then you must select the image that you want Portainer to pull to your Raspberry Pi (2.).
It is even possible to set up the network ports you want your Docker container to use (3.).
Additionally, you can also control who can manage this container within the Portainer web interface (4.).
Finally, there is a variety of advanced options that you can set using the box at the bottom of the page (5.). The one you will likely configure the most is the “Restart Policy“.
Using this, you can ensure that your docker container is automatically restarted when your Raspberry Pi reboots.
Once you are happy with all of your new Docker container settings, you can click the “Deploy the container” button (6.)

Conclusion
At this point, you should now have successfully gotten Portainer up and running on your Raspberry Pi.
Portainer is a nifty piece of software that allows you to manage your Docker containers easily.
Using the web interface, you can create, edit and delete your containers.
If you have any issues with getting Portainer to run on your Raspberry Pi, please leave a comment below.
You should also check out our other Raspberry Pi projects to see how else you can put your Pi to use.


In Step 2 you have the address listed as
http://[PIIPADDRESS]:9443but it needs to behttps://[PIIPADDRESS]:9443or you just get a “Client sent an HTTP request to an HTTPS server.” errorHi Jonny,
Thank you for pointing out that typo, I have corrected it to utilize the correct protocol.
Kind regards,
Emmet
I get the same error message. In the past I followed this guide again and then it worked but at 9000
There is a typo in the code box of step 2.
The intention is to crate a volume called “portainer_data” but the command line
example incorrectly says docker volume create portainer instead fof portainer_data
Hi MC,
Thank you for noticing that and pointing it out. I have corrected the step to reference the correct volume.
Kind regards,
Emmet
Hello, Is it possible to migrate a Pihole installation from my RPI to a Docker Container?
Hi Daniel,
I believe it is, it isn’t something I have attempted personally. But from memory Pi-Hole has the ability to create and restore backups by going to “Settings” -> “Teleporter” -> “Backup”. That should hopefully allow you to easily migrate from a standard installation to the Docker container version of Pi-Hole.
Please let me know if that answers your question.
Kind regards,
Emmet
Hi Emmet! Thanks again for another phenomenally great and straightforward tutorial. Tiny buglet: the installation command line in section 1 was updated to use :latest, but the text below still refers to :linux-arm, which was slightly confusing until I saw Andrea’s comment above.
Hi Bongo fury,
Thank you very much for pointing out that mistake, in my rush to update the tutorial originally I had completely skimmed over that line.
I have now corrected it so it also references “:latest” and refers to it downloading the latest version of the container.
Cheers,
Emmet
Thanks for the write-up. Always appreciate the helpful walk-throughs. As an FYI, for my install (in June 2022) with the latest image, portainer asks for 12-character passwords, not 8.
Just tried this on a RPi 4B+ 4GB, running Ubuntu 20.04.3 LTS.
Had to change the pull command to this:
as apparently that is a multi-arch package (
https://github.com/portainer/portainer/issues/4465#issuecomment-727764773),Hi Monte,
Thank you for letting me know about this issue.
I have updated the tutorial so that it now references “
portainer-ce:latest” rather than picking a specific build for the architecture.Cheers,
Emmet.
Hi,
just a note: using the tutorial on a raspberry with Ubuntu server (in my case 20.04LTS), the command at point 1 of the chapter “Installing Portainer on to the Raspberry Pi” should be changed from
sudo docker pull portainer/portainer-ce:linux-arm
to
sudo docker pull portainer/portainer-ce
Otherwise you could receive this error message:
no matching manifest for linux/arm64/v8 in the manifest list entries
Hi Andrea,
Thank you for bringing this issue to my attention.
I have updated the tutorial to reference the multi-arch package rather than the specific one we were using previously.
Cheers,
Emmet
You should have a note stating any ARM build of Portainer is restricted from using only compose version less then 3.
Thanks for all of yours tutorials. Works a charm!