In this tutorial, we will show you how to install Portainer on Ubuntu to manage your Docker containers.
Portainer is a tool that makes managing Docker containers significantly more straightforward.
Using Portainer, you can easily create, manage and delete containers on your Ubuntu system without having to worry about using the terminal.
On top of being lightweight, Portainer is also very easy to install. The software is easy to install thanks to it running within a Docker container itself. All we need to do is run a single command.
Portainer is the perfect solution for those who would rather not deal with Dockers command line interface.
Over the following sections, you will learn how to install Portainer on Ubuntu and access its web interface.
Please note that the version of Portainer that we will be installing is the “Community edition“. This edition is both free and open source but with a more restricted feature set.
Preparing Ubuntu for Portainer
Before installing Portainer to Ubuntu, we must ensure a few things are in place. So, over the next couple of steps, we will ensure that you have Docker installed and that all the packages are up to date.
If you are running a desktop version of Ubuntu, you can open the terminal quickly by pressing CTRL + ALT + T on your keyboard.
1. As Portainer itself runs within a Docker container, you must get that up and running before continuing.
Luckily, we have a guide that shows you the process of installing Docker to Ubuntu.
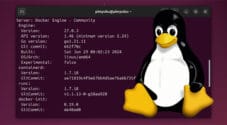
2. You can verify that you have Docker installed on your system using the following command.
This command should output details about the version you installed within our guide.
docker versionCopy3. Before proceeding any further, we should ensure that we are running the latest version of Docker.
Run the following two commands to update the package list and any out-of-date packages.
sudo apt update
sudo apt upgrade -yCopy
Installing Portainer on Ubuntu
With Docker now installed on our Ubuntu system, we can install Portainer. Luckily, Portainer runs within a Docker container, making it incredibly easy to run.
With just a few simple commands, we will have Portainer up and running on your Ubuntu system.
1. Since a Docker container’s content is replaced every time it is updated, we must create a persistent volume for Portainer to use.
Creating this persistent volume is as straightforward as running the command below.
docker volume create portainer_dataCopy2. To install and run Portainer on Ubuntu, you only need to use the following command within the terminal.
This command will download and launch the latest version of the Portainer container. We also pass in the volume we created in the previous step and open up the ports the software requires.
You don’t have to modify your firewall to allow these ports; by default, Docker will automatically handle that.
docker run -d -p 8000:8000 -p 9443:9443 --name portainer --restart=always -v /var/run/docker.sock:/var/run/docker.sock -v portainer_data:/data portainer/portainer-ce:latestCopy3. Using the following command, you can verify that Portainer is now running.
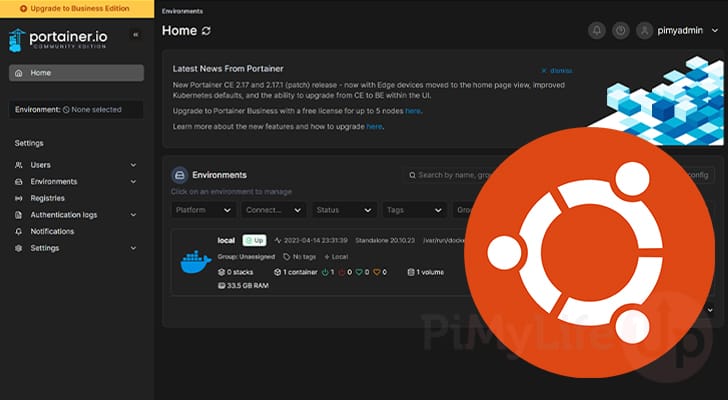
This command will list all containers running on your system. If Portainer is running as intended, you should see a container ID followed by the image name “portainer/portainer-ce:latest“.
docker psCopyBelow is an example of what appeared on our system after running Portainer.
CONTAINER ID   IMAGE                           COMMAND
52fc62e7fbec   portainer/portainer-ce:latest   "/portainer"Copy
Initial Portenier Setup
With Portainer now installed on Ubuntu, we must complete some initial setup steps. These steps are completed through Portainers web interface and involve us creating an admin account.
1. In your favourite web browser, you will want to go to the following address.
If you are installing Portainer on a networked system, you will want to replace “localhost” with the IP address of your Ubuntu device.
https://localhost:9443Upon going to the above address, you will get a warning about the browser being unable to verify the certificate. As this certificate is self-generated, you must ignore this message to continue.
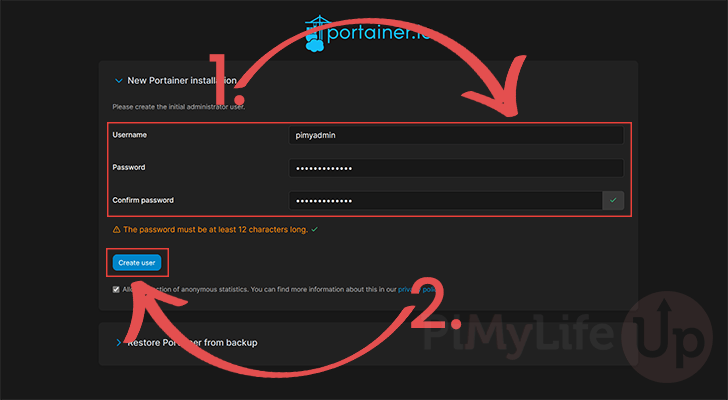
2. When you first open Portainer’s web interface, you will be required to type in a username and password (1.) for the admin user.
Once you have entered a username and password, click the “Create user” button (2.) to proceed.
Please note if you take too long to do the initial setup steps, you will be required to restart the Portainer container.
Restarting a container is as simple as using the following command. First, ensure you replace “CONTAINERID” with the ID you got in step 3 of the previous section.
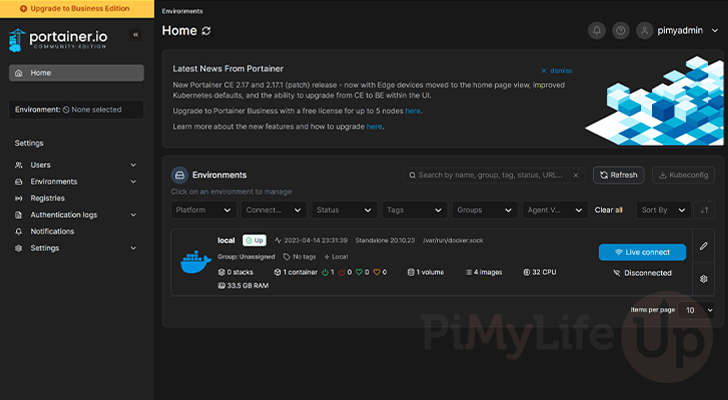
sudo docker restart CONTAINERIDCopy3. You should now have access to the Portainer interface. You can use this interface to install, run and manage Docker containers on your system.
By default, Portainer will only have access to the local Docker environment, but it is possible to add additional remote hosts.
Conclusion
You should hopefully now have Portainer installed on your Ubuntu operating system.
This tool allows you to easily manage any Docker container running on your local system or a remote environment.
Please comment below if you have issues getting Portainer to run on your system.
Check out our many other Ubuntu guides to learn more about this versatile operating system. We also have many tutorials covering how to use a Linux system.