In this tutorial, we will be showing you how to install and run Dockge on a Raspberry Pi.
Dockge is a self-hosted Docker stack manager developed by the same person behind the popular software Uptime Kuma.
This software allows you to manage multiple Docker compose files from a single, easy-to-use interface. It is similar to the stack system Portainer implements but cleaner and simpler to use.
You can perform multiple actions within the Dockge interface without touching the command line. For example, you can easily create, edit, start, restart, and delete Compose files. You can even update your containers with ease.
It even features a fully interactive editor for your compose files, making editing simple without worrying about formatting errors.
You can even access each of your containers through a very simple to use web-based terminal.
In short, Dockge aims to be a versatile solution for simply managing Docker containers on a system like the Raspberry Pi.
Over the following steps, we will show you how to install Dockge onto the Raspberry Pi and explain how it functions.
Equipment
Below is a list of equipment we used while setting up Dockge on our Raspberry Pi.
Recommended
Optional
This tutorial was tested on a Raspberry Pi 5 running the latest version of Raspberry Pi OS Bookworm 64-bit.
Installing Dockge to the Raspberry Pi
In this section, you will learn how to install Dockge on your Raspberry Pi. This process is very straightforward, thanks to the software being available as a Docker container.
All of these installation steps will need to be run within the terminal. If you use Raspberry Pi OS desktop, you can open this by pressing CTRL + ALT + T on your keyboard.
Preparing your Raspberry Pi to Run Dockge
1. Before we continue, our first step will be to ensure we have an updated operating system to run Dockge on.
You can update the package list and upgrade any out-of-date packages using the following two commands.
sudo apt update
sudo apt upgrade -yCopy
2. We now need to ensure we have the “wget” package installed on our system.
The reason for this is that we will be using wget to download the Compose file for Dockge to our Raspberry Pi.
sudo apt install wgetCopy3. Next, you must install Docker on your Raspberry Pi. Follow the guide we linked, as it will get everything set up correctly to run properly on your system.
Even though Dockge is built to manage Docker containers, it is also a Docker container.
4. After installing Docker, we can now create a directory where we will be storing the Dockge compose file on our Raspberry Pi
Create the directory “/opt/dockge” by using the command below in the terminal.
sudo mkdir -p /opt/dockgeCopy5. The next folder we will create is where you can store your stack files for Dockge to manage.
You can store them anywhere, but we will use “/opt/stacks” for our guide. You can create this folder by using the command below.
sudo mkdir -p /opt/stacksCopyIf you have pre-existing compose files, you must copy those folders here for Dockge to manage them. For example, if we had a compose file for Immich on our Raspberry Pi, we would store this at “/opt/stacks/immich/compose.yaml“.
6. For the final part of our preparation, we need to change to the “/opt/dockge” folder we created earlier by running the command below within the terminal.
cd /opt/dockgeCopyDownloading the Docker Compose File for Dockge
7. We are finally at the point where we can download the compose file for Dockge to our Raspberry Pi by using wget
This file is what tells Docker where it should download the Dockge image, and how to set it up.
sudo wget https://raw.githubusercontent.com/louislam/dockge/master/compose.yamlCopyBy using this compose file, your stack files will be saved to the “/opt/stacks” directory we created earlier. Additionally, Dockge’s web interface will operate on port “5001“.
Running Dockge on the Raspberry Pi
8. All you need to do to start up the Dockge server on your Raspberry Pi is run the command below.
Give Docker a few minutes to download the Dockge container and start it up. By using the “-d” option, Docker will automatically detach from the terminal after finishing pulling the container.
docker compose up -dCopyUsing the Dockge Web Interface
Now that we have installed Dockge and have it up and running on our Raspberry Pi, we can utilize its web interface.
The following steps will show you how to access the web interface, create your first account, and add your first managed container.
Accessing Dockge
1. Our first step is to get the IP address of our Raspberry Pi. The easiest way to do this is to use the hostname command.
If you already know your IP, you can skip this step.
hostname -ICopy2. Now that you know your IP address, you will want to go to the following URL in your favourite web browser.
Ensure that you replace “<IPADDRESS>” with the IP of your Raspberry Pi.
http://<IPADDRESS>:5001/Initial User Creation
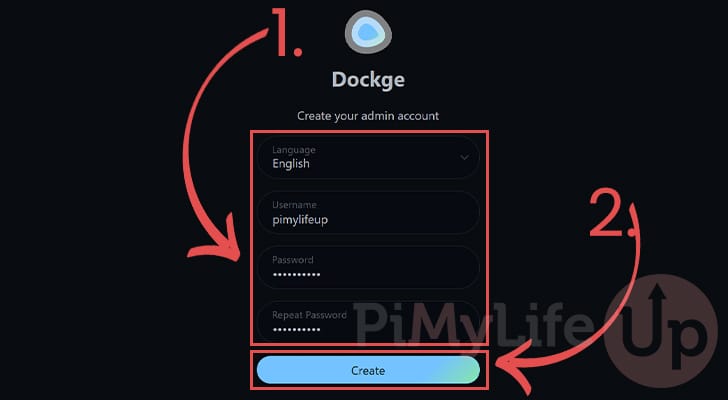
3. When you open Dockge’s web interface for the first time, you must create an account.
Use the boxes on this page to fill in a username and password for your account (1.).
After filling out information for your account, click the “Create” button (2.).
Using Dockge on your Raspberry Pi
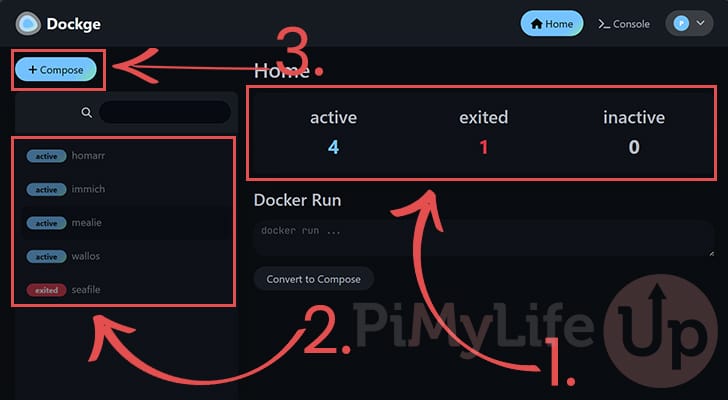
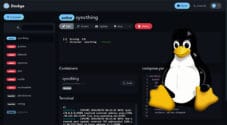
4. After creating your Dockge user, you will be greeted with its dashboard. Here, you can see an overview of all the containers running on your system (1.).
You can see Dockge automatically detected a few, but they are currently greyed out (2.). This is because Dockge is not managing them, and their compose files are not in the “/opt/stacks” directory.
We will cover how to port over these containers to Dockges stacks shortly. But for now, let’s use its web interface to create a new one by clicking the “+ Compose” button (3.).
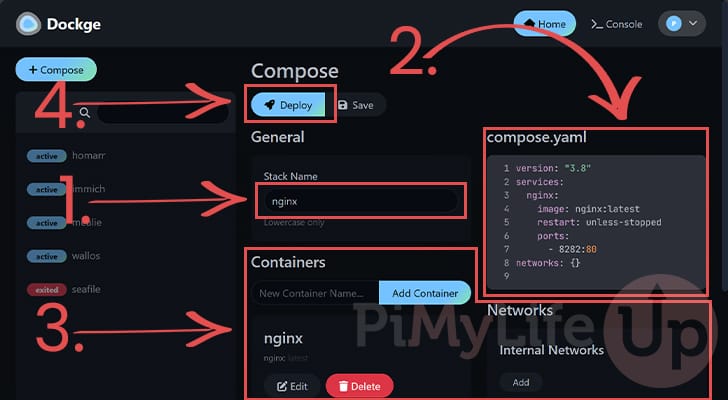
5. In this screen, you can easily create your own Dockge stacks on your Raspberry Pi.
Your first step when creating a new stack is to assign it a name (1.). Try and keep the name relevant to what you are running within it. For example, if you are creating a stack for NGINX, you might label the stack “nginx“.
You can manually write the compose file yourself (2.). Alternatively, you can use Dockge’s interface to add containers and options for those containers (3.).
For this example, we are sticking with the default “Nginx” setup that comes pre-filled.
After filling out all the information for your container, click the “Deploy” button (4.).
6. Now, wait a while, as Docker needs to download and run the stack Dockge just created.
Once it finishes setting up the container, you can manage it through the web interface. This interface lets you easily update, restart, and stop entire stacks.
You can even interact with the terminal for each container within a stack.

Updating Dockge on your Raspberry Pi
Luckily for us, running Dockge as a Docker container makes the update process incredibly simple.
With just a few straightforward commands, you will be running the latest version of Dockge on your Raspberry Pi.
1. Start by changing to the directory where we saved the compose file for Dockge on our Raspberry Pi.
If you are following our tutorial, you can use the following cd command to move to the directory.
cd /opt/dockgeCopy2. Once you are in the correct directory, we can tell Docker that it should try pulling a new version of the container.
To pull a new version, you must use the command below within the terminal.
docker compose pullCopy3. After pulling a new image, you must get Docker to restart the Dockge stack.
To do this, you will want to use the command below. Docker will automatically detect if there is a new image available and restart the container using it.
docker compose up -dCopyMoving a Compose File to be Managed by Dockge
Over the following steps, we will be walking you through moving an existing Docker container so that Dockge manages it.
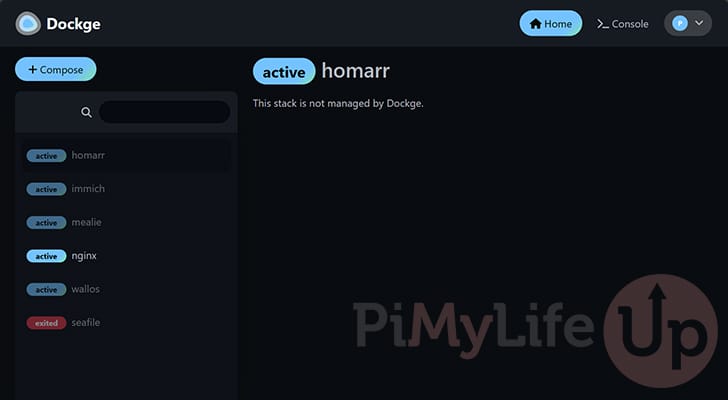
1. If you try to access a Docker container that isn’t within the Dockge stacks directory, you will run into a similar screen to the one shown below.
Luckily, Dockge fully supports importing other Docker compose files. All we need to do is move our existing compose file and its data into the “/opt/stacks” directory.
For this example, we will move Homarr on our Raspberry Pi so that Dockge manages it.
2. Let us start by changing into the directory where we initially set up Homarr.
We need to move to this directory to take the container offline temporarily. It has a data directory saved in its directory that we must move, which will break the currently running container.
cd ~/hommarrCopy2. After moving into the directory, we can use the following command to stop our container.
docker compose downCopy3. Since we will be moving the current directory, we will quickly move somewhere else by using the command below.
cd ~Copy4. Finally, we can move homarr so that it is managed by Dockge on our Raspberry Pi.
All we need to do is move the “homarr” directory into the “/opt/stacks” folder by using the command below.
sudo mv ~/homarr /opt/stacks/Copy5. Lastly, if your Compose file is named “docker-compose.yml“, we must rename it to “compose.yaml” for Dockge to detect it.
Let us rename our “docker-compose.yml” file to “compose.yaml” using the mv command.
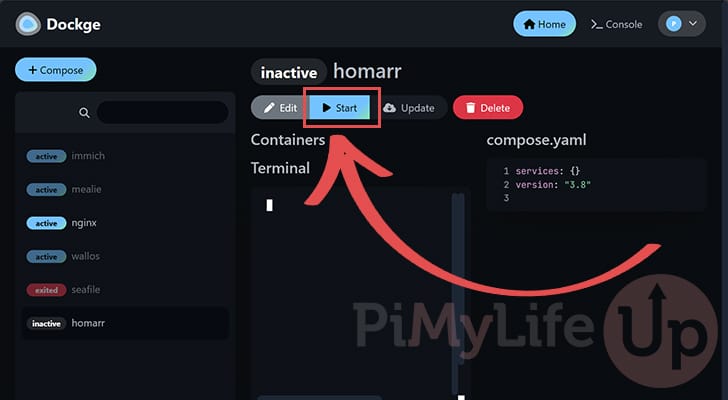
sudo mv /opt/stacks/homarr/docker-compose.yml /opt/stacks/homarr/compose.yamlCopy6. Give it a few seconds, and Dockge will automatically detect the container we just moved.
Currently, it is “inactive“, but all we need to do is click the “Start” button to turn it back on.
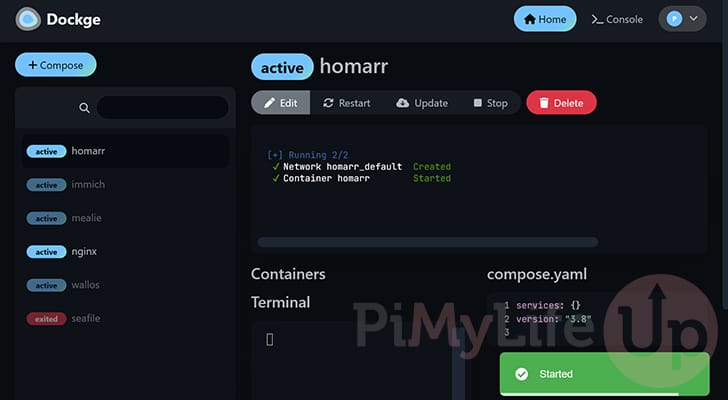
7. We can now continue to manage this container within Dockge’s simple-to-use web interface.
Conclusion
At this stage in the tutorial, you should now have Dockge up and running on your Raspberry Pi.
Dockge is an excellent stack manager for Docker containers. It allows you to manage numerous containers under one simple-to-use web interface easily.
Please comment below if you have had any trouble with getting Dockge to work on your device.
If you found this tutorial to be helpful, you should definitely check out our many other Raspberry Pi Projects.


Do i have to restart dockge from Hand after rebooting the system after e.g. an Update?
Hey,
Docker should automatically start up Dockge when your system boots.
Kind regards,
Emmet
This tutorial was easy to follow. It took a while to complete only because I stopped to install Homarr to have a non dockge app to try.