In this tutorial, I go through all the steps to getting your very own Raspberry Pi plex server up and running.
This project is perfect for anyone who wants to have a media server that can be accessed by anyone within a household. You can also set it up to be accessed outside your local network.
Plex is a client-server setup where the client directly streams data from the Plex media server. This setup means you can have all your movies, music, and photos located on the one device, the server. In this case, we will be using the Raspberry Pi.
You can then have multiple clients connect to the same server. It is great as you don’t need to have multiple copies of the same media across several devices.
The Plex client is supported on a ton of devices including Windows, Apple, Android, Amazon Fire TV, Chromecast, Xbox, PlayStation, Linux, and so much more. It really is a fantastic home media solution.
If you just want a single client without the whole server setup, then something like the Raspberry Pi Kodi media center might interest you more.
If you are after an alternative completely free media server, you can also check out Jellyfin.
Equipment
You will need the following equipment to be able to complete this Raspberry Pi Plex server tutorial.
Recommended
- Raspberry Pi Amazon 2 or Newer
- Micro SD Card Amazon
- Power Supply Amazon
- Ethernet Cable Amazon (Recommended) or Wi-Fi Amazon
Optional
- Raspberry Pi Case Amazon
- USB Keyboard Amazon
- USB Mouse Amazon
- External Hard drive Amazon or USB Drive Amazon (For storing movies, music & photos)
NOTE: This tutorial will not work on older versions of the Pi. A Raspberry Pi 2 or later will work. It was last tested on a Raspberry Pi 5 running the latest version of Raspberry Pi OS Bookworm.
Video
In the video below we will walk you through the steps of installing the Plex Media Server to your Raspberry Pi.
Be sure to also check out the written version of our Plex guide below.
Setting up the Raspberry Pi Plex Server
In this tutorial, I will be using Raspberry Pi OS so if you haven’t got it installed then check out my guide on how to setup Raspberry Pi OS.
If you want to run a slim version of the operating system, you should take a look at installing Raspberry Pi OS Lite.
Preparing your Pi for Plex
1. Now before we install the Plex Media Server software to the Raspberry Pi, we need first to ensure our operating system is entirely up to date by running the following two commands.
sudo apt update
sudo apt upgradeCopy
2. To install the Plex packages to the Raspberry Pi, we will need to add the official Plex package repository.
Before we do that we need to install the “apt-transport-https” and “gnupg2” packages.
This package allows the “apt” package manager to retrieve packages over the “https” protocol that the Plex repository uses.
Install the package by running the command below.
sudo apt install apt-transport-https gnupg2Copy3. Let’s now add the Plex repositories to the “apt” keyrings directory.
This key is used to ensure the files that you are downloading are in fact from that repository and signed by that key.
Run the following command to download and save the key to our keyrings directory.
curl -L https://downloads.plex.tv/plex-keys/PlexSign.v2.key | sudo gpg --yes --dearmor -o /usr/share/keyrings/plexmediaserver.v2.gpgCopy4. With the Plex GPG key now added, we can finally add the official Plex repository to the sources list by running the following command.
echo "deb [signed-by=/usr/share/keyrings/plexmediaserver.v2.gpg] https://repo.plex.tv/deb/ public main" | sudo tee /etc/apt/sources.list.d/plex.listCopyIn the line we are adding, you can see that we refer to the keyring we downloaded in the previous step.
5. As we have just added a new repository to our sources, we will need to run the “update” command again to refresh the package list.
sudo apt updateCopyIf you get the error “/usr/lib/apt/methods/https could not be found.” Then the https transport package hasn’t been installed. Double check that it has been installed correctly.
Installing Plex to your Raspberry Pi
6. Now that we have set up our Raspberry Pi so that it can read from Plex’s official package repositories we can go ahead and finally install the Plex Media server package to the Pi.
To install the “plexmediaserver” package, run the command below.
sudo apt install plexmediaserverCopy7. The installation process for Plex sets up a few different things for us.
The first is that it creates a user and group for Plex to run under. This user and group is called “plex“.
It also will set up two directories, one where to store files temporarily that Plex is transcoding. You can find this folder at “/var/lib/plexmediaserver/tmp_transcoding“.
The second directory is where Plex will store all the metadata it retrieves for your media. This folder can be found at “/var/lib/plexmediaserver/Library/Application Support“
8. As Plex is running a different user to the Raspberry Pi’s default “pi” user, you will need to make sure you have permissions set correctly on your drive.
If you need help setting up your external drive with Plex, you can try following our guide on mounting a USB drive on the Raspberry Pi.
Setting a Static IP Address for your Plex Server
9. Now that we have installed Plex to our Raspberry Pi you will want to ensure that you have a static IP address for your Raspberry Pi. If you don’t have access to your router, you can still set a static IP on your Raspberry Pi itself.
There are two reasons to use a static IP. One is that the IP will be easier to remember. Second is that it will make sure your Plex server can always be found at the same address.
https://pimylifeup.com/raspberry-pi-static-ip-address/10. The Pi should now always start with the same IP. You can also set this on most routers by tying the mac address of your network device (WiFi or Ethernet) to an IP.
Now the Raspberry Pi Plex media server should be all set up and ready to scan your media and stream it any client that wishes to connect. I will go through some basics of setting everything up below.
Storing Media on the Raspberry Pi
Now there are several ways to store your media on the Raspberry Pi. I will mention each of the methods below.
You can hook up an external hard drive with all your music, movies and whatever else you may have. Setting the Plex program to run as the Pi user means you can plug a USB hard drive in and access the media in Plex without any issues.
You’re also able to mount drives permanently; I have already covered this in a previous tutorial, so be sure to check out my guide on how to mount a USB hard drive to the Raspberry Pi. Make sure you set the user & group owner of the drive to Pi.
Another option is to set your Pi up as a NAS. This will allow you to transfer your media across to it without needing to disconnect and reconnect a hard drive.
You can set this all up by following my tutorial on setting up a Raspberry Pi network attached storage.
Lastly, you can use the SD card for storage, but as you could imagine, this will quickly run out of space. You can set up a folder on the SD card to be accessed via the network.
Connecting Clients to The Plex Media Server on the Raspberry Pi
If you’re using an app on your phone, computer, Xbox, PlayStation, or any other device, then the Plex client should be able to pick up on the server automatically.
You will, unfortunately, find the official mobile Plex applications are behind a paywall. For example, you will need to pay money to get full access to all the features. However, all other apps, including the web app, should be free with only a small set of features requiring a subscription.
To connect to the browser, enter the IP followed by the port 32400 and /web/. For example, mine is.
192.168.1.100:32400/web/You will be prompted to log in, simply sign up or sign in to an existing plex account. You can skip this by just entering by entering the address above again.
Next, you will need to set up your music, movie, and TV show libraries. This process is incredibly easy and shouldn’t be too hard in getting it set up correctly.
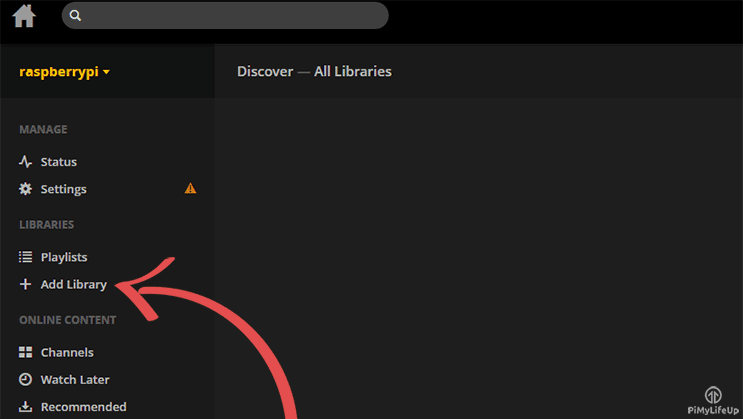
1. First select add library in the left-hand side column.
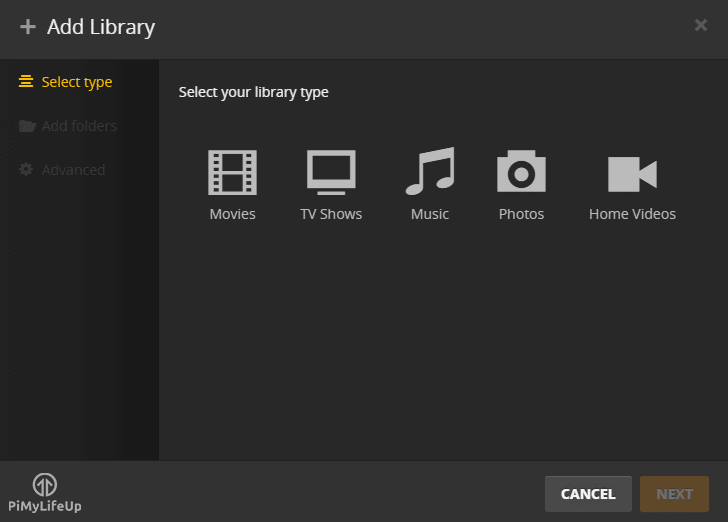
2. Next, select the type of media that is in the folder. If you have more than one type, then you will need to add a new library for each type of media.
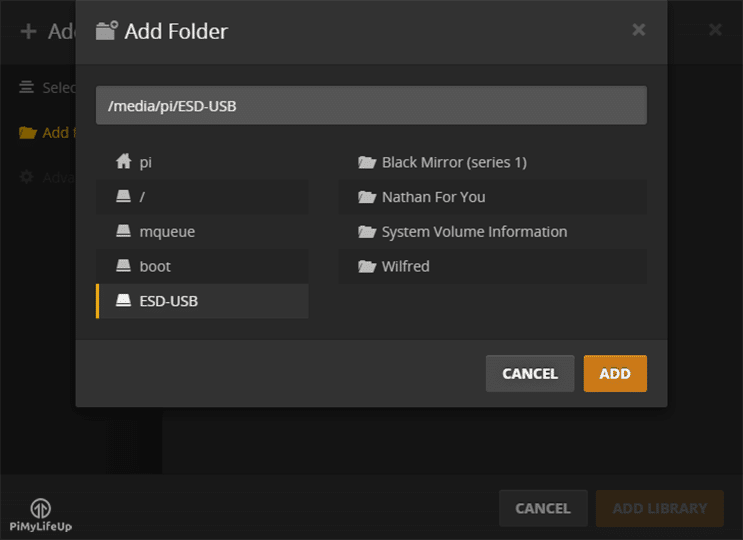
3. Next, you will need to select the folder that has all your media in it.
For example, mine is on a USB drive that is displayed in the left-hand side column or can be found at /media/pi/ESD-USB
4. Once you add the library, it will now organize your clips in a nice easy to browse interface.
If you need more information on how to setup, name and organize your media library, then Plex has an amazing amount of documentation on naming and organization.
Fixing File Permission Errors with Plex
One of the most common problems you may run into with Plex on your Raspberry Pi is with it being unable to access your files. The most common cause of this issue is incorrect permissions.
This section will show you how to modify the permissions for an ext4 drive.
If you are running an NTFS or FAT formatted drive, you will need to try remounting your disk drive and adjusting its mounting options. The reason for this is that the NTFS and FAT filesystems do not support the Linux permission system.
1. To begin, work out the location of the drive or folder that you want to adjust the permissions for.
For example, we have an ext4 drive mounted to our Raspberry Pi at the location /mnt/pimounteddisk/.
2. As the next two commands need to be executed as the superuser, let’s change to it by running the following command.
sudo suCopy3. With the path to your drive or folder in hand, we are going to make use of the following two commands.
Make sure that when you run these that you replace [YOURDRIVEPATH], with the path you want to adjust permissions on.
find [YOURDRIVEPATH] -type d -exec chmod 755 {} \;
find [YOURDRIVEPATH] -type f -exec chmod 644 {} \;Copy
The second command finds all directories and assigns the owner “read“, “write” and “execute” privileges and gives all other uses “read” and “execute” privileges.
The third command is used to find all files and will assign the owner “read” and “write” privileges, and all other users will get the “read” permission.
4. Once those commands have finished running, we can go ahead and exit out of the superuser mode.
exitCopy5. You should now be able to interact with your media files from within Plex successfully.
Conclusion
Hopefully, at this stage, you will now have Plex up and running on your Raspberry Pi without any issues.
If you come across any issues or have some feedback, then please don’t hesitate to leave a comment below.


I really struggled as PLEX couldn’t see my mounted USB HDD. i knew it was a permissions issue, but couldn’t get to the bottom of it for a good while.
The most recent PLEX (Feb 2020) doesn’t have the file at
/etc/default/plexmediaserverso i couldn’t easily change the PLEX user to pi.After some digging around in the weeds, i found the PLEX service file, and intended to use it to find the config file.
The plexmediaserver.service was stopped at the point
As it happened the plexmediaserver.service file found at
/lib/systemd/systemcould be edited and the lineUser=plex could be changed to User=pi
once edited, the daemon required reloading,
sudo systemctl daemon-reloadonce it was reloaded, the service was restarted, and PLEX could dig into my USB drive.
Hi,
I have my video’s already storied on a NAS (Synology 413J), but I can’t install PLEX on it, Can I use this PLEX-server to play video’s from the NAS to tv?
Hi,
Yes this should be possible, all you should need to do is mount your NAS’s shared drive to the Pi then point Plex at that mount point.
I would recommend using a Pi 4 to maximize your network throughput though.
Cheers,
Emmet
Thanks. Ordered a Pi4 (4gb) , now waiting for it to arrive and to play with it.
Can you fix your link to “Raspberry Pi network attached storage” Tutorial? It’s linking to an image.
Thank you pointing this out. It appears WordPress decided an image needed that link instead of the tutorial. It’s all fixed now.
sudo apt-get install plexmediaserver
If you get an error at this step, then be sure to check out my troubleshooting section at the bottom of this tutorial.
what is the cause of this please?
copied and pasted all code so no typos.
Hi Grahame,
Sorry, the line about troubleshooting was from a previous version of this tutorial.
Can you please let me know the error you’re receiving?
Thanks,
Gus
The error I got was:
E: Unable to locate package plexmediaserver
Everything else went alright
Hi Mike,
We have gone ahead and rewritten the tutorial to utilize the repositories provided officially be Plex.
It should all now work as intended.
Cheers,
Emmet
Hey great tutorial. I was able to go through each step with no issue. The problem I’m having now is that when i try to add a library on plex, I select the external hard drive i have my media on, but the folders inside the drive do not show up and it says I have no media in the library. Any suggestions of what is going wrong?
When attempting to start the Plexmediaserver service I receive an error “Status=132”
How do I resolve this?
root@raspberrypi:~# service plexmediaserver status
● plexmediaserver.service – Plex Media Server for Linux
Loaded: loaded (/lib/systemd/system/plexmediaserver.service; enabled; vendor preset: enabled)
Active: failed (Result: exit-code) since Tue 2018-01-09 13:37:59 CST; 2min 59s ago
Process: 3833 ExecStart=/bin/sh -c LD_LIBRARY_PATH=/usr/lib/plexmediaserver “/usr/lib/plexmediaserver/Plex Media Server” (code=exit
Process: 3829 ExecStartPre=/bin/sh -c /usr/bin/test -d “${PLEX_MEDIA_SERVER_APPLICATION_SUPPORT_DIR}” || /bin/mkdir -p “${PLEX_MEDI
Main PID: 3833 (code=exited, status=132)
[–SNIP–]
Hey Daimyo,
What version of the Raspberry Pi are you attempting to utilize with Plex?
Cheers
All of my testing was on a Pi2 (the Pi3 that I had ordered was DOA).
However after receiving a new Pi3 everything worked as expected.
Now I just need to do some video conversions to get my library to natively play from the Plex-Pi
Hey Daimyo,
Glad to hear it all ended up working on the Pi3. It’s strange as it should have worked without issue on the Raspberry Pi 2 as well.
Cheers
I have the same problem as Daimyo. I am using Jessie on a Raspberry Pi 1 B+ V1.2.
Hey Jordon,
Sadly Plex will not work on the Raspberry Pi 1 at all, it simply is not developed with support for the version of ARM that is utilized on the original Raspberry Pi’s.
You will have to upgrade to either a Raspberry Pi 2 or a Raspberry Pi 3 to be able to complete this tutorial. Of course, we recommend upgrading to a Raspberry Pi 3.
Cheers,
Gus
Will this stream all HD content without any issues? Is the raspberry powerful enough to do this? I am looking to replace my media server that is a power hog.
I plan to install plex media server on my pi and use my roku as the client.
You will likely find that the Pi isn’t powerful enough to stream HD content, especially if you want to stream to multiple devices.
Gus,
How do you manually install a Plex Media Server update?
@Teknosherpa open a terminal window on your Raspberry Pi 3, and type
sudo apt-get upgrade
Enter
Let that run, and then once that completes, type
sudo apt-get update
Enter
let that complete, and that will update Plex and any other modules running on your Pi
your tutorial is so clear that i got everything right in one try! thank you so much!
Successfully created NAS raspberry + Plex media server on raspberry pi 3
Thank you for this. I had tried two other tutorials and failed to get everything working properly… this was as simple as it gets. Great work!
Great tutorial. Got everything up and running. Unfortunately, it doesn’t seem the Pi 3 can handle the transcoding of 1080p .MKV files which is a deal breaker for me as that is most of my media.
Did you get a fit x for this? Having the same issue.
It looks like our Pi 3’s are not powerful enough to handle HD content at this time. Looks like we are stuck with SD content for now.
I figured out mine! Just needed to enable port forwarding to 32400 and point it to the static IP of my Pi 3 while it’s connected to Ethernet. Success!
I’ve followed all instructions and added the IP address to the /boot/cmdline.txt file, but when I reboot the Pi 3, and even see the “[ OK ] Started LSB: Plex Media Server. I can’t navigate to the IP:32400/web/. What am I missing?
Great instruction, step-by step, finished it all without a problem, and when I try to connect to server with a PI Browser all works prefect, but when I try connect with a another PC got a following message:
This site can’t be reached
192.169.0.21 took too long to respond.
What to do?
you have to specify the port in the address. Default port used by plex is 32400, so your address should look like this 192.168.0.21:32400/web/
Hello! I’m considering building a Pi-based Plex server in order to free up my PC for use at my office. Leaving my wife and kids without Plex would be a pretty bad move… LOL.
The only concern that comes to mind for me is the ability to stream 1080p .MKV files. Is real-time transcoding performance any different than what I get from my PC? I plan on hanging a USB hard drive from a yet-to-be-purchased Pi 3. Thanks!
Mine had been running fine for weeks, but all of a sudden I have been getting the message that the server is not powerful enough, even on content that had been ok before. Have just re setup the whole thing, done all updates and its a bit better, but still doing it. CPU is at 99%
Step 4 after typing in the command it says
tee: /etc/apt/sources.list.d/pms.list: no such directory Deb https://dev2day.de/pms/ Jessie mainI’m getting this same issue, I think. Any luck?
Thank you for the great article. I was able to setup my Raspberry Pi 3 without any problems.
I followed the guide and almost everything is working as expected. I find my server both locally and on remote networks. I’ve some issues with the streaming though. I’m not sure the Pi3 is powerful enough to stream high quality videos to remote networks. I’m trying to stream 1080p .mkv files with h264 codec, but it buffers like every 5 seconds. I’ve been trying with 720p movies too, but it just doesn’t work smoothly.
Am I missing something? Or is the Pi3 just not powerful enough?
how do you set it up for remote networks