In this tutorial, I go through all the steps to getting your very own Raspberry Pi plex server up and running.
This project is perfect for anyone who wants to have a media server that can be accessed by anyone within a household. You can also set it up to be accessed outside your local network.
Plex is a client-server setup where the client directly streams data from the Plex media server. This setup means you can have all your movies, music, and photos located on the one device, the server. In this case, we will be using the Raspberry Pi.
You can then have multiple clients connect to the same server. It is great as you don’t need to have multiple copies of the same media across several devices.
The Plex client is supported on a ton of devices including Windows, Apple, Android, Amazon Fire TV, Chromecast, Xbox, PlayStation, Linux, and so much more. It really is a fantastic home media solution.
If you just want a single client without the whole server setup, then something like the Raspberry Pi Kodi media center might interest you more.
If you are after an alternative completely free media server, you can also check out Jellyfin.
Equipment
You will need the following equipment to be able to complete this Raspberry Pi Plex server tutorial.
Recommended
- Raspberry Pi Amazon 2 or Newer
- Micro SD Card Amazon
- Power Supply Amazon
- Ethernet Cable Amazon (Recommended) or Wi-Fi Amazon
Optional
- Raspberry Pi Case Amazon
- USB Keyboard Amazon
- USB Mouse Amazon
- External Hard drive Amazon or USB Drive Amazon (For storing movies, music & photos)
NOTE: This tutorial will not work on older versions of the Pi. A Raspberry Pi 2 or later will work. It was last tested on a Raspberry Pi 5 running the latest version of Raspberry Pi OS Bookworm.
Video
In the video below we will walk you through the steps of installing the Plex Media Server to your Raspberry Pi.
Be sure to also check out the written version of our Plex guide below.
Setting up the Raspberry Pi Plex Server
In this tutorial, I will be using Raspberry Pi OS so if you haven’t got it installed then check out my guide on how to setup Raspberry Pi OS.
If you want to run a slim version of the operating system, you should take a look at installing Raspberry Pi OS Lite.
Preparing your Pi for Plex
1. Now before we install the Plex Media Server software to the Raspberry Pi, we need first to ensure our operating system is entirely up to date by running the following two commands.
sudo apt update
sudo apt upgradeCopy
2. To install the Plex packages to the Raspberry Pi, we will need to add the official Plex package repository.
Before we do that we need to install the “apt-transport-https” and “gnupg2” packages.
This package allows the “apt” package manager to retrieve packages over the “https” protocol that the Plex repository uses.
Install the package by running the command below.
sudo apt install apt-transport-https gnupg2Copy3. Let’s now add the Plex repositories to the “apt” keyrings directory.
This key is used to ensure the files that you are downloading are in fact from that repository and signed by that key.
Run the following command to download and save the key to our keyrings directory.
curl -L https://downloads.plex.tv/plex-keys/PlexSign.v2.key | sudo gpg --yes --dearmor -o /usr/share/keyrings/plexmediaserver.v2.gpgCopy4. With the Plex GPG key now added, we can finally add the official Plex repository to the sources list by running the following command.
echo "deb [signed-by=/usr/share/keyrings/plexmediaserver.v2.gpg] https://repo.plex.tv/deb/ public main" | sudo tee /etc/apt/sources.list.d/plex.listCopyIn the line we are adding, you can see that we refer to the keyring we downloaded in the previous step.
5. As we have just added a new repository to our sources, we will need to run the “update” command again to refresh the package list.
sudo apt updateCopyIf you get the error “/usr/lib/apt/methods/https could not be found.” Then the https transport package hasn’t been installed. Double check that it has been installed correctly.
Installing Plex to your Raspberry Pi
6. Now that we have set up our Raspberry Pi so that it can read from Plex’s official package repositories we can go ahead and finally install the Plex Media server package to the Pi.
To install the “plexmediaserver” package, run the command below.
sudo apt install plexmediaserverCopy7. The installation process for Plex sets up a few different things for us.
The first is that it creates a user and group for Plex to run under. This user and group is called “plex“.
It also will set up two directories, one where to store files temporarily that Plex is transcoding. You can find this folder at “/var/lib/plexmediaserver/tmp_transcoding“.
The second directory is where Plex will store all the metadata it retrieves for your media. This folder can be found at “/var/lib/plexmediaserver/Library/Application Support“
8. As Plex is running a different user to the Raspberry Pi’s default “pi” user, you will need to make sure you have permissions set correctly on your drive.
If you need help setting up your external drive with Plex, you can try following our guide on mounting a USB drive on the Raspberry Pi.
Setting a Static IP Address for your Plex Server
9. Now that we have installed Plex to our Raspberry Pi you will want to ensure that you have a static IP address for your Raspberry Pi. If you don’t have access to your router, you can still set a static IP on your Raspberry Pi itself.
There are two reasons to use a static IP. One is that the IP will be easier to remember. Second is that it will make sure your Plex server can always be found at the same address.
https://pimylifeup.com/raspberry-pi-static-ip-address/10. The Pi should now always start with the same IP. You can also set this on most routers by tying the mac address of your network device (WiFi or Ethernet) to an IP.
Now the Raspberry Pi Plex media server should be all set up and ready to scan your media and stream it any client that wishes to connect. I will go through some basics of setting everything up below.
Storing Media on the Raspberry Pi
Now there are several ways to store your media on the Raspberry Pi. I will mention each of the methods below.
You can hook up an external hard drive with all your music, movies and whatever else you may have. Setting the Plex program to run as the Pi user means you can plug a USB hard drive in and access the media in Plex without any issues.
You’re also able to mount drives permanently; I have already covered this in a previous tutorial, so be sure to check out my guide on how to mount a USB hard drive to the Raspberry Pi. Make sure you set the user & group owner of the drive to Pi.
Another option is to set your Pi up as a NAS. This will allow you to transfer your media across to it without needing to disconnect and reconnect a hard drive.
You can set this all up by following my tutorial on setting up a Raspberry Pi network attached storage.
Lastly, you can use the SD card for storage, but as you could imagine, this will quickly run out of space. You can set up a folder on the SD card to be accessed via the network.
Connecting Clients to The Plex Media Server on the Raspberry Pi
If you’re using an app on your phone, computer, Xbox, PlayStation, or any other device, then the Plex client should be able to pick up on the server automatically.
You will, unfortunately, find the official mobile Plex applications are behind a paywall. For example, you will need to pay money to get full access to all the features. However, all other apps, including the web app, should be free with only a small set of features requiring a subscription.
To connect to the browser, enter the IP followed by the port 32400 and /web/. For example, mine is.
192.168.1.100:32400/web/You will be prompted to log in, simply sign up or sign in to an existing plex account. You can skip this by just entering by entering the address above again.
Next, you will need to set up your music, movie, and TV show libraries. This process is incredibly easy and shouldn’t be too hard in getting it set up correctly.
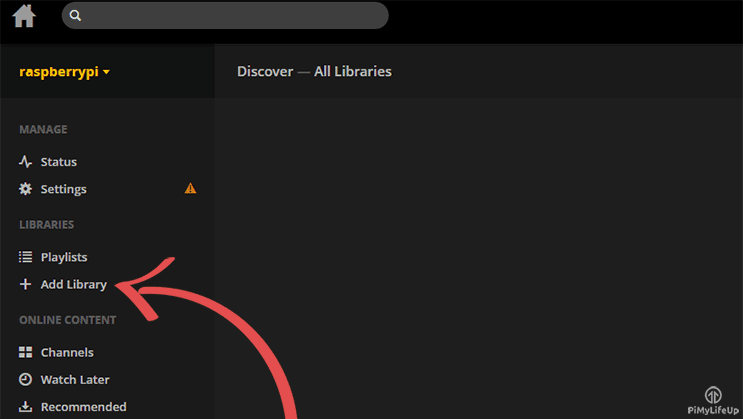
1. First select add library in the left-hand side column.
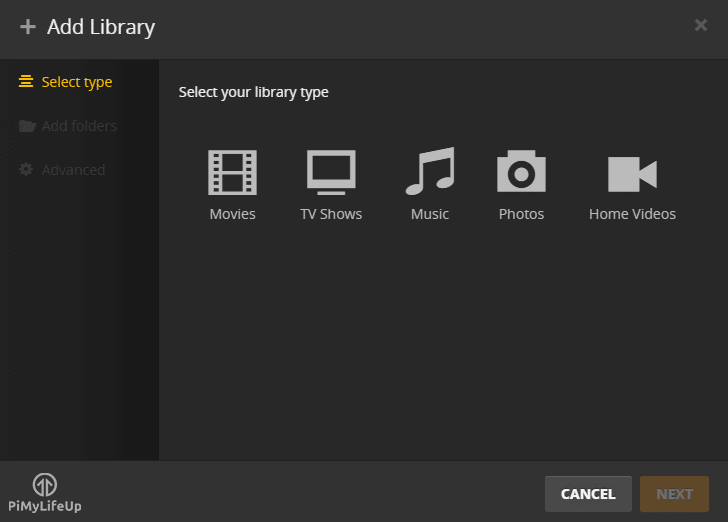
2. Next, select the type of media that is in the folder. If you have more than one type, then you will need to add a new library for each type of media.
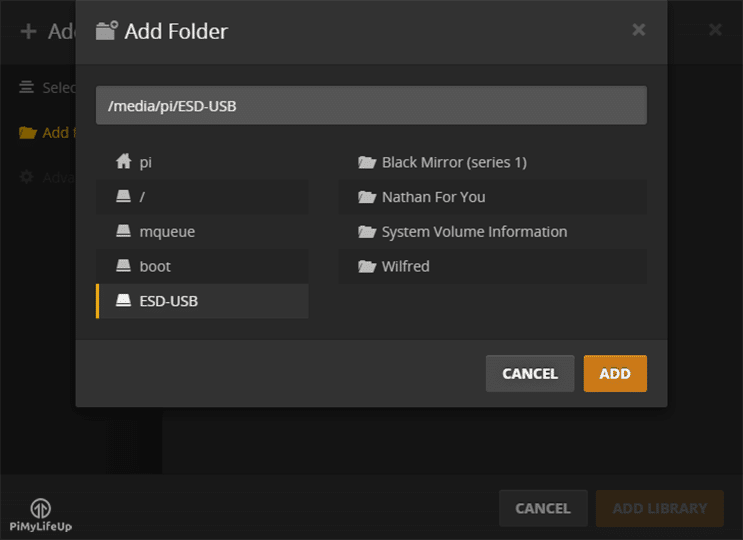
3. Next, you will need to select the folder that has all your media in it.
For example, mine is on a USB drive that is displayed in the left-hand side column or can be found at /media/pi/ESD-USB
4. Once you add the library, it will now organize your clips in a nice easy to browse interface.
If you need more information on how to setup, name and organize your media library, then Plex has an amazing amount of documentation on naming and organization.
Fixing File Permission Errors with Plex
One of the most common problems you may run into with Plex on your Raspberry Pi is with it being unable to access your files. The most common cause of this issue is incorrect permissions.
This section will show you how to modify the permissions for an ext4 drive.
If you are running an NTFS or FAT formatted drive, you will need to try remounting your disk drive and adjusting its mounting options. The reason for this is that the NTFS and FAT filesystems do not support the Linux permission system.
1. To begin, work out the location of the drive or folder that you want to adjust the permissions for.
For example, we have an ext4 drive mounted to our Raspberry Pi at the location /mnt/pimounteddisk/.
2. As the next two commands need to be executed as the superuser, let’s change to it by running the following command.
sudo suCopy3. With the path to your drive or folder in hand, we are going to make use of the following two commands.
Make sure that when you run these that you replace [YOURDRIVEPATH], with the path you want to adjust permissions on.
find [YOURDRIVEPATH] -type d -exec chmod 755 {} \;
find [YOURDRIVEPATH] -type f -exec chmod 644 {} \;Copy
The second command finds all directories and assigns the owner “read“, “write” and “execute” privileges and gives all other uses “read” and “execute” privileges.
The third command is used to find all files and will assign the owner “read” and “write” privileges, and all other users will get the “read” permission.
4. Once those commands have finished running, we can go ahead and exit out of the superuser mode.
exitCopy5. You should now be able to interact with your media files from within Plex successfully.
Conclusion
Hopefully, at this stage, you will now have Plex up and running on your Raspberry Pi without any issues.
If you come across any issues or have some feedback, then please don’t hesitate to leave a comment below.


Thank You SOOOO Much for this! Wow I was skeptical anything would work for me again since I trashed my PC and reinstalled Windows and Trashed my Pi and reinstalled everything from scratch!
After getting the shared folders to finally work then adding Plex Server to my Pi….I’m off to the races again!
Movie-TIME!
Great guide, managed to set up on an old Rasp Pi 3 I had in the cupbaord.
I also managed to get one 4TB external USB drive powered from the unit too so all looks great.
Hi there! If I was looking for someone to help me troubleshoot this system, what skills would they need? Weird situation- my ex boyfriend helped me set this up originally but now we no longer talk so I’m super confused.
Hi Melissa,
A basic understanding of Linux is what would probably help most with working out any issues.
What issues are you having?
Cheers,
Emmet
Hey, went through the whole thing and got no errors, but I can’t connect to the server. Says it failed to start with a result of “signal” Not sure what went wrong, any help would be great.
Hi Caden,
It’s hard to know what exactly is going wrong with few or little errors. If you run the following command is there much information returned by it.
Additionally, what operating system are you using?
Cheers,
Emmet
Hi!
Thanks for the tutorial, super helpful and everything worked a charm! Quick question about updating the Plex server. My Plex tells me there is an update to the Plex server, I ran sudo apt-get update and sudo apt-get upgrade and my Plex still tells me there is a server update. Am I missing something?
Thanks!
Eric
Hi Eric,
This problem occurs when Plex pushes an update but hasn’t yet provided a new one to their package repository for the Pi’s hardware.
The only real solution is to wait and hope that they eventually push the update to the repo. I’m not sure how much of a delay there typically is between updates and it becoming available.
Cheers,
Emmet
Hello! I have used this guide for install Plex on my raspberry pi 2, I would now like to “upgrade” to a pi 4. I’d this a simple thing to do? I can’t find any Pi-specific guides to do this, have you written one? Or is this something you could do? 🙂
Hi Rob,
If you are running Raspberry Pi Buster on the SD card in your Pi 2. You should be able to simply place that SD card into your Pi 4.
Cheers,
Emmet
Thanks, Emmet. I suspected that or a hidden character when I grabbed the command from Plex support and it worked.
Awesome tutorial. Great for us Linux newbees. I did, however, run into an issue and couldn’t complete the task. When I install the key using: ‘
curl https://downloads.plex.tv/plex-keys/PlexSign.key | gpg --dearmor‘ I get this:followed by a dump of hex symbols. No error message. When I download the package in Step 5, I don’t get an error. But when I do the package update, I get this long error:
After this I’m told I can’t install the package because it cannot be found. It would seem that I am not getting the public key but I don’t understand the code well enough to debug.
Hi Russel,
From a quick glance you didn’t use the full command (which is also why you got the dump of hex symbols). It is quite a long command as we need to pipe it through the “
gpg --dearmor” function before saving the resulting key into the keyrings directory.At the end of this long command you will see that we also use “
>/dev/null“. This little piece will direct the output of these commands to “null“. This stops that jumble of hex symbols from appearing in the terminal.Cheers,
Emmet
Thankyou very much for this detailed tutorial which I am trying to follow. I have the new Raspian Bullseye on my Pi4.
Install transport-https ok – version 2.2.4
Use the curl command and I get Warning: apt-key is deprecated. Manage keyring files in trusted.gpg.d instead (see apt-key(8)) and error gpg: can’t open ‘–’: No such file or directory
If I go ahead with the sudo apt update command then I get key errors.
Would appreciate any help to fix this problem.
Hi Brian,
While the deprecated warning shouldn’t of caused the issue you ran into, I have updated the steps to use the newer method.
Please try running through the updated steps and let me know if you are experiencing any issues.
Cheers,
Emmet
Can the Pi-Plex server access media stored on an independent NAS? I don’t see that as a media storage option, but for me that makes the most sense. I currently use a PC as Plex server, but the media is on a NAS.
Hi Joe,
You should definitely be able to use media stored on a NAS. You just need to make sure you mount those drives to your Raspberry Pi.
Cheers,
Emmet
There is a setting in your Plex account to enable remote access. Make sure that is enabled. If you have problems enabling it, something on your network is preventing it, like a tight security setting or the port being blocked
i’m going really crazy with this pms. Can you tell me if there is someone who has managed to show the server on raspberry by clients on smartTV or STB? I didn’t make it, I tried them all, yet it works on the most up-to-date clients of windows and android.
There is a plex client for the Roku & it works well on that. I use the Roku as a STB for an old PC monitor in my study.
Hi and thanks for the excellent guide.
This installed and runs really well for me, However My Pi reboots each night to clean things up as i run a number of services from it.
After each restart I have to claim the server again and worked out that its because the plex service is starting before the Wifi connects.
I cant for the life of me see who to alter the start order as this doesnt appear as a Systemctl service. Any advice on how to delay the start up of the service by like a minute?
Think I found my own Solution.
System was set to wait for network but not to wait for DNS
https://wiki.archlinux.org/index.php/Systemd#Running_services_after_the_network_is_up
Changed the /lib/systemd/system/plexmediaserver.service
[Unit]
Description=Plex Media Server
Wants=network-online.target
After=network.target network-online.target nss-lookup.target
works perfectly now.
Thanks for the excellent tutorial. I too ran into small detailed issues but between this and youtube I was able to get up and running perfectly, in and outside the network. I am very new to all things Pi so forgive me if this seems like a dumb question, but If we run this as a headless server, is it ok to just ssh in and sudo shutdown or could that corrupt or damage any files or necessary information? If so, what is the best way to shutdown for periodic cleaning, movement, etc?
Hi JR,
Glad to hear that you got it all up and running! Always feel free to comment if you have any issues and we will try our best to correct the tutorial to deal with them.
In the case of shutting down your raspberry Pi. Shutting down your Raspberry Pi using ssh then
sudo shutdownis the cleanest way of powering down your Raspberry Pi.Shutdown works by sending a signal to all running programs that they should terminate cleanly so you should avoid any corrutption by using this.
We have a quick run through of the steps the command takes during the powering down process in our how to shutdown a Raspberry Pi guide.
Let me know if that answers your question.
Cheers,
Emmet
Howdy! I too have a question about updating.
I ran through this tutorial a week ago – really liked it, seemed easy and worked right out of the box – sweet!
Tonight, I tried patching and it didn’t appear to grab anything, so I looked in /etc/apt/sources.list.d/. I see two files:
plexmediaserver.list plexmediaserver.list.dpkg-old
Okay, odd, but….sure. What do they look like inside?
Cool, cool. That looks fine.
How about plexmediaserver.list:
Whoa! It looks like it’s disabled. I uncommented out line 3 and ran sudo apt update and, this time, got:
(I then did “sudo apt upgrade”, and now I’m current. (Yay!)
This may be the solution for some of the other people having problems upgrading. I have no idea why it renamed things. Unsure if you want to mention this in the tutorial.
@mbourgon Thank you so much! This was my problem as well. Uncommenting the last line in /etc/apt/sources.list.d/plexmediaserver.list allowed my server to properly find and upgrade the plexmediaserver package. I can now do normal upgrades. Thanks!
Have a question, as new updates for plex for RPI are sent, how can you from the command line update to the new version without unplugging it running it to a TV and downloading the update?
Hi TimK,
You can use SSH to connect to the Raspberry Pi then update the existing packages by running the following two commands.
Cheers,
Emmet
Unfortunately it didn’t work for me.
I’ve got a message (An update is available. Please install manually.) but after update, upgrade and reboot it is still there.
I set up the PMS about a month ago following the instructions of this tutorial.
Could you help me how to update PMS?
Hi David,
If there is no update available then you will have to wait until one is made available by the Plex team.
The Plex Media Server updates are all provided through their package repository.
Cheers,
Emmet
@TimK you may need to edit the plexmediaserver.list file – I just ran into the same problem, and posted the solution as reply to the main post.
Hi Emmet
I’ve followed your instructions, and everything seemed to go smoothly..no error messages etc… However, when I navigate to the plex page, either remotely (http://ipaddress:32400/web), or on the Pi (localhost:32400/manage), I get “this site can’t be reached. 192.168.x.x refused to connect.” in Chrome. Any suggestions please ?
Many Thanks
James
Hi James,
I just re-ran through the tutorial and everything seems to be working as it should be.
Can you try running the following command. It should give us an idea if anything is going wrong.
Cheers,
Emmet
Hi Emmet,
I have the same issue, here’s my output for that command:
pi@raspberrypi:~ $ sudo systemctl status plexmediaserver
● plexmediaserver.service – Plex Media Server
Loaded: loaded (/lib/systemd/system/plexmediaserver.service; enabled; vendor
Active: failed (Result: signal) since Mon 2020-03-16 10:32:53 GMT; 2min 27s a
Process: 803 ExecStartPre=/bin/sh -c /usr/bin/test -d “${PLEX_MEDIA_SERVER_APP
Process: 805 ExecStart=/bin/sh -c export PLEX_MEDIA_SERVER_INFO_VENDOR=”$(gre
Main PID: 805 (code=killed, signal=ABRT)
Mar 16 10:32:53 raspberrypi systemd[1]: plexmediaserver.service: Service Restart
Mar 16 10:32:53 raspberrypi systemd[1]: plexmediaserver.service: Scheduled resta
Mar 16 10:32:53 raspberrypi systemd[1]: Stopped Plex Media Server.
Mar 16 10:32:53 raspberrypi systemd[1]: plexmediaserver.service: Start request r
Mar 16 10:32:53 raspberrypi systemd[1]: plexmediaserver.service: Failed with res
Mar 16 10:32:53 raspberrypi systemd[1]: Failed to start Plex Media Server.
Hi Jasper,
Looks like the important lines were clipped a bit. Can you try getting the full output?
Cheers,
Emmet
Hi Emmet, I cant find this:
You now instead need to modify the service itself. Just follow the new additions under the “Installing Plex to your Raspberry Pi” subheading.
You have a link for me?
Hi René,
I have since changed the tutorial to not require changes to the service anymore and instead use the plex user.
Cheers,
Emmet
I followed the directions, but please seems to be a client instead of a server. When I click on Your Media, I get a button to get plex media server which takes me to the plex site. What did I do wrong?
Hi Juanita,
It looks like your Plex client is for some reason not detecting the Plex Media Server installation on your Raspberry Pi.
Plex is only avaialble officially as a server on the Raspberry Pi so there is no way you could of installed a client instead by following these steps.
We have adjusted the tutorial to fix an issue with the previous installation steps so make sure you run back through the tutorial agian.
Cheers,
Emmet
It is also worth trying to access your server using http://ipaddress:32400/web
Instead of raspberry pi.local should you be trying that.
I had the same issue last weekend and had to kick start it in this manner.
I’m also assuming your server has not yet been claimed.
If it has through a previous attempt, you may have to delete the Plexmediaserver.conf file in the /var/…..location (apologies, I don’t recall the exact location and I’m away from my server)
Hi Emmet,
When I go in to edit the sudo nano /etc/default/plexmediaserver to change the user name from Plex to Pi, I get a blank file with nothing to edit. Any ideas?
Hi Kevin,
There has been a recent change to the Plex Media Server package. We have now modified the tutorial with a solution to this.
You now instead need to modify the service itself. Just follow the new additions under the “Installing Plex to your Raspberry Pi” subheading.
Cheers,
Emmet