In this Raspberry Pi project we will show you how to install Kodi to a Raspberry Pi.
Kodi is one of the most popular ways to play media on your Raspberry Pi.
Kodi is different from a Plex server as the files are played directly on your device, rather than streamed to another device.
It has support for a massive range of different media formats. You can play music, videos, and even showcase your images using this media center software.
One of the coolest things about Kodi is its ability to scan and categorize all your media. It will download information about your media files and present it nicely to you.
Using Kodi on your Raspberry Pi is a great experience. The software has been heavily optimized for the device. It is capable of displaying a large variety of high-resolution files.
You can even use Kodi to play Netflix on your Raspberry Pi, which isn’t even supported by the Chromium web browser.
For the best experience with Kodi, we recommend that you use the Raspberry Pi 4 or newer. The stronger processor and increased RAM will help Kodi run at its best.
Suppose you would prefer to use a distribution that comes with Kodi pre-installed. In that case, we recommend that you check out LibreELEC, OSMC, or XBian.
Equipment List
Below is a list of the equipment we used when installing the Kodi media center to our Raspberry Pi.
Recommended
- Raspberry Pi Amazon
- Micro SD Card Amazon
- Ethernet Cable Amazon or Wi-Fi Amazon
- Power Supply Amazon
- HDMI Cable Amazon
Optional
For this guide on installing Kodi, we were using a Raspberry Pi 4. For the operating system, we used the latest version of the lite edition of Raspberry Pi OS Buster.
Installing Kodi on Raspberry Pi OS
In this section, we will be walking you through the straightforward process of installing Kodi to Raspberry Pi OS.
Before we proceed, you need to have installed either the desktop or lite editions of Raspberry Pi OS. If you are using the lite edition, make sure you have also set up SSH on your device.
Lite is handy for maximizing the memory and CPU performance of your device. When we install Kodi, all the packages needed to display it to your screen will be installed.
1. Before installing Kodi we should first make sure that our Raspberry Pi’s operating system is up to date.
To update your device, all you need to do is run the following two commands.
sudo apt update
sudo apt upgrade -yCopy
These two commands will update the package list then upgrade all packages that have a new version available.
2. Once your Raspberry Pi has finished being updated, we can install Kodi.
Kodi is available through the official Raspbian package repository, meaning installing it is incredibly simple.
To install Kodi, all we need to do is run the command below on our Raspberry Pi.
sudo apt install kodiCopyThis install can take considerable time, depending on your network speed. You will need at least 800mb free on your SD card.
If everything has installed fine you can now skip to our section on running Kodi on the Raspberry Pi.
Compiling Kodi on Raspberry Pi OS Bullseye
If you are using Raspberry Pi OS Bullseye, you may need to compile Kodi to use it. The following steps will walk you through this compilation process.
Please note that the compilation process, while straightforward, consumes a lot of time. Additionally, you will need to ensure you have enough space on your SD card.
Preparing to Compile Kodi
Kodi requires a few initial preparatory steps before we can compile it on our Raspberry Pi. Follow the next few steps to get your device ready.
1. Before proceeding, we need to make sure that the package list is up to date.
Update the package list by running the following command on your device.
sudo apt updateCopy2. With the package list updated, we need to install the numerous packages required to compile Kodi on the Raspberry Pi OS.
This is a reasonably large command as Kodi relies on many third-party libraries for its codebase.
sudo apt install -y autoconf automake autopoint git gettext autotools-dev cmake curl gawk g++ libasound2-dev libass-dev libavahi-client-dev libavahi-common-dev libbluetooth-dev libbluray-dev libbz2-dev libcdio-dev libcdio++-dev libcec-dev libp8-platform-dev libcrossguid-dev libcurl4-openssl-dev libcwiid-dev libdbus-1-dev libegl1-mesa-dev libenca-dev libflac-dev libfontconfig-dev libfmt-dev libfreetype6-dev libfribidi-dev libfstrcmp-dev libgcrypt-dev libgif-dev libgles2-mesa-dev libglu-dev libgnutls28-dev libgpg-error-dev libgtest-dev libiso9660-dev libjpeg-dev liblcms2-dev liblirc-dev libltdl-dev liblzo2-dev libmicrohttpd-dev libmariadb-dev libnfs-dev libogg-dev libpcre3-dev libplist-dev libpng-dev libsmbclient-dev libspdlog-dev libsqlite3-dev libssl-dev libtag1-dev libtiff-dev libtinyxml-dev libtool libudev-dev lsb-release meson nasm ninja-build python3-dev python3-pil rapidjson-dev swig unzip uuid-dev yasm zip zlib1g-dev libgbm-dev libdrm-dev libinput-dev libxkbcommon-dev default-jdk libunistring-dev libflatbuffers-dev libdav1d-dev libavutil-dev libavformat-dev libavfilter-dev libavcodec-dev libswscale-dev libpostproc-dev libiso9660++-dev libxslt-dev libshairplay-dev libaacs-dev libcap-dev libpulse-dev default-libmysqlclient-dev libdvdread-dev debhelper libglm-dev libjsoncpp-devCopy3. Now that we have all the packages installed to your Raspberry Pi, we can clone a branch of Kodi that has been modified to work best on Bullseye.
Run the following command on your Pi to clone this repository.
git clone -b bullseye https://github.com/popcornmix/xbmc.git kodi_gbmCopyThis repository is relatively large and may take some time to clone to your device.
Compiling and Installing Kodi
Now that we have prepared our Raspberry Pi, we can compile and install Kodi onto our system.
1. We need to change into the directory where we just cloned the Kodi source code.
You can change to this directory by using the command below.
cd kodi_gbmCopy2. Now that we are in the correct directory, we can start the compilation process by issuing the following command.
./build_rpi_debian_packages.shCopyPlease note that the compilation process takes considerable time as a fair amount of code needs compiling.
3. Once Kodi has finished compiling, we can move on to installing it on our system. The compilation script we just ran will have compiled everything to the “build/packages” subdirectory.
Change to this subdirectory by using the following command.
cd build_armhf/packages/Copy4. To install all of the packages we just compiled, we will be using the “dpkg” tools “-i” option.
Install all of the packages by running the command below on your Pi.
sudo dpkg -i kodi-bin_19*.deb kodi_19.*.deb kodi-addon-dev*.deb kodi-tools-texturepacker*.debCopyInstalling Additional Kodi Addons
The default compilation script only installs the minimum required addons to get Kodi running on your Raspberry Pi.
However, there are some additional ones that you may want to use, such as the “inputstream adaptive” plugin that is used by the Netflix on Kodi addon and many more.
These next few steps will show you how to compile these addons and install them alongside Kodi.
1. First, we need to make sure that we are in the top-level directory of the repository.
You can change to this directory by using the command below.
cd ~/kodi_gbmCopy2. Now that we are in this directory, we can compile any official Kodi addons we require.
For the first part of this command, we set a list of addons we want compiled to a variable called “ADDONS_TO_BUILD“.
You can add additional addons to this line to compile additional addons. For this guide, we included some plugins that most people might need.
At the same time we make a call to the “build_rpi_debian_packages.sh” script. We use the “-a” option to tell it that we to compile addons.
ADDONS_TO_BUILD="inputstream.adaptive pvr.hts screensaver.shadertoy visualization.shadertoy" \
./build_rpi_debian_packages.sh -aCopy
There is significantly less code to compile this time, so it should take a lot less time to compile.
3. Once your Raspberry Pi has finished compiling the Kodi addons, you can install them with this simple one-line command.
sudo dpkg -i build_armhf/addons_build/*.debCopyThis simple-one line command will install all Debian packages that are stored within the “addons_build” subdirectory.
Configuring Hardware Acceleration on a Raspberry Pi 4
If you are using a Raspberry Pi 4, you will need to change your boot configuration file to allow HEVC hardware acceleration within Kodi.
1. You can edit the boot configuration file from your Raspberry Pi by using the following command.
Alternativelym this file can also be edited using a separate device by plugging the Micro SD card into it.
sudo nano /boot/config.txtCopy2. Find the “pi4” header within the file and add the new driver below it.
When using nanom you can use CTRL + W to search the contents of the file.
[pi4]Add the following line below this file. Simply put, this will make the Raspberry Pi load the driver used for hardware HEVC acceleration.
dtoverlay=rpivid-v4l23. If you plan on using 4K HEVC files on your Pi, you will also need to increase the CMA allocation. Basically, increasing this limit will allow the video driver to access more memory.
Find the following line within the config file.
dtoverlay=vc4-kms-v3dReplace that line with the following, increasing the CMA allocation.
dtoverlay=vc4-kms-v3d,cma-5124. Once you have made the changes to the configuration file, save and quit by pressing CTRL + X, then Y, followed by the ENTER key.
5. For these changes to take effect, you will need to restart your Raspberry Pi.
Restart your device by using the following command within the terminal.
sudo rebootCopyRunning Kodi on your Raspberry Pi
There are two different ways that you can load Kodi on your Raspberry Pi.
One way is to load Kodi up by using a simple command within the terminal.
The other way is to open it by using the automatically created entry on the desktop interface.
Opening Kodi on the Raspberry Pi OS Desktop Interface
In this section, we will show you how to find and load Kodi on the desktop interface.
1. First, open the start menu by clicking the raspberry icon on the top left corner of the screen
2. Within the start menu, hover over the “Sound & Video” option (1.).
Hovering over this option will bring up some additional items. In this sub-menu, click “Kodi” to open it (2.).
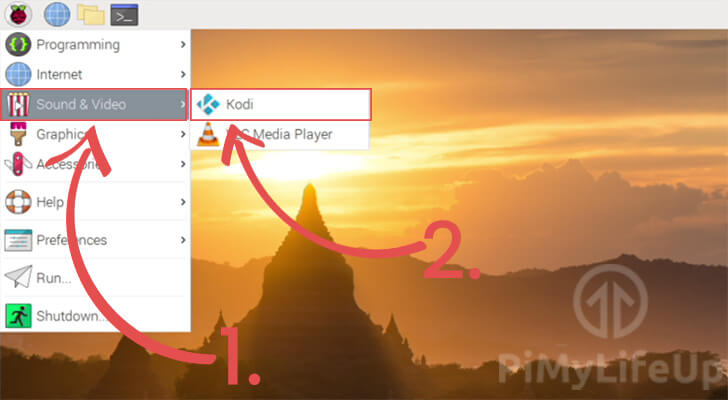
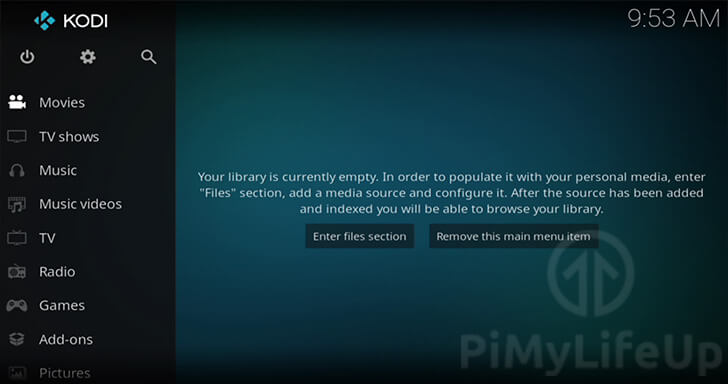
3. You should now have Kodi open on your Raspberry Pi.
Launching Kodi using the Terminal
Opening Kodi using the terminal is a straightforward process as all you need to do is issue a single command.
1. On your Raspberry Pi, type in the following command.
This command will launch the standalone version of Kodi on your device.
kodi-standaloneCopyKodi should begin to start up on your Raspberry Pi immediately.
2. If you would like to start up Kodi without it consuming your terminal session, you can use the following command.
kodi-standalone &CopyThe inclusion of the ampersand (&) will tell bash to run this command asynchronously.
Using this character allows you to continue to use your current terminal session.
3. You should now have Kodi up and running on your device.
If you can’t see anything, make sure your HDMI cable is plugged in correctly.
Getting Kodi to Auto-Start on the Raspberry Pi
In this section, we will show you how to get Kodi to auto-start on your Raspberry Pi.
To achieve this, we will need to create a system service file. Don’t worr, as this process is relatively straightforward.
1. To create the service file, we will make use of the nano text editor.
Begin creating this service for Kodi by running the following command on your Raspberry Pi.
sudo nano /lib/systemd/system/kodi.serviceCopy2. Within this file, enter the following lines of text. Ensure that you replace “<USER>” with the name of your user. For example, if your username is “pi” you would you “pi“.
[Unit]
Description = Kodi Media Center
After = remote-fs.target network-online.target
Wants = network-online.target

[Service]
User = <USER>
Group = <USER>
Type = simple
ExecStart = /usr/bin/kodi-standalone
Restart = on-abort
RestartSec = 5

[Install]
WantedBy = multi-user.targetCopy
These lines will tell the service manager to run the Kodi binary once the network has come online. It will also wait for all remote filesystems have been connected.
The requirement for the filesystem to be online ensures that Kodi should have access to all your networked shares.
3. Once you have entered all the lines correctly, we can now save our Kodi service.
Save the file by pressing CTRL + X, then Y, and finally ENTER.
4. Now that we have created the service, our next step is to enable it.
We can enable the Kodi service by running the following command on your Raspberry Pi.
sudo systemctl enable kodiCopyBy enabling a service, it will be automatically started by the service manager when the system boots.
5. If you want Kodi to be started immediately, you can run the command below.
sudo systemctl start kodiCopy6. Likewise, if you ever wanted to stop Kodi from running on your Raspberry Pi, all you need to do is run the following command.
sudo systemctl stop kodiCopyHopefully, you have now gotten the Kodi media center up and running on your Raspberry Pi.
To improve your experience with Kodi, you might want to look into mounting an external hard drive, or set up a remote control.
If you have found any issues, please feel free to leave a comment below.


Some of your tutorials start with:
sudo apt update
sudo apt full-upgrade
But some of your tutorials start with:
sudo apt update
sudo apt upgrade
What is the difference, and how do you know which to use?
Hi William,
sudo apt update, andsudo apt upgradeare the two that you will want to use.At one point I started writing guides with “full-upgrade” but that should typically be avoided in most cases. With a full-upgrade, the package manager can remove existing packages if that is required to install a new one. While this won’t break most peoples setups, there is still a chance it will.
I have updated this tutorial to use “
sudo apt update” and “sudo apt upgrade“.Thank you for your time in pointing that out.
Kind regards,
Emmet
Now that Kodi can be installed on the Raspberry Pi without compiling from scratch, is it still possible to add visualizations after installation? Every time I install Kodi, “visualizations” doesn’t seem to show up as an available add-on. Can it only be added via a compiled installation?
Hi Steven,
The way Kodi is distributed on the Raspberry Pi, things like visualizations are installed as separate packages.
You can find a list of visualizations you can install by running the following command.
For example, you could install the “startburst” Kodi visualization by running the following command.
Hopefully that answers your question.
Kind regards,
Emmet
Will it install and run on a RPI4 that has Ubuntu 22.04 installed on it instead of Raspi OS?
Hi Gerald,
These steps are purely for Raspberry Pi OS. The Raspberry Pi OS repository contains special builds of Kodi that have been compiled just for the Raspberry Pi.
Cheers,
Emmet
I used your tutorial and have had Kodi up and running for many months. Previously I could use Finder on my MAC computer and add or delete files on the Raspberry Pi external hard drive. I can no longer do this. I can log into it via IP address so I know its on the network, however I don’t see away going through the IP to add or delete items on the external hard drive. I have updated to the latest version of Kodi AFTER the problem developed. Any ideas?
Thanks
Jim
Hi Jim,
This definitely sounds like a strange issue to suddenly start occurring.
Did you perform any updates to either your Mac or your Raspberry Pi in general before this issue popped up?
Cheers,
Emmet
I haven’t yet updated to Bullseye. How can I install it on Buster? Should I upgrade to Bullseye first? (I read someone’s opinion yesterday that it would be better to do a clean install of Bullseye, rather than an upgrade.)
Hi Kevin,
You can simply skip the “Compiling Kodi on Raspberry Pi OS Bullseye” section. Kodi is available as a package on both Buster and Bullseye so it can be installed simply by running “
sudo apt install kodi” as described within the tutorial.If you want to make a move to Bullseye it is definitely better to start off with a clean install. However, we do have a guide on upgrading from Buster to Bullseye if you want to attempt that path. Just note that there is a chance stuff breaks in the progress.
Cheers,
Emmet
Hi Emmet,
Thank you for publishing this guide! It is very helpful. I do have a couple of observations:
1. In my case – PI4, 8GB, Bullseye VThe packages were not stored in “kodi_gbm/build/build/addons_build”, but rather in “build_armhf/addons_build”. I changed the dpkg command to “sudo dpkg -i build_armhf/addons_build/*.deb” and it appears to have worked correctly.
2. Starting kodi from the command line in terminal works but trying to use the sound and video drop down tries to launch 3 times and then fails. Any thoughts on where I went astray?
Thank you so much for this tutorial!
Happy Thanksgiving!!
Hi Rick,
Thank you for letting me know that the directories have changed slightly. I have corrected this now within the tutorial.
With the second issue I’ll have to do some testing. In the meantime though you can try reporting your issues in this topic on the Raspberry Pi forum. Dom (The package maintainer) tends to be fairly active within this topic.
Cheers,
Emmet
Hi!
Is it possible to install kodi in Debian Bullseye?
Hi Nidea,
As Kodi is currently not available through the official package repository, you will need to compile it from the source code.
We have added a new section to the tutorial that will show you have you can do this.
Please let me know if you have any issues.
Cheers,
Emmet