In this guide, we will be showing you how to set up RasPlex on your Raspberry Pi.

RasPlex is an operating system designed to get the Plex Client running on the Raspberry Pi 1, 2, 3 and 3B+ using the OpenPHT project.
Using RasPlex, you can stream all of your media from a Plex Server to your Raspberry Pi.
Provided you are running your Plex server on a powerful device, you should be able to stream any media file to RasPlex thanks to transcoding.
RasPlex is simple to set up as it all comes bundled within a pre-packaged image. It also features a simple wizard that will get you connected to your Plex server quickly.
One of the most significant advantages of RasPlex is that it is optimized to run on the Raspberry Pi. However, it sadly lacks some extra functionality, such as support for Live TV.
Please note that RasPlex does not have support for the Raspberry Pi 4. For the Pi 4, you will need to compile the official Plex Media Player yourself.
Equipment List
For this tutorial on setting up RasPlex on your Raspberry Pi, we used the following list of components.
Recommended
- Raspberry Pi Amazon
- Micro SD Card Amazon
- Power Supply Amazon
- Ethernet Cable Amazon or Wi-Fi Amazon
- HDMI Cable Amazon
Optional
This tutorial was last tested using a Raspberry Pi 3B+ running the latest version of the RasPlex operating system.
Downloading RasPlex for your Raspberry Pi
In this section, we will be pointing you in the direction to download the latest version of RasPlex for your Raspberry Pi.
Remember that if you are using a Raspberry Pi 4, you will not be able to make use of the RasPlex operating system.
There are three different versions of RasPlex that you can download. Each version is targeted at a particular set of hardware.
RasPlex for the Raspberry Pi 1
For the Raspberry Pi 1, download the RasPlex image by clicking the link.
This image has been built for the older version of ARM that the original Raspberry Pi utilizes.
RasPlex for the Raspberry Pi 2 & 3
The second image feature support for the Raspberry Pi 2 and 3.
You can download the RasPlex image for the Raspberry Pi 2 and 3 by clicking the link.
Please note that this image does not support the Raspberry Pi 3B+. You will have to use a separate image that supports the 3B+ hardware.
RasPlex for the Raspberry Pi 3B+
The third and final image is a beta image that has support for the Raspberry Pi 3B+.
Download this version of the RasPlex image by clicking the link.
As this is a beta image, there may be a few bugs that you will run into. If you are having issues, you may have to look into using PlexKodiConnect as an alternative solution.
Writing the RasPlex image to your SD Card
In this section, we will be walking you through writing the RasPlex image to an SD card that you can use with your Raspberry Pi.
For this section of the tutorial, we will be using the image writing software Etcher.
1. First, select the RasPlex image for your Raspberry Pi by clicking the “Select image” button.
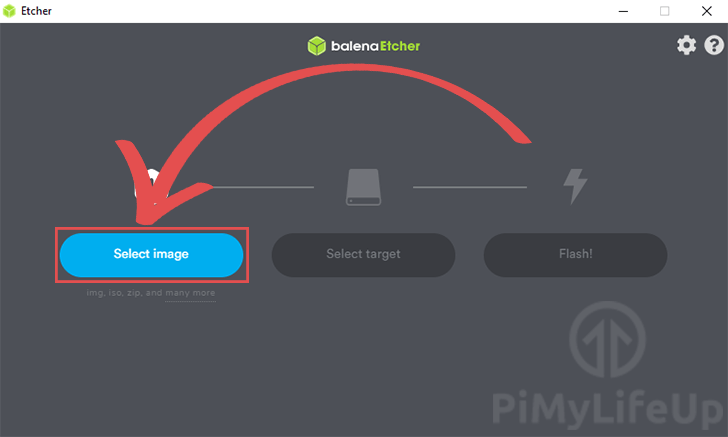
Clicking the button will bring up a system dialog that will allow you to select the image you downloaded earlier.
2. Next, click the “Select target” button.
You will be able to use this dialog to select the device you want to write the image to.
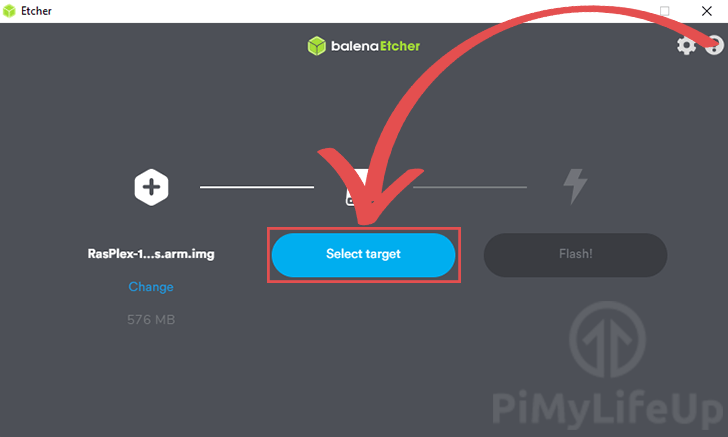
If you only have the one SD card plugged into your computer, Etcher will select it automatically.
3. With the RasPlex image selected and the correct device selected, you can now click the “Flash!” button.
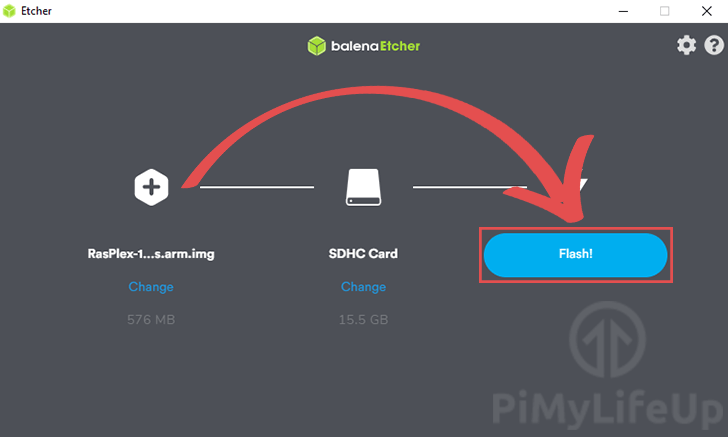
Please note that you must make sure you are writing to the correct device. All data on the drive will be lost during the flashing process.
Once the writing process has completed, you can insert your SD Card into your Raspberry Pi and continue with this tutorial.
First Run of RasPlex on Your Raspberry Pi
Upon your first run of the RasPlex software, you will be required to run through some initial configuration steps.
These steps will allow you to set up networking as well as connect RasPlex to your Plex Media Server.
1. The first screen will let you know that you are about to set up your new RasPlex installation.
These setup steps will allow you to set up a variety of settings, such as your Pi’s networking.
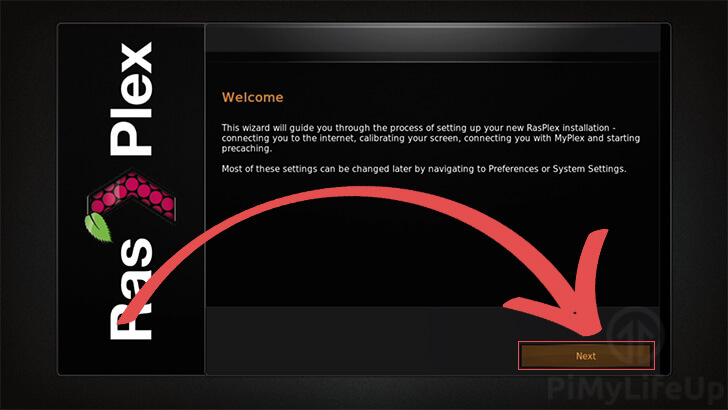
Once you are ready, click the “Next” button to start the set up process.
2. The first setting you will be asked to configure is your network.
Using this screen, you will be able to connect to wireless networks and see the status of any networks you are connecting through. (1.)
Once you have configured your network, you can click the “Next” button (2.).
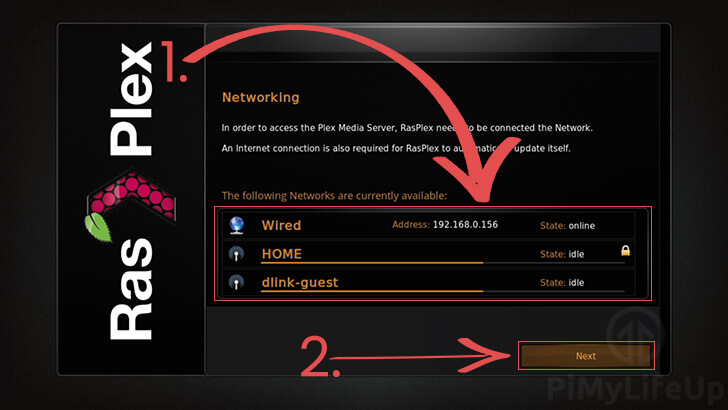
If you want to set up a WiFi network, you can select it using the keyboard. Selecting a secured WiFi network will bring up a text dialog that will allow you to enter its password before proceeding.
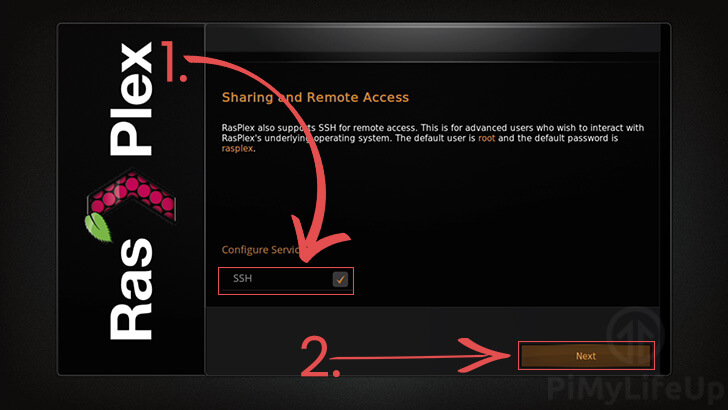
3. On the next screen, you will be able to turn RasPlex’s SSH service on or off (1.).
You can use SSH to manage your Raspberry Pi remotely. However, it does add an extra way someone could gain access to your device.
If you are happy with enabling SSH, you can select the “Next” button (2.).
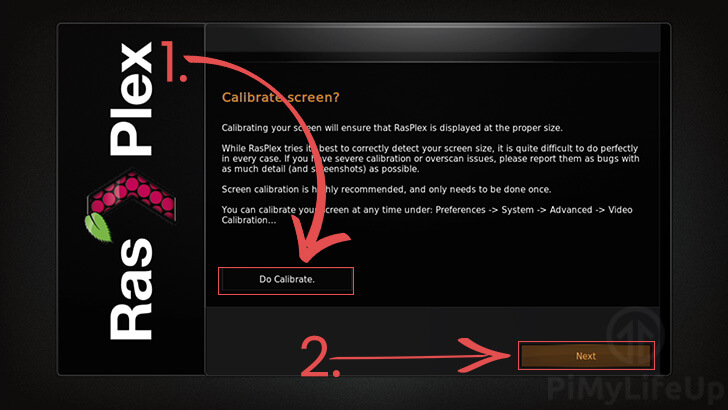
4. If you find that the RasPlex interface doesn’t quite fit your TV or monitor, you can use this tool to correct it.
To begin calibrating your screen, click the “Do Calibrate.” button (1.).
Once you have finished correcting your screen’s calibration, click the “Next” button (2.) to proceed.
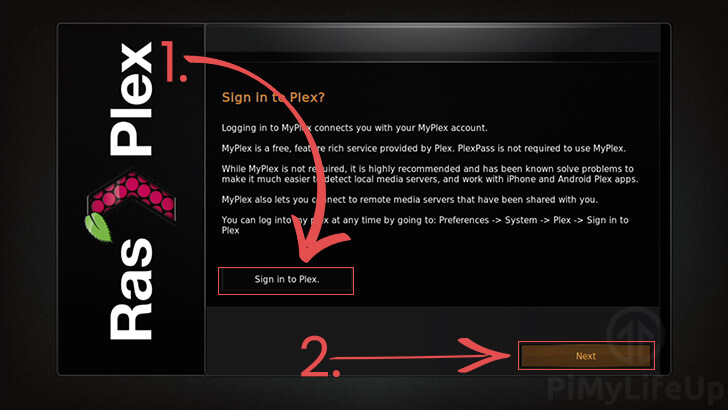
5. Our next step is to sign in to your Plex account.
By connecting to a Plex account, the RasPlex software will be able to find your linked Plex servers with ease as well as help with gaining access to any remote media servers.
Proceed to the sign-in process by selecting the “Sign in to Plex.” button (1.).
If you would prefer not to use a Plex account, click the “Next” button instead (2.) and skip to step 8.
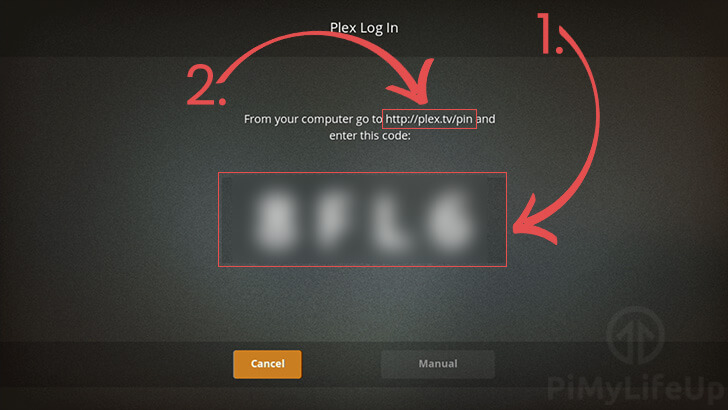
6. Thankfully, RasPlex has support for Plex’s simplified linking method.
Start by copying down the code that is shown in the middle of the screen. This should be a four-character code (1.)
Then in a web browser, go to the Plex device linking page (2.).
Once you are logged in with your Plex account, enter the code currently displayed on the RasPlex interface.
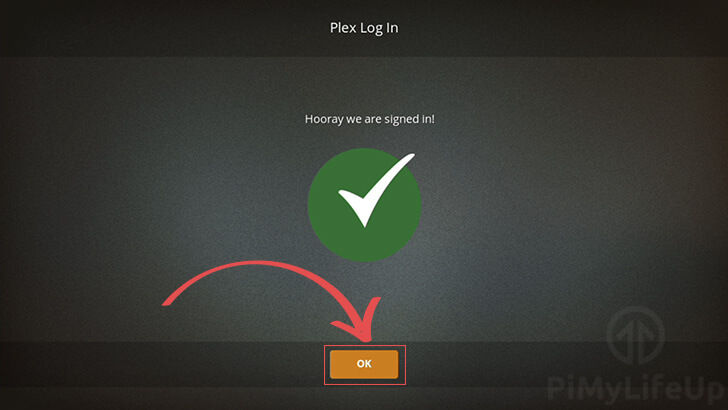
7. Once you have successfully linked your Plex account to the Raspberry Pi, RasPlex will automatically refresh with the following screen.
You can click the “OK” button to proceed.
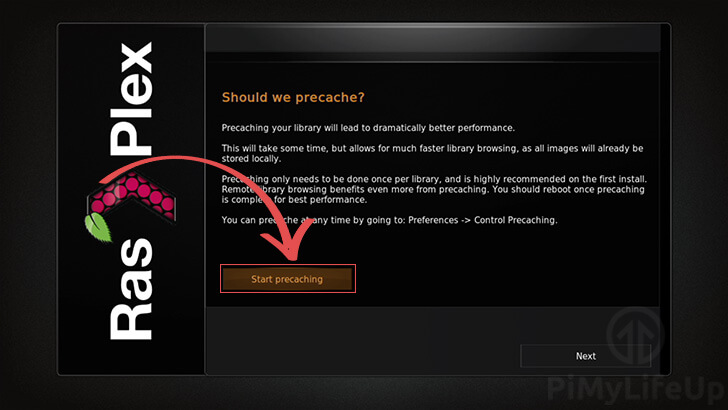
8. The final task we need to deal with is enabling the RasPlex precache functionality.
Precaching allows the RasPlex software to cache things like backgrounds locally, so it does not continually talkback with the Plex Media Server.
Enabling the precache should significantly improve the browsing performance.
To begin the precaching process, click the “Start precaching” button.
9. The next dialog will allow you to select the Plex servers that you want to precache data from.
For our tutorial, we only have the one Plex server, and it has already been selected. However, you can select multiple servers using this interface (1.).
Once you are happy with the selected servers, click the “OK” button to proceed (2.).
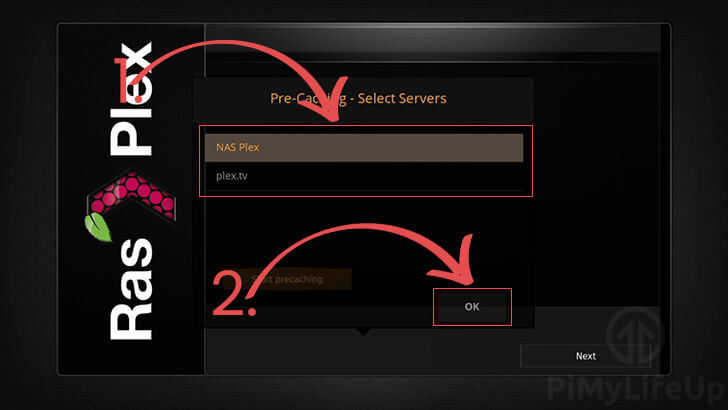
Please note that the precaching process can take some time if you have a considerable number of photos, movies, and TV shows.
10. Once the precaching process has completed, you will be taken back to an empty-looking screen.
All you need to do is click the “Next” button to continue.

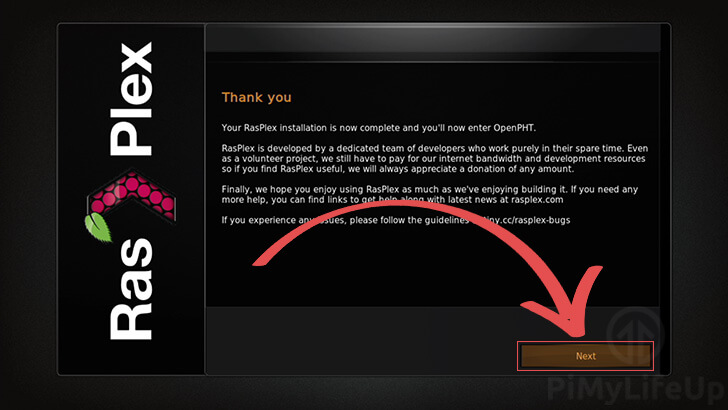
11. The final screen will thank you for installing the RasPlex software on your Raspberry Pi.
It will give you a quick rundown about the project and those who develop it.
Once you are done reading, click the “Next” button to complete the RasPlex setup process.
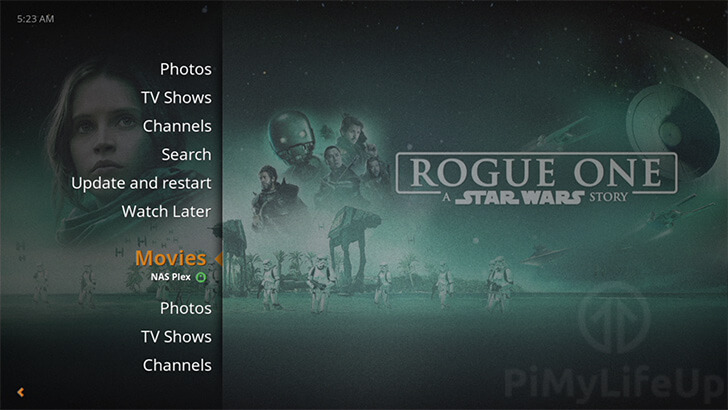
12. You should now see RasPlex’s interface.
If you have already set up media on your Plex server, you should now be able to view it all from the comfort of your Raspberry Pi.
Hopefully, at this stage, you will now have successfully gotten the RasPlex software to run on your Raspberry Pi.
If you have run into any issues with getting this software to work, then feel free to leave a comment below.


You might want to update the RasPlex image links – there was a new build released a few days ago which fixes connection issues to a Plex server that appeared after Sept 30th 2021 due to LetsEncrypt root certificate expiry.
https://github.com/RasPlex/RasPlex/releases/tag/1.8.0b
Hi Jimmy,
Thank you for notifying us about this. I have updated the links to point to the latest release from the RasPlex GitHub.
Cheers,
Emmet
Can I install RasPlex on a Pi 4?
Hi Calvin,
As mentioned at the start of the guide RasPlex has no support for the Raspberry Pi 4, and at this stage it does not look like there has been any work done on making it work on the Pi 4.
You will have to try using something like the Plex Media Player instead.
Cheers,
Emmet