In this tutorial, I go through all the steps to getting your very own Raspberry Pi plex server up and running.
This project is perfect for anyone who wants to have a media server that can be accessed by anyone within a household. You can also set it up to be accessed outside your local network.
Plex is a client-server setup where the client directly streams data from the Plex media server. This setup means you can have all your movies, music, and photos located on the one device, the server. In this case, we will be using the Raspberry Pi.
You can then have multiple clients connect to the same server. It is great as you don’t need to have multiple copies of the same media across several devices.
The Plex client is supported on a ton of devices including Windows, Apple, Android, Amazon Fire TV, Chromecast, Xbox, PlayStation, Linux, and so much more. It really is a fantastic home media solution.
If you just want a single client without the whole server setup, then something like the Raspberry Pi Kodi media center might interest you more.
If you are after an alternative completely free media server, you can also check out Jellyfin.
Equipment
You will need the following equipment to be able to complete this Raspberry Pi Plex server tutorial.
Recommended
- Raspberry Pi Amazon 2 or Newer
- Micro SD Card Amazon
- Power Supply Amazon
- Ethernet Cable Amazon (Recommended) or Wi-Fi Amazon
Optional
- Raspberry Pi Case Amazon
- USB Keyboard Amazon
- USB Mouse Amazon
- External Hard drive Amazon or USB Drive Amazon (For storing movies, music & photos)
NOTE: This tutorial will not work on older versions of the Pi. A Raspberry Pi 2 or later will work. It was last tested on a Raspberry Pi 5 running the latest version of Raspberry Pi OS Bookworm.
Video
In the video below we will walk you through the steps of installing the Plex Media Server to your Raspberry Pi.
Be sure to also check out the written version of our Plex guide below.
Setting up the Raspberry Pi Plex Server
In this tutorial, I will be using Raspberry Pi OS so if you haven’t got it installed then check out my guide on how to setup Raspberry Pi OS.
If you want to run a slim version of the operating system, you should take a look at installing Raspberry Pi OS Lite.
Preparing your Pi for Plex
1. Now before we install the Plex Media Server software to the Raspberry Pi, we need first to ensure our operating system is entirely up to date by running the following two commands.
sudo apt update
sudo apt upgradeCopy
2. To install the Plex packages to the Raspberry Pi, we will need to add the official Plex package repository.
Before we do that we need to install the “apt-transport-https” and “gnupg2” packages.
This package allows the “apt” package manager to retrieve packages over the “https” protocol that the Plex repository uses.
Install the package by running the command below.
sudo apt install apt-transport-https gnupg2Copy3. Let’s now add the Plex repositories to the “apt” keyrings directory.
This key is used to ensure the files that you are downloading are in fact from that repository and signed by that key.
Run the following command to download and save the key to our keyrings directory.
curl -L https://downloads.plex.tv/plex-keys/PlexSign.v2.key | sudo gpg --yes --dearmor -o /usr/share/keyrings/plexmediaserver.v2.gpgCopy4. With the Plex GPG key now added, we can finally add the official Plex repository to the sources list by running the following command.
echo "deb [signed-by=/usr/share/keyrings/plexmediaserver.v2.gpg] https://repo.plex.tv/deb/ public main" | sudo tee /etc/apt/sources.list.d/plex.listCopyIn the line we are adding, you can see that we refer to the keyring we downloaded in the previous step.
5. As we have just added a new repository to our sources, we will need to run the “update” command again to refresh the package list.
sudo apt updateCopyIf you get the error “/usr/lib/apt/methods/https could not be found.” Then the https transport package hasn’t been installed. Double check that it has been installed correctly.
Installing Plex to your Raspberry Pi
6. Now that we have set up our Raspberry Pi so that it can read from Plex’s official package repositories we can go ahead and finally install the Plex Media server package to the Pi.
To install the “plexmediaserver” package, run the command below.
sudo apt install plexmediaserverCopy7. The installation process for Plex sets up a few different things for us.
The first is that it creates a user and group for Plex to run under. This user and group is called “plex“.
It also will set up two directories, one where to store files temporarily that Plex is transcoding. You can find this folder at “/var/lib/plexmediaserver/tmp_transcoding“.
The second directory is where Plex will store all the metadata it retrieves for your media. This folder can be found at “/var/lib/plexmediaserver/Library/Application Support“
8. As Plex is running a different user to the Raspberry Pi’s default “pi” user, you will need to make sure you have permissions set correctly on your drive.
If you need help setting up your external drive with Plex, you can try following our guide on mounting a USB drive on the Raspberry Pi.
Setting a Static IP Address for your Plex Server
9. Now that we have installed Plex to our Raspberry Pi you will want to ensure that you have a static IP address for your Raspberry Pi. If you don’t have access to your router, you can still set a static IP on your Raspberry Pi itself.
There are two reasons to use a static IP. One is that the IP will be easier to remember. Second is that it will make sure your Plex server can always be found at the same address.
https://pimylifeup.com/raspberry-pi-static-ip-address/10. The Pi should now always start with the same IP. You can also set this on most routers by tying the mac address of your network device (WiFi or Ethernet) to an IP.
Now the Raspberry Pi Plex media server should be all set up and ready to scan your media and stream it any client that wishes to connect. I will go through some basics of setting everything up below.
Storing Media on the Raspberry Pi
Now there are several ways to store your media on the Raspberry Pi. I will mention each of the methods below.
You can hook up an external hard drive with all your music, movies and whatever else you may have. Setting the Plex program to run as the Pi user means you can plug a USB hard drive in and access the media in Plex without any issues.
You’re also able to mount drives permanently; I have already covered this in a previous tutorial, so be sure to check out my guide on how to mount a USB hard drive to the Raspberry Pi. Make sure you set the user & group owner of the drive to Pi.
Another option is to set your Pi up as a NAS. This will allow you to transfer your media across to it without needing to disconnect and reconnect a hard drive.
You can set this all up by following my tutorial on setting up a Raspberry Pi network attached storage.
Lastly, you can use the SD card for storage, but as you could imagine, this will quickly run out of space. You can set up a folder on the SD card to be accessed via the network.
Connecting Clients to The Plex Media Server on the Raspberry Pi
If you’re using an app on your phone, computer, Xbox, PlayStation, or any other device, then the Plex client should be able to pick up on the server automatically.
You will, unfortunately, find the official mobile Plex applications are behind a paywall. For example, you will need to pay money to get full access to all the features. However, all other apps, including the web app, should be free with only a small set of features requiring a subscription.
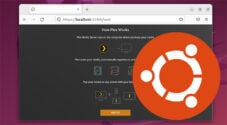
To connect to the browser, enter the IP followed by the port 32400 and /web/. For example, mine is.
192.168.1.100:32400/web/You will be prompted to log in, simply sign up or sign in to an existing plex account. You can skip this by just entering by entering the address above again.
Next, you will need to set up your music, movie, and TV show libraries. This process is incredibly easy and shouldn’t be too hard in getting it set up correctly.
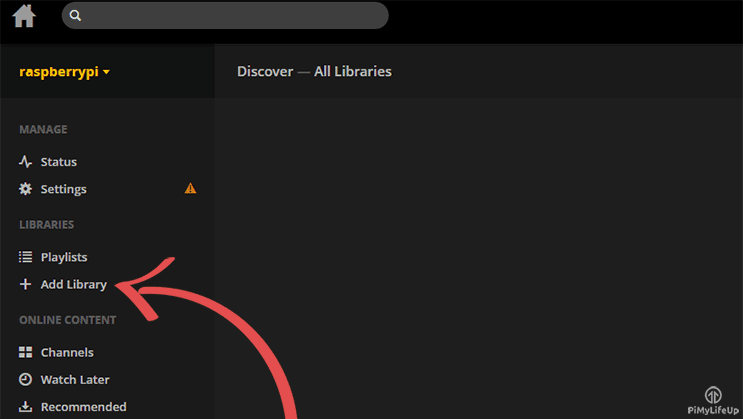
1. First select add library in the left-hand side column.
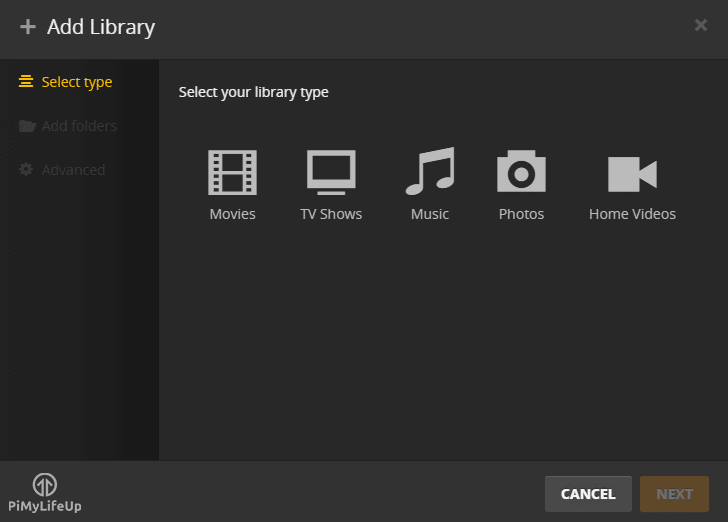
2. Next, select the type of media that is in the folder. If you have more than one type, then you will need to add a new library for each type of media.
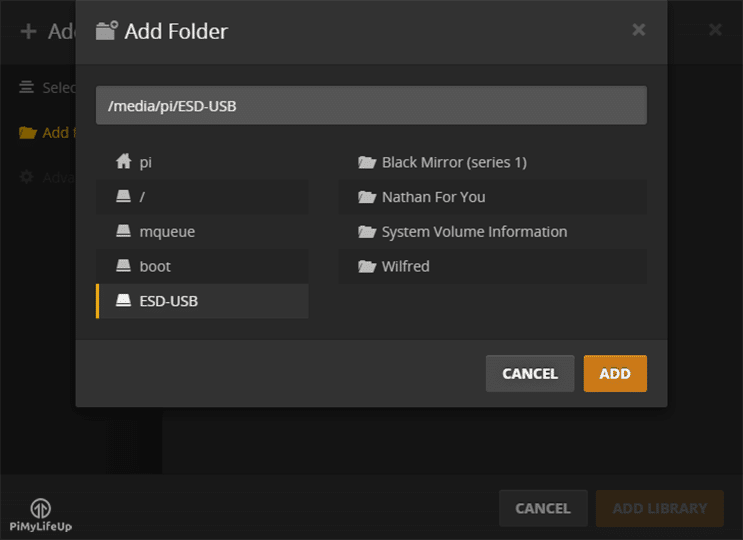
3. Next, you will need to select the folder that has all your media in it.
For example, mine is on a USB drive that is displayed in the left-hand side column or can be found at /media/pi/ESD-USB
4. Once you add the library, it will now organize your clips in a nice easy to browse interface.
If you need more information on how to setup, name and organize your media library, then Plex has an amazing amount of documentation on naming and organization.
Fixing File Permission Errors with Plex
One of the most common problems you may run into with Plex on your Raspberry Pi is with it being unable to access your files. The most common cause of this issue is incorrect permissions.
This section will show you how to modify the permissions for an ext4 drive.
If you are running an NTFS or FAT formatted drive, you will need to try remounting your disk drive and adjusting its mounting options. The reason for this is that the NTFS and FAT filesystems do not support the Linux permission system.
1. To begin, work out the location of the drive or folder that you want to adjust the permissions for.
For example, we have an ext4 drive mounted to our Raspberry Pi at the location /mnt/pimounteddisk/.
2. As the next two commands need to be executed as the superuser, let’s change to it by running the following command.
sudo suCopy3. With the path to your drive or folder in hand, we are going to make use of the following two commands.
Make sure that when you run these that you replace [YOURDRIVEPATH], with the path you want to adjust permissions on.
find [YOURDRIVEPATH] -type d -exec chmod 755 {} \;
find [YOURDRIVEPATH] -type f -exec chmod 644 {} \;Copy
The second command finds all directories and assigns the owner “read“, “write” and “execute” privileges and gives all other uses “read” and “execute” privileges.
The third command is used to find all files and will assign the owner “read” and “write” privileges, and all other users will get the “read” permission.
4. Once those commands have finished running, we can go ahead and exit out of the superuser mode.
exitCopy5. You should now be able to interact with your media files from within Plex successfully.
Conclusion
Hopefully, at this stage, you will now have Plex up and running on your Raspberry Pi without any issues.
If you come across any issues or have some feedback, then please don’t hesitate to leave a comment below.


Í’m sorry, I got the problem. I messed up the “PLEX_MEDIA_SERVER_USER=pi” step this fixed the problem. Thanks for your video’s
I can see all my movies on the raspberrypi 3 but when I want to view them in the plex server (so add them to my libarry) it doesn’t show any movies in that folder.
I have my Plex server up and running, but I would like to add videos remotely without having to physically access my Pi. Is that possible?
I have the same goal as you and my idea how to solve it is to run utorrent on the pi too and remotely control it from my phone with the utorrent remote app. Not sure how it works if it downloads and streams at the same time..
I know this is an old comment, but in case anyone is still looking around (like I was), you can set up samba server on the Pi and access it as a network share.
Hey, I set up plex no problem but for remote access it doesn’t work I don’t know if there something I missed or messed up?
Generally all that is need for remote access to work is to forward port 32400 to your Plex server. This is probably easier to do if the Plex server is given a static IP address.
For remote access, you need to change some settings on your router.
In your router’s interface, forward port 32400 to the IP address of your raspberry pi. If you don’t know how to do this, generally a google search for ” port forward guide” will get you a going.
Once that is setup, in the Plex web UI got to Settings > Server > Remote Access > Show advanced > check off manually specify port and leave the default of 32400
If you have DHCP enabled your pi may get a new IP address from time to time. If the IP address changes the port forward will no longer be pointing to the R Pi. This is why it is useful to set the Pi to have a static IP. This can also be done in your router’s interface. (credit to Teem214)
Great tutorial. I have set it up on a Pi3 and it seems fine, with one problem: I can play either music or video from apps, but it will only play for about a minute and then stop. I have my media stored on a usb stick. Any thoughts on why only the minute of playback?
Not sure why you’re only getting a minute playback. From what I remember some of the plex apps only allow for 1 minute playback unless you pay for it. You need to either buy the app or purchase a plex pass (It could this or something else). The browser version is completely free.
I followed these steps on a fresh Jessie install of Raspbian but i keep getting the following when trying to install plexmediaserver:
Reading package lists… Done
Building dependency tree
Reading state information… Done
Package plexmediaserver is not available, but is referred to by another package.
This may mean that the package is missing, has been obsoleted, or
is only available from another source
However the following packages replace it:
plexmediaserver-installer
E: Package ‘plexmediaserver’ has no installation candidate
Try running
sudo apt-get install plexmediaserver-installerLet me know how that goes.
Any idea if this will run on a pi Zero?
I am not sure, I think even if it did work it would struggle to the point that it would be pointless for video.
No problem, thanks for getting back to me Gus. Looking more at streaming remote channels through plex rather than physical files. May work, I will report back with my outcome. Cheers
Setup in less than an HR…Seamless, all is working as expected.. Cheers
Thanks for the great tutorial! Once I got NFS setup on my Synology and mounted the share in Raspbian, I went through this step by step and got Plex working on the first try! This is my first Rpi project and am hoping I can replace my temperamental old Plex laptop with this for serving up my media…we’ll just have to see how well it can transcode everything. Anyway, just wanted to say thank you!
Hi Gus,
First of all many thanks for your tutorials, they are fantastic (not to say the best)!
I am just a bit confused about the connection of the plex server to a NAS. Specially when you write : “Again make sure you set the group & user owner to pi or whatever the user Plex is running as”.
I followed step by step your NAS tutorial and it is working perfectly! but in your NAS tutorial, you are creating a pimylifeup user (I take your tutorial user name for the sake of the explanation). My question is should I change the user from plex to pimylifeup or can I keep it to pi and it will access to the NAS ?
Again thanks a lot for your tutorials!
Geoff
Hi Geoff,
Is the NAS running on the same Pi? If not you don’t need to change the user. Just connect to the network storage using the username/password you set for it.
If it’s on the same Pi and you want to directly access the NAS folder (/media/NAS/). Then you may come across permission problems when trying to access the files you want. To correct this you may want to change plex to run as pimylifeup or the NAS to run as Pi.
I hope that helps, let me know if you need any more info or a better explanation 😀
Hi Gus,
Many many thanks for your reply it does help a lot! My plex server is setup to the pi user and so far, so good! but I will follow your comment and change it to pimylifeup!
Again thanks for your massive help and thanks for being so inspirational!
Geoff
after entering (
wget -O - https://dev2day.de/pms/dev2day-pms.gpg.key | sudo apt-key add -) i get these line:wget: invalid option --'0' , Usage: wget [option]...[URL]... , Try 'wget --help' for more options. , gpg: no valid OpenPGP data found.help please!!
It looks like you’re entering a 0 (Zero) instead of an O (Capital O).
thanks it worked. working on setting up the NAS I probably will get that a little wrong to.
Great tutorial, easy to follow, works like a charm.
I have a question, for which I apologize for being new to this: how do I start up or launch the PMS when I start up or reboot my Raspberry Pi (3)? I would like to keep it running so that outher TVs’ in my home can access it.
Plex should start up automatically when you reboot/start your Pi. If it isn’t you can do the following.
First open up the rc.local file by doing the following.
sudo nano /etc/rc.localThen before the exit 0 line add the following line.
sudo service plexmediaserver restartGreat video and article. Clearly laid out info was all i needed to make my pi a powerhouse!
Just a minor issue, when i type hostname -I, i get 2 ips? How to get rid of that?
Thanks a lot and i subscribed to your email 🙂
Update: I got 2 ips as I was connected to both Ethernet and wifi.
Great Article. Mine has been running on a PI 3 flawlessly since the article was posted. I’m primarily using it to Host music for my family. All my music is stored on a 128GB USB Thumb Drive. Thanks for the great article!
Hi! You mentioned in your comment that you are streaming your media off a flash drive. Did that require any additional setup? When I attempted this, Plex complained that it could not play the media, but it works with the files on the Rasberry Pi just fine! (also using Pi3 btw)
My thumb drive is 128gb EXFat. So I did have to find a tutorial about how to mount that and put it in my
/etc/fstabThis is what my line looks like.
/dev/sda /media/NASHDD1 auto nofail,uid=1001,gid=1001,noatime 0 0
Does plex see your USB Drive?
Did streaming from the USB drive require any additional setup/configuration?
Looks like its working for me! Best tutorial for my needs. Thank you so much!
Hi Jeff, which Rasp Pi are you using? I have followed all steps as shown in the video, but the plex server isn’t being visible for some reason. I am using a B+.
I’m using a Pi 2.
thanks for the great tut!
I am looking to replace minidlna on my pi2, i really like the inotify feature.
does plex have an auto library detect/update features like this?
Thank you for this great tutorial. What if I don’t want to use my RPi3 as server but just want to install PLEX inside of raspberry jessie and connect to windows 10 plex server?
Nevermind. I misunderstood something and makes sense now. Thanks again for another great tutorial!!!!
Hi in need some help, I use a Pi3 Raspberrian GNU/Linux8 and followed all your steps succesfully.
However when I reboot the system waits during reboot for 110 seconds to connect to the network.
Next line says: IP-config: Guessing netmask 255.255.255.0
Then IP-config: Complete;
Device=eth0,hwaddr=b8:27….. ipaddr=192.168.1.7 , mask=255.255.255.0 ,gw=255.255.255
host=192.168.1.7 domain=, nis-domain=(none)
once it ran through the boot, the OS shows on my touch screen but I see nothing of the Plex Server.
Do I need to start it somehwor (how??) or is there a problem while booting ?
Is it necessary to restart the plex server once the Pi is restarted or does it auto run?
It should auto run!
Thanks for the step-by-step. I can’t get the server to recognise my media. I have renamed my files, the folders they are in and did all kinds of searching on the Internet to find an answer but still have not been able to get the server to see my media, any of it.
I fixed it! The third time is the charm I guess! I just started over with the entire installation, and it worked. This time I really looked at everything and made sure I typed everthing correctly. I just missed something the first two attempts.
Thank you again for these instructions and for a great website!
Will this also works with the new Pi 4 ?
Hi Frits,
This should work fine with the Raspberry Pi 4, even though the Pi 4 uses a better processor then the Pi 3 they both still use the same architecture.
Cheers,
Emmet