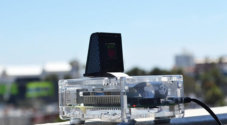
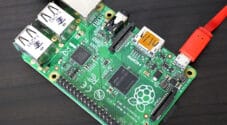
This tutorial will take you through how to set up a webcam server on the Raspberry Pi. You can have your very own Webcam visible on a web page.
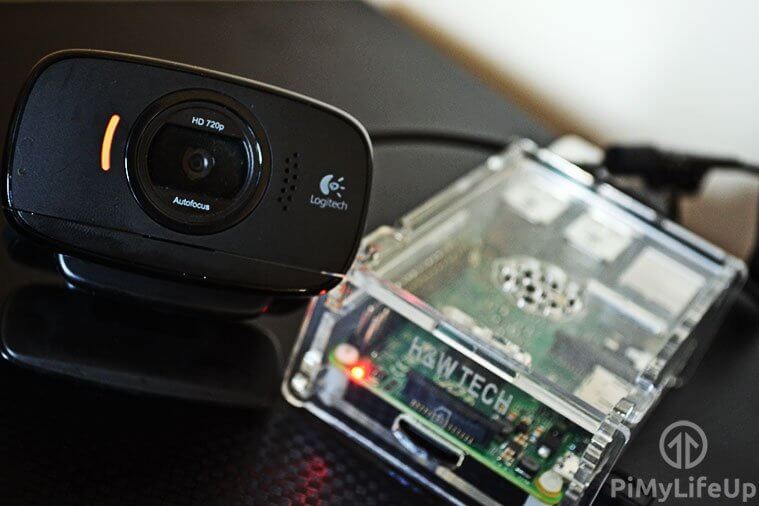
In this tutorial, we will be using a package called Motion. If you want to learn more about it, you can check out their website at Motion. This software will allow us to stream footage from a webcam connected to the Raspberry Pi. You will be able to view the stream via a web page in your favorite browser.
If you’re after more of a security-like system, check out the Raspberry Pi security camera tutorial as it features fully-fledged web streaming, motion detection, recording, and multi-camera functionality.
This tutorial is marked intermediate as it can be challenging to get it working, especially if you have hardware that differs to the versions used in this tutorial. If you can’t get this to work, the security camera solution linked above is much easier to get going.
Equipment
Below are some of the pieces of equipment that you will need to be able to complete this tutorial.
Recommended
- Raspberry Pi Amazon
- Micro SD Card Amazon
- Ethernet Cable Amazon or Wi-Fi Amazon
- Raspberry Pi Camera Amazon or USB Webcam Amazon
Optional
This tutorial was last tested on the Raspberry Pi 5 running the full version of Raspberry Pi OS Bookworm.
Setting up the Webcam Server on the Raspberry Pi
Firstly, we will need to install Raspberry Pi OS onto the Raspberry Pi. If you haven’t already done this, check out our guide on installing Raspberry Pi OS. It will take you through all the steps that you will need to do to get up and running.
1. We will be using the terminal, so open the terminal on the Pi or connect to it via SSH.
2. To begin, first, update the Raspberry Pi OS, so you’re running on the latest packages.
sudo apt update
sudo apt upgradeCopy
3. Next, install the following packages. This command will work on the full and lite versions of Raspberry Pi OS.
sudo apt install autoconf automake build-essential pkgconf libtool git libzip-dev libjpeg-dev gettext libmicrohttpd-dev libavformat-dev libavcodec-dev libavutil-dev libswscale-dev libavdevice-dev default-libmysqlclient-dev libpq-dev libsqlite3-dev libwebp-dev libcamera-v4l2Copy3. To make things a little easier later on, let us create a Bash variable called “MOTION_VERSION” that will store the version of Motion we want to install to our Raspberry Pi.
With this particular command, we will be setting it up, so we install Motion 4.7.0. You can view all the releases for Motion over at their Github.
MOTION_VERSION=4.7.0Copy4. Next, use the following command to download the Motion package to your Raspberry Pi from GitHub. We will be using the wget command alongside a few others to ensure we get the correct release.
wget https://github.com/Motion-Project/motion/releases/download/release-$MOTION_VERSION/$(lsb_release -cs)_motion_$MOTION_VERSION-1_$(dpkg --print-architecture).deb -O motion.debCopy5. Once downloaded, all we need to do to install Motion on to our Raspberry Pi is to use the following command.
This command will use the dpkg tool to install the package we downloaded in the previous step.
sudo dpkg -i motion.debCopyThat’s all you need to do before moving on to configuring Motion so that it will run on your Raspberry Pi.
Configuring Motion
1. We need to edit the configuration file, motion.conf. To do this, open the file in the nano text editor.
sudo nano /etc/motion/motion.confCopy2. Find the following lines and ensure they are set to the values below.
daemon offstream_localhost off
Note: Change the following two lines from on to off if you have issues with the stream freezing whenever motion occurs.
picture_output offmovie_output off
Optional (Don’t include the text after the #)
stream_maxrate 100# This change will allow for real-time streaming but requires more bandwidth and resources. It needs to be added to the config file. Default is 1framerate 100# Changing this option will allow for 100 frames to be captured per second, allowing for smoother video. Default is 50width 640# This line changes the width of the image displayed. Default is 640height 480# This option changes the height of the image displayed. Default is 480
Altering these options can drastically affect the performance. You may need to tinker to get the best results.
3. Once done, save and exit by pressing CTRL + X then Y.
4. We need to enable the Motion service by running the command below.
This command will make Motion start when your Raspberry Pi powers on.
sudo systemctl enable motionCopy5. Ensure the camera is connected and run the following line.
sudo systemctl start motionCopyIf you need to stop the service, run the following command.
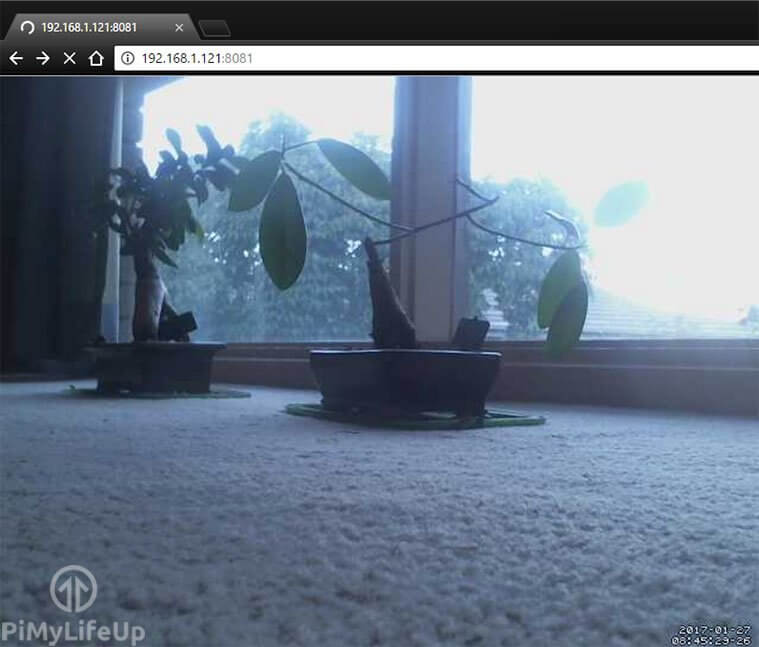
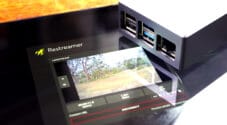
sudo systemctl stop motionCopy6. You should be able to check out the webcam stream at the IP address of the Raspberry Pi. To get the IP address, use the hostname command.
hostname -ICopy7. In your browser, go to the IP address of your Raspberry Pi, followed by the port 8081.
192.168.1.121:8081If you are using a Raspberry Pi camera, you will need to do a few extra steps, mentioned further down the page. You will see a grey box with an error if you do not do these steps.
8. If the web page isn’t loading, try restarting the service.
sudo systemctl restart motionCopy9. You should now have a fully working Raspberry Pi Webcam server that you can place wherever you would like (Given it is within Wi-Fi range) and be able to view the stream via the web browser.
If you want to allow external access to the camera, check out my instructions at the bottom of this tutorial.
Additional Steps for Using a Raspberry Pi Camera
If you want to use the Raspberry Pi camera module, you will need to do a few additional steps to set it up.
A Raspberry Pi 5 uses a different port, so you may need to acquire a ribbon cable (Amazon) designed to fit into the new ports.
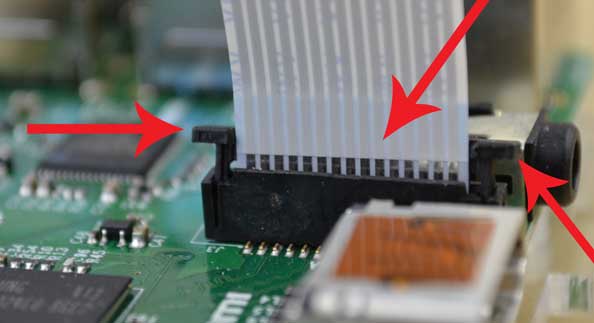
1. First, go to the CSI (Camera Serial Interface) ribbon cable slot on the Pi and with two fingers on each side of the connector, pull up. This technique should now open the connector. This port is labeled CAM/DISP 0 on the Raspberry Pi 5.
2. Insert the ribbon cable with the metal leads facing away from the Ethernet Port. If you are using a Raspberry Pi 5, the metal leads must face toward the ethernet port.
3. Once you have lined it up, gently press the connector back down, and the cable will lock in place.
4. Since the Raspberry Pi camera relies on a library called libcamera we will need to edit the service file. To do this, enter the following line.
sudo nano /lib/systemd/system/motion.serviceCopy5. In this file, find the line that contains the following text.
ExecStart=/usr/bin/motionCopyUpdate the line to the following text.
ExecStart=/usr/bin/libcamerify /usr/bin/motionCopyOnce done, exit the file by pressing CRTL + X and then Y.
6. Since we just changed the source service file, we will need to reload the systemctl daemon. You can do this by running the following command.
sudo systemctl daemon-reloadCopy7. Lastly, restart the motion service to ensure our changes have taken effect.
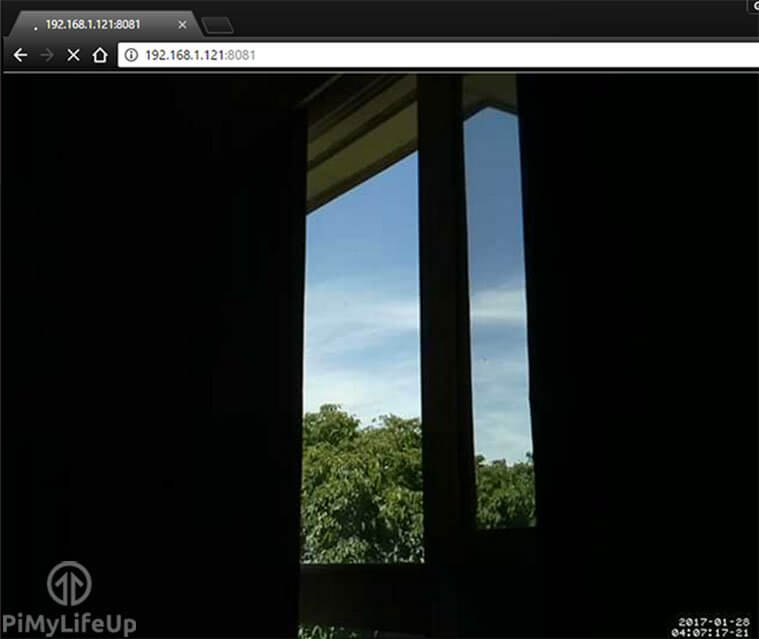
sudo systemctl restart motionCopy8. You should now be able to access the Raspberry Pi webcam stream by going to the Pi’s IP address on port 8081.
192.168.1.121:8081You should now have a fully working Raspberry Pi camera server accessible within your local network. If you want to allow external access to the camera, please follow my instructions below.
Saving Motion Footage and Photos
By default, you will likely have permission problems when saving the photos and video triggered by motion. I go through the steps below on how to set this up to work correctly.
1. Firstly, let’s make a new directory for our photos and videos.
sudo mkdir /motionCopy2. Next, we need to change the group of the motion folder so motion can write into it. After that, we give the group; read, write, and execute permissions using the chmod command.
sudo chgrp motion /motion
sudo chmod g+rwx /motionCopy
3. We need to go back into the motion configuration file and change the target_dir to our new directory. First, open up the file with the nano text editor.
sudo nano /etc/motion/motion.confCopy4. Update the target_dir line so it looks like the one below. Ensure you remove the ; from the start of the line.
target_dir /motion5. Next, restart the motion service to load the configuration correctly.
sudo systemctl restart motionCopy6. When the camera detects motion, it will be saved into the specified folder. You can check this by running the following command.
ls /motionCopyCheck out our Linux permissions guide for more information on setting permissions correctly.
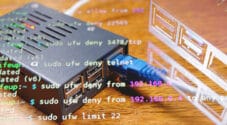
Setting Up External Access
To enable external access to the Raspberry Pi webcam server, we will need to change some settings on the router. However, all routers are designed differently, so you may need to look up instructions for your router brand.
Please note that opening ports to the internet comes with a security risk. Please use strong security measures to prevent unauthorized access to your local network.
If you need a more in-depth guide, be sure to look at my guide on how to set up Raspberry Pi port forwarding and dynamic DNS.
If you’re unable to connect outside your local network, then you can try the following.
- Check your router settings and confirm they are correct.
- Check your IP hasn’t changed. Some internet service providers will provide you with a dynamic IP rather than a static IP. You can set up dynamic DNS to counter this.
- Ensure that the port mapping matches correctly with the motion port. For example, the internal port must be set to 8081.
- Restart the router.
Conclusion
I hope you enjoyed this tutorial on how to build a Raspberry Pi webcam server. You should now be able to view your camera stream using a web browser.
If you want more projects, please check out all our Raspberry Pi projects. We are always working on more, so be sure to check back in the future or stay up to date by signing up to our newsletter.
Please feel free to use the comment section below to provide feedback for this tutorial.

works great!!!
Is there some way to set up two USB webcams with Motion?
I want to setup my Pi with 2 webcams and mount them to my 3d printer for monitoring.
Just set up a USB camera with your tutorial.
Now I can check my birdfeeder from my comfy chair.
Thank you.
For new installs using a Pi Camera, make sure to install libcamera-tools as well, this package now includes the libcamerify
Update – success!
Raspberry Pi 5 8GB + Pi Camera v3.
Fresh updated full 64bit OS Bookworm install plus used Motion 4.7.1 as outlined on comment below.
Works a treat – currently tuning motion.conf – up to 1280×720 at 15 frames/sec works. CPU running at ~10%.
Thanks for good tutorial.
Mike
Hi – Can you please advise if this tutorial is compatible with the Raspberry Pi Camera V3 (wide) ?
Plan to use Pi 5 running latest OS Bookwork
I am sure I read somewhere that the V3 camera has different drivers to previous ones!
Thought I would ask before committing (wasting) time finding out the hard way.
Thanks, Mike
Hi Mike,
We don’t actually have the Pi Camera V3 on hand here, just an older variant from when they first started making the Pi cameras. I can’t see why it wouldn’t work, but don’t have it on hand to test it myself.
Kind regards,
Emmet
I literally just finished getting it running with a V3 (wide) camera on a Pi Zero 2w!
I got this to work on a Zero 2W after i installed the updated motion 4.7.0-1
on the latest recommended aarch64 full dtop
Instead of the 4.6.0-1 version in the script.
i also run rpi-connect on the board.
I have only tried the pi camera v3 but vill try the others also.
Easy to follow script.
thanks.
Nice writeup, but… It did not work on for Bookworm lite on a Zero2W. libcamerify was no loaded as part of the OS or lib installs. I had to go to the full version to get it to work.
I’ve used this numerous times with a Pi Zero and USB cams and once with a Pi Cam module v2…and it is AWESOME!!! That said, should I expect it to work with a Pi 5/Bookworm/Pi cam module v3 wide? I only get “UNABLE TO OPEN VIDEO DEVICE” when I open the web page locally. Curious if anyone has it working with a Pi 5 and v3 module? Thanks!
We updated the tutorial, so it should work on the Raspberry Pi 5/Bookworm. You will need to make use of libcamerify to get it to work.
Really excellent guide. Thanks.
Thanks for this guide. I’ve used it successfully a few times now.
I am getting a string of broken dependencies. Motion cannot install. Raspian 9.11 stretch.
Hi Raymond,
Raspbian Stretch is out of date. As stated in the tutorial you should be running Raspbian Buster for this tutorial to work.
You can either upgrade from Raspbian stretch to buster, or create a new installation using the Raspbian Buster image.
Cheers,
Emmet
Hi, I tried that. Everything works fine although at the beginning I faced the trouble with the dependencies… just go again to the update or try “sudo apt –fix-broken install”. However, the view is upside down. Any idea how to flip it?
never mind, I’ve got it 🙂
in motion.conf add “rotate 180”
Thanks for the previous response, new question. I’m having issues downloading some of the dependant packages. Example is it says: Unable to locate package libmariab3. There are a few other packages it could not locate.
Hi Garth,
I just tried on a fresh installation of Raspbian Buster and all the packages installed successfully.
Try running
sudo apt updateagain before installing the packages.Cheers,
Emmet
I figured it out that the mirror repository that I was downloading packages from was down so I changed the repository I was downloading from. Thanks.
I was having the same issue even after running all of the updates, so what I did was I first purged the failed install attempt:
*sudo dpkg -P motion*
Then I just did a full install of whatever the most recent version, which will also make sure that all of the dependencies are installed. HOWEVER, when you do this, note that the settings in the file motion.conf will not match these instructions exactly. For example, *picture_output* is now *output_picture* … so I recommend just going through the config file and change the settings that make sense for your desired config. In my case, I just needed to stream my logitech USB cam over the local network, so I turned off *stream_localhost*, increased the streaming framerate to 50 and I changed the image size to 640×480. I’m only using this to monitor my 3D printer during print jobs.
Here is the command to do a full clean install of the most recent version:
*sudo apt-get install motion*
Good Luck!
Hi do you know if this will work for raspbian jessie or will I have to upgrade to buster?
Hi Garth,
To use the latest version of the motion server software you will need to be running Raspbian Buster.
Cheers,
Emmet
On 11-22-2019 I used this page to set up motion on Pi3b.
“For this tutorial, we will be installing Motion for Raspbian Stretch.
If you’re not already on it then I highly recommend that you upgrade.”
<<<< I loaded stretch on card.
Step 3 shows command for Buster but not for stretch Raspbian Buster.
sudo apt install autoconf automake build-essential pkgconf libtool git libzip-dev libjpeg-dev gettext libmicrohttpd-dev
libavformat-dev libavcodec-dev libavutil-dev libswscale-dev libavdevice-dev default-libmysqlclient-dev libpq-dev
libsqlite3-dev libwebp-dev " <<<< this command fails and I cannot find what will work with stretch
I loaded SD with stretch and did update and upgrade (long time). Since I couldn't for command for stretch I used
the buster command above. Failed. Should I just reload card with buster?
[SNIP, PACKAGES NOT FOUND, SNIP]
Hi Jim,
Sorry about that, the tutorial should of been updated to mention that we are installing Motion for Raspbian Buster isntead of Stretch.
I have now corrected this.
We recommend upgrading your Raspbian image to Buster then trying the tutorial again.
Cheers,
Emmet
How to make it run script on startup? Would adding service motion start to the end of /etc/rc.local work?
Hi Branson,
Try running the following command.
This command should allow the service manager to handle it automatically for you.
Cheers,
Emmet
Hi,
I just got a new Pi4b and tried to go through the installation. It has Raspbian GNU/Linux 10 (buster) and it complains that the libmariadbclient18 cannot be found and installed.
Now, I have an older Pi3 with Raspbian GNU/Linux 8 (jessie) and there it seems to work.
Is this a release issue? Some incompatibility? Should I try to install Jessie on the new one as well?
thanks,
aron
Hi Aron,
I took a quick look into this and it looks like some of the packages changed in Debian Buster.
We have updated the package list so it should now work fine.
The updated command is the following one.
Cheers,
Emmet
Thanks a lot! I will check it now.
cheers Emmet I will try that
I am now using raspbian Buster. Do I just alter the stretch to Buster in
“sudo dpkg -i pi_stretch_motion_4.2.1-1_armhf.deb”
Hi John,
We have gone ahead and updated the tutorial so that it points to the new buster version of Motion.
You should be able to run the following two commands.
Cheers,
Emmet