In this tutorial, we will be showing you how to run PhotoPrism on your Raspberry Pi.

PhotoPrism is an open-source and free photo app that uses AI to tag and categorize your photos on your Raspberry Pi.
One of the most promising features of PhotoPrism is its AI functionality. With this AI, the photo app can classify your photos, recognize the faces of your family and friends, and more.
Best of all, you don’t have to install native applications to view your photos stored with PhotoPrism. Built as a web app any modern web browser can run the website locally as if it was a native app on your device.
Being made available as a docker container getting PhotoPrism to run on the Raspberry Pi will be a straightforward process.
Equipment
Below you can find a list of the equipment we used to get PhotoPrism running on our Raspberry Pi.
Recommended
Optional
The following tutorial was tested on a Raspberry Pi 400 running the latest version of Raspberry Pi OS Bullseye 64-bit.
Preparing your Raspberry Pi for PhotoPrism
Before installing and running PhotoPrism on our Raspberry Pi, we must ensure we have everything we require installed.
Luckily with PhotoPrism being provided as a Docker container, we only need the Docker runtime and a tool to grab PhotoPrism’s config file.
1. Before installing Docker, we will update both our package list and installed packages.
All you need to do to update both is run the following command in the terminal.
sudo apt update
sudo apt upgradeCopy
2. Now that we are up to date, we can finally install the packages we need to run PhotoPrism on our Pi.
In our case, we only need to ensure that “wget” is installed by using the following command in the terminal. We will use this tool to grab the “docker-compose.yml” file from the PhotoPrism GitHub.
sudo apt install wgetCopy3. Once you have the “wget” package install on your Raspberry Pi, you will now want to follow our guide on installing Docker.
This will get the latest version of Docker running on your Raspberry Pi.
https://pimylifeup.com/raspberry-pi-docker/Configuring the Docker-Compose file for PhotoPrism
The most complicated process of setting up PhotoPrism is configuring the “docker-compose.yaml” file. Within this section, we will grab the sample config file and show you what you should be adjusting.
Getting Ready to Configure PhotoPrism for the Raspberry Pi
1. Start by using the mkdir command to create a directory where we will store this configuration file.
With the following command, you will create a directory called “photoprism” within the “/opt/stacks/” directory.
sudo mkdir -p /opt/stacks/photoprismCopy2. With the directory created, you can now use the cd command to change into it.
cd /opt/stacks/photoprismCopy3. Now that we are in the correct directory, our next step is to download the Docker composer file for PhotoPrism to our Raspberry Pi
Here we will use the wget tool we installed earlier to download the “docker-compose.yml” file to the current directory.
Please note that the version of this command changes slightly if you are running a 32-bit or 64-bit system. We recommend using a 64-bit OS when following this tutorial.
64-Bit Operating System
sudo wget https://dl.photoprism.app/docker/arm64/compose.yamlCopy32-Bit Operating System
sudo wget https://dl.photoprism.app/docker/armv7/compose.yamlCopyConfiguring PhotoPrism
4. Now that we have the docker compose file here, we will want to make some adjustments to its configuration.
You can begin editing this file by using the following command.
sudo nano compose.yamlCopyWe like to use the nano text editor as it is relatively easy to use. You can use whichever text editor you feel most comfortable with.
5. The first option you will want to change within this configuration file is the initial password used for the admin panel.
Start by finding the following line within the file. You can use CTRL + W to search the file when using nano.
PHOTOPRISM_ADMIN_PASSWORD: "insecure"CopyOnce you have found the above text, replace “insecure” with a secure password of your choosing. The password you choose must be at least eight characters long.
PHOTOPRISM_ADMIN_PASSWORD: "YOURPASSWORDGOESHERE"Copy6. With the password changed to something more secure, you can move on to configuring the volumes. Any additional folders you want accessible within PhotoPrism must be included as a volume.
All subdirectories of that folder will, of course, be accessible, so if you want to include an entire drive, you only need to add its mount path.
Within this file, you will want to find the following line. This gives you an example of how they are written and indicates where you need to add additional folders.
# "/host/folder:/photoprism/folder" # ExampleCopyHere, the volume is specified with the left side (/host/folder) being the folder on your Raspberry Pi that you want to be mounted to the volume.
The right side (/photoprism/folder) is the location it will be made available within the container. When setting a new volume for PhotoPrism, the container path must always start with “/photoprism/“.
7. To showcase this, we will add a new volume to this list, mounting our external drive located at “/mnt/holidayphotos” to “/photoprism/holidayphotos“.
To add this line, we will add the following under the “volumes:” label.
- "/mnt/holidayphotos:/photoprism/holidayphotos"CopyIf you find this confusing, please comment below or check out the official PhotoPrism documentation on volumes.
8. Once you have finished making changes to the file, you can save and quit by pressing CTRL + X, followed by Y, and then the ENTER key.
Running PhotoPrism on the Raspberry Pi
Now that we have created our “docker-compose.yml” file getting PhotoPrism to run on the Raspberry Pi is very straightforward.
At this point, all we need to do is run a single command to get the photo app up and running.
1. For the following step to work, you will need to ensure you are still in the directory where we created the “docker-compose.yml” file.
If you are still in the correct place, you can now start up PhotoPrism on your Raspberry Pi by using the command below.
sudo docker compose up -dCopy2. The initial startup process for PhotoPrism can take some time as Docker needs to download all of the required container images.
Once the download completes, PhotoPrism should be started immediately on your device.
Using the PhotoPrism Web Interface
Now that we have PhotoPrism installed on your Raspberry Pi, you can access its web interface. This part of the guide shows you how to access the web interface and provides a quick overview.
Accessing the PhotoPrism Web Interface
1. Before we begin, you will need to know the IP address of your Pi to connect to it from elsewhere in your local network.
One of the easiest ways to get the IP for your device is to use the hostname command.
hostname -ICopyDocker generates several IP addresses for its internal usage. Therefore, your Pi’s local IP is typically the first one listed by this command.
2. Now that we know your Pi’s IP address, you can go to the following address in your web browser.
By default, PhotoPrism is listening on port 2342 on your Raspberry Pi.
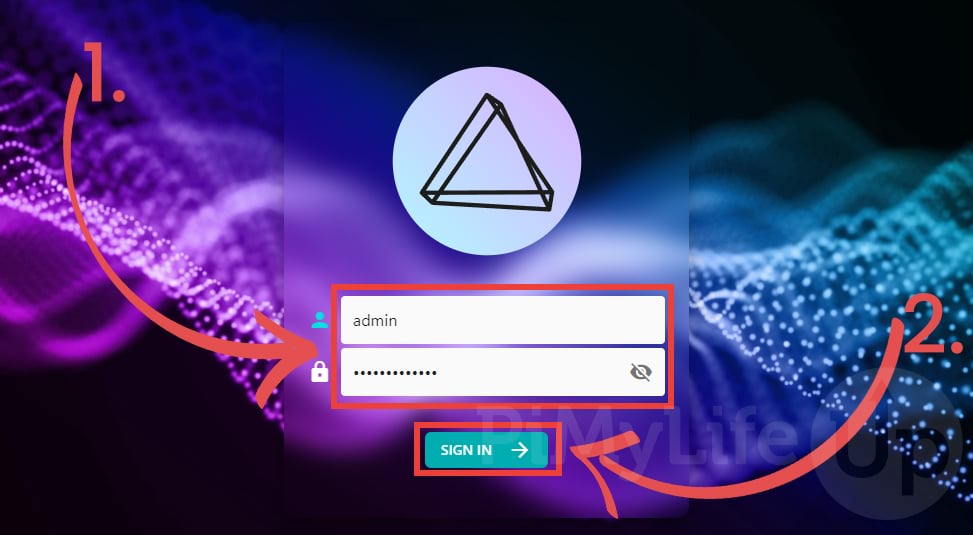
http://YOURIPADDRESS:2342/3. When you load up the PhotoPrism web interface, you will be asked to log in to an account. By default, this will be the “admin” account.
Using the text boxes in the middle of the screen (1.), type in “admin” as the username. Then for the password, use the one you specified within the “docker-compose.yml” file earlier in this guide.
Once you have typed in your login details, you can click the “SIGN IN” button (2.).
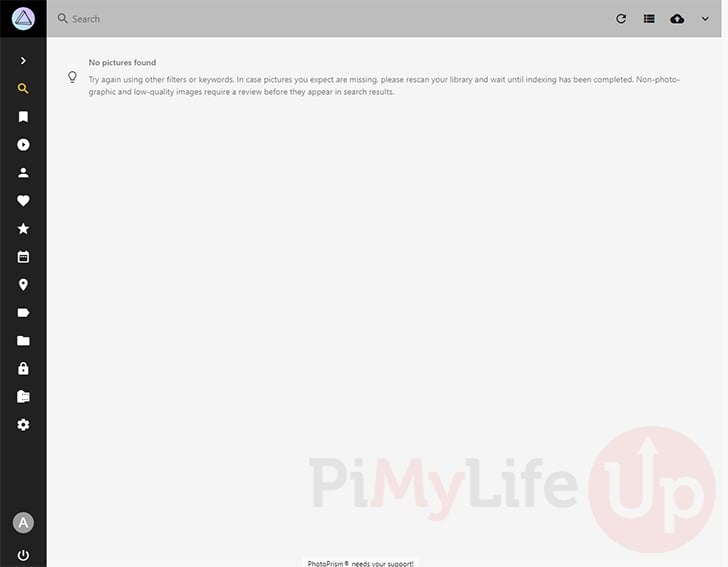
4. You will now be greeted by the PhotoPrism home page. If you are like us and only have empty folders, then the dashboard will be empty.
We will walk you through uploading photos to PhotoPrism later in this guide.
Viewing the PhotoPrism Settings Page
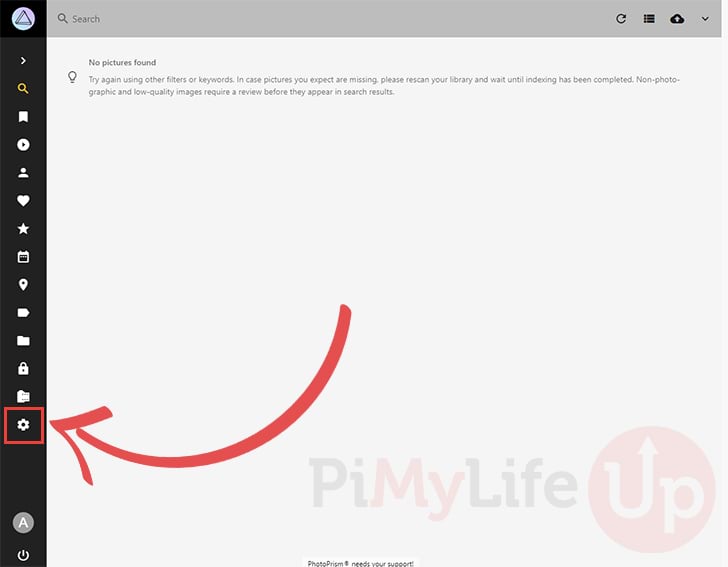
1. Getting to PhotoPrism’s settings page is a simple process and can be easily accessed using the sidebar.
In the sidebar, you should see a cog icon, click this icon to move to the settings page.
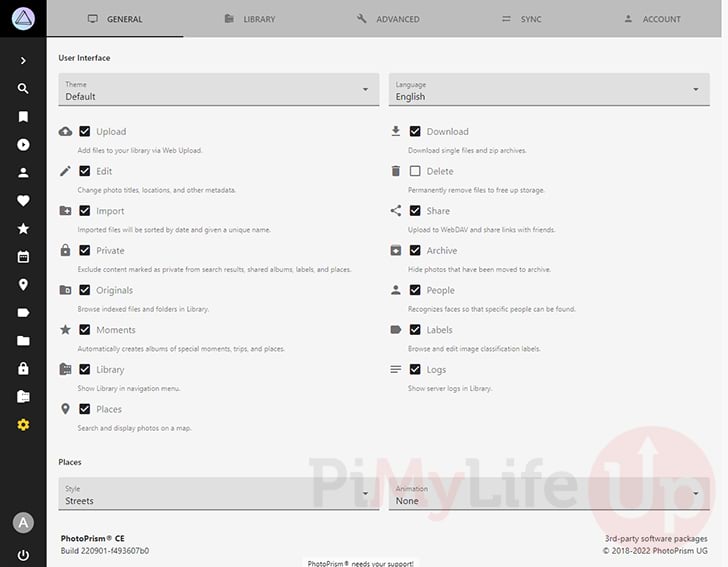
2. Now that we are in the settings screen, let us explore each page and what the settings are used for.
The general settings page, as shown below, mainly focuses on options controlling the user interface. For example, you can use this to hide menus from the sidebar or change the theme and interface language.
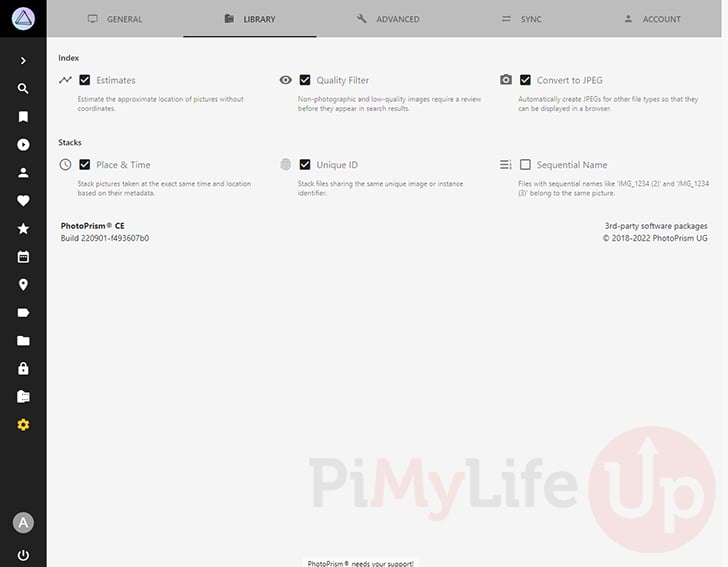
3. The “Library” options page lets you control how PhotoPrism handles your photos on the Raspberry Pi.
For example, you can control whether PhotoPrism should automatically create JPEGs for the photos you upload. Altern
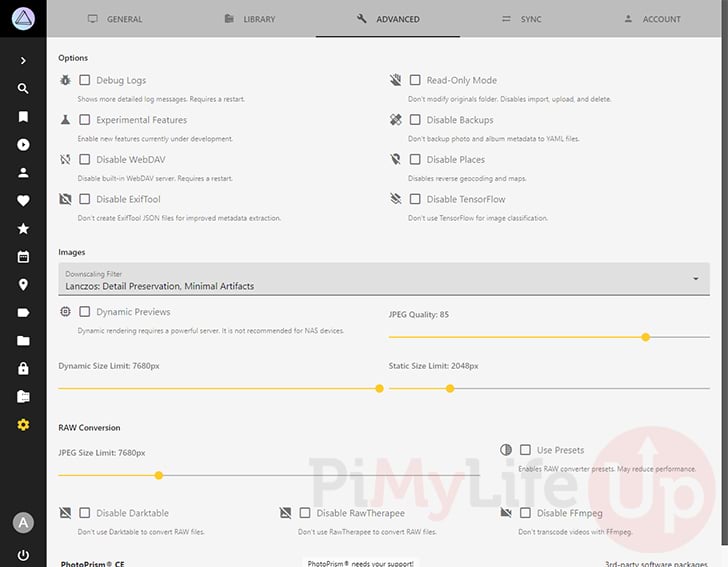
4. The advanced tab contains what it says it does: advanced options.
These options allow you to configure some of the more complicated parts of PhotoPrism. For example, you can use this to disable certain functionality or control how PhotoPrism converts RAW files.
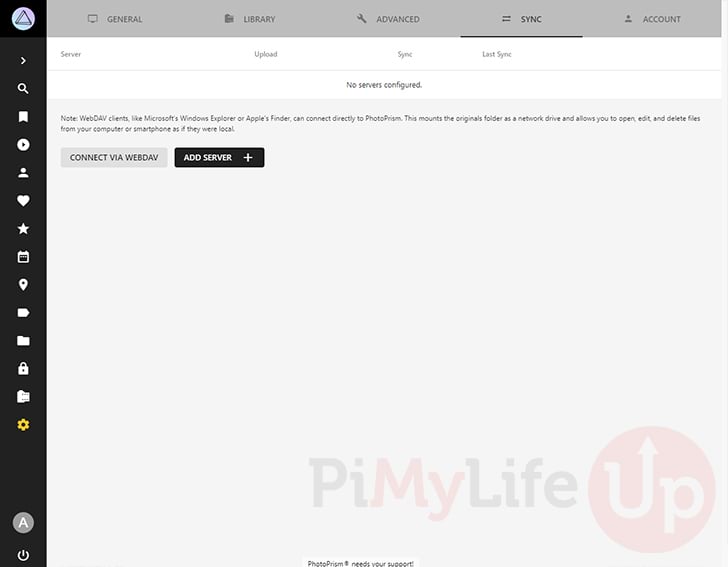
5. With the sync tab, you can control servers that you want to be synchronized to your Raspberry Pi’s instance of PhotoPrism.
You can also connect to PhotoPrism using WebDAV. WebDAV allows you to mount PhotoPrism as if it was a networked drive.
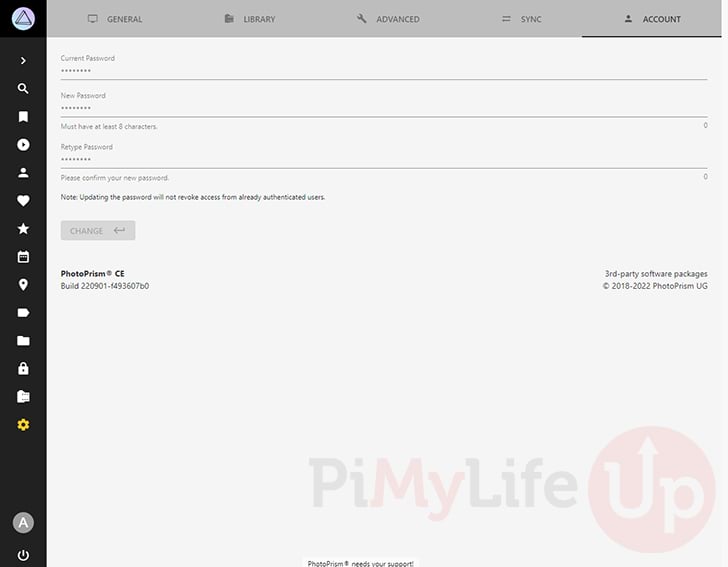
6. The final options page is for the PhotoPrism account you used to log in. With this page, you can change the password of your account.
If you still use the password you configured when writing the “docker-compose.yml” file, then now is a good time to change it.
Uploading Photos to your Raspberry Pi with PhotoPrism
1. The PhotoPrism web interface allows you to upload photos directly from its interface to your Raspberry Pi.
Getting to the upload screen is as simple as clicking the cloud icon in the top-right corner of the interface.

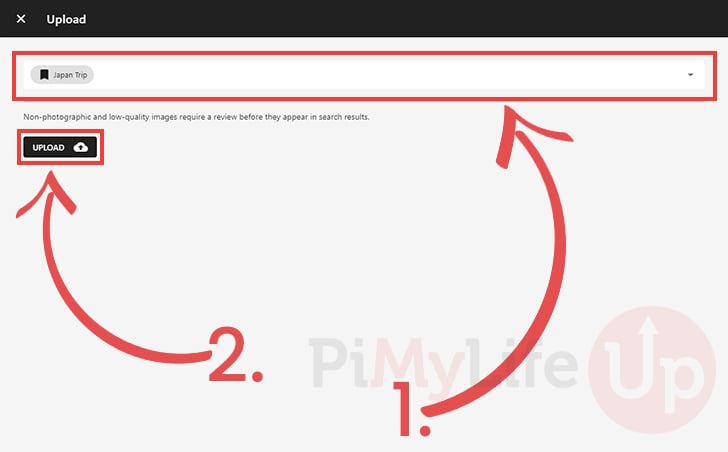
2. You should now see the screen shown below displayed within your web interface.
The text box at the top of the page (1.) allows you to select or create new albums to store your new photos. If you want to create a new album, all you need to do is type in the name and press the ENTER key.
Once you are happy with your selected albums, click the “UPLOAD” button to begin uploading your photos to PhotoPrism.
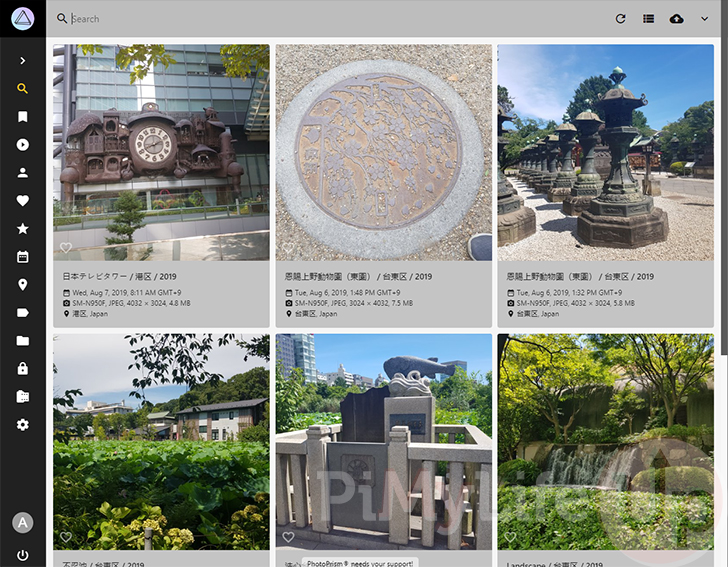
3. Uploading photos to PhotoPrism can take some time. After uploading, your Raspberry Pi will have to analyze each of them.
Once the process has finished, you should see your new images displayed within the web interface.
Updating to a New Release of Photoprism on the Raspberry Pi
A key advantage of using Docker to run Photoprism on your Raspberry Pi is that updating to the latest release is a fairly straightforward process.
1. Your first step is to change to the directory where we downloaded the “docker-compose.yml” file earlier in the guide.
cd /opt/stacks/photoprismCopy2. We can now use Docker to pull the latest image of Photoprism to our Pi by running the command below.
docker compose pullCopy3. Once a new version of Photoprism has been downloaded, you can move your running container to this new release by running the command below.
docker compose up -dCopyConclusion
At this point in our Raspberry Pi project, you should have the PhotoPrism photo app running and have hopefully uploaded some of your photos.
PhotoPrism is an impressive web app that allows you to categorize and present your photos without relying on a third-party service.
Please comment below if you have had any issues with getting PhotoPrism running on the Raspberry Pi.
If you liked this project, be sure to check out our many other Raspberry Pi projects.


use this to get the right docker compose…the link in the steps doesn’t work anymore
wget https://dl.photoprism.app/docker/arm64/compose.yamlThank you, we have updated the links, so they are correct again.
Hi there,
When I type this sudo docker compose up -d
I get this:
sudo: docker: command not found
Pi 5 using Raspberry pi OS
The install went just fine up until this point.
Dennis
Hi Dennis,
Ensure that you have followed our guide on installing Docker on your Raspberry Pi.
Kind regards,
Emmet
Would these instructions work if installed on a Linux mint desktop?
Hi John,
I believe these should. Linux Mint still uses the apt package manager and there is nothing here that is actually super specific to Raspberry Pi OS.
Kind regards,
Emmet
When I try to install docker it fails. Could this be because I am using the 32 bit version of the OS?
Hi Tom,
Sorry to hear that you are having troubles with this tutorial. Is there a particular error that you are running into? As that would help diagnose the issue that is occurring here.
I did personally test this on 64-bit Raspberry Pi, so while it should work on 32-bit I haven’t yet tested that myself.
Looking forward to your response.
Cheers,
Emmet
I just gave up and went with the 64-bit version. Installed without issue.
i used first time with changedetection.io manuel
Hi Memoli,
Thank you for commenting about your issue. That command needed to be ran using “sudo” which is why you ran into that particular error.
I have updated the guide so everything should now work fine.
Cheers,
Emmet
I am intrigued. Is it possible for PhotoPrism to import the photos off my Asustor NAS and then export them back to another directory on the NAS after they have been processed?
Hi Richard,
As long as your Asustor NAS supports WebDAV then yes, I believe it is fully possible to do that.
Cheers,
Emmet