This tutorial will show you how to install the Rockstar Games Launcher on the Steam Deck.
This launcher will give your Steam Deck access to games you bought directly through Rockstar. This includes hits like Red Dead Redemption 2 and Grand Theft Auto V.
Installing the Rockstar Games Launcher to your Steam Deck is the only way to play the GTA Trilogy definitive edition.
Like most third-party launchers, this one does not natively support Steam OS, so we must rely on Proton to get it to run. Proton allows you to run software designed for Windows on your Steam Deck.
Installing the Rockstar Games Launcher to your Steam Deck is relatively straightforward but takes a few minutes to complete.
You can also install this launcher to your Steam Deck alongside others, such as EA App, Ubisoft Connect, Battle.net, Epic Games Store, and more.
Setting up and Running Rockstar Games Launcher on the Steam Deck
The following steps will walk you through installing the Rockstar Games Launcher on your Steam Deck. By the end of these steps, you should have the launcher running and be able to access it while you are in gaming mode.
We have embedded our video guide below that will walk you through the whole process. If you prefer to take this at your own pace, our written steps are a great alternative.
Changing to the Desktop Mode
1. To install the Rockstar Games Launcher to your Steam Deck, you must change to desktop mode.
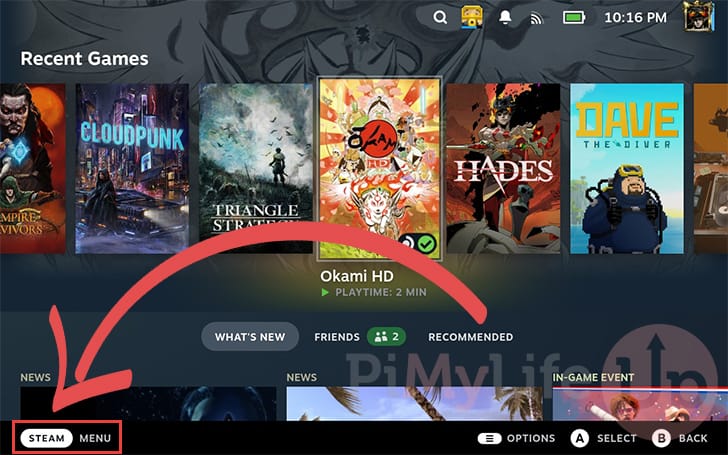
To swap to desktop mode, first, bring up the Steam menu. You can open the menu by pressing the STEAM button or tapping “STEAM MENU” in the bottom-left corner of the screen.
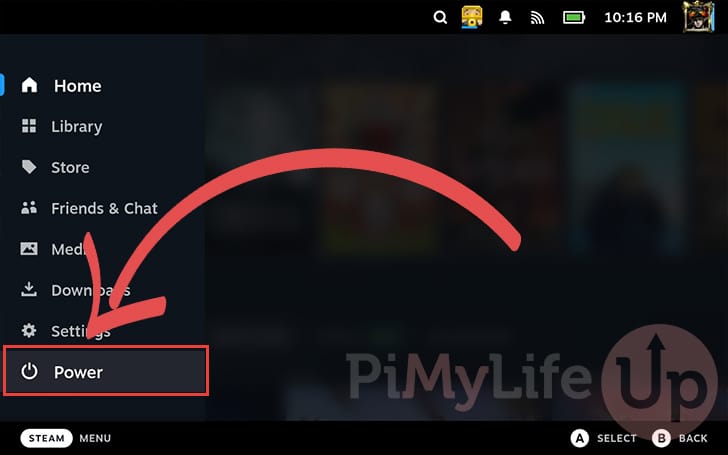
2. With the Steam menu now open, navigate and open the “Power” menu. This menu is where we can swap from gaming to desktop mode on your Steam Deck.
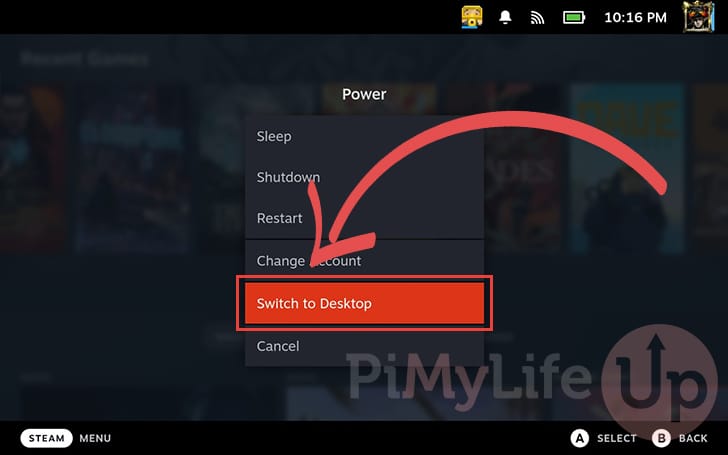
3. With the power menu open, you can swap to desktop mode by selecting the “Switch to Desktop” option.
Downloading the Rockstar Games Launcher to your Steam Deck
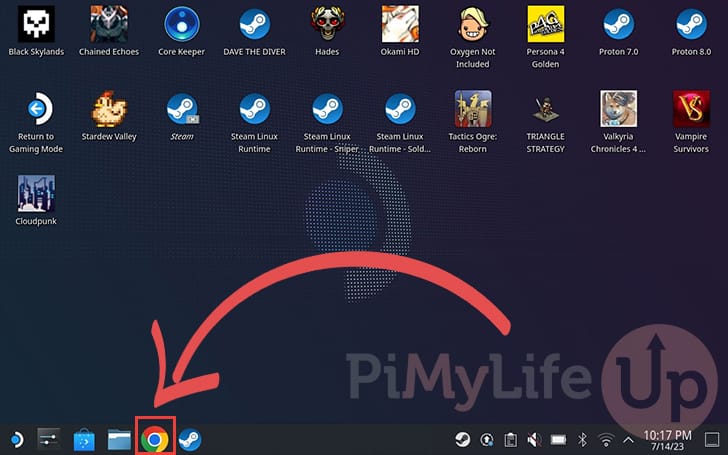
4. Now that you are in desktop mode, you must open a web browser that you will use to download the Rockstar Games Launcher to your Steam Deck.
In our example, we will be using the Chrome web browser.
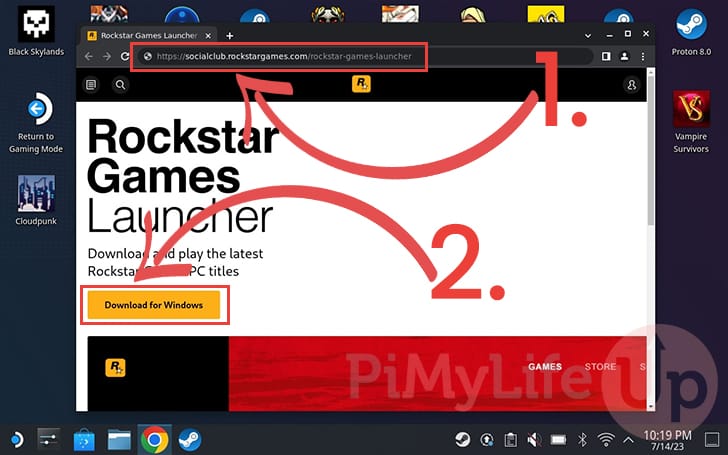
5. With your favorite web browser open on your Steam Deck, go to the following URL (1.).
https://socialclub.rockstargames.com/rockstar-games-launcher/Once you are on the Rockstar Games web page, click the “Download for Windows” button (2.).
Adding the Rockstar Games Launcher to your Steam library
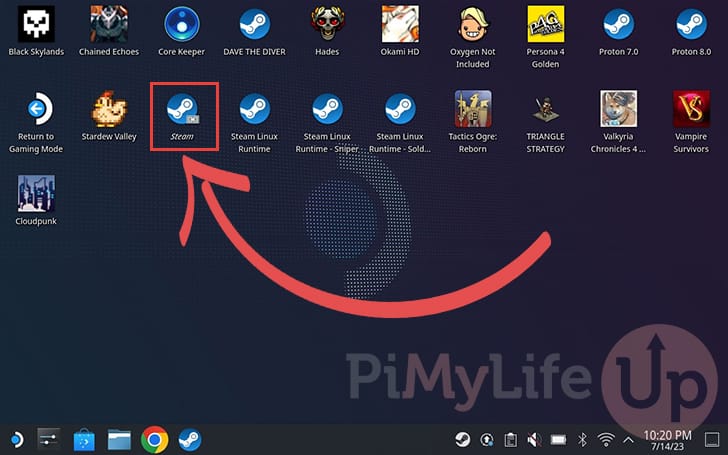
6. Once you have downloaded the Rockstar Games Launcher installer, you will need to add it to your Steam Deck’s library.
To do this, you must first open the Steam client by clicking the “Steam” icon on the desktop.
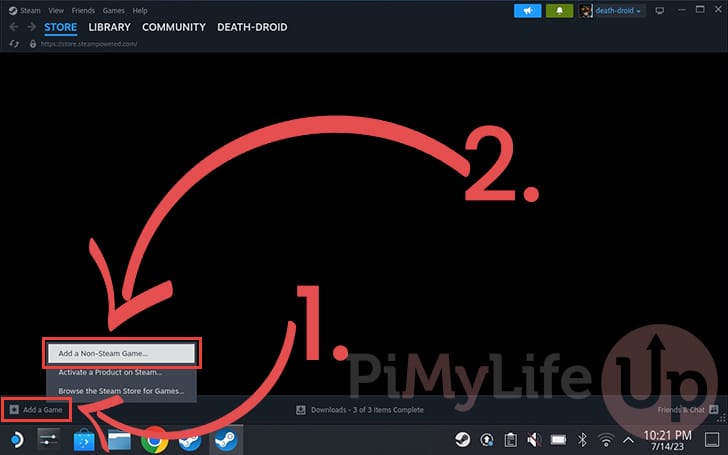
7. Once the Steam desktop client is open, click the “Add a Game” button (1.) in the bottom-left corner.
In the context menu that appears, click the “Add a Non-Steam Game...” (2.) button.
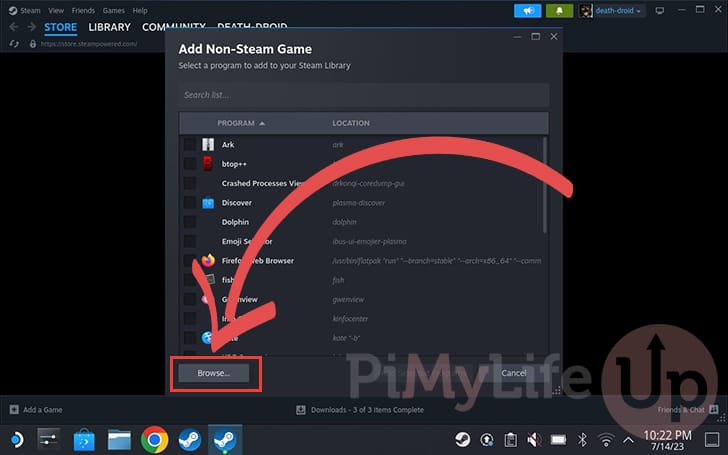
8. With the “Add Non-Steam Game” dialog open, click the “Browse...” button to begin adding the Rockstar Games Launcher to the Steam Deck library.
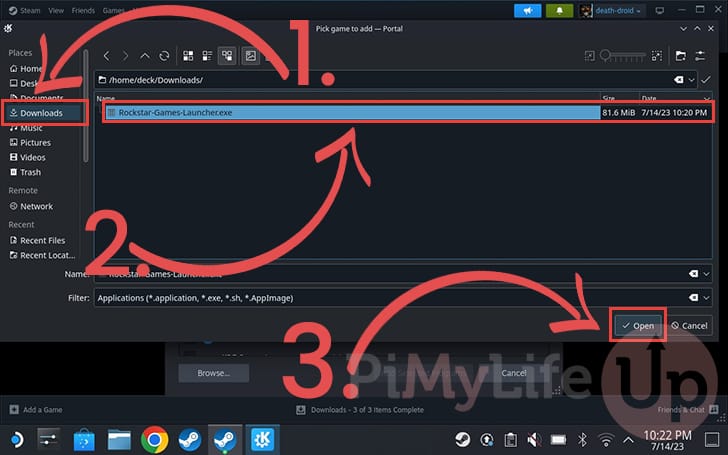
9. With the file browser open, change to the “Downloads” folder (1.).
Once in the “Downloads” directory, find and click the Rockstar Games Launcher installer (2.).
When the installer is selected, click the “Open” button (3.).
10. You should now see the “Rockstar-Games-Launcher.exe” file selected (1.).
Once you have ensured the installer is selected, click the “Add Selected Programs” (2.) button.

Enabling Proton Compatibility
11. With the Rockstar Games Launcher installer added to your Steam Deck’s library, you must enable Proton compatibility. Proton will allow you to run the Rockstar Games Launcher on your device.
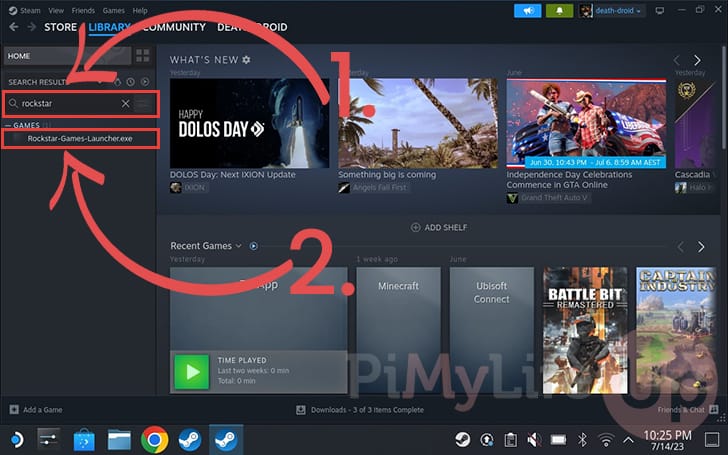
First, use the search box (1.) to look for “rockstar-games-launcher” in your library.
Once the “Rockstar-Games-Launcher.exe” entry appears (2.), select it to continue.
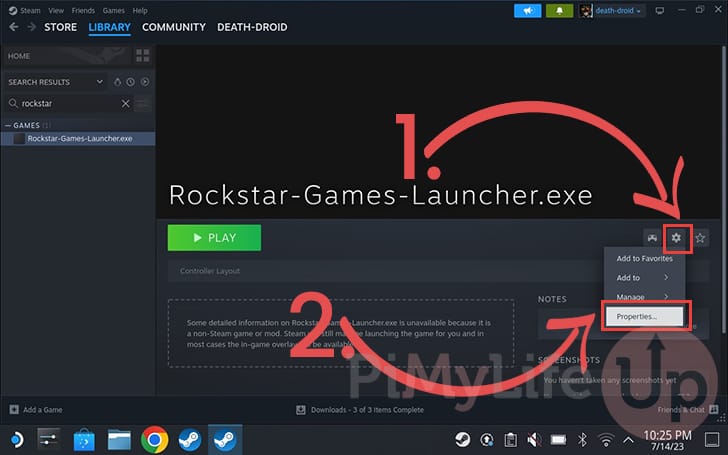
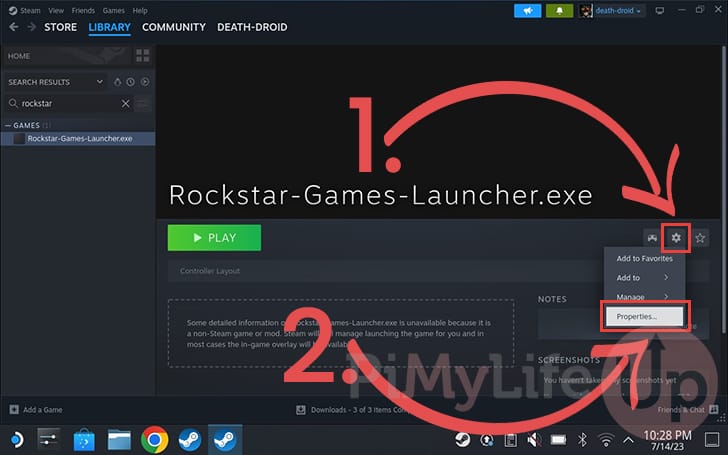
12. You will now want to open the Rockstar Games Launcher Installer preferences page. To get to this page, bring up the settings context menu by clicking the cog icon (1.).
In the context menu, click the “Properties...” option (2.).
13. Once the properties screen is open, change to the “Compatibility” tab (1.).
In this tab, ensure that you have ticked the “Force the use of a specific Steam Play compatibility tool” option (2.).
Once enabled, you must ensure the Proton version is set to “Proton Experimental” (3.).

Installing the Rockstar Games Launcher to your Steam Deck
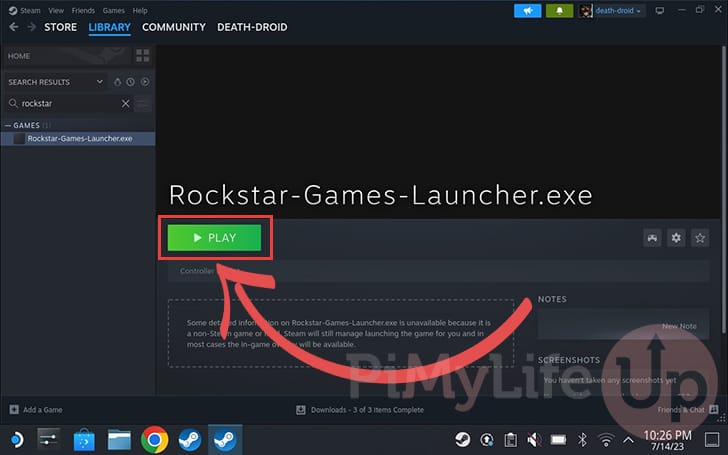
14. At this point, we can finally install the Rockstar Games Launcher to the Steam Deck.
To start this process, click the “Play” button while you have the “Rockstar-Games-Launcher” selected.
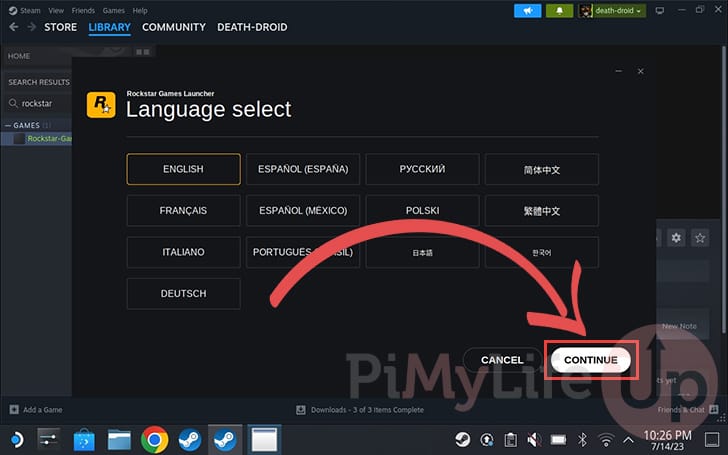
15. Upon starting the Rockstar Games Launcher installer on your Steam Deck, you will be asked to select the language you want to use.
After selecting your language, click the “Continue” button.
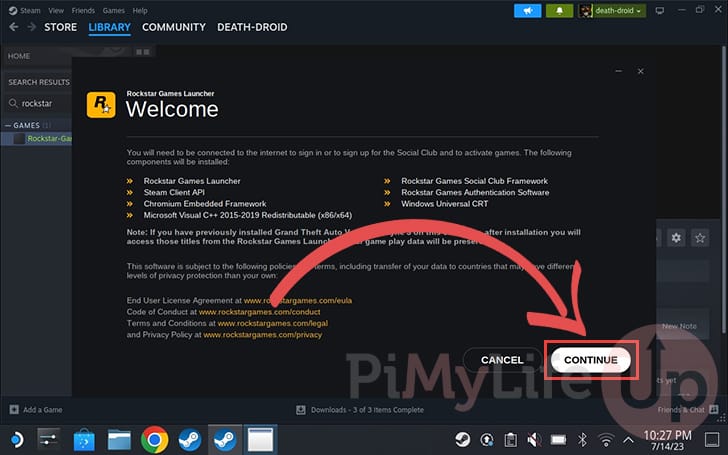
16.This next screen will list the additional programs installed alongside the Rockstar Games Launcher.
To proceed with the installation, click the “CONTINUE” button.
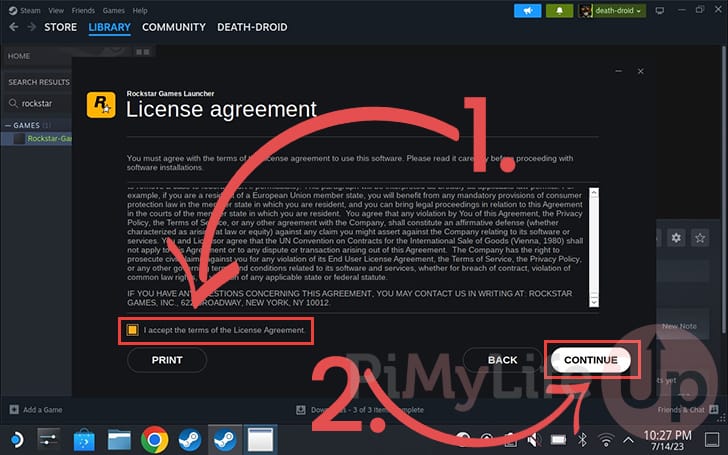
17. To install the Rockstar Games Launcher to your Steam Deck, you must agree to a license agreement (1.).
Once you have read and accepted the agreement, click the “CONTINUE” button (2.) to proceed.
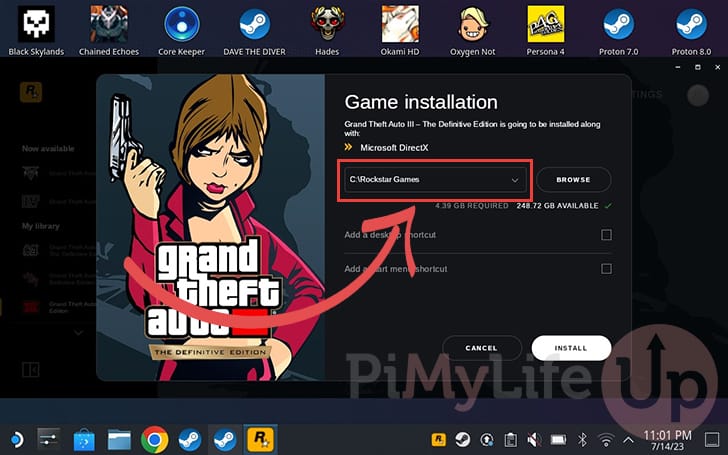
18. You will next be asked to choose the installation location. As it is installed using Proton, we recommend you keep the default settings.
Proceed with installing the launcher by clicking the “CONTINUE” button.

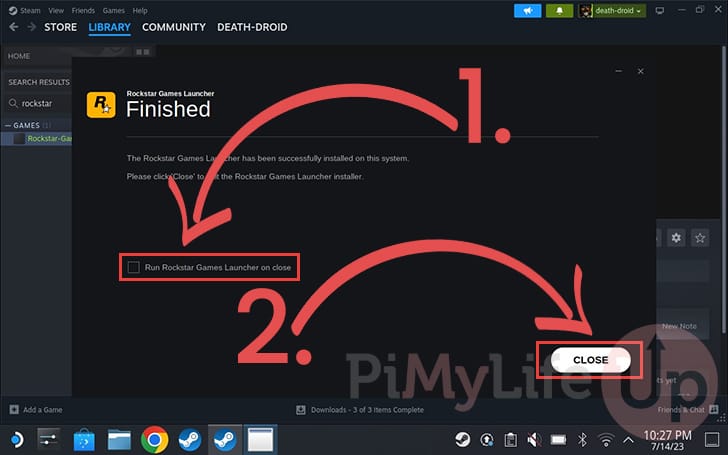
19. Once the Rockstar Games Launched has been installed on your Steam Deck, you will be asked if you want it to launch immediately.
We need to do some additional configuration first, so ensure that the “Run Rockstar Games Launcher on Close” checkbox is unticked (1.).
Once the option is unticked, you can safely click the “CLOSE” button (2.).
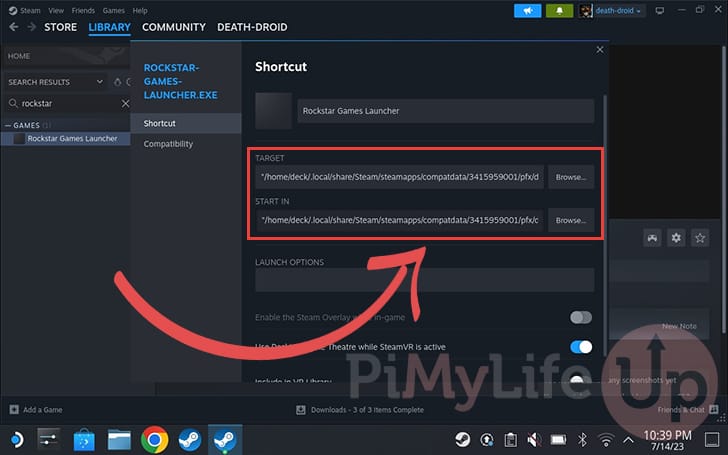
Changing the Launch and Start In Target
20. Our next task is to set the launch and start in target. At the moment, if you press the play button, it will relaunch the installer.
To change these targets, you must open the preferences panel again. Bring up the settings context menu by clicking the cog icon on the right-side corner (1.).
In this context menu, you must click the “Properties...” button (2.).
Renaming the Rockstar Games Shortcut
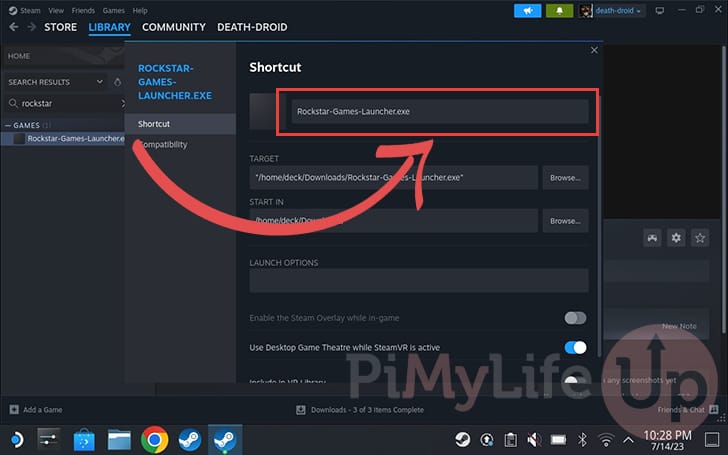
21. The first thing you should do while in the properties screen is rename the shortcut.
In our case, we changed it from “Rockstar-Games-Launcher.exe” to “Rockstar Games Launcher“. You can bring up the keyboard in desktop mode by pressing the STEAM + X buttons.
Setting the Rockstar Games Launcher Launch Target
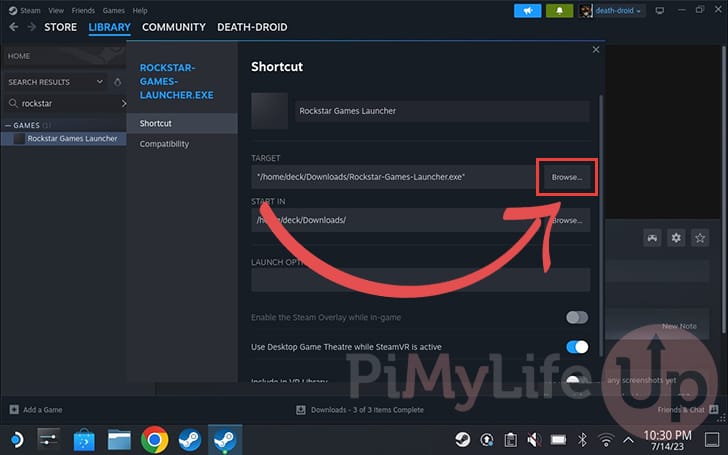
22. With the shortcut name updated, we need to update the “TARGET” so that our Steam Deck will launch the Rockstar Games Launcher.
To choose the target, click the “Browse...” button.
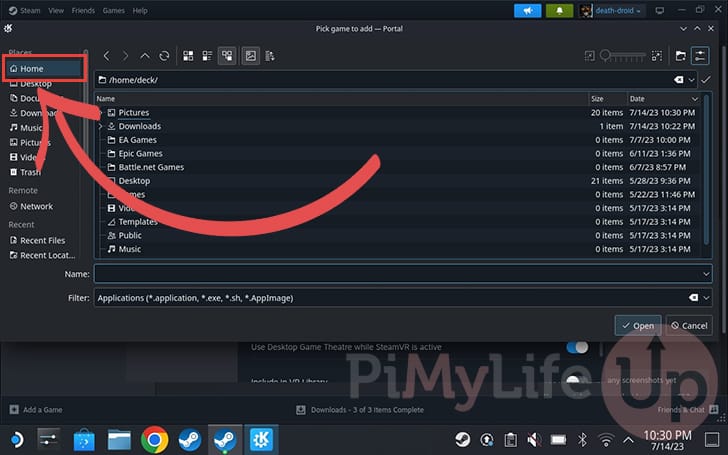
23. With the file browser open, ensure you are in the Steam Deck’s home directory by clicking “Home” in the sidebar.
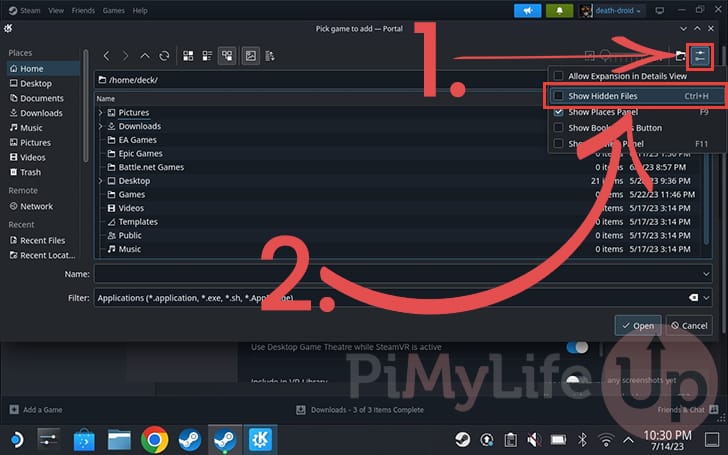
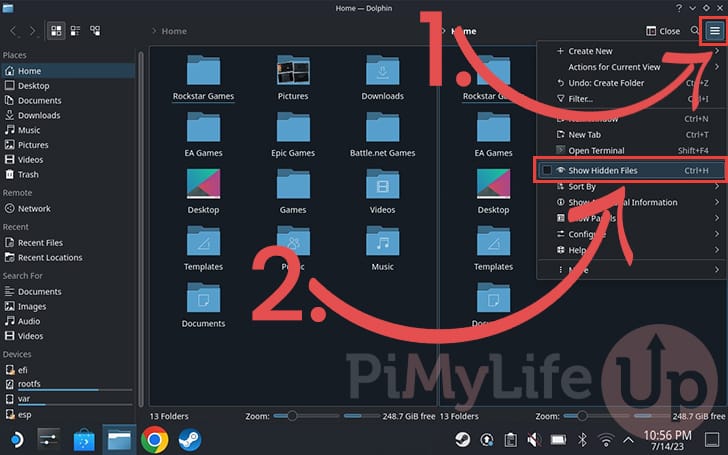
24. Once you are in the home directory, we must enable hidden files. Open the file browser’s settings menu by clicking the icon in the far left (1.) of the dialog box.
Next, tick the “Show Hidden Files” checkbox (2.).
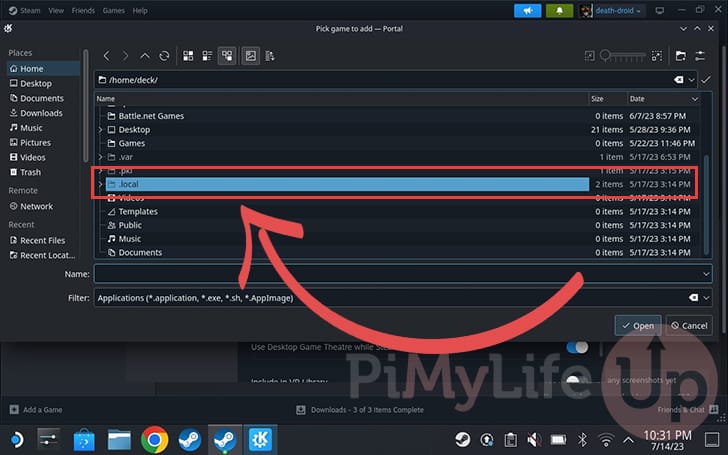
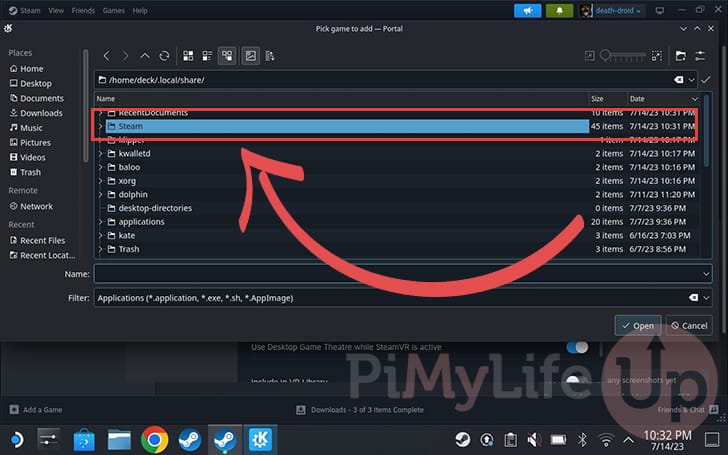
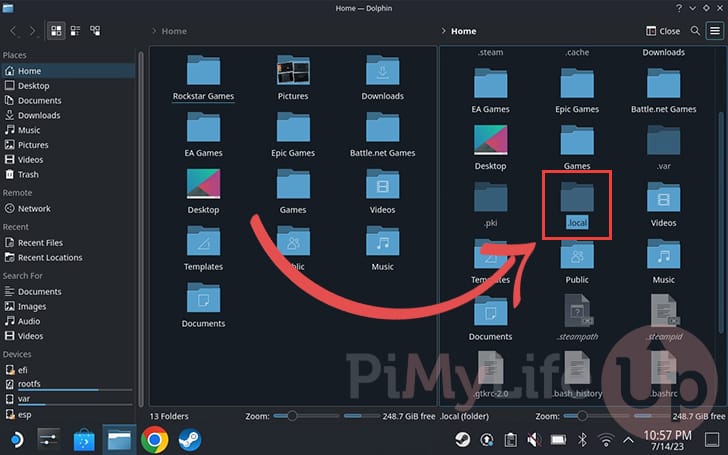
25. The first folder you will need to enter is named “.local“.
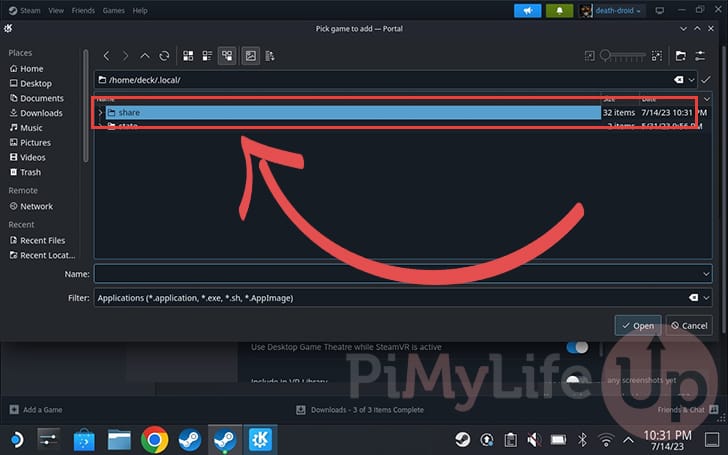
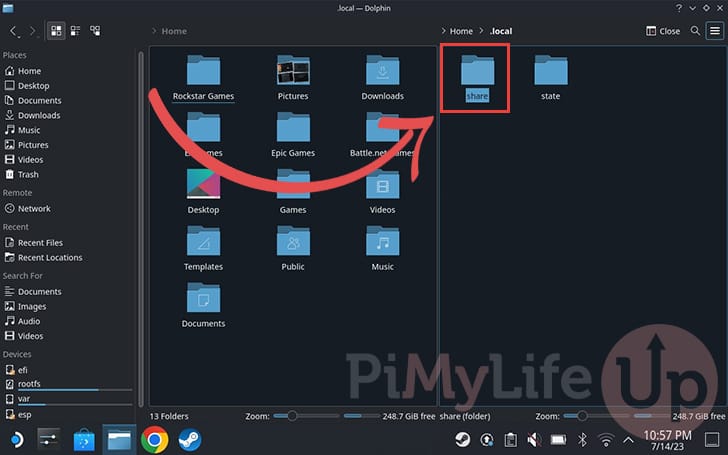
26. Now, navigate to the “share” folder.
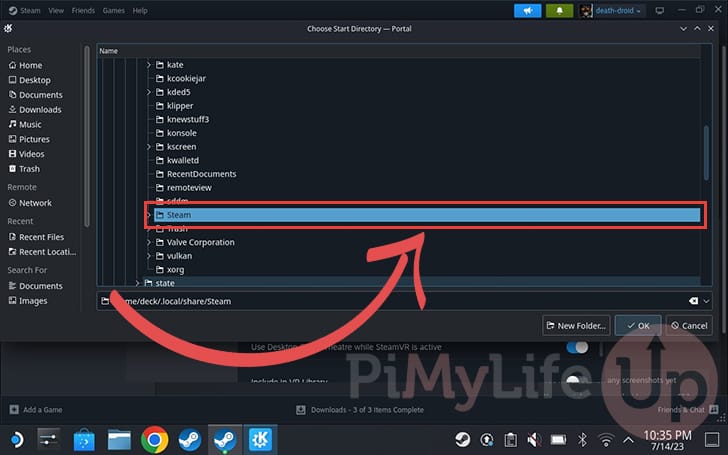
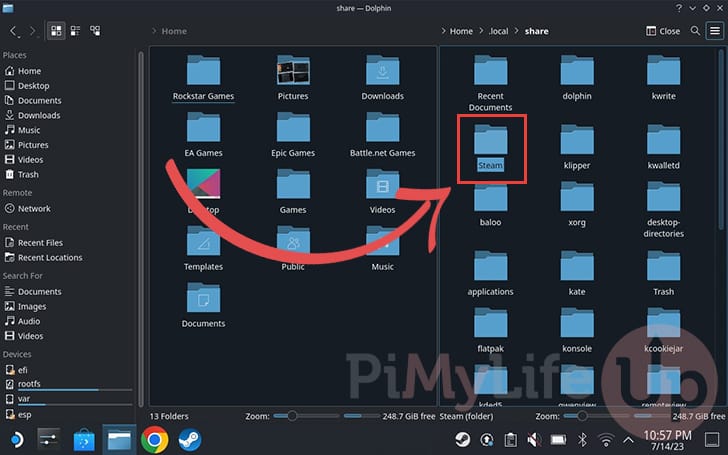
27. Within this folder, you should see a directory named “Steam“. Enter this directory to continue.
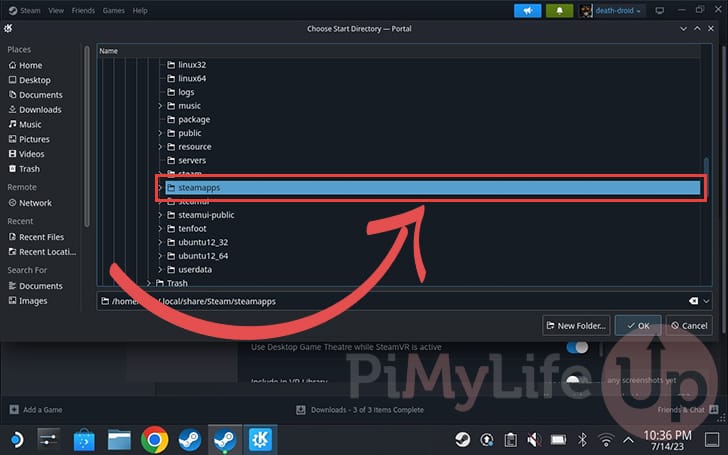
28. You should next change to the folder named “steamapps“.
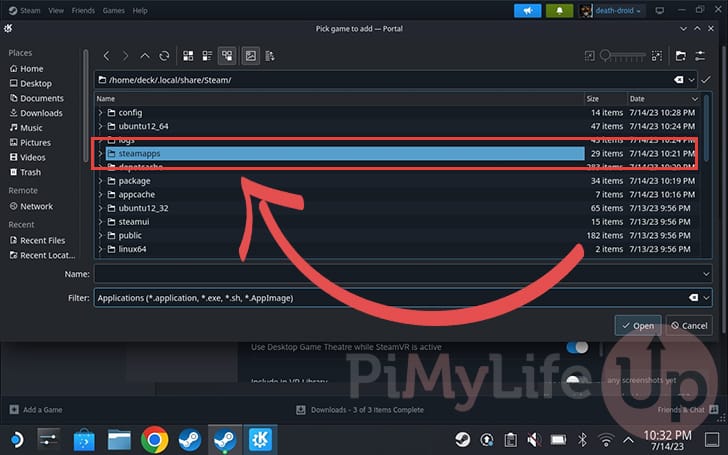
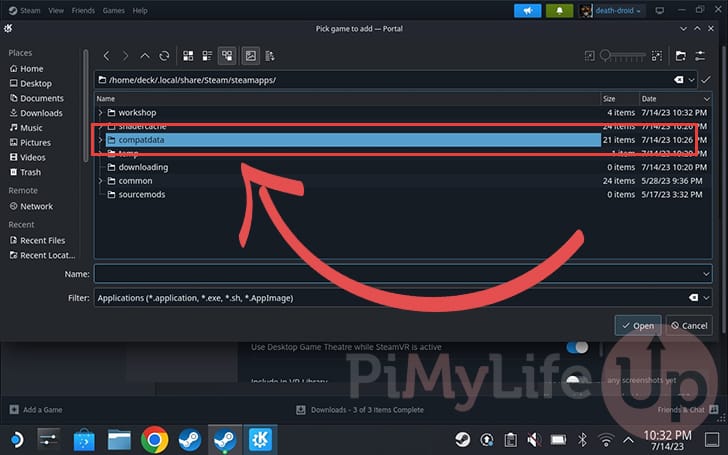
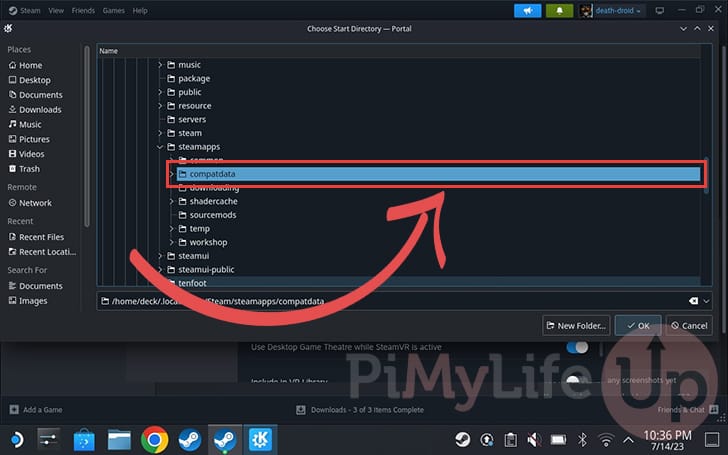
29. We now need to swap to the “compatdata” folder. This folder is where apps running through Proton are stored on your Steam Deck. This includes the Rockstar Games Launcher we just installed.
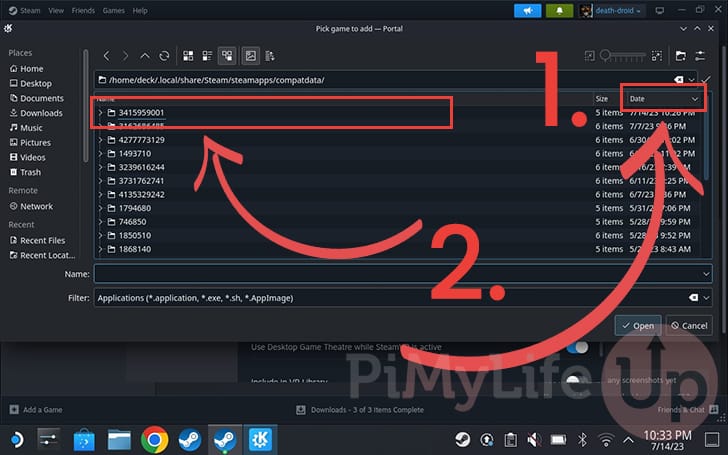
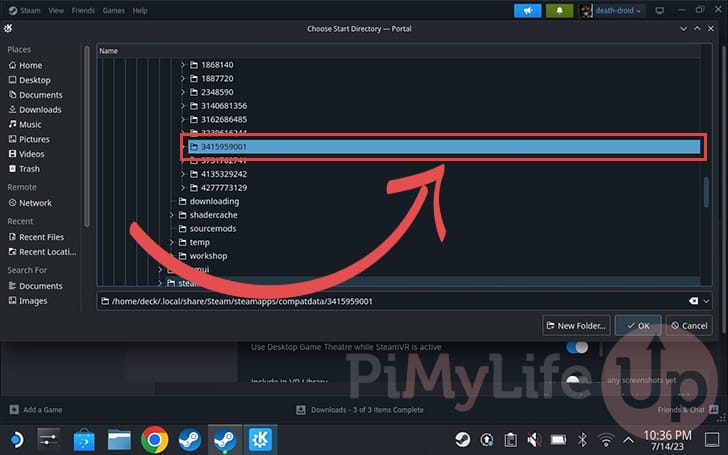
30. As Proton directories are named using a generated ID, you must first sort the folders by date.
You can change the browser to order by date by clicking the “Date” heading (1.) and ensuring the arrow is pointing down.
The folder belonging to the Rockstar Games Launcher should now be at the top of the list (2.). Open this directory to continue.
Note down the name of this directory, as you will need to know it later on in this guide.
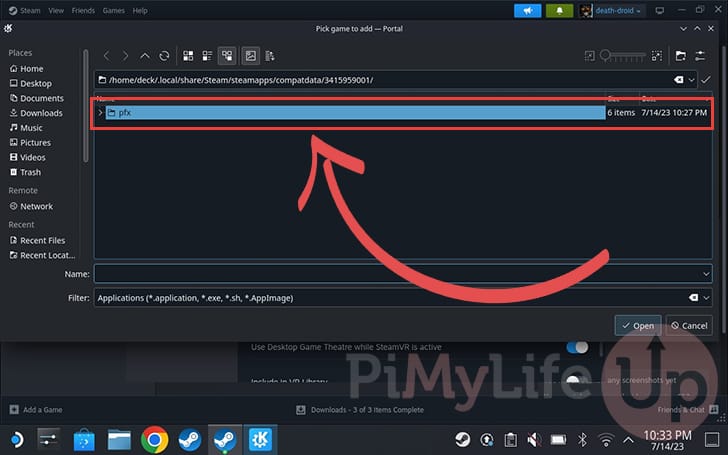
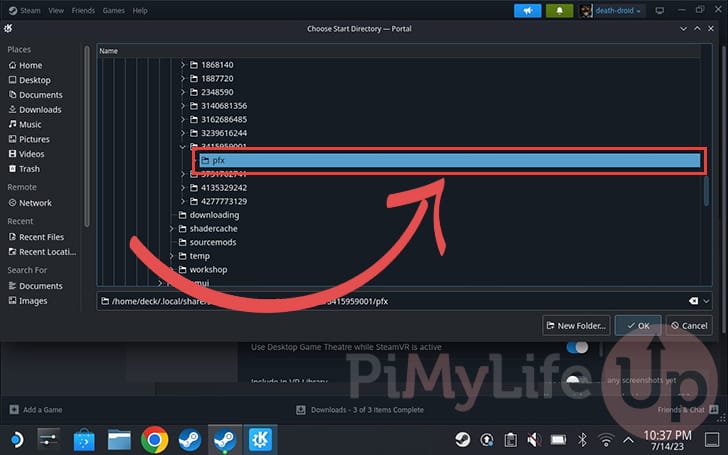
31. Now, swap to the “pfx” folder.
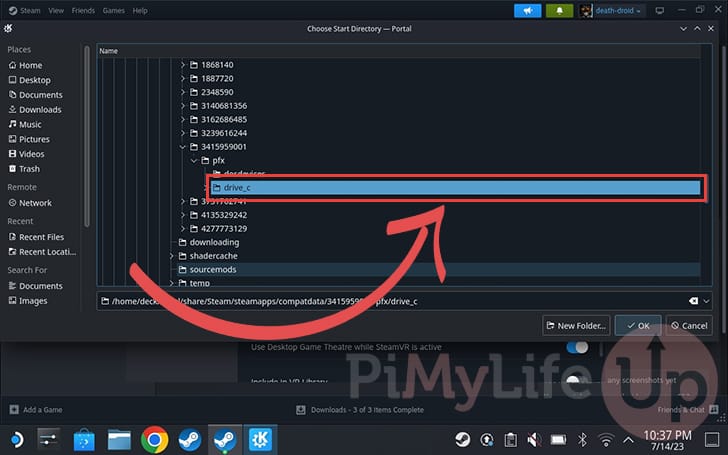
32. The next folder you want to change to is named “drive_c“. This is where Proton simulates the “C” drive that the launcher will see.

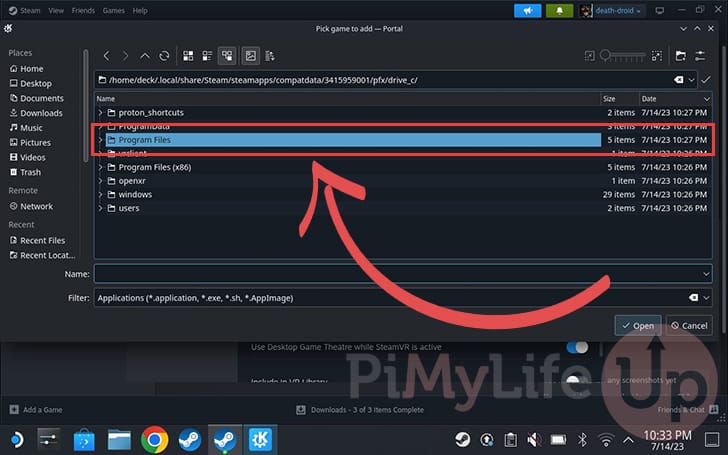
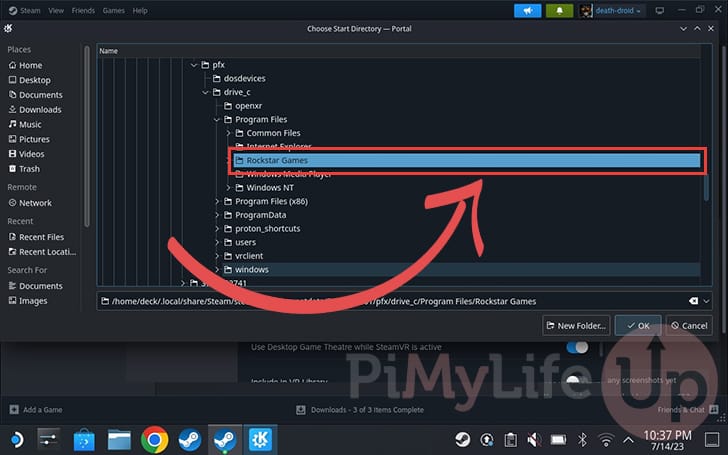
33. You will now want to swap to the “Program Files” directory.
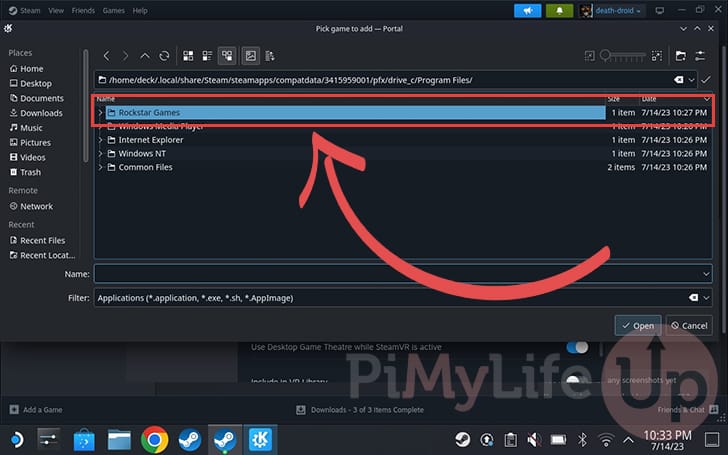
34. Change to the “Rockstar Games” folder, as this is where the Launcher is stored.
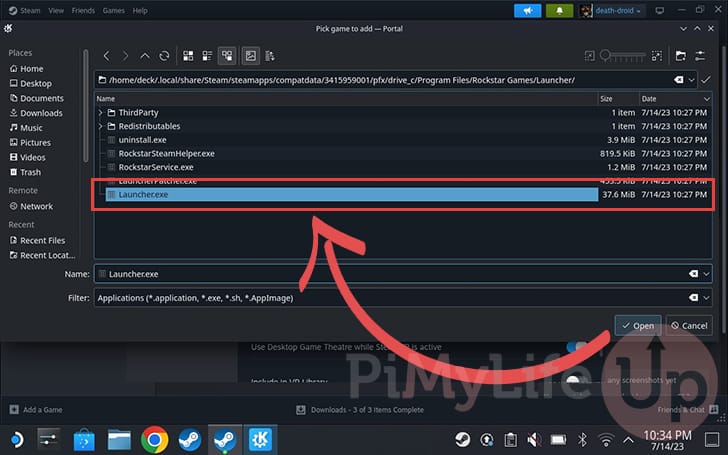
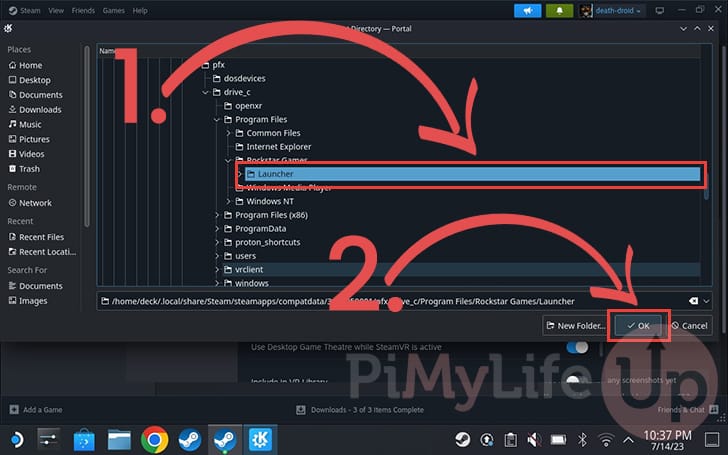
35. Finally, change into the “Launcher” folder.
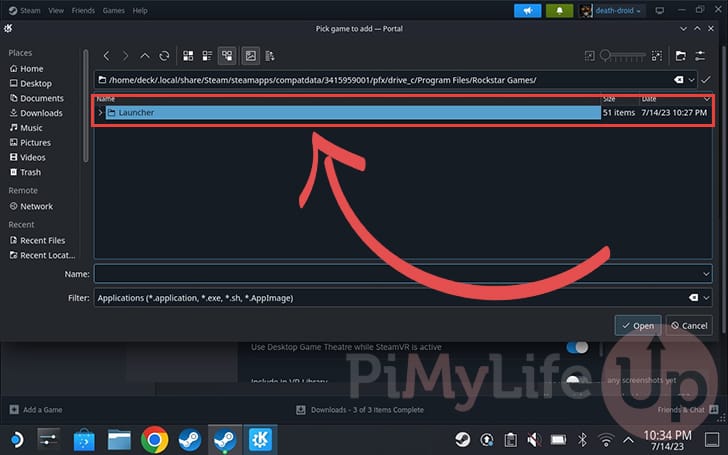
36. Within this directory, you will want to scroll down and select the “Launcher.exe” file and click the “Open” button.
Doing this will fix the launch target for the Rockstar Games Launcher on your Steam Deck.
Updating the Rockstar Games Launch Start In Directory on your Steam Deck
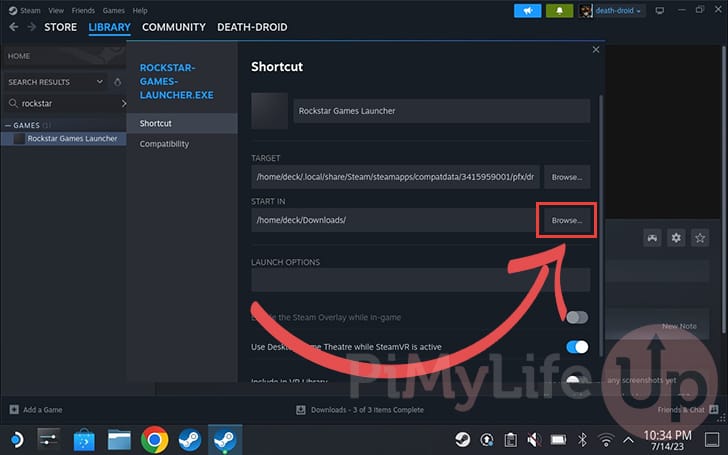
37. Our next step is to update the “START IN” directory for the Rockstar Games Launcher on our Steam Deck to point to the “Launcher” directory.
To begin this process, click the “Browse...” button.
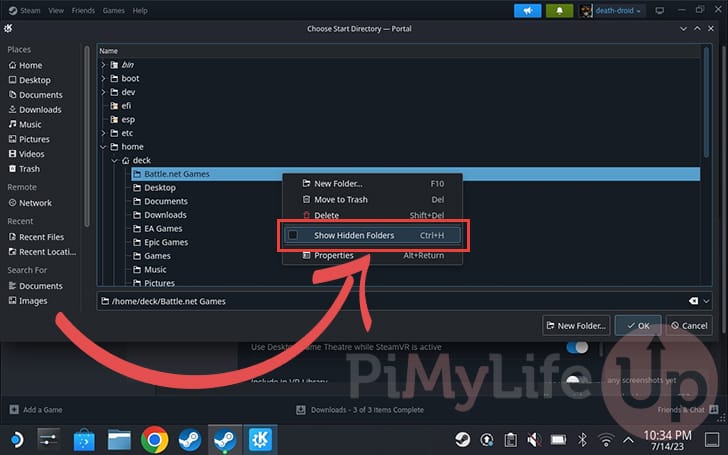
38. With the “Choose Start Directory” dialog open, right-click on the screen and select the “Show Hidden Folders” option from the context menu.
You can right-click using the left trigger (L2) on your Steam Deck.
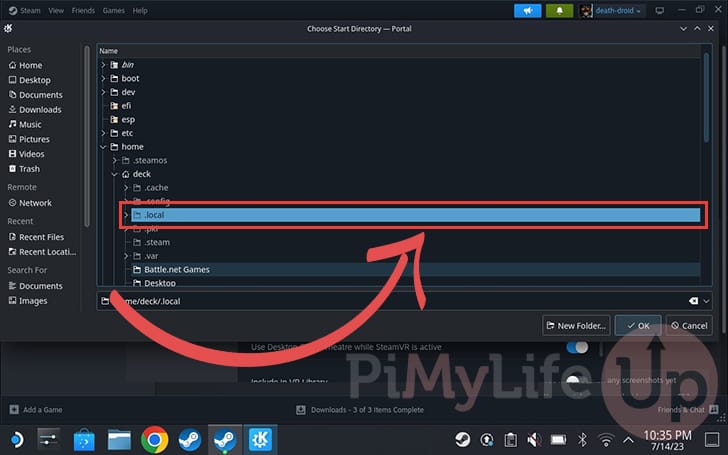
39. Now, with hidden folders shown, navigate to the “.local” directory.
You can navigate these folders quickly using the D-PAD on your Steam Deck.
40. The next directory you will want to open is the one named “share“.

41. You will now want to navigate down and open the “Steam” folder.
42. Scroll down and open the “steamapps” folder.
43. Change into the “compatdata” directory.
44. Within this list, scroll until you find the Proton directory belonging to the Rockstar Games Launcher you installed to your Steam Deck.
You should know the name of this folder from earlier on in this guide.
45. Once in the Proton directory, you will want to change to the “pfx” folder.
46. Now, swap to the “drive_c” folder.
47. You will now want to open the directory that is named “Program Files“.

48. The next folder you want to change to is “Rockstar Games“.
49. Finally, we are in the right place. Select the “Launcher” folder (1.) by clicking it.
Once selected, click the “OK” button (2.) to update the “START IN” target for the Rockstar Games Launcher.
Ensure Both Fields have Double Quotes
50. Before continuing any further, ensure that the “TARGET” and “START IN” fields start and end with a double-quote (").
Sometimes these fields are missing the double quotes which will cause the Rockstar Games Launcher to not run on the Steam Deck.
Creating a Folder to Store your Games
51. The next step is to create a folder to store games downloaded through the Rockstar Games Launcher to your Steam Deck.
While you can install these within the Proton directory, they are harder to manage, and if you ever remove the Launcher, they will be removed alongside it.
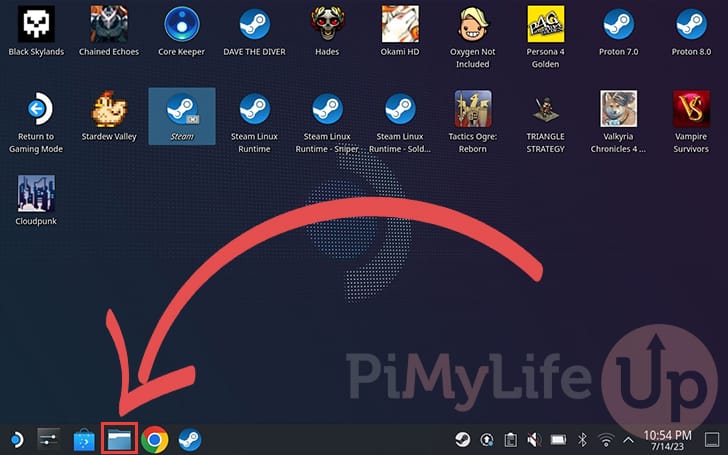
To create this directory, open the Dolphin file browser by clicking the “folder” icon in the taskbar.
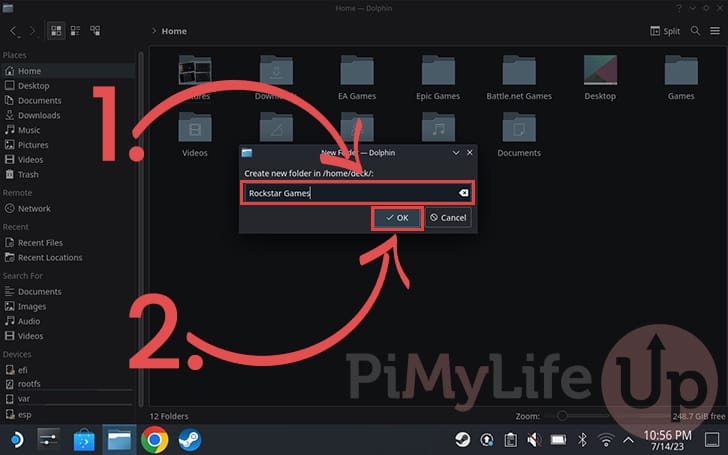
52. With the Dolphin file explorer open, right-click in the main window space (1.) to bring up the context menu. You can right-click on the Steam Deck by pressing the left trigger (L2).
In the context menu, select the “Create New” option (2.).
You will then want to select the “Folder...” option (3.).

53. You will now be prompted to give a name for your new folder (1.). In our example, we will be naming the folder “Rockstar Games“.
To confirm the creation of this new folder, click the “OK” button (2.).
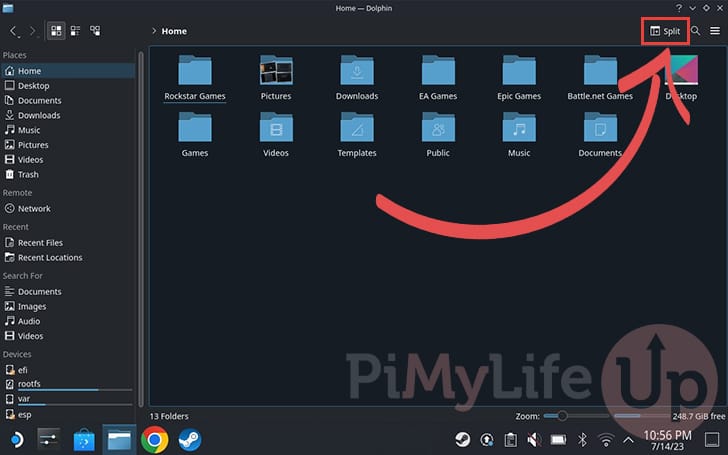
54. With the folder created, you must now split the Dolphin file explorer. You can split the window by clicking the “Split” button in the top-right corner.
Splitting the window will allow us to create a symbolic link on our Steam Deck between our new Rockstar Games folder and the Proton directory we explored earlier.
55. By default, the Dolphin file explorer does not show hidden files. To enable this, open the browser context menu by clicking the icon in the top-right corner (1.).
In the context menu that appears, you must click the “Show Hidden Files” option (2.).
56. The first folder you will need to find and open within Dolphin is named “.local“.
57. Next, change to the directory with the name “share“.
58. You will now want to navigate to the “Steam” directory.
59. Within this directory, search for the folder named “steamapps” and open it.
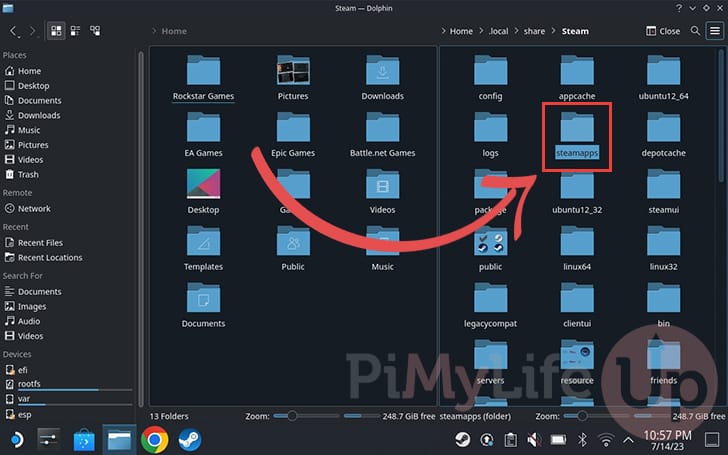
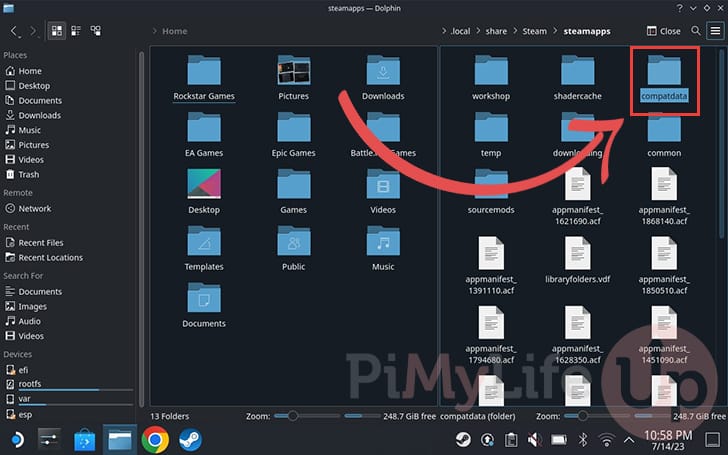
60. Now open the “compatdata” folder. This directory is where you will find programs running under Steam Link’s Proton compatibility layer.
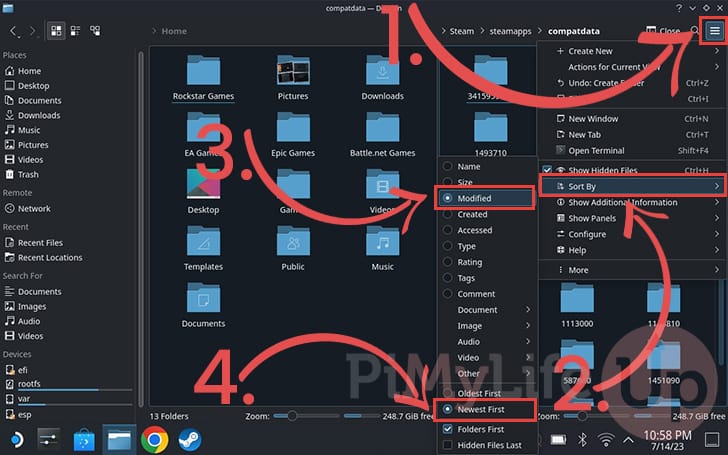
61. To find the correct Proton directory, we should order the folders by last modified. Bring up the context menu by clicking the hamburger icon in the top-right corner (1.).
Now navigate down and bring up the “Sort By” menu (2.).
Finally, ensure that the folders are sorted by “Modified” (3.) and that the order is set to “Newest First” (4.).
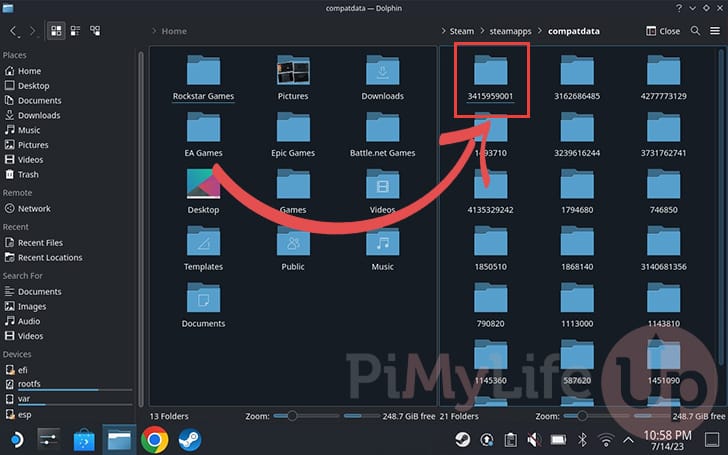
62. The folder belonging to your Steam Deck’s Rockstar Games Launcher installation should now be at the top.
Navigate to this folder to continue.
63. Now change to the “pfx” directory.

64. Finally, open the “drive_c” directory to finish navigating where we need to go.

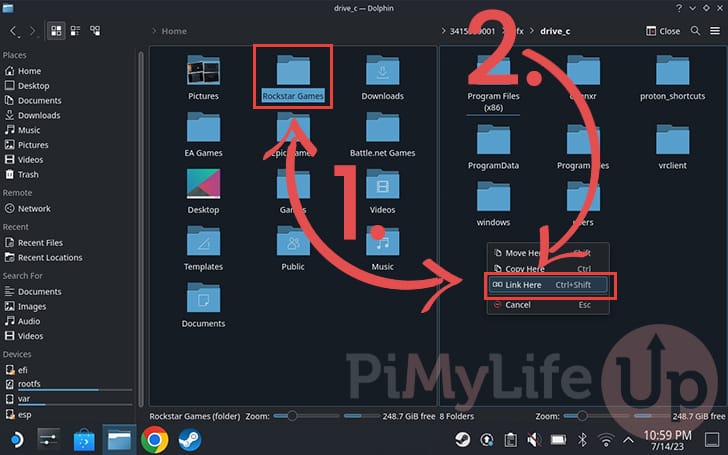
65. As we are finally in the correct directory, click and drag the “Rockstar Games” folder (1.) from the left to the right side of the screen.
You will be prompted with four different options. Select the “Link Here” option (2.) to continue.
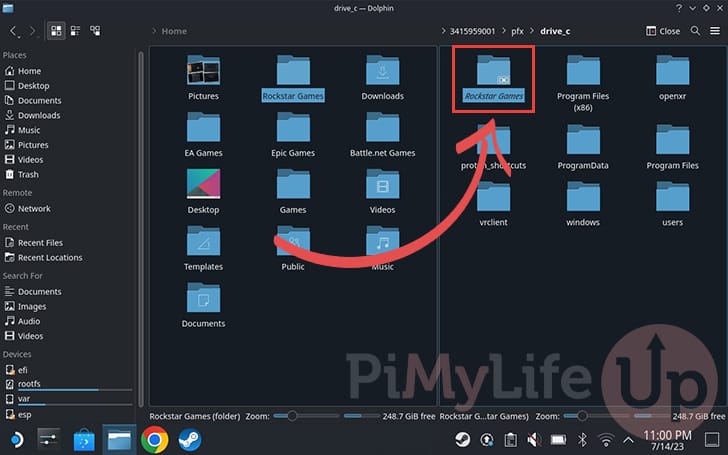
66. After creating the symbolic link, you should see a folder named “Rockstar Games” with a link icon.
Launching the Rockstar Games Launcher on your Steam Deck
67. We can finally take the Rockstar Games Launcher for its first run on the Steam Deck.
To do this, open the “Rockstar Games Launcher” entry in your Steam library and click the “Play” button.
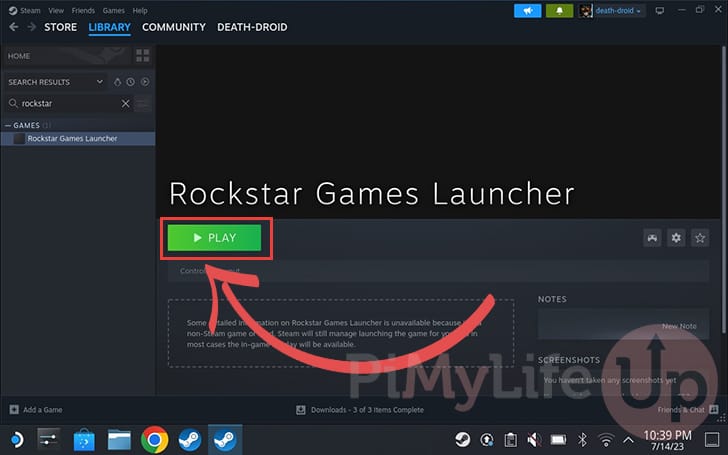
If you experience an issue with a window continually appearing and disappearing, try changing the Proton compatibility from “Proton Experimental” to “Proton 8.0-3“.
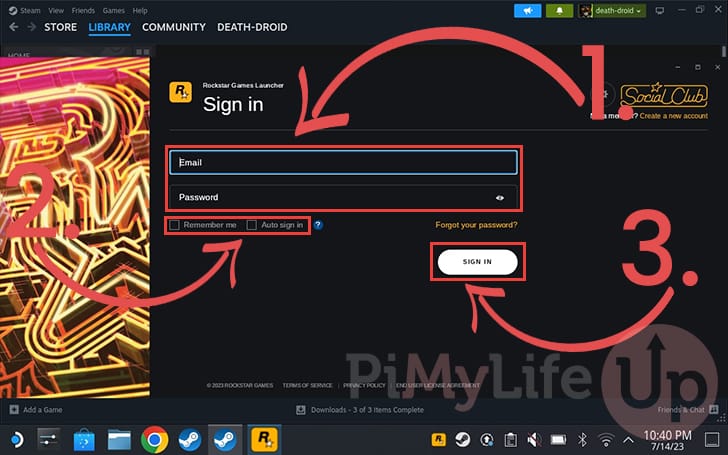
68. You must now log in to your Rockstar Social Club account (1.).
We recommend that you tick both the “Remember me” and “Auto sign in” checkboxes (2.). This way, you won’t have to type in your username and password whenever you want to play a Rockstar Games game on your Steam Deck.
Once everything is set, click the “SIGN IN” button to continue (3.).
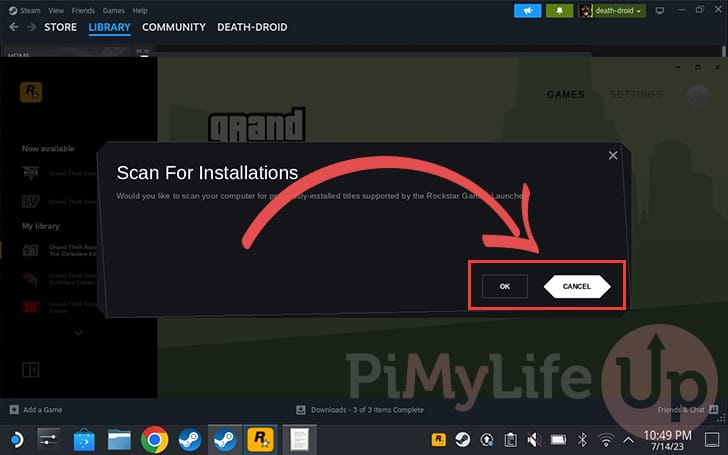
69. Upon running Rockstar Games Launcher for the first time on your Steam Deck, you will be prompted to scan for installations.
This option lets you add games you have already copied to your Steam Deck. If you haven’t installed a game previously, you can click the “CANCEL” button.
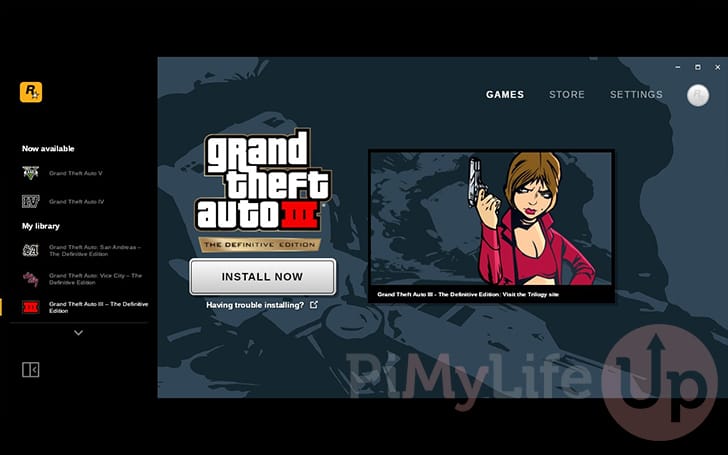
70. Now, the Rockstar Games Launcher is running on your Steam Deck in desktop mode.

Changing the Default Install Location
71. The Rockstar Games Launcher doesn’t allow you to change the default install location globally. Instead, you must set it every time you install a game.
To give an example, let us run through installing a game.
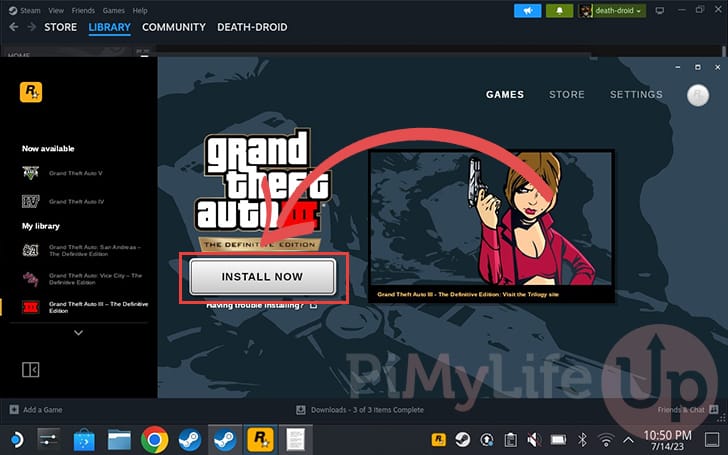
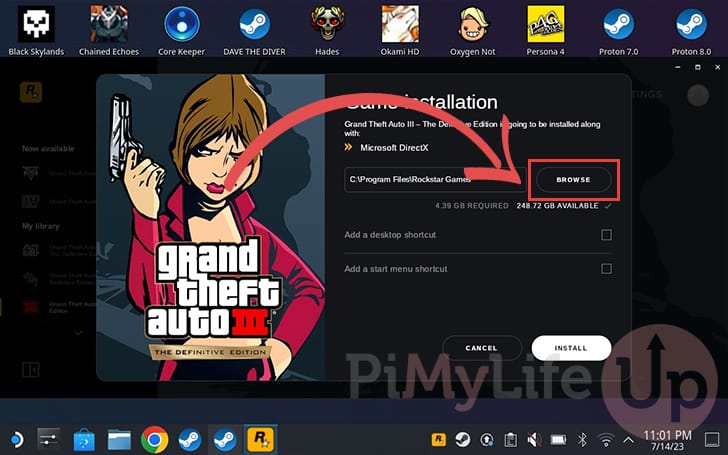
72. While installing a game, you can set the install location by clicking the “BROWSE” button.
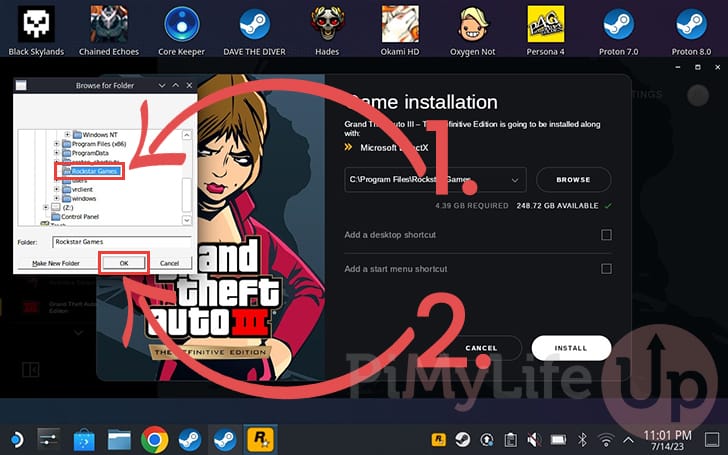
73. A dialog will pop up that allows you to select a folder to install the game to. In our example, we will select the “Rockstar Games” folder (1.) we created in our simulated “C Drive” earlier.
Once a folder is selected, click the “OK” button (2.).
74. You should now see that the file path has been updated to point to your new directory.
Returning to Gaming Mode
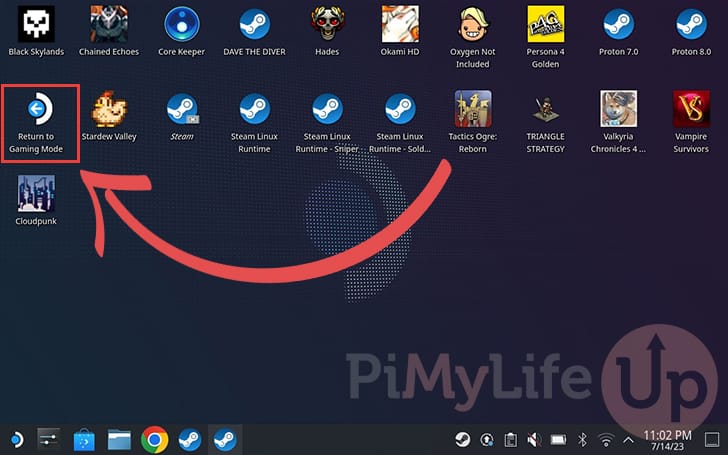
75. As we have completed all the tasks, you can now return to your Steam Deck’s gaming mode.
To return to gaming mode, double-click the “Return to Gaming Mode” icon on the desktop.
Finding the Rockstar Games Launcher in Gaming Mode
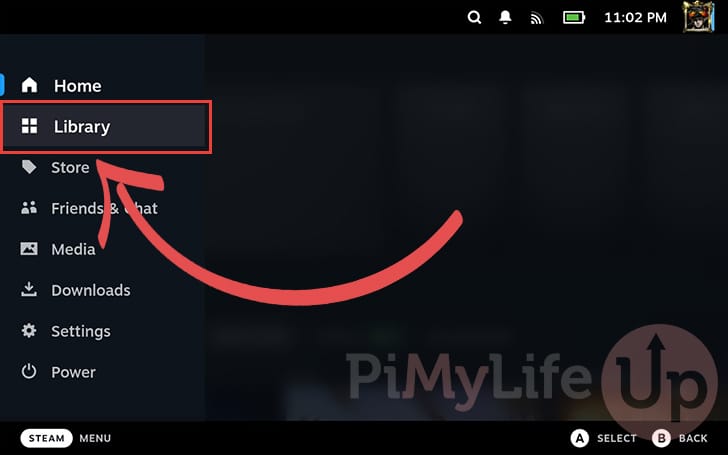
76. Back in gaming mode, open your Steam Deck’s library from within the “STEAM MENU”.
77. In your Steam library, you will want to change to the “NON-STEAM” tab (1.).
Within this tab, you should see an entry labeled “Rockstar Games Launcher” (2.).
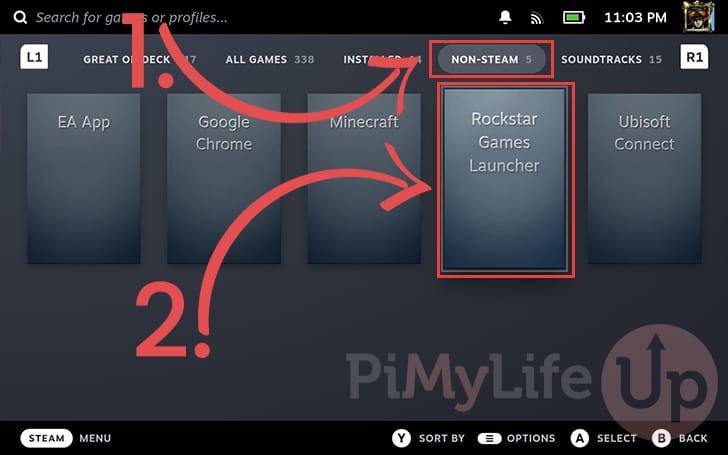
78. Now, all you need to do to launch the “Rockstar Games Launcher” is to click the “Play” button.
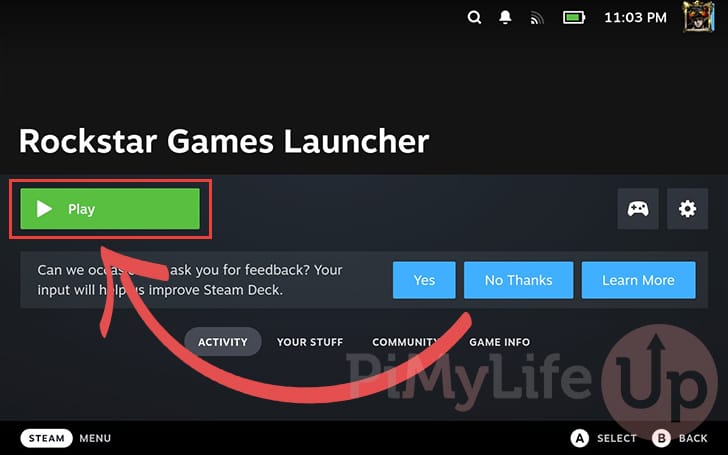
79. You should now have the Rockstar Games Launcher running on your Steam Deck while in gaming mode.
Conclusion
At this point in the guide, you should have successfully set up the Rockstar Games Launcher on your Steam Deck.
Installing this launcher lets you access any games you buy directly from Rockstar. These games include hits like GTA V and more.
Please comment below if you have any issues with getting this launcher to run on your device.
Be sure to check out our many other Steam Deck tutorials to make the most of your system.


Hey great guide! Is there anyway to download my game to a SD card? I find that the game will take a lot of storage on the internal drive and is wondering if I just switch the install location in the launcher to my card or do I have to do that whole link thing?
Hi Teagan,
In the “Creating a Folder to Store your Games” section, you would just make this folder on your SD card and link it into the proton directory. It’s a bit of a tedious process but its needed for the Proton layer to actually be able to see it.
Kind regards,
Emmet
ahoi!
i’m facing the problem to log into my rockstar account since the steam-virtual-keyboard isn’t appearing in the rockstar launcher – i can’t even copy/paste to log in.
any solutions?
Hey,
Sometimes the Steam OS desktop mode can be a bit finicky. I would suggest try booting into gaming mode and loading up the rockstar launcher within that, I found the virtual keyboard worked more reliably through that, then in desktop.
Kind Regards,
Emmet
Amazing guide! Everything was simple to follow! Great screenshots great text! 10/10 guide
thank you, you guys are great
Hi, firstly, this has been one of the easiest guides I’ve used on the steam deck so thank you for that.
I got to step 71 but the option was “Buy Now” and not “Install”? I bought GTA 4 via the steam sale, so it should be there.
The only issue I can think of is the email for steam and rockstar are different and the game was installed in “Game Mode” before I used the above guide.
Help will be appreciated 😊
Hi Chad,
I have never actually tried this with a game bought through Steam.
If you have installed the game through Steam, I’m fairly sure the Rockstar Games Launcher has a “Locate Game” feature that you can use. You’ll just have to point this to where GTA 4 is installed. Since GTA 4 is a Windows game it will be within the “steamcompat” directory.
Please let me know if you need more help.
Kind regards,
Emmet
Hello, i followed the steps, but once i got to step 67, we can finally run rockstar.
There was a very annoying box that kept flashing on and off, i couldn’t click it, as it would disappear as soon as it would re appear again, and it wouldn’t let me open my keyboard to input my login details to rockstar. Please help thank you
Hi Connor,
Sorry to hear that you are running into issues with getting the launcher to work properly.
I don’t remember running into an annoying box while I was setting it up but will see if I can investigate that further. Do you remember if the box had any messages or anything at all distinct about it?
In the case of the keyboard not appearing sometimes I find you have to press the STEAM + X buttons a lot for it to actually pop up. Seems to be very flakey.
You could also work around this by installing an alternative on-screen keyboard to temporarily use.
Please let me know if you continue to run into issues and I’ll see if I can offer some better solutions.
Cheers,
Emmet
I have the same problem the box that keeps appearing and disappearing at the top says C:\Program Files (x86)\Steam\steam.exe
Hi Steven,
I finally got around to checking out this issue on my own Steam Deck.
Try setting the “
Compatibility” from “Proton Experimental” to “Proton 8.0-3”. It seems to have fixed the issue for me.Cheers,
Emmet