This Raspberry Pi project will show you how to install and setup the OSMC media center software.
OSMC is one of the best and easiest ways to turn your Raspberry Pi into a fully-fledged media center.
Not only is OSMC a feature-packed media center, but it has also been optimized heavily to work on the Raspberry Pi’s hardware.
OSMC is an operating system distribution that makes use of the Kodi media center software. One of the advantages of OSMC is that it is actively maintained and built on top of a full operating system.
By being built on top of a full operating system, OSMC can be easily extended beyond its built-in Kodi functionality. For example, we can set up Netflix on it with ease as we can access the backend easily.
OSMC is one of the best distributions for Kodi that you can install on your Raspberry Pi. From our testing, it is also one of the most optimized Kodi experiences for the Pi.
If you are after an alternative to OSMC, you can either install Kodi to your Raspberry Pi yourself or look into LibreELEC and XBian.
Equipment List
Below is all the equipment you will need to set up and install OSMC on your Raspberry Pi.
Recommended
- Raspberry Pi Amazon
- Micro SD Card Amazon (8GB+)
- Ethernet Cable Amazon or Wi-Fi Amazon
- HDMI Cable Amazon
- Monitor Amazon
Optional
Note: The USB ports on the Raspberry Pi might not be enough to power an external drive, so you might need to invest in a powered USB hub.
Installing OSMC to your Raspberry Pi from image
This section will show you the straightforward steps to downloading and installing the OSMC image to an SD card.
1. Before installing OSMC to the Raspberry Pi, we will need first to download its image.
You can obtain the latest version of the OSMC image by going to the OSMC download page.
2. Scroll down to the bottom of the page and click the “Disk images” button.
This button will bring up a list of OSMC images for different versions of the Raspberry Pi.
Identify the download list for your Raspberry Pi then download the image provided at the top of the list.
3. Now that we have the OSMC image downloaded, we will need to install a tool to write the image to an SD card.
For our guide, we will use a tool called Etcher. You can download Etcher from their website. There are plenty of alternatives, but we feel like Etcher is one of the best available.
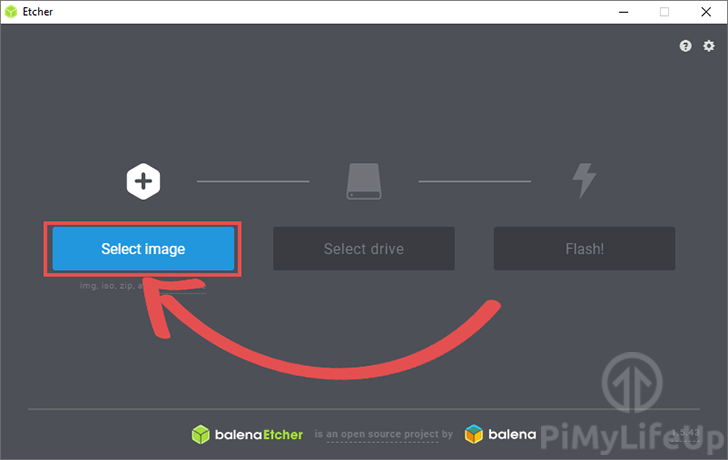
4. Once you have downloaded and installed Etcher, go ahead and press the “Select Image” button.
Browse to the OSMC image that you downloaded in Step 2 of this section and select it.
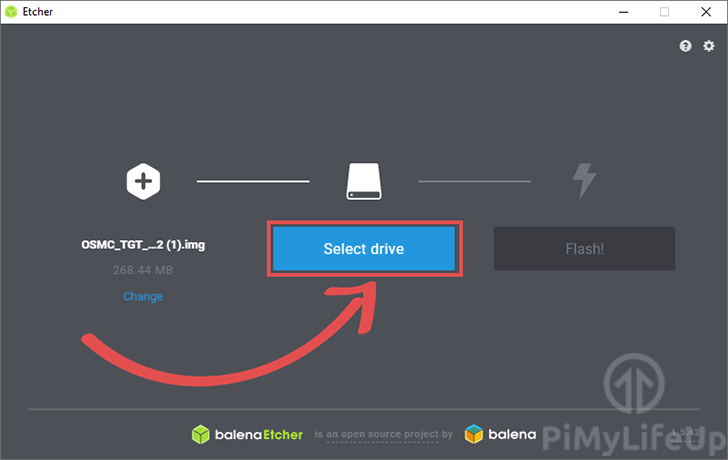
5. Next, click the “Select Drive” button. With the correct drive selected, press “Continue“.
Double-check to ensure it is the SD Card; otherwise, you might accidentally wipe a hard drive.
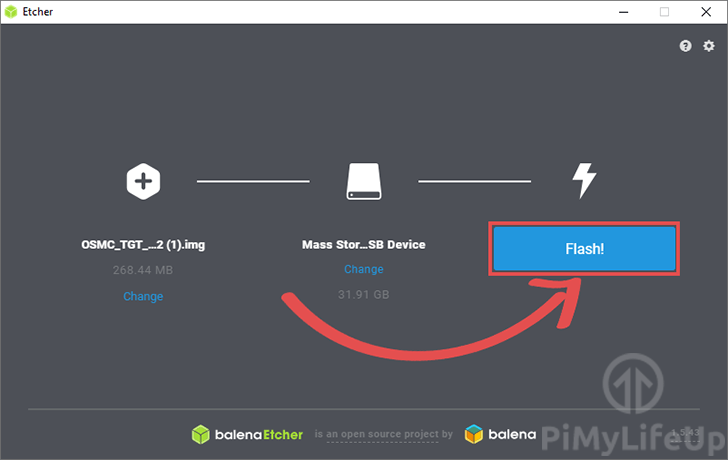
6. Finally, write OSMC to the Raspberry Pi’s SD Card click the “Flash!” button.
Clicking the button will start the flashing process. This process can take some time to complete.
7. Once your software has finished writing the OSMC image to your SD card, take it out and insert it into your device.
Initial Setup of OSMC on the Raspberry Pi
Now that we have installed OSMC to an SD card, we will walk you through the process of its initial set up process.
1. On the initial startup of the OSMC, you will be greeted by the following screen.
Please wait until the setup process has been completed before proceeding on with our OSMC setup guide.

2. Now, you will be first asked to select a language for the OSMC installation to use.

Select one from the numerous options to proceed.
3. With a language selected for OSMC, you will be asked to confirm it.
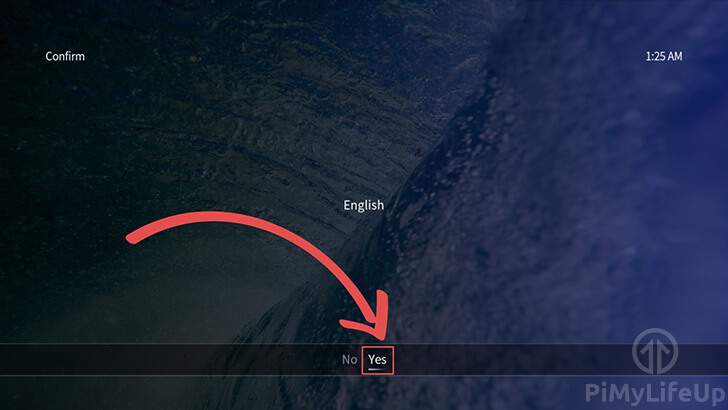
Select “Yes” to continue with the setup process.
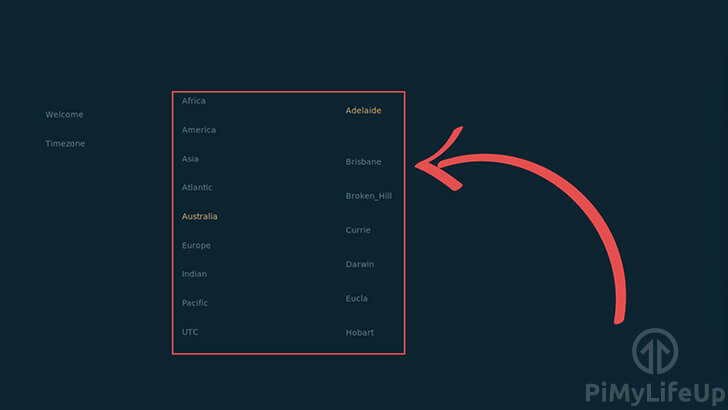
4. Next, you will be asked to select the time zone you want to utilize for your Raspberry Pi OSMC installation.
Make sure you select the relevant time zone for where you live, which will help ensure the time is correct.
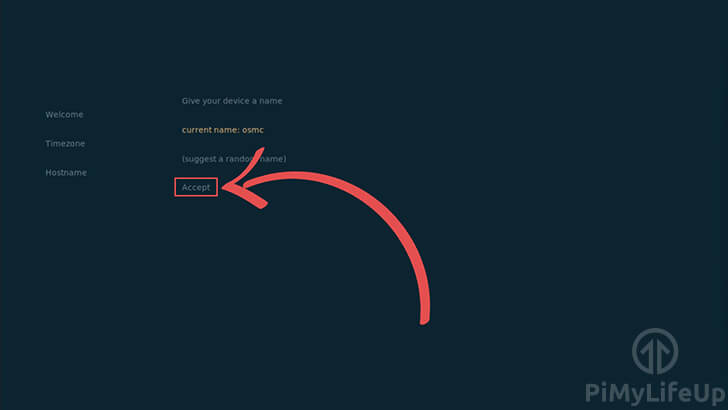
5. In the step below, you will be asked if you want to give your device a name. The name given to your device by default is “osmc“.
If you are happy with the default setting, you can select the “Accept” option to continue.
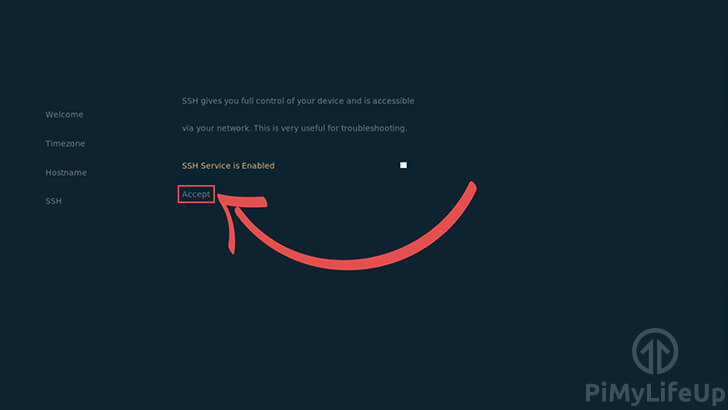
6. This section will allow you to disable or enable the SSH service.
By default, SSH will be enabled by OSMC’s setup tool.
Select “Accept” to proceed on with the installation process.
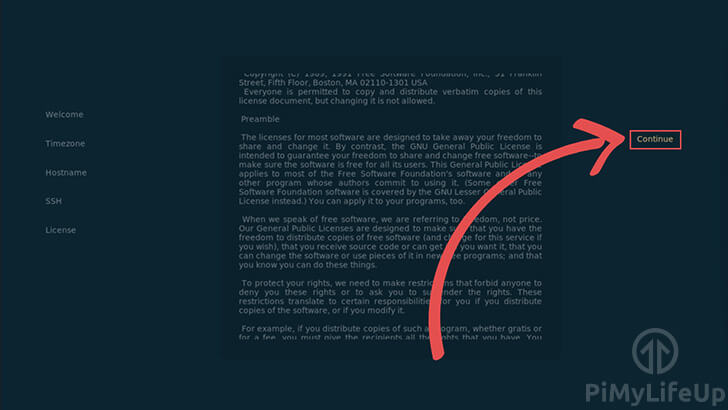
7. You will now be asked to agree to both OSMC’s and Kodi’s terms and conditions.
Once you have read through the licensing and are happy to agree with it, select the “Continue” option on the left of the screen.
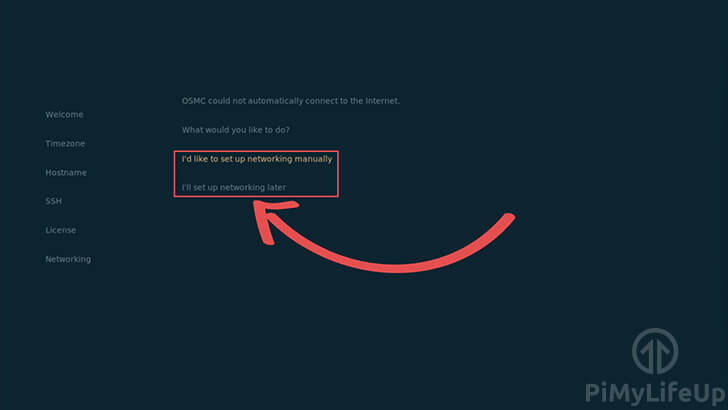
8. You will now be asked if you want to set up networking.
If you are not ready to set up the network yet, you can still set it up later within the “My OSMC” submenu of OSMC’s Kodi installation.
As we intend to go through the process later on in the guide, we will be selecting the “I’ll set up networking later” option.
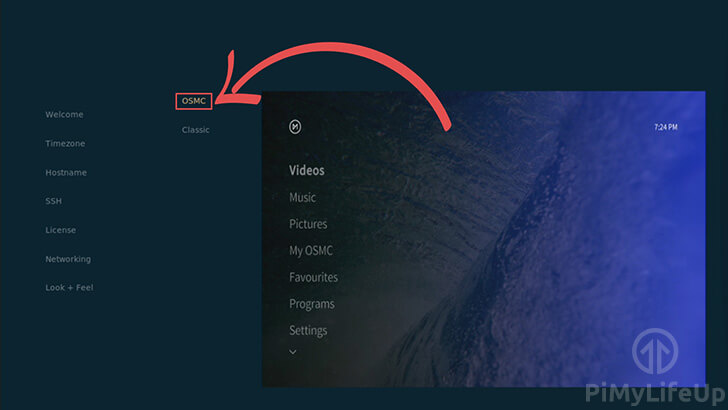
9. Next, you will be asked what theme you want to use.
For this guide, we will be sticking with the default “OSMC” theme.
If you prefer the default look of Kodi, you can select the “Classic” option. If you choose the classic theme, you should still be able to go through the rest of the guide smoothly.
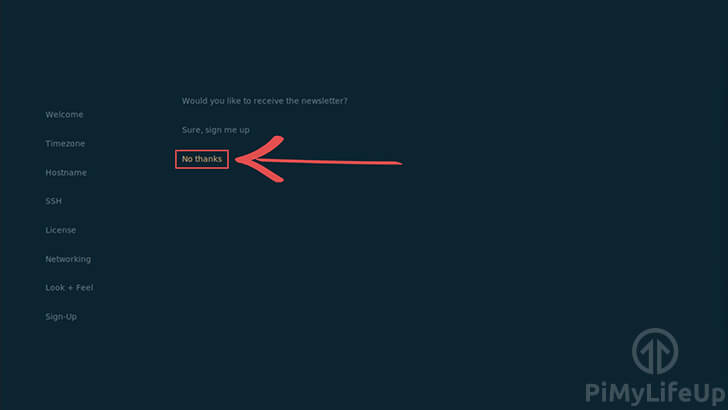
10. Now, you will be asked if you want to sign up for OSMC’s newsletter.
For this guide, we are just going to go with the “No thanks” option to proceed.
11. At this point, you will now have finally finished the initial configuration process of OSMC on your Raspberry Pi.
You can select the “Exit” option to bring yourself to the main Kodi screen.

Configuring Network Settings in OSMC
In this section, we will show you how to use the OSMC interface to configure network settings for your device.
1. As we are using the OSMC distribution for this guide, the process of configuring your Raspberry Pi’s network settings is greatly simplified.
To access the network configuration tool, you must first go to the “My OSMC” menu.
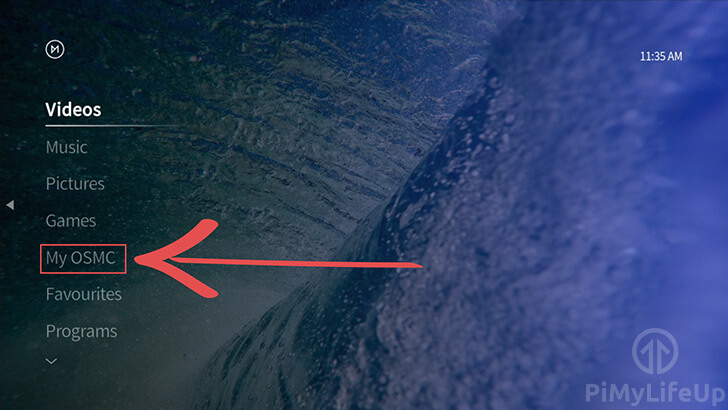
2. Now, within the “My OSMC” menu, you need to select the icon at the bottom of the wheel. This item is the “Network configuration” menu.
You will notice there are several other items on this menu. It is well worth exploring the different options within this menu to help you configure OSMC on your Raspberry Pi.

3. Within the network configuration tool, you can control settings for “Wired“, “Wireless“, and “Bluetooth” adapters.
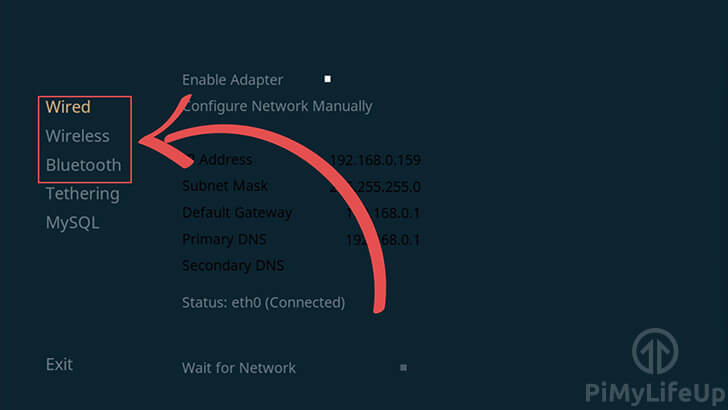
You can configure your connection to your Wi-Fi network within this menu.
Adding Videos for OSMC to Scrape
In this section, we will show you how to add your video folders for OSMC to scrape.
Scraping videos is a fairly straightforward process and is one of the key features of Kodi.
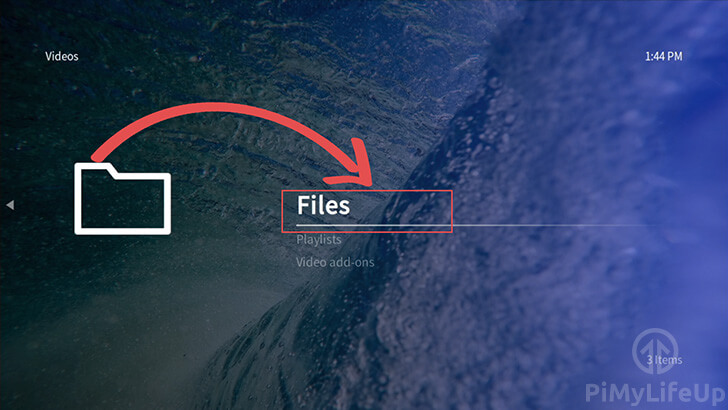
1. Firstly, we need to go to the videos menu.

2. Secondly, we need to select the “Files” submenu.
This submenu will allow you to browse already imported folders or add additional ones.
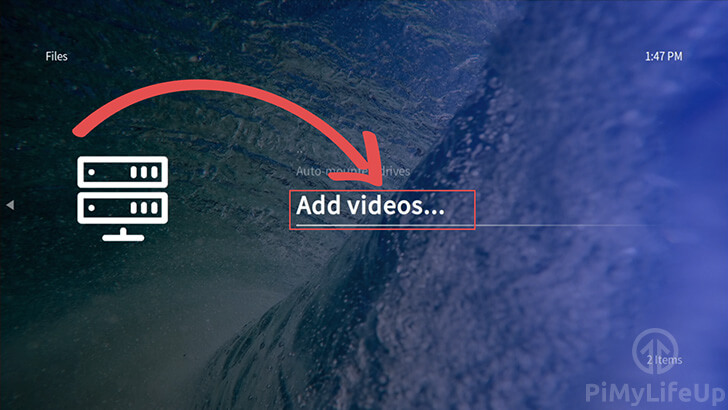
3. Next, select the “Add videos…” option.
This option is where we will add folders for OSMC’s Kodi installation to scan into its library.
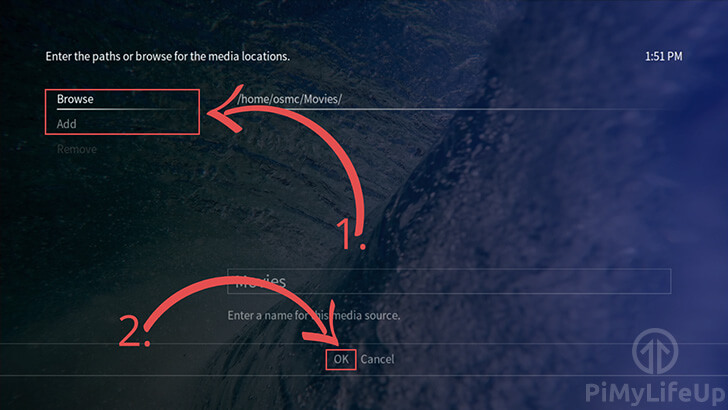
4. Within this menu, you will need to select either the “Browse” or “Add” options (1.).
The “Browse” option will allow you to locate the folders through OSMC’s file browser. The “Add” option will have you enter the path to your directory manually.
Whichever route you go, select the folder where your TV shows or movies are located, then select “Ok” (2.) to proceed.
One thing to note is that you should make sure both your movies and TV shows are split into separate folders.
This is because Kodi’s scrapers will not be able to differentiate between them if they are contained within the same folder.
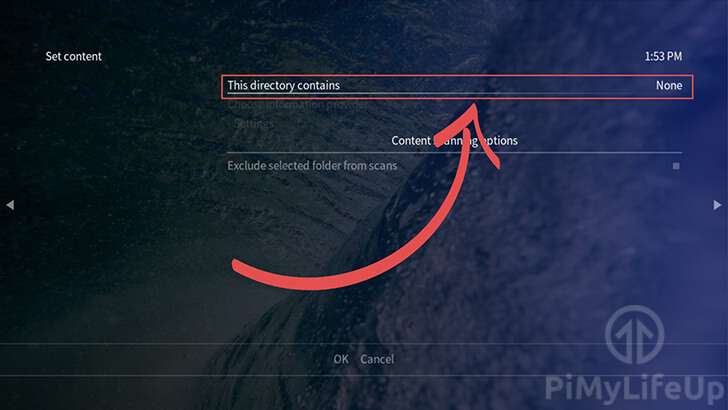
5. On this screen, you need to start by selecting the “This directory contains” option.
This option will allow us to choose what type of videos are in this directory.
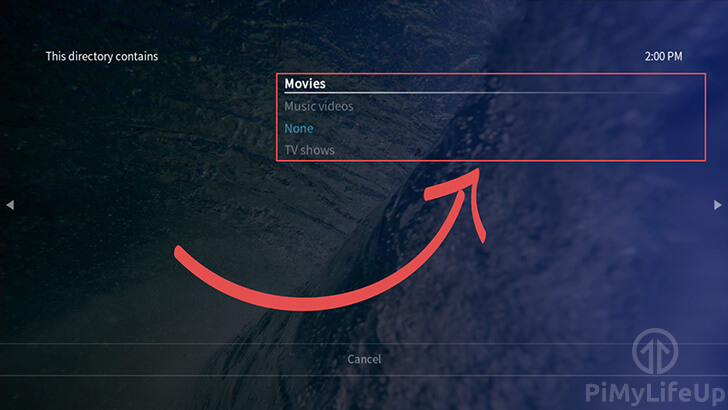
6. You will be asked to select what sort of videos reside in this folder.
OSMC separates videos into three separate categories, “Movies“, “Music videos” and “TV shows“.
Select the option that is most relevant for your videos. The option you select will affect how OSMC scrapes the videos for information.
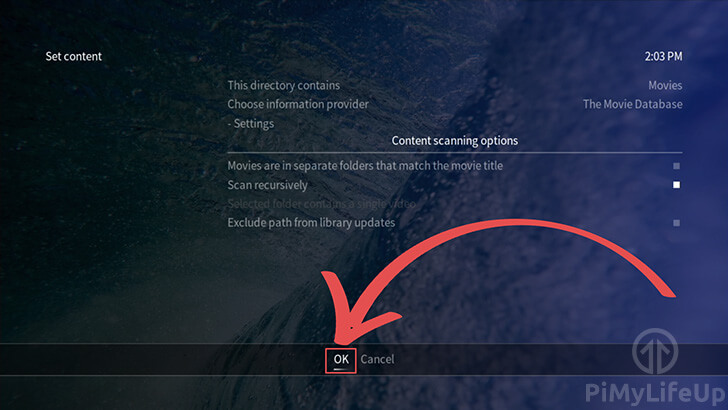
7. Once you have selected the type of media the directory contains, you can now select “Ok“.
OSMC will automatically select a known good “Information provider” that it will use to scrape your library.
OSMC scans your videos and searches their name within databases on the internet. This scan allows it to retrieve things like posters, actors, information, and other interesting information about your videos.
Once you select Ok, the scraping process should automatically start. You should start seeing your movies or tv shows added to the OSMC interface.
Hopefully, by this point, you will now have a good idea of how to use the OSMC Kodi distribution on your Raspberry Pi.
You can expand the functionality of your OSMC installation further by setting up Netflix.
It is also easy to connect a remote control thanks to the solid backend Kodi provides.
If you have any feedback, suggestions, or anything else, please don’t hesitate to comment below.


Excelente as usual.
Congratulations on a clear set of instructions for installing the great OSMC on a Pi. I have been using OSMC on a Pi3 or Pi2 for a number of years. The Pi3 died when I attached a fan to the pins when it was running 🙁 HDMI from the Pi2 to a Sanyo projector works fine. I also have Kodi on a Pi4. Using Etcher was a great simplification to using the command line “dd” instruction. I have not used the OSMC Add Videos feature but your instructions tempt me to give it go. Congratulations also to Sam.