In this guide, we are going to show you how you can watch Netflix on Kodi.

Netflix is one of the most popular streaming services globally, with it boasting numerous critically acclaimed TV shows and movies.
Despite Netflix’s popularity, it does not have any official support for Kodi.
Our solution is to use a 3rd party plugin that allows you to watch your Netflix tv shows and movies within the Kodi interface.
To get Netflix working on Kodi, you will need to be using version 18 (Leia) or newer. The reason for this is that the plugin makes use of the Adaptive input stream functionality that was implemented relatively recently.
This Netflix plugin for Kodi is developed over at the CatagnaIT repository.
The plugin that we will be using works on Windows, Linux, macOS, and Android operating systems. Some operating systems require additional dependencies to be installed before the plugin will function.
If you wanted to get Netflix on your Raspberry Pi, be sure to check out our specific guide on that. That guide will also work on the popular Kodi distribution, OSMC.
Installing the Required Dependencies on Linux
If you are running a Linux distribution, we may have to install some additional packages before getting the Netflix plugin to work.
From this point on, we will be assuming that you are using a distribution such as Ubuntu that uses the apt package manager.
These same steps should work with other package managers. You will just need to swap out the apt commands with the relevant ones for your system.
1. To ensure the next couple of steps go smoothly, let us first update the package list and upgrade any existing packages.
We can achieve this by running the following two commands within the terminal of your device.
sudo apt update
sudo apt upgradeCopy
2. Let us now install all of the packages that we need for the Netflix add-on to work.
All of these packages are required so that we can download the two Python packages we need.
sudo apt install build-essential python-pip python-dev python-setuptools libffi-dev libssl-dev libnss3Copy3. Now that we have Python and the pip package manager installed, we can now install the dependencies required to run the Netflix add-on for Kodi.
To install the Python packages that we require, run the following command on your device.
sudo pip install setuptools wheel
sudo pip install pycryptodomex win_inet_ptonCopy
4. Now that we have all the dependencies installed, we can now install the Netflix add-on to Kodi.
Download the Netflix Add-on Repository for Kodi
Before we can install the Netflix add-on to Kodi, we should first add its repository.
The advantage of adding the repository is that your Kodi media center will automatically update the Netflix add-on.
However, before we can add the repository, we need to download the archive file that contains all of its information. Kodi will read in this information to know where to check for add-on updates to the Netflix plugin.
If you are using a system where you have a GUI such as Windows or the desktop version of Ubuntu, you can download these by browsing to the URLs provided.
CastagnaIT Repository for Kodi 18.x (Leia)
Leia is the current release of Kodi. This is the download most people should be using when installing the add-on repository.
Downloading through a Web Browser
In your favorite web browser, click the following button to download the 18.x version of the add-on repository.
Download CastagnaIT Repository for Kodi 18.x (Leia)
Make sure you download this file to a location that’s easily browsable to. Doing this will make your life easier in the next section.
Alternatively, you can download this repository plugin to a USB drive and then plug it into your Kodi media center.
Downloading through the Terminal
In some cases, you may not have access to a web browser on your Kodi media center. For example, if you are using an operating system such as Ubuntu server that features no GUI.
To get around this, we can instead make use of the terminal to download the repository instead.
wget https://github.com/castagnait/repository.castagnait/raw/master/repository.castagnait-1.0.1.zipCopyYou should pay attention to where this file is downloaded to as you will need to find it again shortly.
CastagnaIT Repository for Kodi 19.x (Matrix)
Matrix is the upcoming version of Kodi that is currently in testing. These builds could potentially be unstable due to the nature of pre-release software.
Downloading Through a Web Browser
On your device, open up a web browser and click through the button below to download the 19.x version of the CastagnaIT repository.
Download CastagnaIT Repository for Kodi 19.x (Matrix)
When you download this file, make sure it gets saved to an easily accessible location for the Kodi file manager.
Suppose you would prefer to download the repository archive from a separate device. In that case, you can save it to a USB drive and plug that into your Kodi media center.
Downloading through the terminal
There are times where you may not have access to a web browser on your device.
To get around this, you can utilize your system’s terminal to download the repository using a tool such as wget.
For example, you can use the following command to download the 19.x (Matrix) version of the repository to your device.
wget https://github.com/castagnait/repository.castagnait/raw/matrix/repository.castagnait-1.0.0.zipCopyPlease pay attention to the directory you are in when you run this command, as you will need to browse to it in the next section.
Allowing Unknown Sources in Kodi
Before we can add our new Netflix repository to Kodi, you will need to allow unknown sources.
By default, Kodi blocks any addons from being installed that isn’t from their official repositories.
1. Now, start Kodi on your device to proceed with this guide on watching Netflix.
Please note that this tutorial will assume that you are using the default Kodi theme. The placement of settings shouldn’t be too different if you are using an alternative theme.
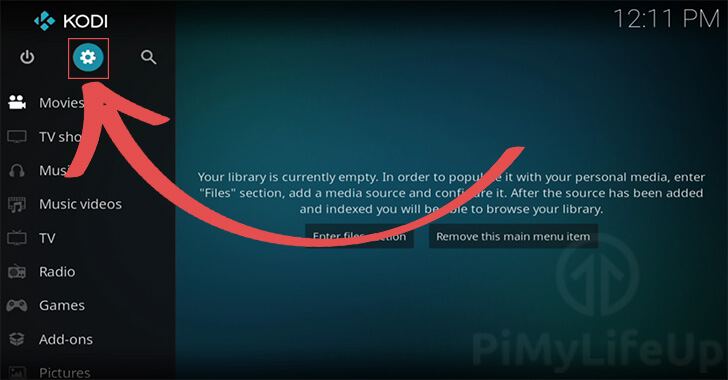
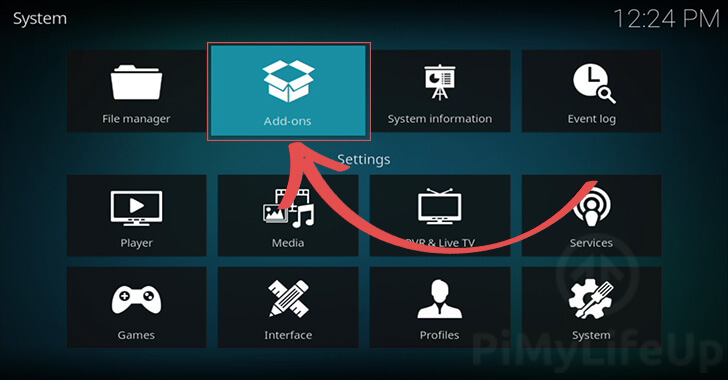
2. With Kodi open on your media center, you will need first go to the settings menu.
You can get to this by selecting the cog in the top-left corner, as shown in the screenshot below.
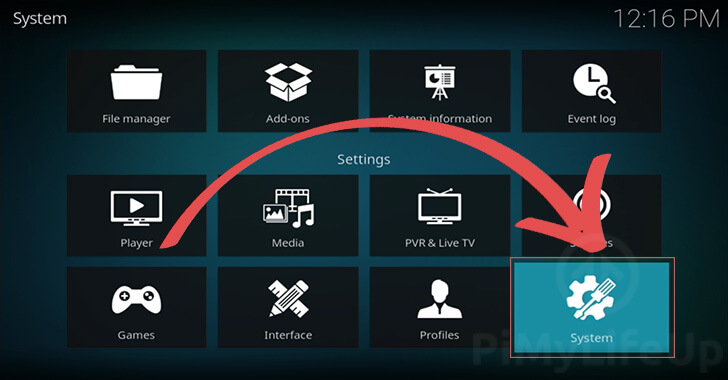
3. On this screen, you need to find and select the “System” option.
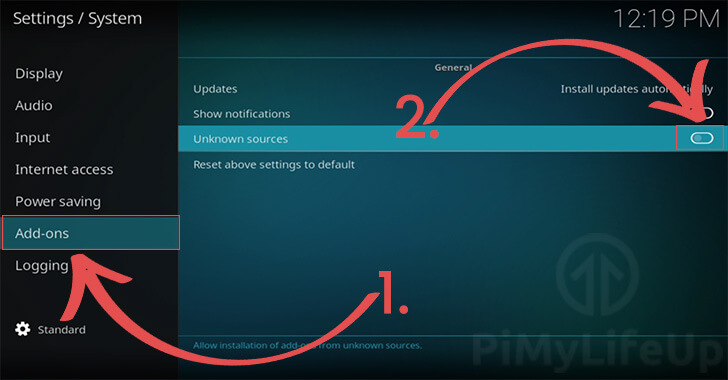
4. Within the settings page, you need to switch to the “Add-ons” sub-menu (1.)
Once on this page, you need to select the “Unknown Sources” option and toggle it on. (2.)
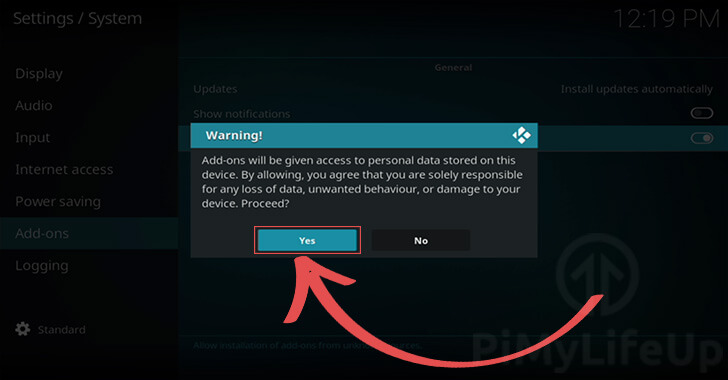
5. You will see a warning about installing addons from unknown sources and how they could affect your system.
As we want to install the Netflix addon for Kodi, you will need to select the Yes button.
Enabling the CastagnaIT Repository
Now that we have enabled add-ons from unknown repositories, we can add the CastagnaIT repo add-on we downloaded earlier in this guide.
This repository is the one where we will be installing the Kodi Netflix addon from.
1. To add this repository, we need to return to the main settings page.
If you are back on Kodi’s main menu again, you can find this by selecting the cog, as shown in the screenshot below.
2. On this settings page, you need to go to the “Addons” option.
The addons page is what will allow us to install the repository, and later the Netflix addon.
3. As we downloaded the repository archive already, we need to select the “Install addon from zip” option.
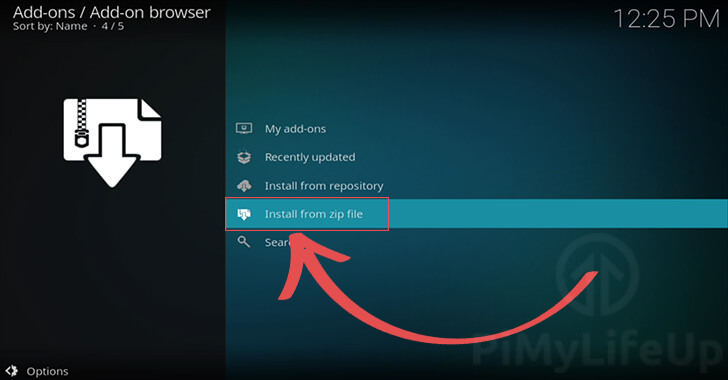
4. Clicking the option will bring up a file dialog.
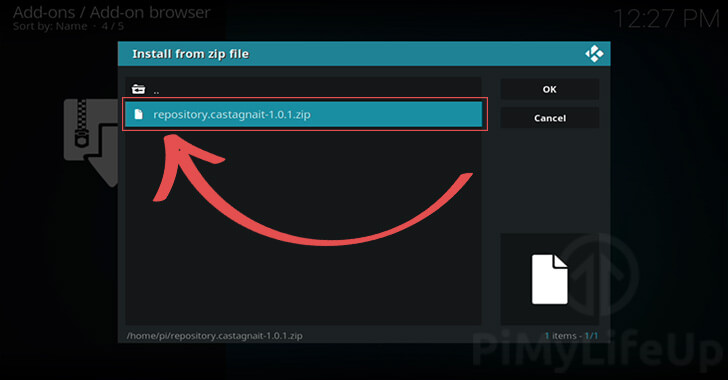
Use this file dialog to browse your system until you find the zip archive you downloaded earlier in this guide.
In our case, this file is called “repository-castagnait-1.0.1.zip“, once found select it to install the repository.
Installing the Netflix Addon for Kodi
With the repository added to Kodi, we can finally proceed to install the Netflix addon for Kodi.
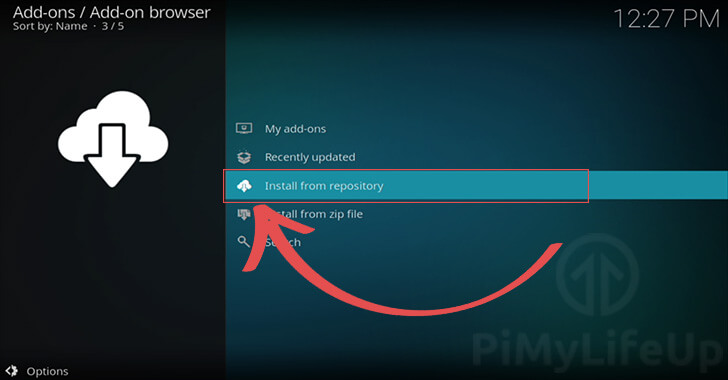
1. First, return to the addons page within Kodi.
Once you are in the right menu, you will need to select the “Install from repository” option.
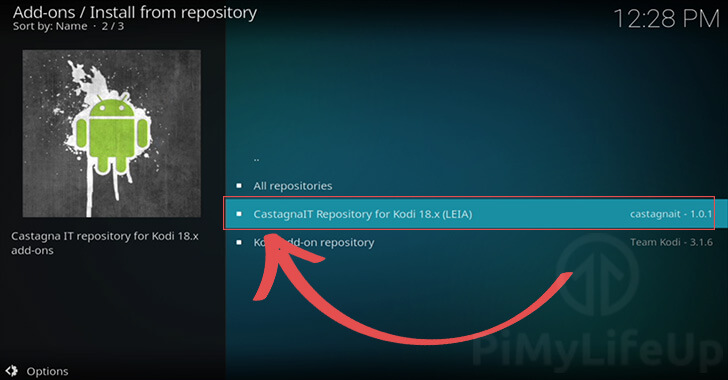
2. Select the CastagnaIT repository that we installed in the previous section.
This repository should be labeled as something like “CatagnaIT Repository for Kodi 18.x (LEIA)“.
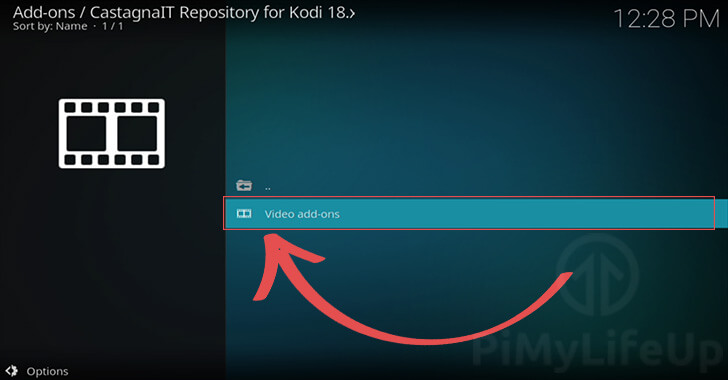
3. Next, move into the Video Add-on category.
This category is where we will find the Netflix add-on for Kodi.
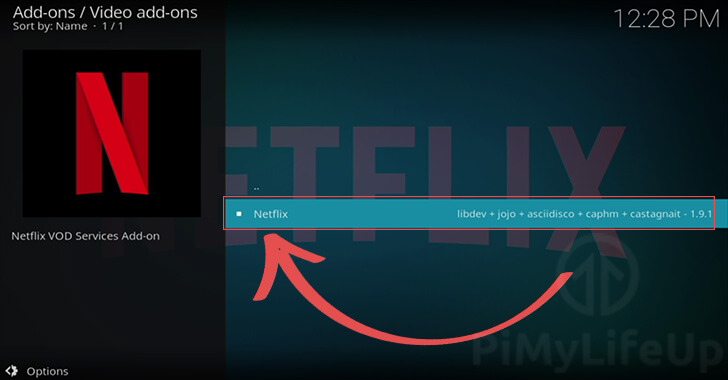
4. Within this category, you should see the Netflix add-on as an option.
Select the Netflix addon to proceed with this guide.
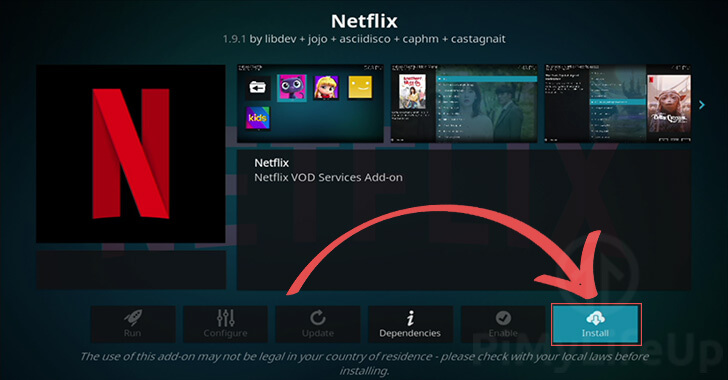
5. Within this menu, we can finally install the Netflix addon to Kodi.
Select the “Install” option at the bottom of the screen to begin installing the Kodi addon.
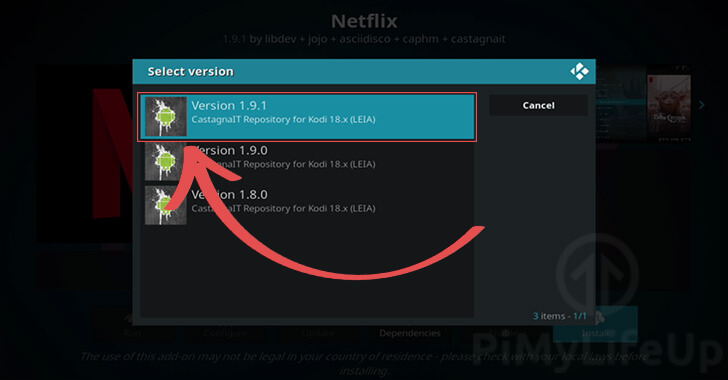
6. You may now be greeted with a box asking you to select the version of the addon you want to select.
Select the latest available version of the Netflix Kodi addon. At the time of writing this tutorial, the latest version was 1.9.1.
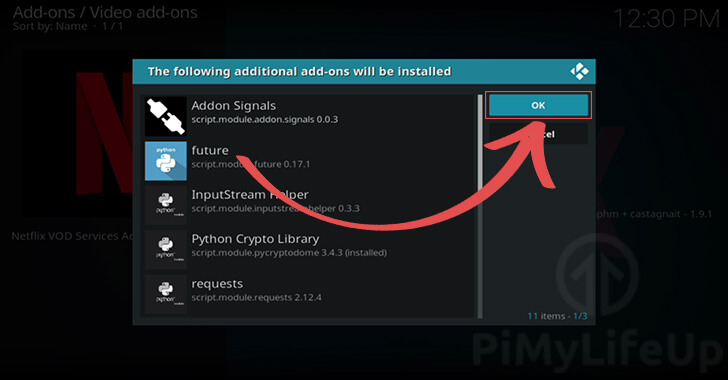
7. Before continuing, Kodi will show you a list of additional add-ons that will be installed as well.
As the Netflix add-on requires these to operate, you will need to select the “OK” button to continue.
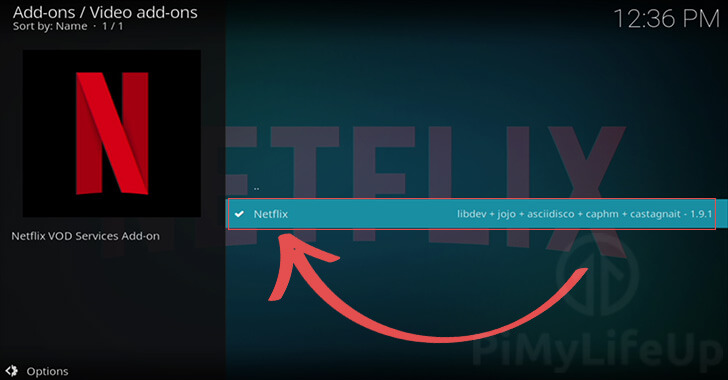
8. Kodi will now download and install the Netflix addon and all of its dependencies to your media center.
Once Kodi has finished the installation process, you should see a tick next to the Netflix addon.
Logging in to the Netflix Addon on Kodi
Now that you have installed the Netflix addon to Kodi, you can now login to your account.
There are two separate ways to login to your account that we will explain later in this section.
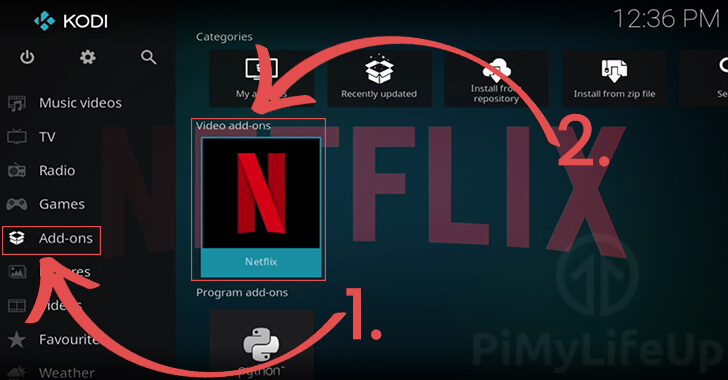
1. On Kodi’s main screen, change to the “Add-ons” menu using the sidebar (1.).
Once you get to the correct page, you should see the “Netflix” add-on under the “Video add-ons” section (2.).
Once selected, open the Netflix add-on.
2. When you first run the Netflix add-on, you will be asked to enable the adaptive input stream functionality.
As the Netflix add-on relies on Kodi’s adaptive input stream functionality to work, you will need to select the “Yes” option to proceed.
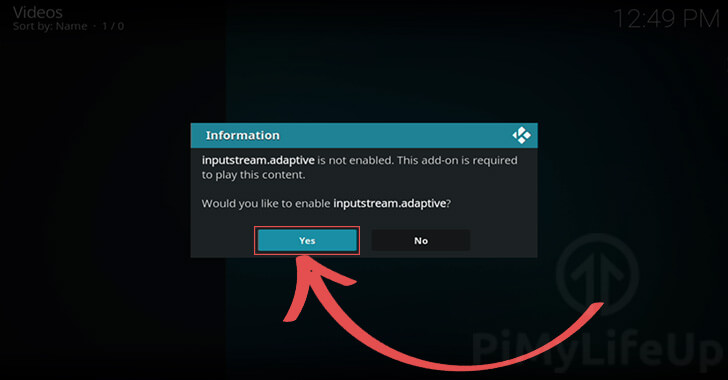
If you don’t see this message, likely, the functionality has already been enabled on your Kodi media center.
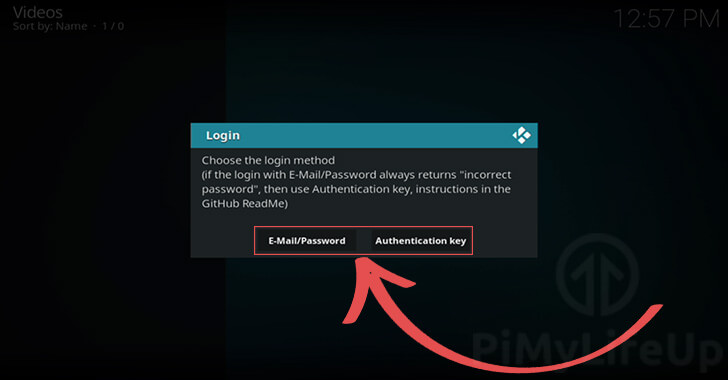
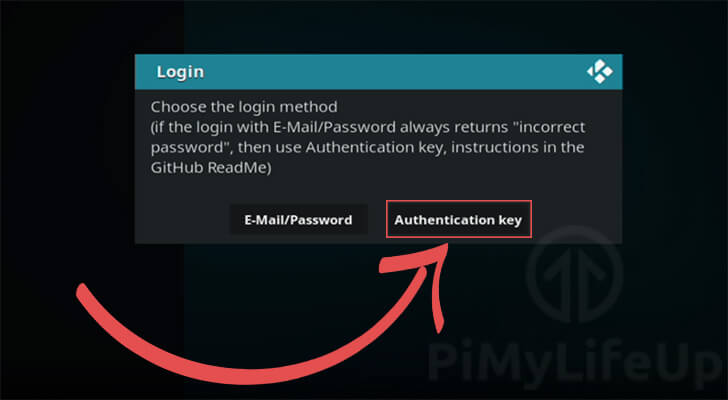
3. You will now be given a choice in the way you want to login to Netflix within Kodi.
The first of these methods is to use your email and password to login. While this is the easiest way of logging into your account, recent Netflix changes have made this method somewhat unreliable.
As an alternative, you can generate an authentication key to login to the Netflix addon.
This process requires a few extra steps and needs you to have access to the Chrome web browser on a system. This system doesn’t need to be the same as your Kodi media center.
While more work, the authentication key is currently the most reliable method for logging in to Netflix from within Kodi.
Logging in using your Email and Password
This section will run you through the simple process of logging in to Netflix using your email and password.
This method is the simplest and means you only need to know your Netflix account’s password and email.
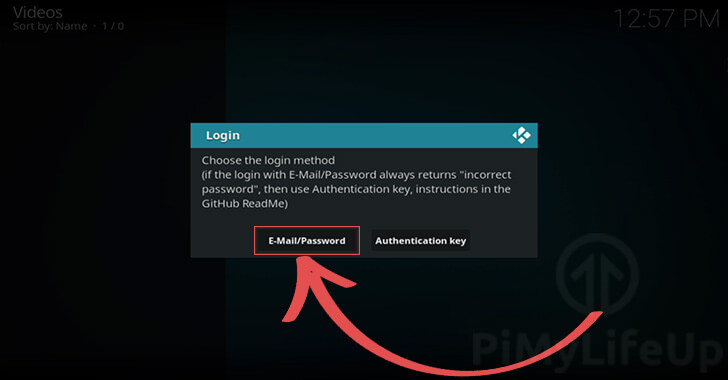
1. When prompted for the login method, make sure you select the “E-Mail/Password” button.
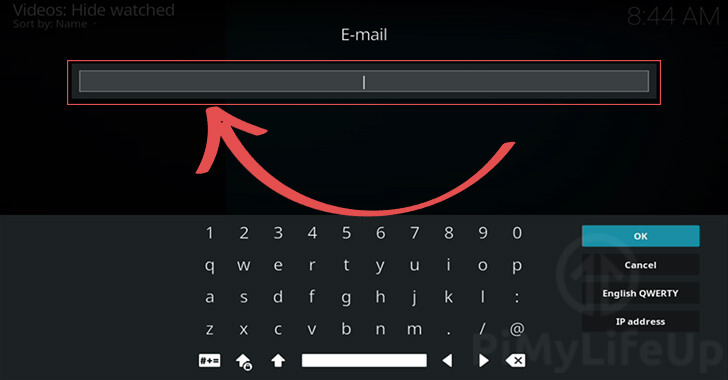
2. First, you need to enter the email for your Netflix account.
You can either use a keyboard or the provided interface to type in the email.
3. Next, type in the password for your account.
Be careful when typing in your password as you will have to restart the login process if you get this incorrect.
4. Hopefully, everything has gone well, and you are now successfully logged in to your Netflix account on Kodi.
Sadly there is a chance that you received an error about having an incorrect password despite entering your password correctly.
To solve this, you will need to use the authentication key method below.

If you managed to login successfully, there is still an additional error that you may experience.
If there is an addon error saying “Addon Signals Call Timeout” you need to skip to our “Dealing with the Addon Signals Call Timeout Error” section.
Logging in using the Authentication Key
This section will show you the process of logging into your Netflix account using an authentication key.
We will split this into two sections as we will have to generate the authentication key before we can login.
1 – Generating the Authentication Key
Before we can login using this method, we will need to generate the authentication key for Netflix.
For these steps to work, you will need access to a computer that can install the Chrome web browser, whether that be a Windows or Linux based system.
A – Generating the Netflix Authentication Key on Windows
On Windows, we will be using a simple program designed to talk with the Chrome web browser to generate the authentication key we need.
For this program to work, you will need to have the Chrome browser installed on your Windows system. This program works by talking with the web browser to retrieve the information it needs.
Additionally, you can not have any tabs opened in Chrome while this tool runs.
This tool was written by the same team who wrote the Netflix addon for Kodi. If you want to see how this program works, check out the GitHub repository for the NFAuthenticationKey program.
1. Our first task is to download the NFAuthentication Key program we need to generate the data we need.
You will find the download link on this page under the “For Windows” header.
After this download, you should have a zip file called “NFAuthenticationKey_Windows_1.0.2.0.zip” on your device.
Once downloaded, you should have a zip archive on your device called “NFAuthenticationKey_Windows_1.0.2.0.zip“.
2. Extract the folder from the archive that you downloaded in the previous step.
Within this folder, you should find an executable called “NFAuthenticationKey.exe.
You will need to run this executable as it is the program that will generate the key we need.
3. Upon opening this program, you will see some instructions on how it works.
To start the key generation process, you need to click the “Start” button.
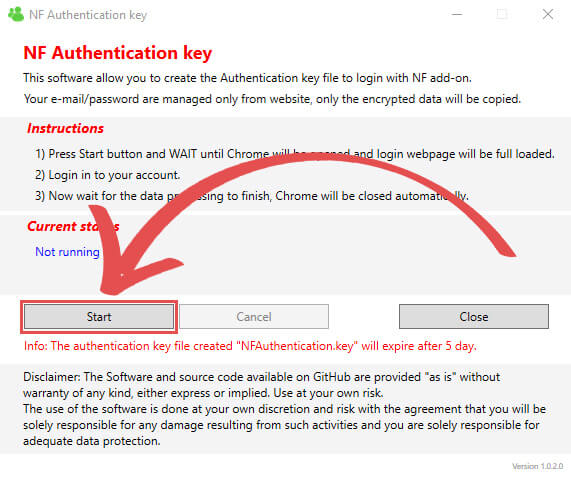
Please note for this tool to work, Chrome must be completely closed before starting.
4. You should now have a Chrome web browser open on your device.
Wait patiently for the software to redirect you to the Netflix login screen automatically.
If the software does not automatically redirect you, click the “Cancel” button and try again.
5. Once the Netflix login page appears, login to the account you want to use with Kodi.
Once you have logged in, please sit back and wait for the software to generate the keys it requires.
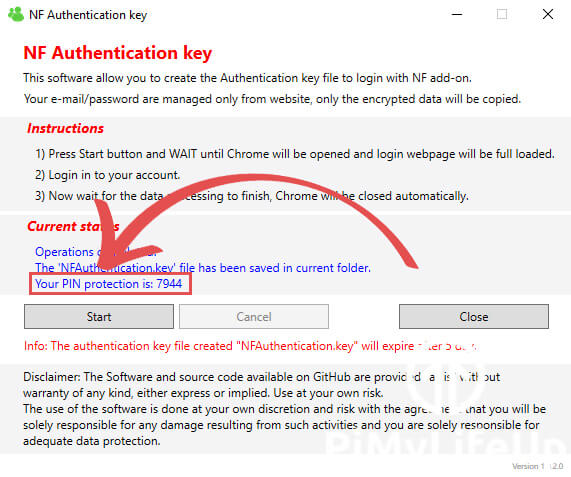
6. Once the Netflix authentication key has been generated, the software will automatically close out of the Chrome browser.
You should now have a file called “NFAuthentication.key” within the same directory as the program.
To use this file within Kodi, you will need to note the four-digit pin (Eg. 1234) code, as highlighted in the screenshot below.
7. Make sure you copy the key file over to your Kodi media center.
You can even copy this key to a USB drive and access it through that.
B – Generating the Netflix Authentication Key on Linux
This section will show you how to generate the Netflix authentication key on a Linux-based operating system.
This process is relatively simple; however, it requires you to have Chrome or Chromium installed as well as Python 3.
For this guide, our steps will be written based on operating systems that use the apt package manage (In this case, Ubuntu).
You may have to adjust these slightly for other Linux based operating systems.
1. On your Linux system, open up a terminal session. In some cases, you can use the following keyboard combination to open the terminal, CTRL + ALT + T.
We will use this terminal to install some additional packages to generate the NFAuthentication key that we need.
2. Our first step is to install Python 3 and a variety of dependencies that we need for the Python packages.
To install these packages, run the following command on your Linux device.
sudo apt install build-essential python3-pip python3-dev libffi-dev libssl-dev libnss3Copy3. Next, we need to install two Python packages using pip.
The script relies on these two packages to interact with the Chrome browser and to generate the script.
pip3 install pycryptodomex
pip3 install websocket-clientCopy
4. We can now use wget to download the Python script from CastagnaIT’s NFAuthentication repository to the device.
wget https://raw.githubusercontent.com/CastagnaIT/NFAuthenticationKey/linux/NFAuthenticationKey.pyCopy5. Now that we have the Python script downloaded to the device we can run it.
Before running this script, make sure that you have Chrome completely closed on your Linux device.
Once you are ready, run the following command to start the script.
python3 NFAuthenticationKey.pyCopy6. Follow the prompts displayed by the script to generate the NFAuthentication key.
During this process, you will be required to login to your Netflix account.
7. Once the script has finished running, you should end up with a file called “NFAuthentication.key” in the same directory as the script.
You should also see a PIN presented to you. You will need to know this PIN when you go to make use of the file.
If you want, you can use the ls command to list the files present in the current working directory.
ls -lCopy8. Your final task is to copy the “NFAuthentication.key” file from your Linux device to your Kodi media center.
Wherever you place it, make sure its an easy place for the Kodi software to find it.
2 – Using the Authentication Key to Login to Netflix on Kodi
This section will show you how to use your newly generated authentication key to login to Netflix on Kodi.
1. When you are prompted for the login method, make sure you select the “Authentication key” button.
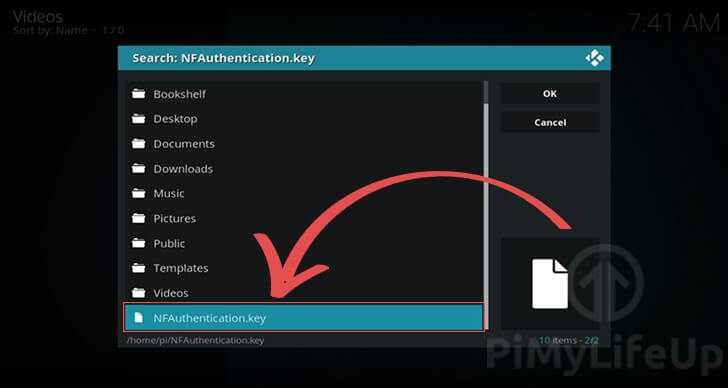
2. You will now be shown a file dialog.
Use this file dialog to browse to the location of the Netflix authentication key that you generated.
To make this process easier, we saved our authentication key to our home directory to find it reasonably easy.
Once you have found and highlighted the file, use the ENTER key to select it.
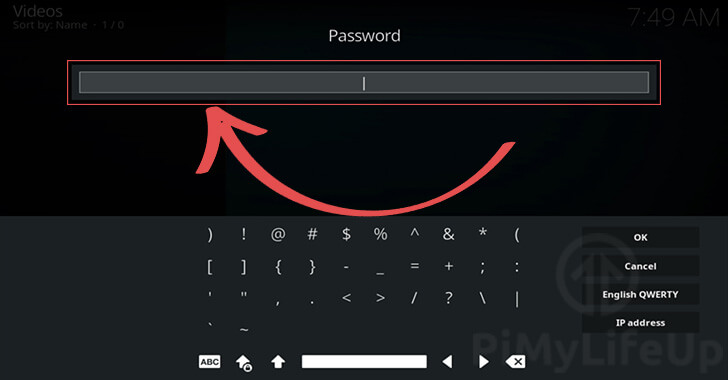
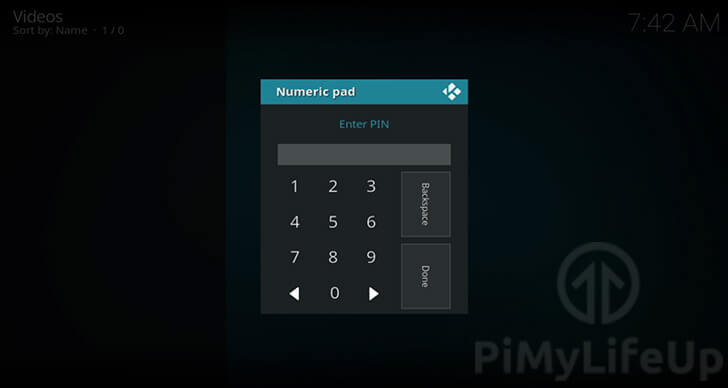
3. Before the Netflix for Kodi addon will utilize this file, you will need to enter the PIN that was generated alongside the file.
You can use the interface provided to you to type in the PIN for the file.
Once you have typed in your PIN, you can either press the ENTER key or click the “Done” button.
4. Lastly, you will be required to enter the password for the Netflix account your trying to login to.
This is the final part of the logging in process, so use the provided dialog box or your keyboard to enter the password.

5. At this point, you should hopefully be logged into Netflix within Kodi.
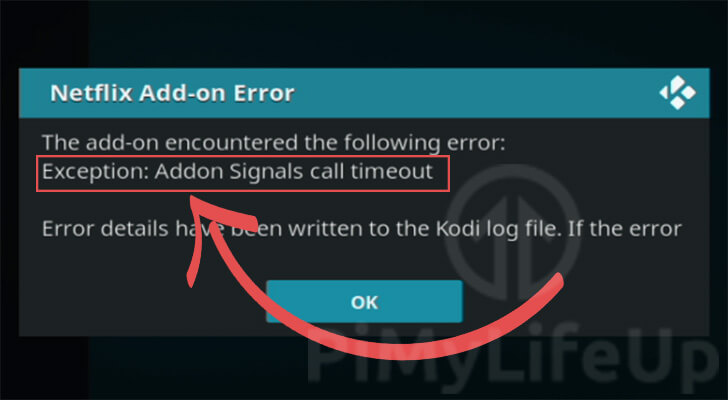
If you run into an error saying “Addon Signals Call Timeout” as we have shown below, be sure to continue to the next section.
Dealing with the Addon Signals Call Timeout Error
This section will show you how to deal with the “Addon Signals Call Timeout” error that you may experience when running the Netflix addon.
If you are not experiencing any such errors, you can safely skip to our “First run of Netflix on Kodi” section.
1. To deal with this error, we will need to go to the Netflix add-on settings.
From the main Kodi menu, click the cog in the sidebar to get to Kodi’s settings page.
2. Within this page, we need to select the “Add-ons” option.
The add-on settings will allow us to to get the configuration page for the Netflix add-on
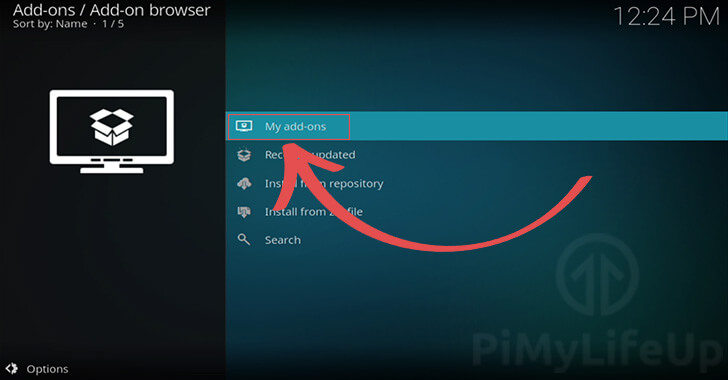
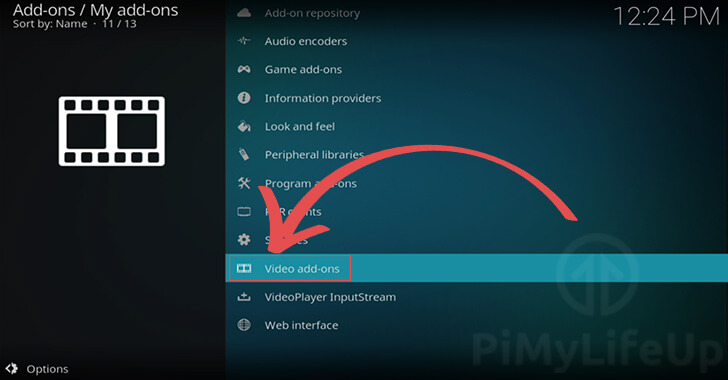
3. Within the Add-on settings, you need to go to the “My Addons” section.
4. Scroll down till you see the “Video Add-ons” category and select it.
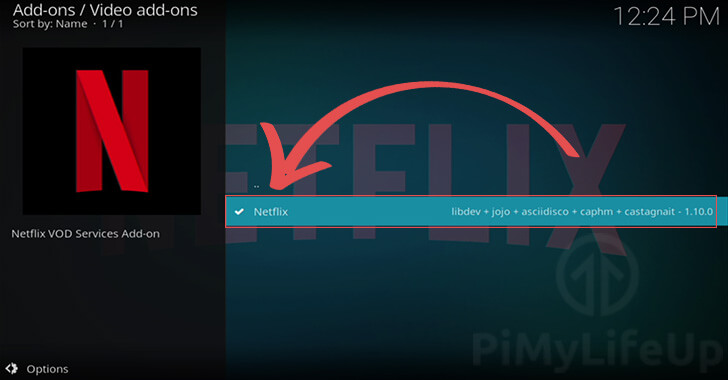
5. Within this category, you need to select the Netflix addon, as we have below.
Selecting the addon will give us a range of options, including the ability to configure the addon.
6. Within the Netflix addon page in Kodi, find the “Configure” option on the bottom bar and select it.

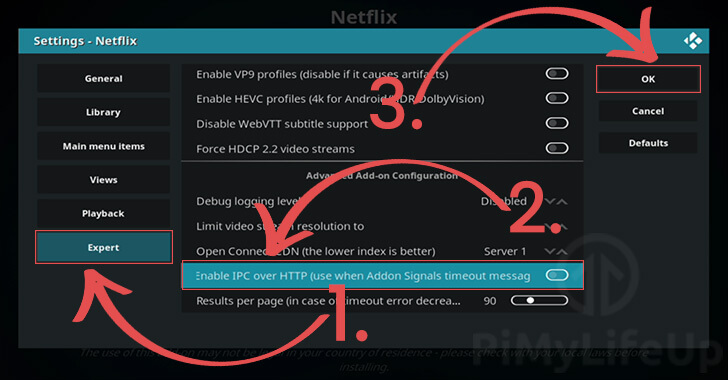
7. First change to the “Expert” page on the left sidebar (1.).
Within this set of options, scroll down till you find the “Enable IPC over HTTP” option and toggle it on (2.).
Once you have enabled that option, you can confirm your settings change by clicking the “OK” button (3.).
8. You should now be able to continue using the Netflix addon for Kodi without any issues.
First Run of Netflix on Kodi
Now that you have hopefully successfully logged into Netflix, you can now run your first movie or TV show.
There is one last process you will need to follow before your TV show or movie will play. The reason for this is that the Kodi addon needs to access the Widevine CDM modules. Widevine is one of the DRM modules that Netflix requires.
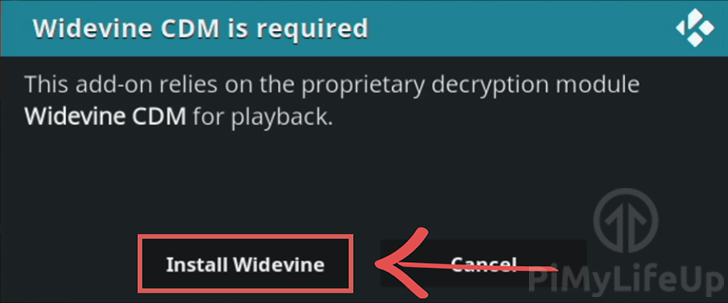
1. When you first play something using the Netflix for Kodi add-on, it will tell you that the “Widevine CDM is required“.
As we require this file to play anything from Netflix, you need to click the “Install Widevine” button.
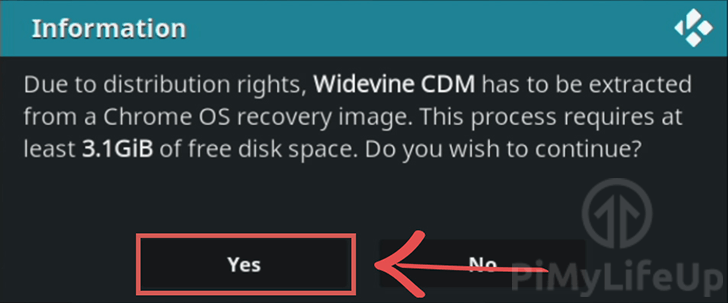
2. The next notification will tell you that the Netflix addon needs to download the Chrome OS recovery image. To download this image, make sure that you have 3.1 GB free on your media center.
It will use this image to extract the relevant version of the Widevine CDM for your operating system.
For legal reasons, it is not possible to download the required DRM library by itself.
To continue with the process of running Netflix on Kodi, you need to click the “Yes button.
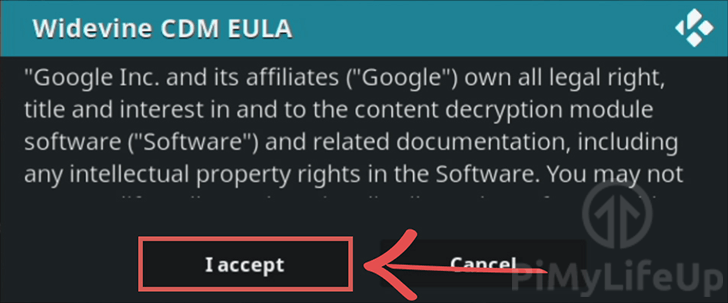
3. Before the Netflix add-on on Kodi can download the Chrome OS image, you will be required to agree to a EULA provided from Google.
To continue with the setup process, you need to click the “I Accept” button.
4. The final message you see will state that it may need to use certain tools with root permissions to extract the images.
To start the download and extraction process, you need to click the “I accept” button.

5. Now, all you have to do is wait for the download and extraction process to finish.
Depending on your network connection and device, this process can take some time.
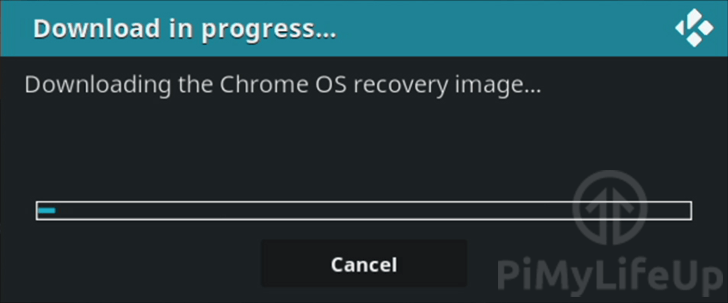
If the progress bar appears to be stuck, please be patient as the Netflix addon has to download, mount, and extract the files it needs.
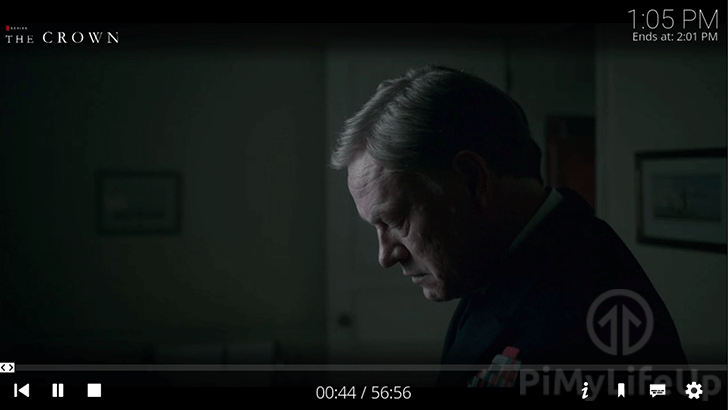
6. Once the Netflix addon for Kodi has finished extracting the Widevine CDM, you will now be able to start streaming any movie or tv show you want from the service.
We have included the following screenshot of us running the TV show “The Crown” on our Kodi media center. This TV series is exclusive to Netflix.
Hopefully, you will now have successfully gotten Netflix to work on your Kodi media center. You should now be able to stream your favorite Netflix TV shows and movies.
Please post a comment below if you ran in to any issues with getting the addon to work or have any feedback on this Netflix on Kodi guide.


The Ubuntu version does not work anymore. Is there a workaround? Thanks
Unfortunately, there isn’t any decent workaround that I’ve found that works directly in Kodi. Netflix seemed to have gone out of there way to break things.
If you aren’t locked into using Kodi, another solution would be to install Waydroid and use the Netflix app through that https://pimylifeup.com/ubuntu-waydroid/.
Kind regards,
Emmet