This tutorial will show you how you can set up an uptime monitor on your Raspberry Pi using the Uptime Kuma software.

Uptime Kuma is a free and open-source uptime monitor tool that you can easily install on a Raspberry Pi.
Using this software, you can measure the uptime and response time of various services.
Some of the services that Uptime Kuma can monitor are HTTP(s), TCP, PING, DNS Records, Steam Game Servers, Docker containers, and more.
If your Raspberry Pi detects an outage, Uptime Kuma can send a notification to various services. These services include Discord, Telegram, Slack, and Email.
Equipment
Below is a list of the equipment we used while setting up an uptime monitor on our Raspberry Pi.
Recommended
Optional
This tutorial was last tested on a Raspberry Pi 5 running the latest version of Raspberry Pi OS Bookworm.
Video
In the video below, we take you through all the steps of setting up Uptime Kuma on the Raspberry Pi. We also touch on setting up your first monitor and some of the settings that you can use to ensure the most reliable monitoring.
If you prefer written content, you can find the full tutorial immediately below the video.
Preparing your Raspberry Pi for the Uptime Monitor
Let us start by preparing our Raspberry Pi by installing all the software required to run Uptime Kuma. Luckily, the software has few requirements and is relatively straightforward to prepare for.
1. Before proceeding, we should ensure that we have an updated package list and upgrade any out-of-date packages.
Use the following two commands within the terminal to update your Raspberry Pi.
sudo apt update
sudo apt upgradeCopy
2. With our operating system up to date, you must install Docker on the Raspberry Pi OS. The process is straightforward and will not take too long to complete. We recommend following our guide to set up Docker correctly.
https://pimylifeup.com/raspberry-pi-docker/CopyYou can check whether Docker is installed by running the following command.
docker --versionCopy3. We will want to create a directory to store our compose files for the Uptime Kuma Docker. We recommend storing it within /opt/stacks/ directory, especially if you also plan on using Dockge.
sudo mkdir -p /opt/stacks/uptimekumaCopy5. Before we move to the next section, make sure you change the directory to our newly created directory.
cd /opt/stacks/uptimekumaCopy6. Once you have prepared the Raspberry Pi, you can continue to the next section of this tutorial.
Setting up Uptime Kuma on the Raspberry Pi
This section will show you how to install the Uptime Kuma software to the Raspberry Pi. Installing and setting up Uptime Kuma is a simple process thanks to some additional software we can utilize.
Setting up the Uptime Kuma Docker Compose File
7. We will now need to write the compose file for our Docker stack. Create and open the compose.yaml file by using the nano text editor or your preferred editor.
sudo nano compose.yamlCopy8. In this file, you will need to write a few lines, but they are very basic. We will also only be using a single service.
Copy the following code into the compose file. We briefly explain the code below the code block.
services:
  uptime-kuma:
    image: louislam/uptime-kuma:2
    volumes:
      - ./data:/app/data
      - /var/run/docker.sock:/var/run/docker.sock
    ports:
      - 3001:3001
    restart: unless-stoppedCopy
We first define the uptime-kuma service and set the image to point to the latest version of the Uptime Kma image.
Next, we define two different volumes. The first one will map the external data (/opt/stacks/uptimekuma/data) directory to the internal app/data directory. The second volume will allow Uptime Kuma access to the docker.sock file, which will allow Uptime Kuma to monitor other Docker services.
The port configuration will map the external port 3001 to the internal port 3001. You can change the external port if required; however, do not change the internal port. For example, the port format is as follows: external_port:internal_port.
Lastly, Docker will restart the service if it crashes or stops responding. If you manually stop the service, it will not automatically restart.
9. Once you are happy with the compose file, save and quit by pressing CTRL + X, Y, and then ENTER.
10. You are now ready to start the Uptime Kuma Docker container. To do this, run the following command.
The -d option will have Docker put the service into the background.
docker compose up -dCopyUsing the Uptime Kuma Web Interface
Now that we have installed Uptime Kuma on the Raspberry Pi, we can access its web interface.
11. Before proceeding, if you aren’t running this on your Pi, you will need to know its local IP address.
The easiest way to get the local IP address of your Raspberry Pi is to use the hostname command.
hostname -ICopy12. With your IP address handy, go to the following address in your favorite web browser. As you can see, Uptime Kuma on your Raspberry Pi operates on port 3001 by default.
Make sure to replace “[IPADDRESS]” with your IP.
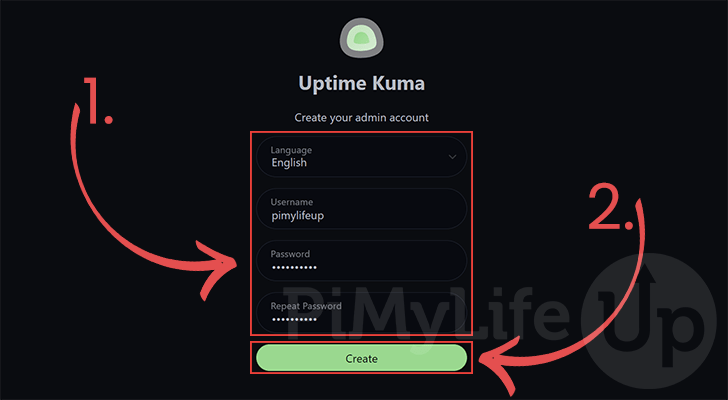
http://[IPADDRESS]:300113. When you first load up the Uptime Kuma web interface, you will be greeted with the following screen.
Using this screen, you will create the account you will use to log in to the web interface. Fill out the login details for your new account (1.).
Once you have filled out all your details, click the “Create” button (2.) to continue.
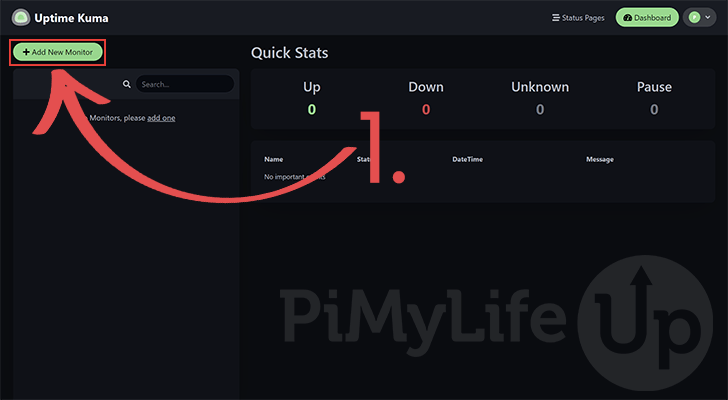
14. After creating your account, you will be greeted with a blank dashboard since you wouldn’t have added any monitors.
Adding a monitor using the web interface is a super easy process that you can start by clicking the “Add New Monitor” button.
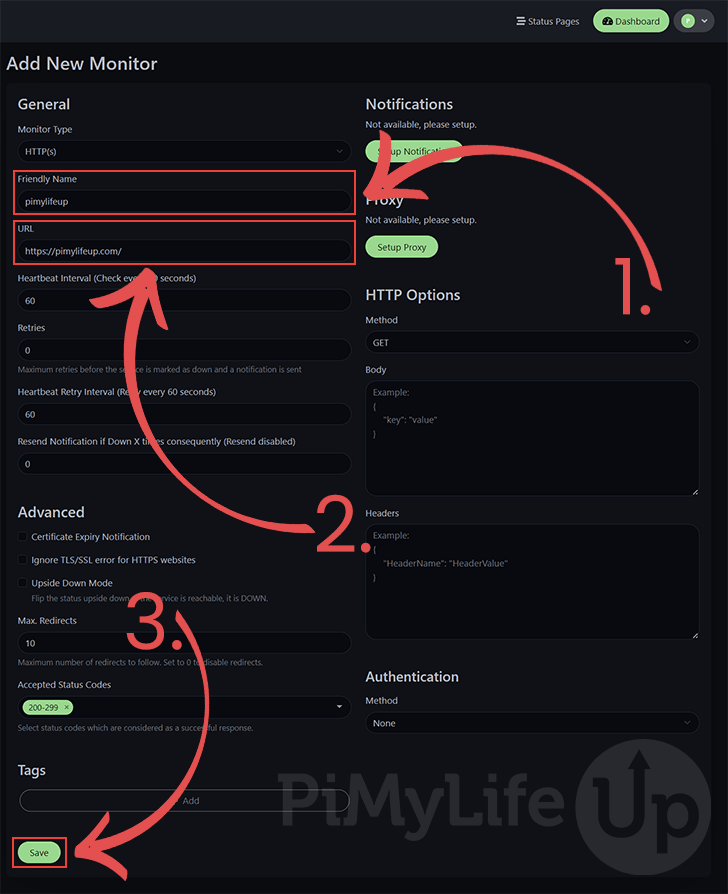
15. Uptime Kuma will display a bunch of text boxes on the left-hand side of the screen. Using these, you can configure your brand-new monitor.
With the default options, you must at least specify two details for the monitor to be created.
- The first option you must set is the “
Friendly Name” (1.). This field dictates the name that will be used for this monitor within the web interface. - Secondly, you must also specify the URL you want to monitor (2.). With the default monitor type (HTTP(s)), the Raspberry Pi will constantly grab the page and check the status code is OK (200-299).
Once you have configured your new uptime monitor, click the “Save” button (3.) located at the bottom of the page.
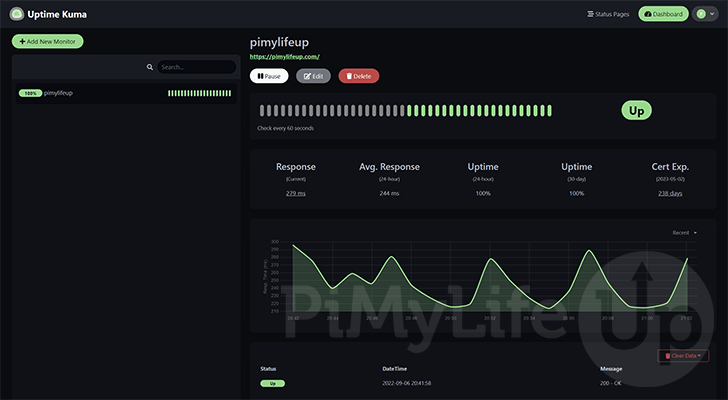
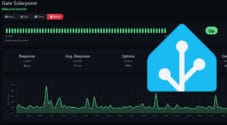
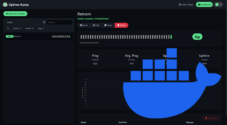
16. Your Raspberry Pi will now successfully be using the Uptime Kuma software to monitor your chosen service.
You should immediately start to see data populated for your chosen service. For example, below, you can see how ours looked after running the uptime monitor for a few minutes.
Updating Uptime Kuma on the Raspberry Pi
Once the Uptime Kuma team releases an update, you will likely want to upgrade to it. The following section will show you how to update the software in a few simple steps.
1. First, we will need to change into the directory where we cloned Uptime Kuma to our Raspberry Pi.
You can change to this directory by using the command below.
cd /opt/stacks/uptimekumaCopy2. Now that you are in the correct directory, you will want to use Docker to pull the latest version of the Uptime Kuma software.
docker compose pullCopy3. To have Docker move your service to the latest version, simply run the following command.
Docker will detect a new version and automatically update and restart the service.
docker compose up -dCopyConclusion
In this tutorial, we showed you how to set up your Raspberry Pi as an uptime monitor using the Uptime Kuma software.
Uptime Kuma, as you have seen, is a super modern, sleek, and free uptime monitor packed with functionality.
Please comment below if you have had any issues running Uptime Kuma on the Raspberry Pi.
If you liked this tutorial, you may want to check out our many other Raspberry Pi projects.


Great instructions, can you now tell us how to update the install to the latest version the version pulled using these update instructions is Version: 1.23.17 while the version on the GitHub is 2.3.0. Also I had to change the port from 3001 to 3002 because it was conflicting with my UniFi UOS program would it be possible to also include instructions on udating with a changed port?
Thanks
Hi Bill,
Thank you for letting us know about the outdated version refence.
To update, open your
compose.ymlfile and change the image line fromlouislam/uptime-kuma:1tolouislam/uptime-kuma:2.After that, run
docker compose up -dand it should pull the new version and run the migration.You can run Uptime Kuma you want, as long as you keep the internal port for Docker the same. For example, 4000:3001, will work fine (Internal:External).
Hi Gus,
Thanks for the update. I installed it and setup the following port forward in my router Internal 40000: External 3001 and it resulted in giving me the following message when I requested the address: “Which database would you like to use?” Then it listed Embedded MariaDB or MariaDB/MySQL or SQLite. I selected Embedded MariaDB and it seems to have worked.
Hi. Great guide.
Would be nice to make info how to install Uptime in Docker and monitor containers.
Hi Martin,
Sorry for the late response. I wrote a guide to show how you can set up Uptime Kuma using Docker instead, as well as a brief example of how you can use it to monitor containers.
Kind regards,
Emmet
Greetings, thank you for the guide.
Using this install method, how do I update via SSH?
Hi JB,
I have updated the guide to cover updating Uptime Kuma on your Raspberry Pi.
Please let me know if this works for you.
Cheers,
Emmet
Following your guide.
The update feature doesn’t work now.
Hi Josh,
There is no reason that this wouldn’t be working. There haven’t been any updates to the branch we target since December 2024. If there is any particular issue that you are seeing when attempt to update, please let me know.
I will move our guide over to the “2.0” branch once it becomes stable.
Kind regards,
Emmet
Kind regards,
Emmet
Hi
Is there any possibility to set heartbeat to 10 or 5 seconds?
Hi Dariusz,
The Uptime Kuma web interface currently locks itself to 20 seconds minumum interval. They are exploring allow people to set a lower limit but it can potentially make the software unstable.
You can, however, override this by using your web browsers dev tools, inspecting the interval textbox and removing the “
min=20” attribute.Cheers,
Emmet