With this tutorial, we will be showing you the process of installing the UniFi Controller on a Raspberry Pi
UniFi is a range of network devices created by Ubiquiti. These devices range from Wi-Fi access points to security gateways and switches.
For a more future-proof setup, we highly recommend that you set up UniFi OS Server on your Raspberry Pi instead. This new way of setting up a network controller gives you more functionality and a better base that will be supported better going forward.
Setting up the UniFi software on a Raspberry Pi is a fairly straightforward process as it just relies on the multi-platform Java runtime to run.
Using the UniFi network controller, you can manage all the UniFi devices that are a part of your network. You will also be able to use this dashboard to see the statistics of your UniFi network.
Please note that before proceeding you will need to be running a 64-bit version of Raspberry Pi OS for this tutorial to work. Recent changes to UniFi have broken support for 32-bit operating systems.
Equipment List
Below is a list of the equipment that you will need to set up the Unifi Network Controller software on your Raspberry Pi
Recommended
Optional
This tutorial on setting up the UniFi Network Controller was tested on a Raspberry Pi 5 running the latest version of Raspberry Pi OS Trixie 64-bit.
Video
The video we have embedded below will walk you through all of the steps needed to set up the UniFi network server on your Raspberry Pi. If you prefer to go at your own pace, be sure to follow our written instructions below instead.
Preparing your Raspberry Pi for the UniFi Controller
In this section, we will prepare the operating system to run the UniFi software. These steps mainly revolve around getting the database server UniFi requires installed on your Raspberry Pi.
Getting Ready
1. Before you proceed any further, you should consider using UniFi OS on your Raspberry Pi instead. This gives you the network controller as well as a bunch of other functionality.
The UniFi team plans on focusing on that distribution method for the UniFi Network controller, so this method may break more periodically.
https://pimylifeup.com/raspberry-pi-unifi-os-server/2. The first thing you should do is ensure that your Raspberry Pi is running up to date packages.
To update all packages, you will be required to run the following command.
sudo apt update
sudo apt upgradeCopy
Adding Entropy using rng-tools
3. To improve the startup speed of the UniFi controller software on our Raspberry Pi, we need to install rng-tools.
We will utilize this package to ensure the Raspberry Pi has enough entropy for the random number generation that the UniFi software uses.
sudo apt install rng-toolsCopy4. We now need to make a slight change to the rng-tools configuration.
Begin editing the config file by running the following command.
sudo nano /etc/default/rng-tools-debianCopy5. Within this file, find and uncomment the following line.
Find
#HRNGDEVICE=/dev/hwrngCopyReplace With
HRNGDEVICE=/dev/hwrngCopyBy uncommenting this line, we are adding to the amount of entropy (The amount of randomness) that the system has available.
The Raspberry Pi features an integrated random number generator that we can utilize to increase the entropy pool.
6. Once you have made the change, save the file by pressing CTRL + X, then Y, followed by ENTER.
7. Finally, restart the rng-tools service by running the command below.
sudo systemctl restart rng-toolsCopyOnce the service has finished restarting, it should now be safe to proceed to the next section of this guide.
Installing LibSSL1.1
8. Due to the version of MongoDB that we require to run the Unifi Controller on our Raspberry Pi, we will need to install LibSSL1.1.
As this package is no longer available through the Raspberry Pi OS repository, we will need to wget it manually from the Ubuntu packages.
wget http://ports.ubuntu.com/pool/main/o/openssl/libssl1.1_1.1.1f-1ubuntu2_arm64.deb -O libssl1.1.debCopy9. With LibSSL1.1 now downloaded, we will need to install the package itself. You can install this by simply using the command below within the terminal.
sudo dpkg -i libssl1.1.debCopyInstalling MongoDB to your Raspberry Pi for the UniFi Controller
10. To use the UniFi Controller on your Raspberry Pi, we will need to install MongoDB.
This is the database server that UniFi uses to store all of its data. As we can’t rely on the package repository, we will need to follow some additional steps.
For this first step, we will download MongoDB 4.4.18 to our Pi. We are installing 4.4 as this is currently the only supported release for the UniFi Controller that is compatible with the Raspberry Pi.
wget https://repo.mongodb.org/apt/ubuntu/dists/focal/mongodb-org/4.4/multiverse/binary-arm64/mongodb-org-server_4.4.18_arm64.deb -O mongodb.debCopy11. Once the package is downloaded, install it by using the following command within the terminal.
sudo dpkg -i mongodb.debCopy12. Now that we have installed the MongoDB server, set it to start when your Raspberry Pi boots using the command below.
sudo systemctl enable mongodCopy13. Finally, start MongoDB by running the command shown below in the terminal.
This will start the server immediately, so we won’t have to wait till our device restarts.
sudo systemctl start mongodCopyInstalling the UniFi Controller to the Raspberry Pi
1. Our first task is to add the UniFi repository to our sources list.
We can achieve this by running the command below.
echo 'deb [arch=amd64 signed-by=/usr/share/keyrings/ubiquiti-archive-keyring.gpg] https://www.ui.com/downloads/unifi/debian stable ubiquiti' | sudo tee /etc/apt/sources.list.d/100-ubnt-unifi.list >/dev/nullCopyYou might notice that we are using “amd64” and not “arm64” or “armhf“. This is due to Ubiquiti not having their repository set up to mark “arm64” as compatible. However, it doesn’t hugely matter as, at the moment, it will still download files compatible with our Raspberry Pi.
2. We now need to add the repository’s GPG key by using the following command.
curl https://dl.ui.com/unifi/unifi-repo.gpg | sudo tee /usr/share/keyrings/ubiquiti-archive-keyring.gpg >/dev/nullCopyThe GPG key is what helps tell the package manager it is downloading the correct package.
3. As we made changes to the repositories, we need to now update the package list by running the command below.
sudo apt updateCopy4. Now finally, we can install version 21of the OpenJDK runtime as well as the Unifi Controller software itself to our Raspberry Pi by running the following command.
sudo apt install openjdk-21-jre-headless unifiCopyInstalling UniFi through this method will automatically set up a service. This service will automatically start the UniFi software at boot.
First Boot of the UniFi Controller on your Raspberry Pi
In this section, we are going to walk you through the initial configuration steps of the UniFi software.
1. First, retrieve the local IP address for your Raspberry Pi.
If you have terminal access to your Pi, you can use the following command.
hostname -ICopy2. With your Raspberry Pi’s IP address handy, go to the following web address in your favorite web browser.
Ensure that you replace “<IPADDRES>” with the IP of your Raspberry Pi.
https://<IPADDRESS>:8443If you run into a certificate error, it is safe to ignore it as we know what device we are connecting to.
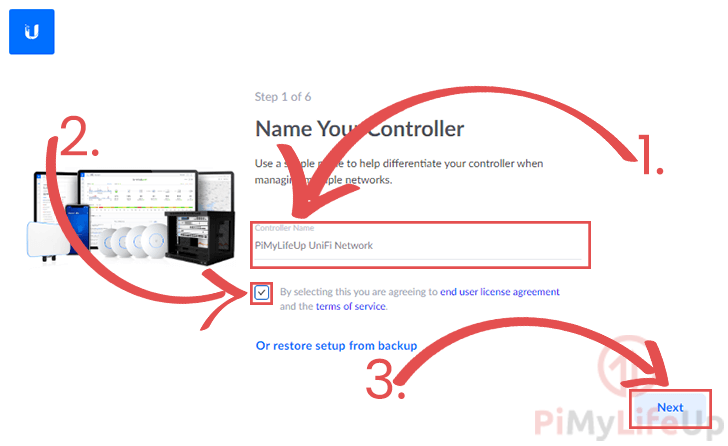
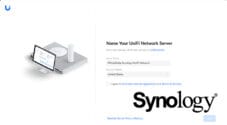
3. The first step requires you to give a name for your Raspberry Pi powered UniFi controller (1.).
You are also required to agree to the end-user license agreement and terms of service from UniFi, once you have read through them, click the checkbox (2.).
Once all done, click the “Next” button (3.) to proceed.
4. Next, you will need to sign in to your Ubiquiti account (1.).
If you don’t already have an account, you can register at the Ubiquiti website.
Once you have entered your login details, proceed by clicking the “Next” button.

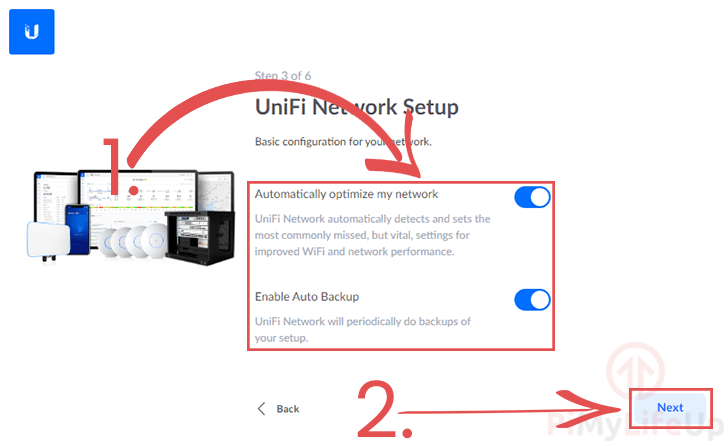
5. Tweak the settings on this page that best suits your needs.
Once configured, click the “Next” button.
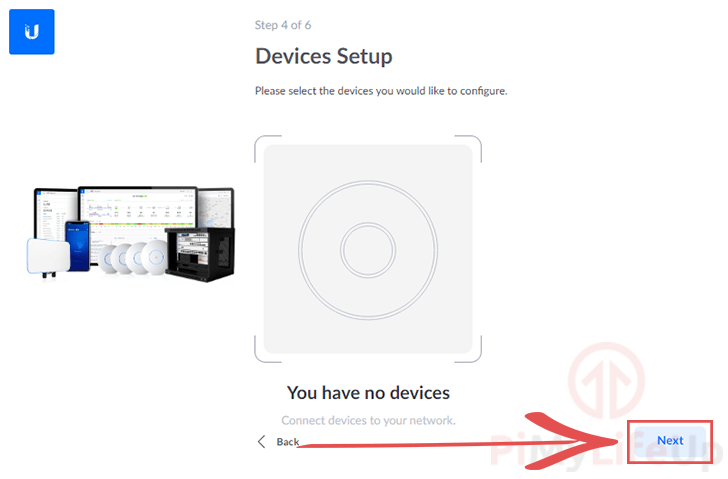
6. Use this screen to connect your Pi UniFi Network controller to the devices on your network.
To proceed, click the “Next” button.
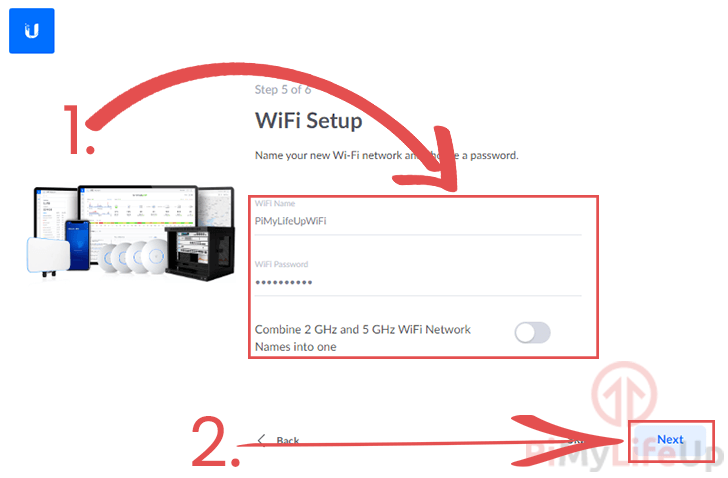
7. Now give your new Wi-Fi network a name and a password.
Once you have configured your WiFi details (1.), click the “Next” button to proceed (2.).
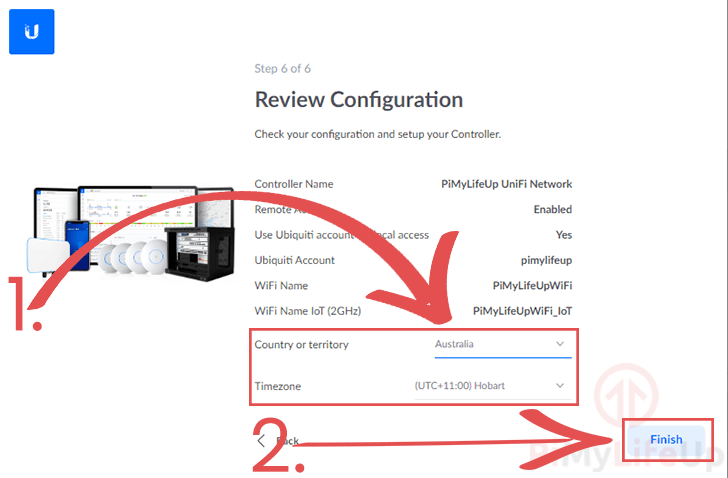
8. This final screen will get you to review all your settings.
You will also be able to use this screen to set both the country and timezone (1.). Make sure you set these before continuing.
Once you have verified everything is correct, you can now click the “Finish” button (2.) to finish the setup process.
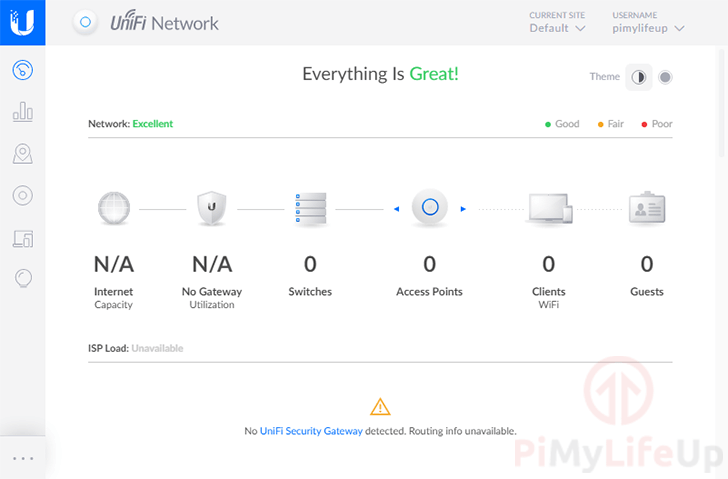
7. At this point, you should now have successfully set up the UniFi network controller on your Raspberry Pi.
Conclusion
Hopefully, at this point in the tutorial, you will now have the UniFi controller installed and running on your Raspberry Pi.
The Pi is a great base for your network controller as it can run 24/7 with little power.
If you have run into any issues setting up the UniFi software, feel free to comment below.
Check out our many other Raspberry Pi tutorials to learn more about this versatile system.


How do you update the Controller version now? or does it do it within itself by auto ?
I ran the older version on TrueNAS linux server and had to do it myself back in the days before i transfered to Pi …
Hi Marko,
As we are installing Unifi from their repository all you need to do to update it is to run the following two commands.
If their is an update available from Unifi it should be updated as part of the upgrade process.
Cheers,
Emmet
FYI the rngd step is no longer needed as it is installed and running by default, at least on my newly installed Pi 4. It seems that the init script autodetects the correct hardware device to use.
Perfect!!!
Thanks for this tutorial. Well written and easy to follow.
Worked for me. Controller is running along with Pihole.
8Gb Memory usage was 2% before Unifi, with Unifi it’s now at 7.1%.
Backed up the config from the old Unifi controller that was running on Mac Laptop and restored it to the new controller on RPi. Then, “Forget” all my devices one at a time from the old controller and the new controller adopted them automatically.
Thanks.
Thanks. Great tutorial, worked first time. I had initially installed the Unifi Controller on my Macbook Pro (version 6.1.71) and the transition worked perfectly. I backed up from the old controller and then restored from backup when installing the new controller on my Raspberry Pi (Raspberry PI OS Lite, headless)
This worked perfectly, thanks for the clear instructions! I couldn’t find an installer for Raspbian Buster, so I got it running on a Raspberry Pi 4 with Raspberry Pi OS Lite.
Are there any requirements in terms of RAM or SD storage that we should keep in mind when buying the hardware?
Hi Daniel,
As always for the best experience, more resources are always good. I would personally at least try to stick with the Raspberry Pi 4 with at least 2GB of RAM.
SD storage wise you can’t go to wrong with a 32GB card, they are reasonably affordable these days. It gives you some extra room to store logs produced by the UniFi controller software.
Cheers,
Emmet
Hi,
Thank you for the very excellent, detailed instructions. If only everything I was trying to do had instructions this thorough and well written. Sometimes if I’m lucky I find instructions that tell me what to do but never do I find instructions tell also tell my why I am performing each step.
Thanks!
I’m a bit unsure what the HRNGDEVICE=/dev/hwrng config option actually does. Could you explain why you chose to uncomment this?
Great tutorial!
Hi Steven,
By uncommenting this line we are letting the
rng_toolsuse the Raspberry Pi’s inbuilt hardware number generator.This increases the entropy available to the operating system . This helps certain software like UniFi complete tasks faster that requires a certain degree of randomness.
Cheers,
Emmet
This is awesome! Though how do I update the controller now that its been up for a while? Just follow the install steps again?
Hi Evan,
As we added the package repository you should be able to just run the following two commands whenever an update is available.
Cheers,
Emmet
Can I install older version (5.6.42) of Unifi controller?
My UniFi AP-AC v2 is not supported in newer versions:(
Hi Janro,
Yes you definitely can.
Of course we won’t be able to install it using the repository so you will need to follow a different set of instructions to what we do in the tutorial.
1. We need to first download the 5.6.42 version of the Unifi Controller to the Raspberry Pi.
2. Once the package has downloaded to the system, we can install it by running the following command.
3. With it downloaded we can remove the old version of the package.
4. You should now be able to continue on with the tutorial.
PS. If you have already installed Unifi following the original instructions you should be able to remove it by running the command below.
I followed your process and the controller would not start due to an issue with mongodb. After searching a while (and posting to reddit) I entered these two commands after installing but before rebooting:
sudo systemctl stop mongodb
sudo systemctl disable mongodb
I think that there is a version of mongodb that comes with Buster and a different, incompatible version that is installed with Unifi. The command lines stop and disable the pre-installed version so there is no conflict.
But I may not understand the details completely.
Wow what a great tutorial. Worked perfectly first time. Had previously spent a whole day messing with Unifi on my windows 10 pc and network to no avail. Installed this on my old spare Pi3 and it only took less than 15mins to be all up and running.
Many thanks.
Thanks for this tutorial.
Well explained and it worked right away !!
The only tutorial which worked for me.
Many thanks!
great step by step instructions! works like a charm!
I always install UFW on my Rpis. That caused me a bit of trouble this time. But for those that want a firewall, I had to open ports 22, 8080, 8443, 8843, 8880, 8881 and 27117 (per an old post in the Ubiquiti forums).
Thanks for the very helpful instructions!
I spent a long time trying to set the ubiquiti controller up on my Windows PC to no avail. This tutorial was easy and I was up and running in no time!
Thank you so much!
That fixed it, thanks Emmet.
Kind of disconcerting that certain mirrors have bad images.
When I get to “sudo apt install unifi” it fails to install with many messages like the following:
File has unexpected size (32768 != 31176). Mirror sync in progress? [IP: SNIPPED]Any ideas? TIA
Hi Sean,
That looks like there is an issue with the mirror the operating system is trying to download from.
You can either wait and hope it eventually fixes itself (Will likely need to run another
sudo apt update) or change it to another mirror manually.You can follow our guide on changing the Raspbian repository if you decide to go down that route.
Cheers,
Emmet
On step 2 under installing the UniFi controller software I keep getting the following message when running the sudo apt-get update command:
N: Skipping acquire of configured file ‘ubiquiti/binary-arm64/Packages’ as repository ‘https://www.ui.com/downloads/unifi/debian stable InRelease’ doesn’t support architecture ‘arm64’
I can’t seem to get past this and after googling around I can’t seem to find anyone with the answer to solve the issue either.
Any thoughts?
Hi Jonathon,
Are you trying to install this in a 64bit operating system?
Cheers,
Emmet
Emmet,
I was using 64 bit ubuntu but I went back to Raspberrian Lite and it works great now!
Thanks!
Jonathan