This tutorial will show you how you can run changedetection.io on your Raspberry Pi.
Changedetction.io is a service designed to detect whether changes have been made on a specific website. This is like a more advanced version of our Python website monitor project.
This service works by grabbing a page’s output periodically. Then, anytime a change is noticed, the service can send you a notification, presenting you with an easy way of seeing what exactly changed since the last update.
The Raspberry Pi makes an excellent choice for Changedetection.io as it is a relatively low-powered device that can be affordably left running 24/7.
Please note for the best experience, you will need to use the 64-bit version of Raspberry Pi OS. However, Changedetection.io still works fine on 32-bit. You just won’t be able to detect changes on websites that require JavaScript to display.
Equipment
Below is a list of the equipment we used to set up Changedetection.io on our Raspberry Pi.
Recommended
Optional
This tutorial was tested on a Raspberry Pi 400 running the latest version of Raspberry Pi OS 64-bit Bullseye.
Preparing your Raspberry Pi for Changedetection.io
Before we can install this website change detection tool, we need to install some initial software. The main thing we need to set up is Docker.
The easiest way to install and run Changedetection.io on the Raspberry Pi is through a docker container.
1. Before we proceed, we should perform an update of the package lists as well as any out-of-date packages.
You can run the following two commands to perform both of these actions.
sudo apt update
sudo apt upgradeCopy
2. With your package list up to date, you will now need to follow our guide on installing Docker on the Raspberry Pi.
We will be using Docker to make setting up and installing Changedetection.io on our Raspberry Pi a relatively straightforward process.
https://pimylifeup.com/raspberry-pi-docker/Installing Changedetection.io on the Raspberry Pi
Once you have Docker installed on your Raspberry Pi, we can proceed to install Changedetection.io on it.
Since this website change monitor is available as a docker image, all we need to do is write a quick Docker configuration file and then “run” it.
1. Let us begin by creating a directory where we will store the “compose.yml” file we are about to create.
We can create a directory called “changedetection” within your current user’s home directory by using the mkdir command.
sudo mkdir -p /opt/stacks/changedetectionCopy2. With our new directory created, we must change into by using the cd command as shown below.
cd /opt/stacks/changedetectionCopy3. We can begin writing the “docker-compose.yml” file using the nano text editor.
This file is what tells Docker how to set up one or multiple containers. In our case, this will be “changedetection.io” and the Chromium web driver.
sudo nano compose.yamlCopy4. Within this file, you will want to enter the following lines depending on whether you are running a 64-bit or 32-bit version of Raspberry Pi OS.
The only difference between these two lots of code is that we can’t run the standalone Chrome browser Changedetection.io wants on a 32-bit Raspberry Pi OS.
Compose.yaml for Raspberry Pi OS 64-bit
services:
    changedetection:
      image: ghcr.io/dgtlmoon/changedetection.io
      container_name: changedetection
      hostname: changedetection
      environment:
        - PLAYWRIGHT_DRIVER_URL=ws://playwright-chrome:3000
      volumes:
        - changedetection-data:/datastore
      ports:
        - 5000:5000
      restart: unless-stopped
      depends_on:
          playwright-chrome:
              condition: service_started

    playwright-chrome:
        hostname: playwright-chrome
        image: dgtlmoon/sockpuppetbrowser:latest
        cap_add:
            - SYS_ADMIN
        restart: unless-stopped
        environment:
            - SCREEN_WIDTH=1920
            - SCREEN_HEIGHT=1024
            - SCREEN_DEPTH=16
            - MAX_CONCURRENT_CHROME_PROCESSES=10
volumes:
  changedetection-data:Copy
Compose.yaml for Raspberry Pi OS 32-bit
services:
    changedetection:
      image: ghcr.io/dgtlmoon/changedetection.io
      container_name: changedetection
      hostname: changedetection
      volumes:
        - changedetection-data:/datastore
      ports:
        - 5000:5000
      restart: unless-stopped
volumes:
  changedetection-data:Copy
5. Once you have typed in the configuration for Changedetection.io for your version of Raspberry Pi OS, you can now save and quit out of the text editor.
You can save and quit by pressing CTRL + X, followed by Y, and finally, the ENTER key.
6. Finally, we can start up Changedetection.io on our Raspberry Pi by running the following command within the terminal.
By running this command, Docker will download all of the images specified within our “compose.yaml” file and start up the containers.
docker compose up -dCopyThe Changedetection.io Web Interface
Now that we have installed the Changedetection.io software to our Raspberry Pi, we can finally access its web interface.
This part of the tutorial will show you how to access the web interface and give you a quick overview.
Accessing the Web Interface
1. You can access the changedetection.io web interface either directly on your Raspberry Pi or by accessing it from a local device.
To get the local IP address of your Raspberry Pi, you can utilize the hostname command.
hostname -ICopyPlease note that you will see a bunch of different IP addresses created by Docker. Typically, your device’s IP address will be the first listed.
For example, the local IP address for our Raspberry Pi was the following.
192.168.0.1342. Once you have your IP address handy, go to the following address within your web browser.
The main thing you will notice here is that we are using port “5000“, as that is what changedetection.io uses by default.
Make sure to replace “IPADDRESS” with either the IP address you got in the previous step or “localhost” if connecting locally.
http://IPADDRESS:5000Using your Raspberry Pi’s Changedetection.io Web Interface
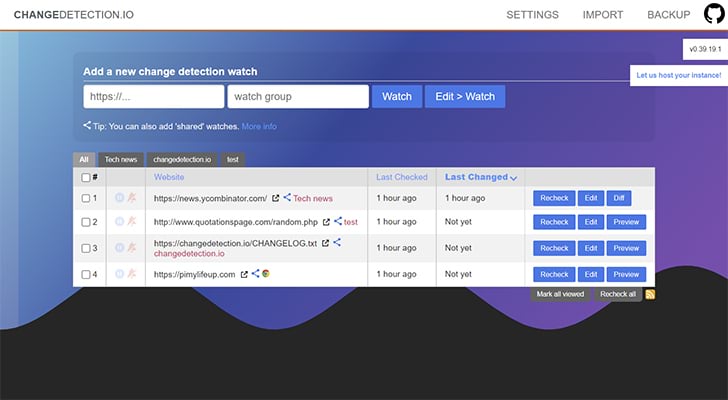
3. Once you have the Changedetection.io web interface open, one of the first things you will want to do is add a website to watch for changes.
You can do this directly from the dashboard easily.
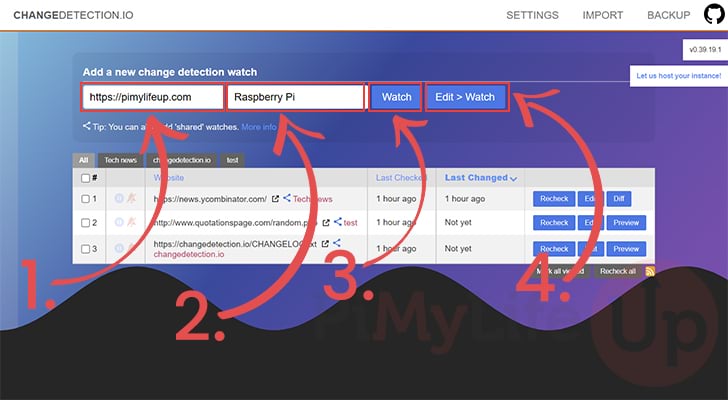
- First, you will want to enter the URL (1.) that you want your Raspberry Pi to watch for changes.
- Next, you can optionally specify a group name (2.) for this particular change detection watcher.
- You now have a choice to either save this watcher immediately (3.) by clicking the “
Watch” button.
Alternatively, you can choose to edit advanced options (4.) before the watch start by clicking the “Edit > Watch” button.
For the following steps, we will assume that you wanted to configure your Raspberry Pi’s website change detector further.
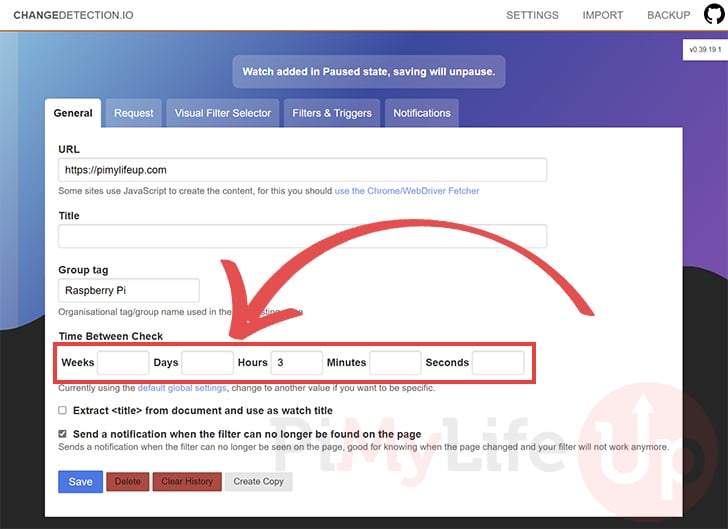
4. We will start by checking out the “General” settings page on the Changedetection.io web interface.
You can control details such as the URL you want to be monitored for changes. One of the key things you might want to adjust is the “Time Between Check” option.
Using this option, you can choose how long Changedetection.io will wait before it checks if a change has occurred.
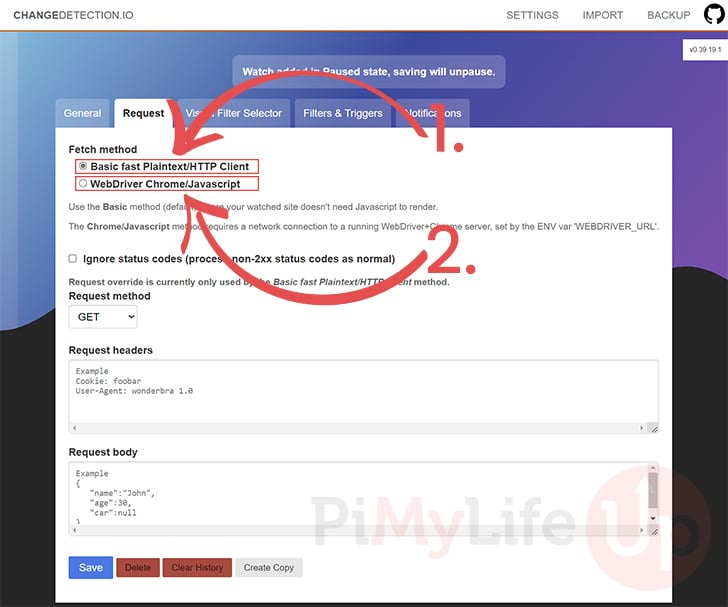
5. Next is the “Request” tab. The options on this page control how your Raspberry Pi’s website change detector will make its request.
You can control the headers and body utilized when a request is made using the options on this page.
One of the key options you may want to adjust is the “fetch method“.
- Basic fast Plaintext/HTTP Client: This is the fastest way to check if a change has occurred on a website. It is simple in that it is mindlessly grabbing the page and comparing the plain text.
This method is great when you don’t have to worry about JavaScript. - WebDriver Chrome/JavaScript: You will want to use this option when the website you are checking requires JavaScript to render.
As a bonus, Changedetection.io will also take a screenshot of the website when it performs its check.
Please note that you can’t select this option if you are running a 32-bit operating system on your Raspberry Pi.
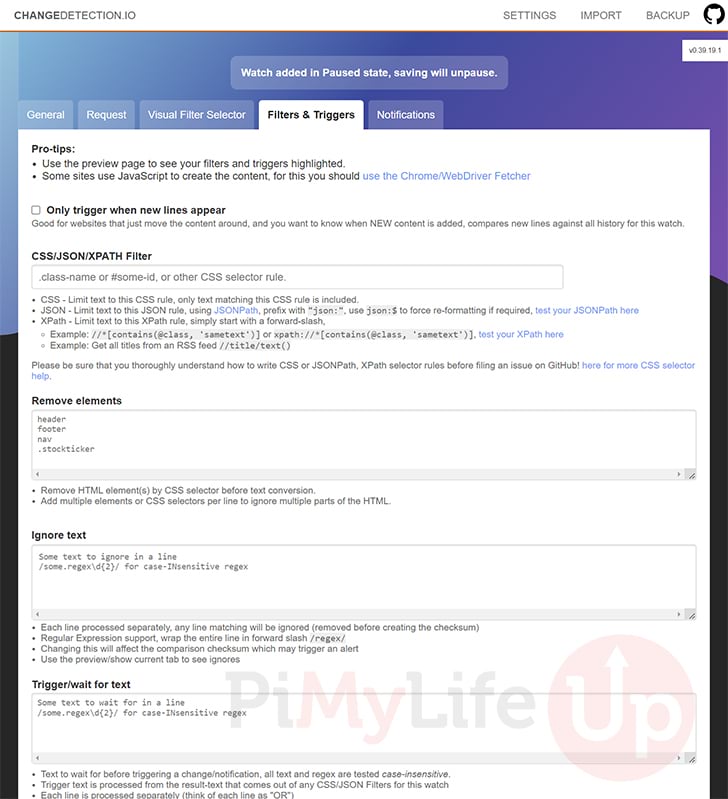
6. The next tab we will look at is the “Filters & Triggers” tab.
You can use the options in this tab to filter out content or add additional triggers. For example, if there is a certain element that is constantly changing, you can use these options to ignore it.
Additionally, you can also set text to trigger a change notification. With the “Trigger/wait for text” option configured, a notification will only be sent if that text or regex is found on the page.
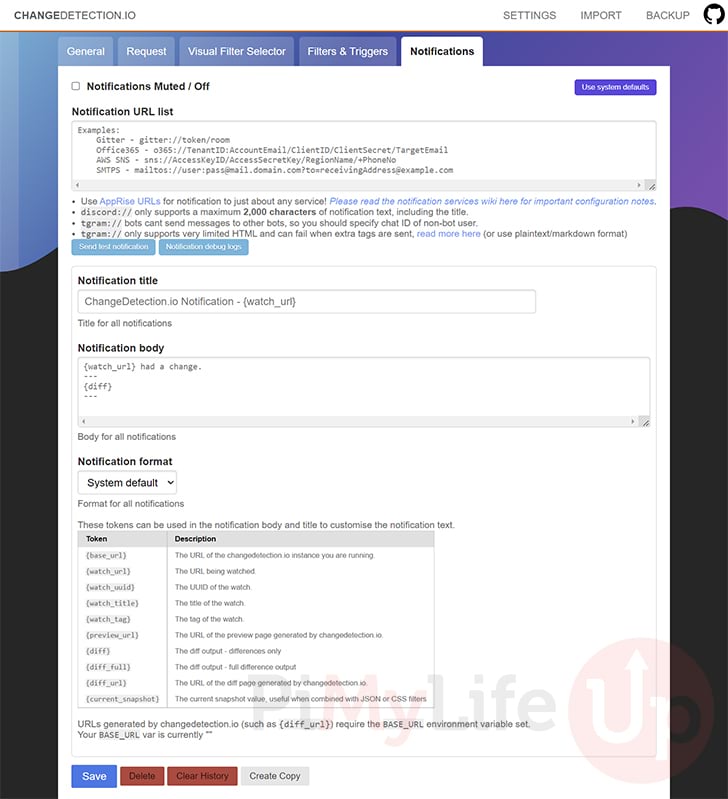
7. The final tab we are looking at is potentially one of the most important, the “Notifications” tab.
With this tab, you can set where notifications should be sent by your Raspberry Pi when it notices a change has occurred on your website.
You can read about the supported URLs and their format on the AppRise GitHub.
8. Below, you can see that we now have Changedetection.io running on our Raspberry Pi, with our newly added URL being watched for changes.
Updating Changedetection.io On the Raspberry Pi
In this section, we will be walking you through the quick and easy steps of updating the Changedetection software on your Raspberry Pi.
Since we are using Docker to run this software, we can update it using a few short commands.
1. Your first step is to change to the directory where we wrote the Compose file for Changedetection.
If you followed this tutorial exactly, you should be able to get to this directory by using the command below.
cd /opt/stacks/changedetectionCopy2. Once we are in the right place, we can get Docker to pull the latest version of Changedetection to our Raspberry Pi by running the command below.
Docker will only download the image if a new version is available, and then it will only download the updated layers.
docker compose pullCopy3. Finally, once a new version has been downloaded, you must get Docker to restart the container and move to the new image.
You can achieve this by using the same command you used to start the software. Run the command below to get Docker to check for the new image and move over to it.
docker compose up -dCopyConclusion
By this point in the tutorial, you should now have the Changedetection.io software running on your Raspberry Pi.
This software allows you to easily check whether a change has occurred on a website periodically.
Please comment below if you have any issues with getting this website change detector to work on your device.
Be sure to check out our many other Raspberry Pi projects. An example of various others you might like is our Internet speed monitor and our FreshRSS installation guide.


Thank you very much for your guide.
Unfortunately, I am having trouble getting Playwright installed on my Raspberry Pi. I have tried following the instructions in the link provided by commenter George (https://github.com/dgtlmoon/changedetection.io/wiki/Playwright-content-fetcher), but when I get to the line “Python3 -m pip install playwright” it simply tells me that there is no matching distribution for my operating system.
I am running Raspbian GNU/Linux 12 (Bookworm) on a Raspberry Pi 5. Do I have to “downgrade” to Bullseye to get this guide to work?
(Apologies for the double comment, I’m not sure that my previous comment went through.)
Hi Pi in the sky,
Please refer to my response to your previous comment.
This issue is likely caused by you running a 32-bit operating system.
You shouldn’t have to install anything using pip and the tutorial has been tested to work with Bookworm.
Kind regards,
Emmet
Thanks so much for this guide! Everything went well in setting it up and getting it working.
With the current installation, I’m not able to use the Visual Filter Selector. It appears we need to use Playwright to do so (https://github.com/dgtlmoon/changedetection.io/wiki/Playwright-content-fetcher), as I am currently getting the following message in that section: “Sorry, this functionality only works with Playwright/Chrome enabled watches. Enable the Playwright Chrome fetcher.”
How would I go about enabling this?
P.S. In the update section of the guide, there is a hyphen missing to get the commands working properly (for me, at least). I had to use “docker-compose”, instead of just “docker compose”, which mirrors the commands given earlier in the guide:
step 2: sudo docker-compose pull
step 3: sudo docker-compose up -d
Thanks again for the great guide!
Hi George,
I have updated the tutorial so that it will now use the Playwright fetcher, the web url is also now properly set so that Changedetection.io will be aware of it. You should be able to replicate these changes in the Compose file that you wrote in the original version of this guide.
On top of this I now point to our Docker guide to install Docker, rather than using the now outdated version from the package repository. It is still usable but its much better to use the latest versions of Docker straight from the developers themselves.
Lastly I re-adjusted the tutorial so that the compose file is now saved within the “/opt/stacks/changedetection” directory.
Please let me know if you need anymore help.
Kind regards,
Emmet
Hey there, thank you very much for this guide!
Apologies if this is a silly question, but how do I install Playwright on my Raspberry Pi 5? I managed to get changedetection.io up and running, but when I try to select “Webpage Text/HTML, JSON and PDF changes” for my website check, it gives an error “Exception: No module named ‘playwright’.” Next, I tried to follow the instructions on playwright.dev and attempted to use npm to install playwright, but this resulted in “Error: ERROR: Playwright does not support chromium on .”
It might be worth noting that to get changedetection.io working properly with my OS (aarch64), I also had to add “platform: linux/arm64” to my yaml file in the playwright-chrome part (otherwise it would give the error “no matching manifest for linux/arm/v8 in the manifest list entries”).
Hi Pi in the Sky,
I went over the tutorial and verified everything is still working properly.
Could you please verify that you are running a 64-bit operating system by using the following command. The errors you are running into would indicate that you are using a 32-bit OS. The Pi OS ships with a 64-bit kernel regardless which can make it more painful to check whether you are actually running a 64-bit operating system.
Kind regards,
Emmet
Oh I see, many thanks for your help! Running that command gives me “armhf”, which Google tells me is 32-bit, so yes you are correct! I’d previously run “uname -m” which returned “aarch64”, so that’s why I thought I was running a 64-bit OS (I was also told by the sales representative when I purchased the Pi that it had a 64-bit OS)…painful indeed!
The “uname -m” command always throws me for a bit of a loop to! Usually its a great way of checking whether you are using a 32-bit or 64-bit OS but the Pi’s kernel throws a bit of a wrench in the works. Which reminds me, I need to update our own guide that covers checking whether you are using a 32-bit or 64-bit OS.
Luckily, the Raspberry Pi Imager is a pretty easy tool that you can use to flash the 64-bit release of Raspberry Pi OS. Of course, sucks a bit if you have already installed other software you like to your Pi.
Kind regards,
Emmet
Hi!
How do I perform an update when a new release of Changedetection is available?
Hi Thomas,
I have updated the guide to walk you through the process of updating the Changedetection software on your Raspberry Pi.
Please let me know if you have any additional questions.
Kind regards,
Emmet