In this tutorial, you will learn how to run Watcharr on your Raspberry Pi.

The Watcharr software is an open-source, self-hosted watch list. It allows you to store the shows you have watched, are watching, or plan to watch. It supports both movies and TV shows.
Using this software, you can even rate the TV shows and movies you watch and track how far you have watched them. The Watcharr software can even be configured to track video games.
All of this functionality is wrapped in a sleek, modern, and fast web interface that makes finding and tracking your shows, movies, or games a breeze.
With this software being written in Go and Svelte, it is reasonably lightweight, making it great to run on the Raspberry Pi. You can easily have this software run alongside more demanding software such as the Plex media server.
By the end of the following sections, you will have Watcharr up and running on your Raspberry Pi. The only caveat is that you must be running a 64-bit version of Raspberry Pi OS. Watcharr does not provide builds for 32-bit releases.
Equipment
Below is a list of equipment we used when setting up the Watcharr watch list on our Raspberry Pi.
Recommended
Optional
This tutorial was last tested on a Raspberry Pi 5 running the latest version of Raspberry Pi OS 64-bit Bookworm.
Installing and Running Watcharr on your Raspberry Pi
In the following steps, we will walk you through how to install and run the self-hosted watch list web app Watcharr on your Raspberry Pi.
To improve your experience with Watcharr, we highly recommend that you set up a static IP address for your Raspberry Pi before continuing. This will save you from having to continually work out what IP has been assigned to your device.
Preparing your Raspberry Pi
1. Before proceeding further, let us ensure our Raspberry Pi is up to date.
You can update the package list cache and upgrade any out-of-date packages using the command below.
sudo apt update
sudo apt upgrade -yCopy
2. To run Watcharr on the Raspberry Pi, we must set up Docker. Follow our guide on installing Docker to the Pi before continuing any further with this guide.
Docker is what will make installing and running Watcharr a straightforward process.
https://pimylifeup.com/raspberry-pi-docker/Setting up Folders to Store Watcharr
3. After setting up Docker on your Pi, you can continue with setting up your Pi to run Watcharr.
Our next step will be to create a directory where we will store the Compose file for Watcharr. It is also the same directory that we will use to store Watcharr’s cache and data.
You can create this directory by running the following command in the terminal.
sudo mkdir -p /opt/stacks/watcharrCopyUsing the “-p” option with the mkdir command allows us to create the full path, even if part of the path doesn’t exist already.
4. After creating the folder, you must change into it by making use of the cd command.
The rest of the tutorial will expect you to be within this directory.
cd /opt/stacks/watcharrCopyWriting a Compose File for Watcharr on the Raspberry Pi
5. We can now begin writing the Compose file that will be used by Ducker to download and run Watcharr to your Raspberry Pi.
You can begin writing the Compose file by using the following command.
sudo nano compose.yamlCopy6. Within this file, you must type in the following lines.
version: "3"

services:
  watcharr:
    image: ghcr.io/sbondco/watcharr:latest
    container_name: watcharr
    ports:
      - 3080:3080
    volumes:
      - ./data:/data
    restart: unless-stoppedCopy
7. After filling out the Compose file, save and quit by pressing CTRL + X, Y, and then ENTER.
Starting up Watcharr on the Raspberry Pi
8. Once the Compose file has been written, we can now start the Watcharr container on our Raspberry Pi.
Getting Docker to start Watcharr is as easy as running the command below. Depending on your internet connection this can take a couple of minutes as Docker downloads the latest version of the Watcharr ontainer.
docker compose up -dCopyThe “-d” option tells Docker to detach from the current terminal session after successfully starting the container.
Accessing your Watcharr Web Interface
9. Now that Watcharr is running, we will need to get the IP address of your Raspberry Pi.
You can get the IP of your device by using the hostname command.
hostname -ICopy10. In your favorite web browser, you will want to go to the following address to access the Watcharr web interface.
Ensure you replace “<IPADDRESS>” with the IP of your Pi.
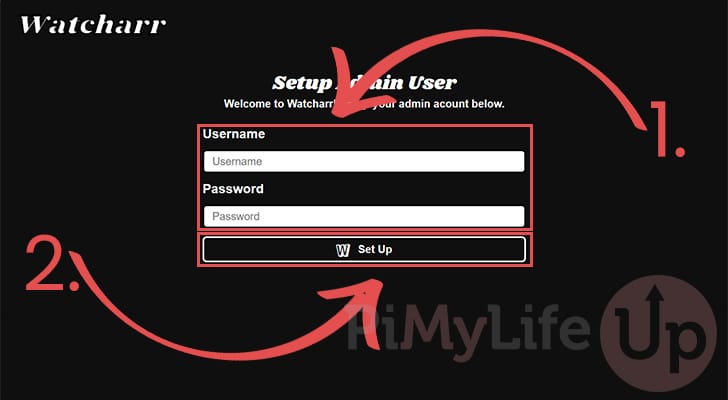
http://<IPADDRESS>:3080/11. The first time you access the Watcharr web interface, you will be asked to create an admin user.
Enter the username and password you want to use to access the web interface (1.).
After filling out your information, click the “Set Up” button (2.) to create an account.
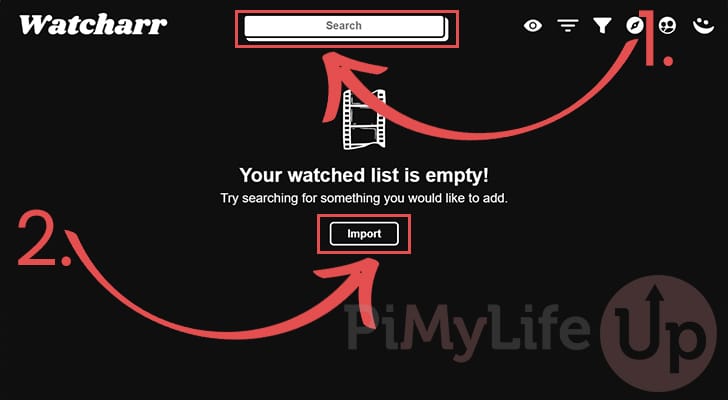
12. You will be immediately logged into the Watcharr web interface after creating an account.
You can now begin to use the interface to log the shows you have watched. There are a couple of ways to add shows or movies. The first is to use the search functionality at the top of the screen (1.).
The software also allows you to import a list of watched shows by clicking the “Import” button (2.) and following the prompts.
13. Below, you can see how Watcharr’s search functionality works to search for movies and TV shows.
You will quickly find this interface to be super easy to use.

Updating the Watcharr Watch List on the Raspberry Pi
Using Docker to run Watcharr on our Raspberry Pi makes updating this software a breeze.
We can download and upgrade to the latest release using the next few steps.
1. First, we must change to the directory where we wrote the Compose file earlier in this guide.
The reason for this is that we must use the Compose file to get Docker to download the latest release of Watcharr.
cd /opt/stacks/watcharrCopy2. Once we are in the correct location, use the “pull” option to download the latest version of Watcharr.
While this command downloads the latest version of the image, it won’t automatically update the running container.
docker compose pullCopy3. To get Docker to update the Watcharr container to the latest version, we must use the same command we used to start it in the first place.
When Docker goes to start the container, it will detect a new available image, shut down the old container, and then restart it using the new image.
docker compose up -dCopyConclusion
At this point, you should hopefully have the self-hosted watch list called Watcharr installed on your Raspberry Pi.
Using this list, you can easily track the movies and TV shows that you have watched, plan to watch, or are currently watching.
Please comment below if you have questions about getting Watcharr running on your Pi.
If you found this tutorial useful, we have many other Raspberry Pi guides that are worth exploring.


I get “no matching manifest for linux/arm/v7 in the manifest list entries” on my raspberry. Can’t find a docker image for arm v7
Hi Paul,
You must be running a 64-bit operating system on a Raspberry Pi 3 or newer for this guide to work. Watcharr does not provide built for 32-bit versions of ARM.
Kind regards,
Emmet Young