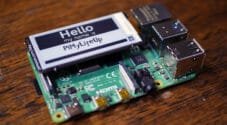
In this tutorial, we will show you how to set up your Raspberry Pi as an Eddystone Bluetooth beacon.
For those who do not know what Eddystone is, it is a protocol specification by Google that defines a Bluetooth low energy (BLE) message format that can be utilized for proximity-based beacon messages.
You can use an Eddystone message to broadcast data such as a URL from your Bluetooth device.
Devices running a scanner that can understand the Eddystone protocol will be able to pick up the beacon. In the case of our tutorial, it will allow the user to open the URL that you are broadcasting. In addition to this, the beacon also shows distance data.
While Eddystone beacons were originally going to be utilized for Google’s “Physical Web” project and utilized by Androids “Nearby Notifications” they have since dropped support for Eddystone in both.
Another beacon that’s worth taking a look at is the iBeacon, you can also set it up on your Raspberry Pi.
Equipment List
Below are all the bits and pieces that I used for this tutorial on setting up your Raspberry Pi to act as an Eddystone beacon.
Recommended
- Raspberry Pi Amazon
- Micro SD Card Amazon
- Power Supply Amazon
- Bluetooth Adapter Amazon that support Advertising Mode
Optional
Setting up the Eddystone Beacon on the Raspberry Pi
1. The software this project relies on is no longer maintained. This tutorial is kept live for archive purposes only.
Now before we start the process of setting up our Raspberry Pi’s Bluetooth as an Eddystone beacon, we must ensure that everything is up to date.
We can achieve this by running the following two commands on our Raspberry Pi’s terminal.
sudo apt-get update
sudo apt-get upgrade
2. Once the update has finished, we need to go ahead and first turn on our Bluetooth device. It will be pretty tricky to do anything with it switched off.
To switch on the Raspberry Pi’s Bluetooth device, you can utilize the following command.
sudo hciconfig hci0 up3. With the Raspberry Pi’s Bluetooth powered on we need to go ahead and switch on the Low Energy Advertising mode, and set it to the Nonconnectable undirected advertising mode.
We can do this by running the following command. The leadv argument switches on the LE Advertising mode and the number after it specifies the mode we want to utilize.
sudo hciconfig hci0 leadv 34. Now that we have put our Raspberry Pi into the right mode, we need to advertise some data with it.
This time we will be utilizing the hcitool, this tool will allow us to send a command to our Bluetooth device to broadcast a specified URL.
For our example command, we will be broadcasting the URL https://pimylifeup.com.
In the next step, we will go through the process of easily generating a command that will broadcast your URL as an Eddystone beacon.
To begin testing that everything is working as intended, enter the following command into your Raspberry Pi’s terminal. The command is long and should be entered in one line.
sudo hcitool -i hci0 cmd 0x08 0x0008 19 02 01 06 03 03 aa fe 11 16 aa fe 10 00 03 70 69 6d 79 6c 69 66 65 75 70 07 00 00 00 00 00 005. Of course, you don’t have to utilize our website. Instead, you can generate some new Eddystone payload data by using a special script created by Github user Yencarnacion.
You can utilize this script by going to the Yencarnacion’s Eddystone Calculator and typing your URL into the textbox and pressing ENTER.
This script will generate you the three commands that you will need to enter.
However, since we have already run the first two, you need only to pay attention to the third command as this is what will set the payload data.
6. Now that we have set the Eddystone payload data for our Raspberry Pi’s Bluetooth to broadcast we can now take a quick look into what we are sending and what each of those bits is used for.
Most of this payload data should be kept as it is as the Eddystone payload requires it. We have highlighted the bits of data that can be modified.
Also, one restriction to note is that the URL can only have a maximum length of 17 bits. Any longer and you will need to rely on a link shortening service such as bit.ly.
| Byte Value | Description |
|---|---|
| 0x08 | Defines the OGF as the Bluetooth Command Group 0x08 |
| 0x0008 | Defines the OCF so that we set the bluetooth advertising data |
| 19 | Defines the data length of our entire payload, 25 bytes |
| 02 | Data length of the next section, 2 bytes |
| 01 | Data Type, defines that this section is flag data |
| 06 | Defines the flag needed for Low Energy Advertising mode |
| 03 | Data length of the next secion, 3 bytes |
| 03 | Data Type, defines Complete list of 16-bit Service UUIDs |
| AA | 16-bit Eddystone UUID |
| FE | 16-bit Eddystone UUID |
| 11 | Defines the length of the following service data. 17 bytes. |
| 16 | Defines that the following data is “service data” for eddystone |
| AA | 16-bit Eddystone UUID |
| FE | 16-bit Eddystone UUID |
| 10 | Defines the Frame Type which in this case is URL |
| 00 | TX Power, used to calculate distance to the eddystone beacon |
| 03 | URL Scheme, must be set to 0x03 which is https:// |
| 70 | ‘p’ in hexadecimal (ASCII) |
| 69 | ‘i’ in hexadecimal (ASCII) |
| 6D | ‘m’ in hexadecimal (ASCII) |
| 79 | ‘y’ in hexadecimal (ASCII) |
| 6C | ‘l’ in hexadecimal (ASCII) |
| 69 | ‘i’ in hexadecimal (ASCII) |
| 66 | ‘f’ in hexadecimal (ASCII) |
| 65 | ‘e’ in hexadecimal (ASCII) |
| 75 | ‘u’ in hexadecimal (ASCII) |
| 70 | ‘p’ in hexadecimal (ASCII) |
| 07 | .com (.com = 0x07) |
| 00 | |
| 00 | |
| 00 | |
| 00 | |
| 00 | |
| 00 |
Testing the Eddystone Beacon
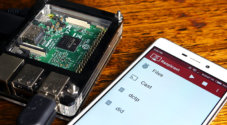
7. To test that the Raspberry Pi’s Bluetooth is now broadcasting our Eddystone beacon we will need to make use of a device such as an Android phone or an iPhone.
On Android, we utilized the Beacon Scanner app (no longer avaliable) by Nicolas Bridoux. Using this app, you should be able to run a scan using the Bluetooth on your device.
By tapping the URL that is transmitted from our beacon, it should open it up in your favorite web browser.
8. By now you should have successfully set up your Raspberry Pi to act as an Eddystone beacon that broadcasts the URL of your choice.
This example is not the only way you can set up an Eddystone beacon. You can also have it broadcast a UUID among other things.
If you are interested in looking more into the Eddystone protocol, then you can check out the project by going to the Eddystone Github page.
I hope that this Raspberry Pi Eddystone has shown you everything you need to know to get it up and running. If you have any feedback, then please don’t hesitate to leave a comment below.


My Raspberry Pi 3B+ seems to do fine on it’s own. No need for a Bluetooth dongle to have it broadcast the Eddystone URL message.
Please carry on these Bluetooth experiments!