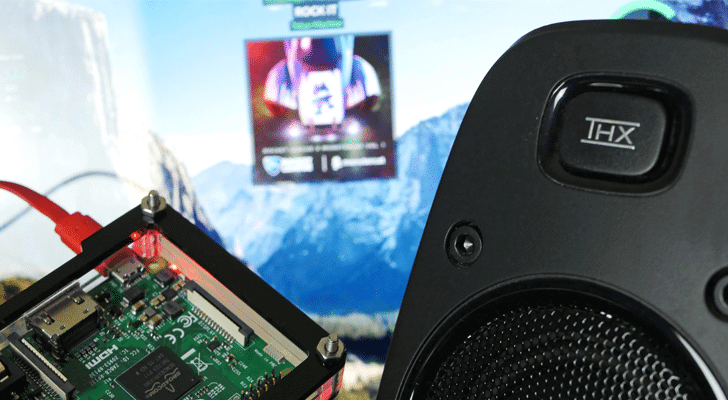
In this tutorial, we show you the basics of installing the headless music player Volumio to the Raspberry Pi.
We will also be walking you through how to get Wi-Fi up and running on your Raspberry Pi through Volumio’s interface. Additionally, the tutorial also shows you the steps to go through to install and setup Volumio’s Spotify plugin.
Volumio is an open source, a headless music player that is designed to be able to play almost every single music file, providing support for MP3, FLAC, WAV, AAC, ALAC, DSD and many more.
In addition to supporting of a large variety of audio codecs, it also provides support for UPNP\DLNA, Airplay, Spotify and Web Radios making it an all-in-one audio player. This project is very similar to the Pi music box that I covered in an earlier tutorial.
Additionally, Volumio also provides support for USB 2.0 DAC’s and a significant of Raspberry Pi DAC’s that work through I2S.
To load music files on to Volumio make sure you put them on a USB device and plug that into your Raspberry Pi.
Equipment List
Below are all the bits and pieces that I used for this Raspberry Pi Volumio tutorial. You might want to pick up some speakers and a USB audio card for the Pi for some better sound.
Recommended
- Raspberry Pi Amazon
- Micro SD Card Amazon (8gb+ recommended)
- Ethernet Cable Amazon or Wi-Fi Amazon
- USB Keyboard Amazon
- USB Mouse Amazon
Optional
Since with a project like this you might want better audio, it might be worth getting a USB Audio Card or a Raspberry Pi sound card. Something like the HiFiberry might take your fancy.
Installing Volumio to the Raspberry Pi
1. First, go to Volumio’s “Get Started” page and download the latest image for the Raspberry Pi. Keep note of where you downloaded the file.
2. Now you will need a tool to write this image to your SD Card. For our tutorial, we will be utilizing a tool called Etcher.
You can obtain Etcher from their Etchers official website. The software is available for Windows, Linux, and Mac OS X
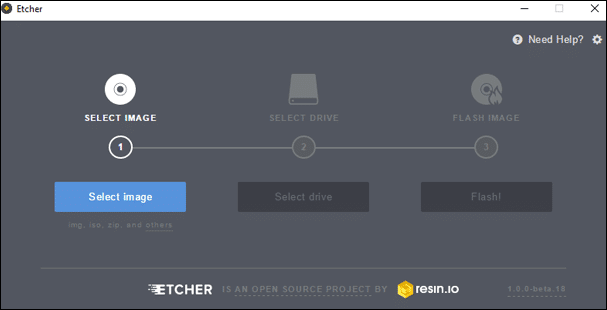
3. Once you have downloaded and installed Etcher, open the program.
You should see a screen as we have in the image below. Click Select Image then browse to the image you downloaded in the first step of this tutorial.
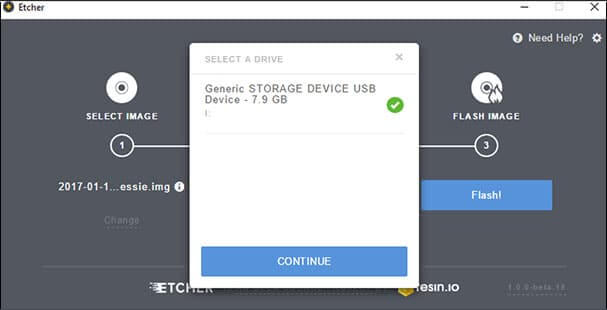
4. For the next step click the Select Drive button. Make sure you select the correct drive in this stage as it will wipe the device in the process.
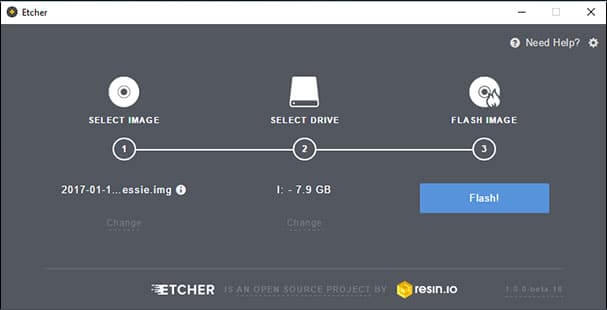
5. Finally, click the Flash! button to begin the flashing process. Please note that this can take some time.
Once it has completed, take out your SD Card and put it into the Raspberry Pi and power it on.
Setting up Wi-Fi on Volumio
1. Now that you have your Raspberry Pi turned on, Volumio should have automatically started. Please note that the first boot of Volumio can take up to 6 minutes to finish as it does the initial setup process.
Now here is the point that the tutorial splits up, if you are using an ethernet connection you can skip this section. Otherwise, if you want to use Wi-Fi, you will need to complete the following steps to set up Wi-Fi.
To set up Wi-Fi Volumio generates its own temporary Wi-Fi hotspot under the name Volumio. You will need to connect to this on your computer to proceed with this tutorial when prompted for the password type in volumio2.
2. Once you are connected to Volumio’s temporary Wi-Fi hotspot, go to http://volumio.local in your favorite web browser. Once you have browsed to the address, you should now be greeted with the following screen.
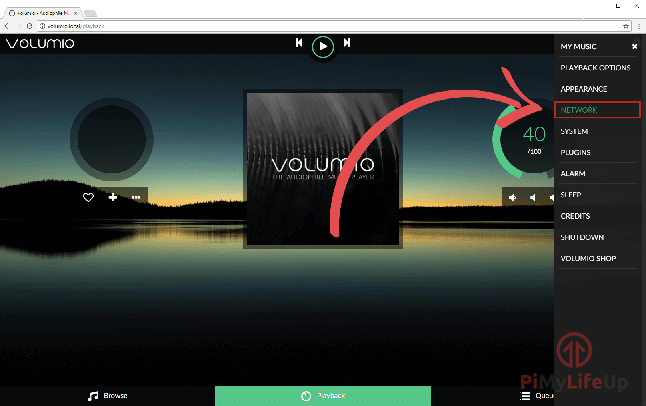
On this screen, click the cog in the top right-hand corner to bring out the navigation menu.

3. Now on the navigation menu, click Network as highlighted below. This option will take us to the screen where we can finally set up our Wi-Fi.
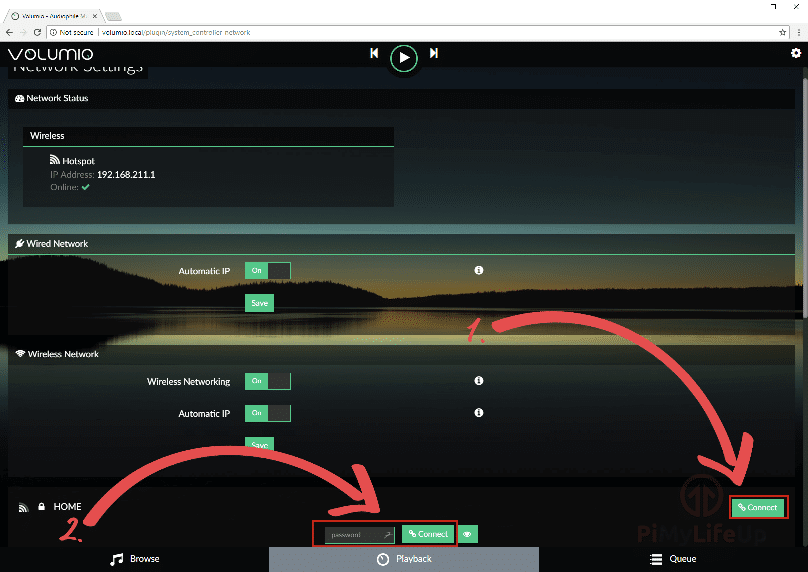
4. On the network screen, you will want to scroll down till you see the Wireless Network section and a list of available Wi-Fi connections. Once you have found your Wi-Fi connection, click the Connect button (1.)
After clicking the first Connect button, you will then be asked to enter the password for your Wi-Fi connection. Make sure you enter your password correctly here as this will disable the Wi-Fi hotspot, you can click the button with the eye icon to be able to see what you are typing.
Once you are certain you have typed in the password correctly press the second Connect button (2.).
5. You will now be automatically disconnected from the Wi-Fi hotspot as Volumio reconfigures itself to connect to your Wi-Fi Network.
You should now be able to successfully connect back to your own internet connection and again browse to https://volumio.local. If it doesn’t load straight away, give it a few minutes for your Raspberry Pi to finish reconfiguring itself.
Setting up Spotify on Volumio
1. Now that we have our internet connection up and running on the Raspberry Pi Volumio system, one of the first things you will likely want to do is set it up with Spotify.
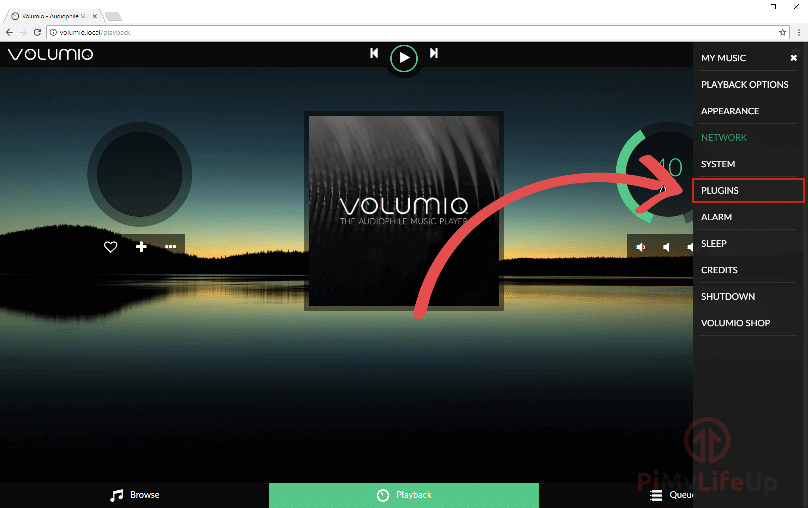
To be able to do this again press the cog in the top right-hand corner of the screen as we have shown below.
2. Now again on the navigation menu click Plugins as shown below.
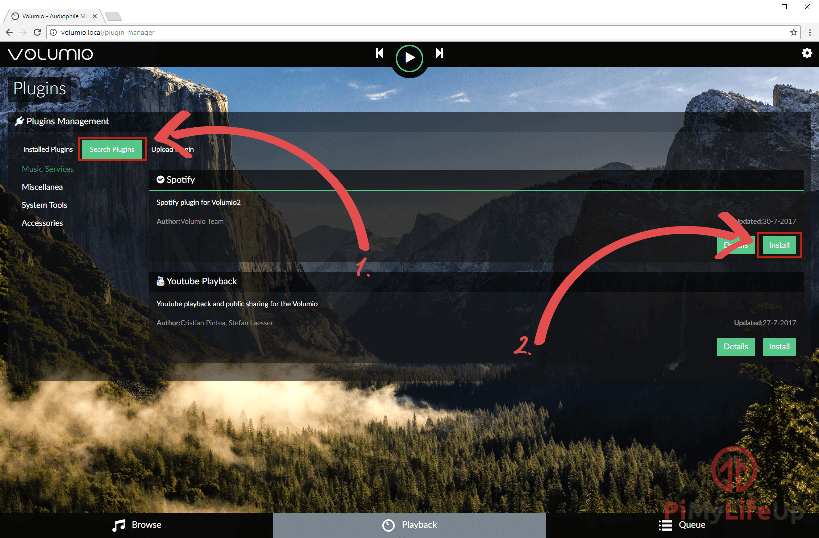
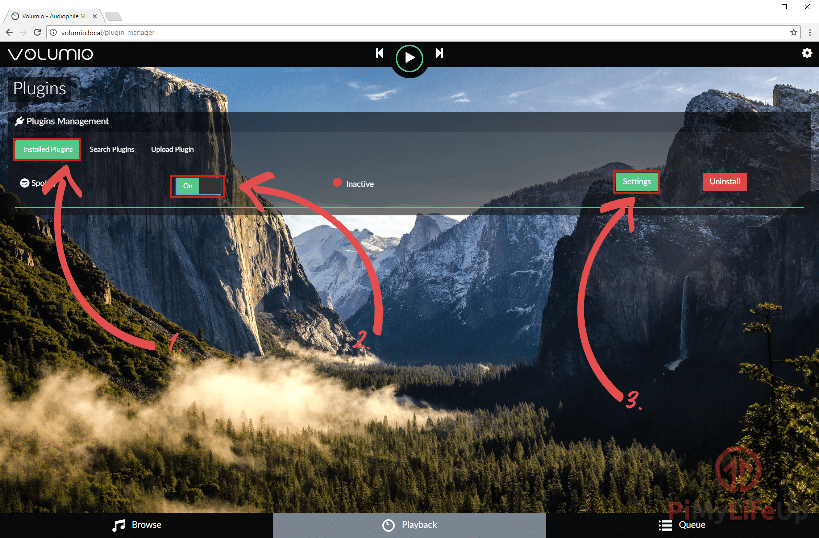
3. On the Plugins Management screen click the Search Plugins tab (1.), then the Install button (2.) next to Spotify.
4. After the installation process has completed for the Spotify plugin, click the Installed Plugins tab (1.).
On this new tab, click the On/Off Button (2.) to toggle the plugin on. Finally, after that has toggled on click the Settings button (3.)
5. Begin by filling out your Spotify Username and your Spotify Password in the first two text boxes (1.).
Afterward, you must disable High Quality (2.) if you are running a free Spotify account, it should be safe to leave on for a paid account.
Once you have set your Spotify Username and Spotify Password and set High Quality to on or off you can finally press the “Save” (3.) Button.
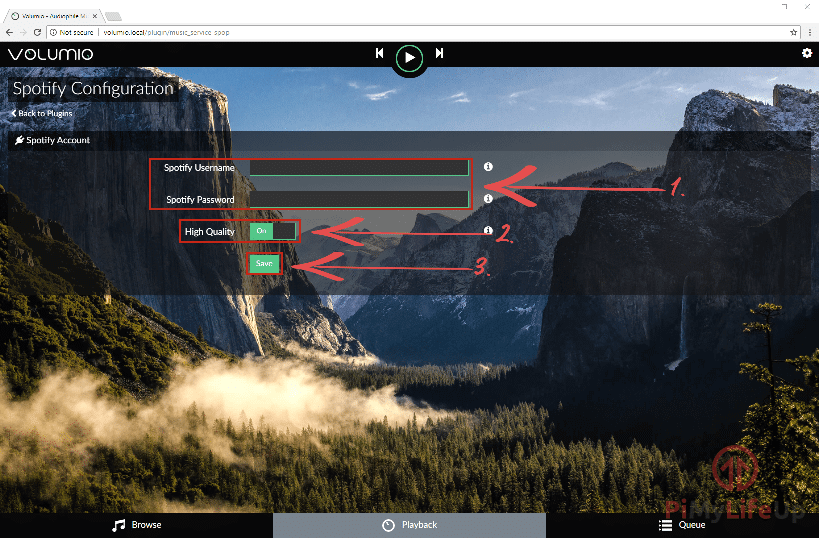
After pressing the save Volumio button, Volumio should automatically make a connection with Spotify and configure itself to be able to load songs from it.
Please note if you are using 2-Factor authentication, then this may fail to work. You will first have to generate an App Password and use that instead as Volumio does not support logins through 2-Factor.
You should now be able to go back to the main menu and click browse in the bottom right- hand corner. On here you will be able to see all your available music that is located on any plugged in USB devices, you will also now be able to see a category called Spotify.
Within the Spotify menu you can find all your playlists and have access to all songs on Spotify.
Conclusion
Hopefully, by the end of this tutorial, you have now successfully setup Volumio on your Raspberry Pi and also have Spotify running on it.
If you have any issues or have any feedback, then feel free to drop a comment below.


Thanks a lot for your instructions!
Using Volumio for almost a year now, installed it by your intruction.
Added NAS and torrent box on top of it (cuz why not 🙂 ), also based on your tutorials.
You are very helpful!
i don’t see volumio om my 7 inch lcd only:volumio@volumio: $
what to do
Hi,
Volumio is a headless music player. You will need to launch something like chrome on the Pi itself and have it automatically load up the Volumio web interface.
Cheers,
Emmet