This guide will take you through the steps on how to setup the Raspberry Pi. If you have just acquired a Pi or thinking of buying one, then this guide will take you everything you need to know.
This guide takes you through the very basics of getting your Raspberry Pi set up and ready to use. Be sure to check out our many other getting started guides for more in-depth tutorials.
Lucky the setup process for the Raspberry Pi 5, 4 3, 2, and 1 is basically the same. This guide will help you no matter which version of the Pi you have.
In this guide, we will take a look at all the pieces of equipment that you will need. We will also go through all the steps to booting the Raspberry Pi for the first time.
Essential Equipment
I will just quickly go through all the equipment that you will need if you’re starting from scratch.
You might have some of these parts already so you can save a bit of money and reuse the parts for the Raspberry Pi.
The following is some of the essential equipment that you will need to operate the Pi correctly. If you’re doing a specific project, you may find you will need more or fewer pieces of equipment.
Raspberry Pi
You can’t start without a Raspberry Pi! There are quite a few variations of the Raspberry Pi, so be sure to choose whichever best suits your needs.
I highly recommend using the latest version possible, and you will get the best performance and features.
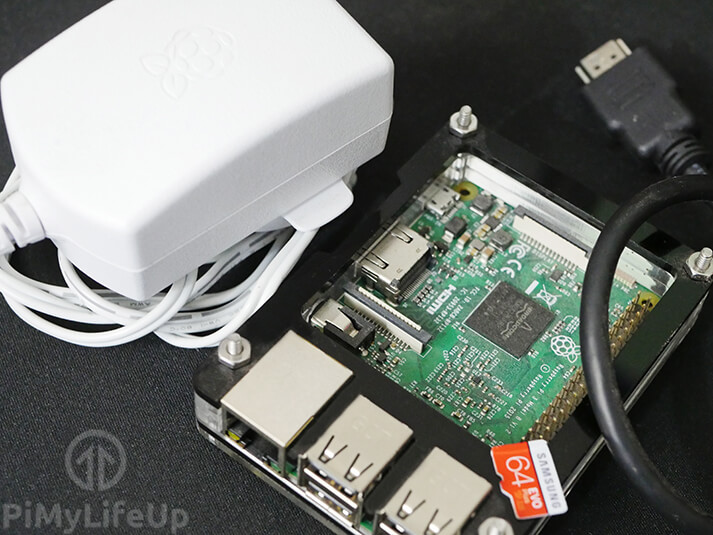
Micro SD Card
A micro SD card is an essential piece of equipment as the Raspberry Pi will not function without it. You can set up USB boot instead, but I recommend sticking to the SD card method if you’re new to the Pi.
Some old versions of the Raspberry Pi will require a plain SD Card. Anything newer than the Raspberry Pi B+ will need the micro-SD card.
I highly recommend that you get an SD card that is at least 8GB in size, the bigger, the better, especially if you’re doing data hungry projects.
Keyboard and Mouse
A keyboard and mouse are only required if you’re controlling the Pi directly and not using something like SSH to control it.
I highly recommend that you keep a keyboard and mouse nearby as there will be times when the Pi becomes inaccessible over the network, and you will have to intervene locally.
HDMI Cable
You will need an HDMI cable to be able to connect the Raspberry Pi to a monitor or TV.
This cable is necessary if you will be controlling and using the Pi directly rather than setting it up to be headless (connecting to it remotely).
Power Supply
A power supply is essential if you would like the Pi to turn on. A 5V, 2A micro USB power supply is recommended for the Pi.
It is essential that it outputs at least 5V, 2A otherwise the Pi may not turn on or behave unusually.
If you get a rainbow colored square in the top right corner, then you do not have a good enough power supply connected and should be replaced if you want your Pi to be stable.
Optional Equipment
These items are only optional and not necessary for your Pi to run correctly. However I do highly recommend having both as they’re incredibly handy for keeping your Pi in top notch condition.
A Network or Internet Connection
A Wi-Fi adapter or Ethernet cord will be required to connect to a local network or the internet.
If you have a Raspberry Pi 3, then you won’t need a WiFi dongle as there is a WiFi module onboard.
Having an active network connection will make working the Raspberry Pi so much easier as you can make use of tools such as SSH, FTP, and much more.
A Case for your Raspberry Pi
While not essential it is recommended that you use a case as it will help protect your Raspberry Pi. You will notice some cases will even add some more functionality to your Pi.
You can find many Raspberry Pi cases available for purchase, or you can 3D print your own.
Assembling your Raspberry Pi Case
If you have purchased a case for your Raspberry Pi, then this is a good time to assemble the case. Since all cases are different, simply assemble according to the instructions that hopefully were supplied with the case.
Once you have assembled the case, you are then ready to plug everything in and get your Pi working.
Turning on your Raspberry Pi
Before you turn on your Raspberry Pi, make sure you have all the required equipment listed above. If you don’t have some of the equipment you may find the Pi will not function or will be impossible to control.
Firstly, you will need a micro-SD card with an operating system pre-installed. Most SD Cards that come bundled will with the Pi come with Raspberry Pi OS pre-installed. If it doesn’t, then follow this Raspberry Pi OS installation guide to install it.
1. Start by inserting your micro-SD card into the slot on the Raspberry Pi. The location of the slot is on the bottom of the Pi, and the card will only fit one way.
2. Next plug in the keyboard and mouse into the USB slots.
3. Now connect the HDMI cord to the HDMI port on the Pi and then to the TV or monitor. It’s important to make sure you have selected the right input on your TV or monitor (Eg. HDMI 1).
4. If you want to connect your Raspberry Pi to the internet, insert an Ethernet cord or a Wi-Fi adapter. The Raspberry Pi 3, 4, and 5 have Wi-Fi built-in, so you won’t need a dongle.
5. When you are happy that all the cables and the SD card are correctly connected, finally plug in the micro USB power supply. This cable will power and boot the Raspberry Pi.
There is no on or off switch for the Raspberry Pi, so you will need to be careful when pulling the power out. There is a method of shutting down your Raspberry Pi correctly that you should learn.
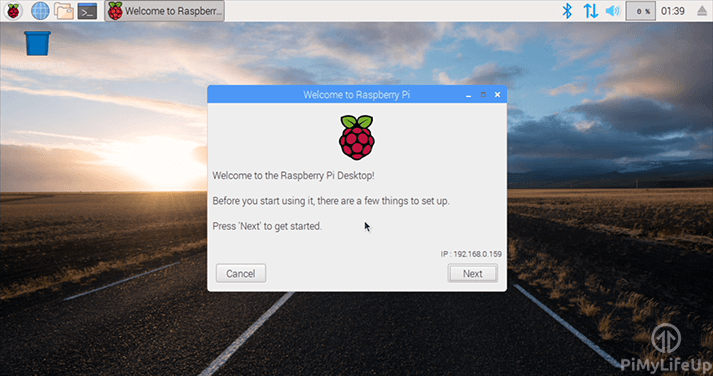
Luckily, the setup process for every version of the Raspberry Pi is essentially the same. This guide will help you no matter which version of the Pi you have. If you have Raspberry Pi OS installed, it should boot straight to the desktop.
Conclusion
Once you’re all set up, you might want to take a look at some awesome Raspberry Pi projects that you can do. These projects will help you get the most of your Pi. You will be surprised by just how much this cool little computer can do.
I hope that this guide has helped you learn how to setup the Raspberry Pi. If you come across any issues or would like to add something, then please don’t hesitate to leave a comment below.


thank you so much for the site, it’s really cool
but my problem is how (for example i insalled the above system) how to give commands through Terminal
how do i connect etc.
Hi Lior,
There is two different ways you can start up a terminal session on your device. You can either connect using SSH, which we have a guide on.
Or you can open up a terminal session. If you are using a verison of Raspberry Pi OS that has the desktop you can open one up by either looking for the “terminal” application or by pressing CTRL + T. You can then type commands in to this.
If you are using the lite version of Raspberry Pi OS then you will have access to the terminal from the get go as that is what the OS boots in to.
Cheers,
Emmet