In this tutorial, we will be showing you how to set up and connect to TeamViewer on the Raspberry Pi.
For those who do not know what TeamViewer is, it is proprietary software that is hugely popular for sharing desktops as well as giving others remote access to the device. It is heavily used by support teams as it can make diagnosing and fixing problems a lot easier.
The version of TeamViewer that we will be installing to the Raspberry Pi is called TeamViewer Host. Unlike standard versions of TeamViewer, it is purely designed to receive connections and act as a server.
You cannot use TeamViewer on your Raspberry Pi to connect to other TeamViewer clients, but others can connect to it.
To install TeamViewer on the Raspberry Pi, you will have to be utilizing a Raspberry Pi 2 or newer running Raspbian Jessie or newer.
This means that the TeamViewer software should work for the vast majority of people unless you are running a now somewhat outdated version of the Raspberry Pi.
There are other methods of connecting to your Raspberry Pi remotely such as using VNC server. For pure terminal sharing you can use something like tmate.
Equipment
Below is all the equipment that you will need for setting up TeamViewer on your Raspberry Pi.
Recommended
- Raspberry Pi Amazon 2 or newer
- Micro SD Card Amazon
- USB Keyboard Amazon
- USB Mouse Amazon
- HDMI Cable Amazon
- Monitor Amazon
- Ethernet Cable Amazon or Wi-Fi Amazon
Optional
- Raspberry Pi Case Amazon
Installing TeamViewer to the Raspberry Pi
1. To install TeamViewer to your Raspberry Pi, we will have first to ensure that our package list and all installed packages are up to date.
You can achieve this by running the following command.
sudo apt update
sudo apt upgradeCopy
2. With the Raspberry Pi now entirely up to date. Let’s go ahead and download the software package from Teamviewer’s servers.
As we are already using the command line, we can do that by running the following command. This command will use wget to download the .deb file from TeamViewer’s server.
A .deb file is a package file designed for the Debian systems package management system. The .deb file is an archive containing all the files that we need for TeamViewer.
wget https://download.teamviewer.com/download/linux/teamviewer-host_armhf.debCopy3. Now that we have the TeamViewer deb file available on our Raspberry Pi lets go ahead and install it by running the following command.
To install the TeamViewer deb package, we will be making use of the dpkg utility which is the base of the Debian package management software.
sudo dpkg -i teamviewer-host_armhf.debCopy4. Upon running the above command, you will notice a bunch of errors about specific packages not being installed.
To fix this, we will have to make use of our package manager to repair the “broken install”.
The apt package manager will automatically detect the missing packages and attempt to download the best versions available for the software.
Now let’s utilize the apt tool by running the command below.
sudo apt --fix-broken installCopy5. TeamViewer should now be up and running on your Raspberry Pi. The software is automatically set up so that it will start up on boot, so you do not have to worry about that.
In the next two sections, we will explore utilizing TeamViewer on both a GUI setup and a headless setup.
With TeamViewer, you can access your Raspberry Pi even if you are running a lite version of Raspberry Pi OS that only has the command line. TeamViewer is setup to share the command line screen as well.
Using TeamViewer on a Headless Raspberry Pi Setup
1. Before you can access the Raspberry Pi from a TeamViewer client, we will first have to designate a password for the server.
We can do that by running the following command, where “<password>” is the password that you want to utilize.
Make sure you keep this password secure as it will allow someone access to your Raspberry Pi if they manage to get your TeamViewer ID and its password.
sudo teamviewer passwd <strong><password></strong>Copy2. Now that we have set a password for TeamViewer let’s now go ahead and retrieve the TeamViewer ID.
The TeamViewer ID is the ID that you will utilize to make a connection to the TeamViewer server sitting on the Raspberry Pi.
To retrieve the TeamViewer ID type in the following command into the terminal.
teamviewer info3. You will get a result from this command showing something like what we have below.
Where we have {xxxxxxxxxx} is where your TeamViewer ID will be, write this number down as you will need this to connect to your Raspberry Pi.
 TeamViewer                           14.2.2558  (DEB)

 TeamViewer ID:                        {xxxxxxxxxx}
4. Alternatively, if you want to be able to connect to your Raspberry Pi through TeamViewer easier, then you can connect your device up to your TeamViewer account.
To begin this process, run the following command.
sudo teamviewer setupCopy5. During the setup process, you will be asked to agree to the terms and conditions as well as enter the details of your TeamViewer account.
Entering your account details is so that TeamViewer can make a connection to it and allow you to gain access to your account through the TeamViewer interface easily.
Once you have completed the setup process you should now be able to connect to your TeamViewer server.
You can skip to the Using TeamViewer to connect to your Raspberry Pi section to see how you can connect to your Raspberry Pi’s installation of TeamViewer.
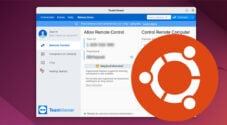
Using TeamViewer from the GUI on the Raspberry Pi
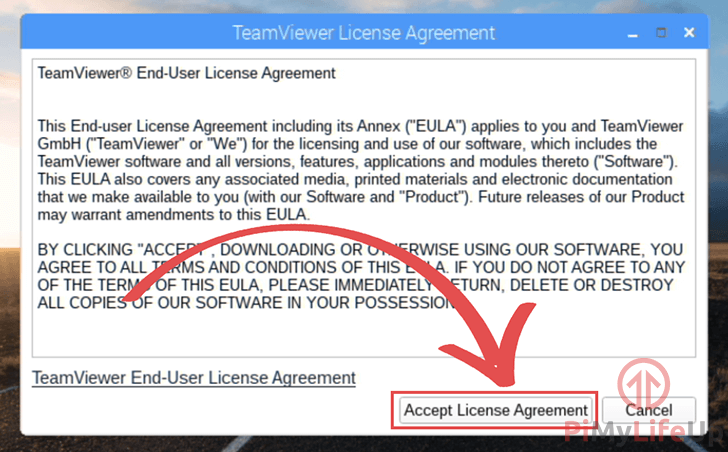
1. Upon installing TeamViewer to your Raspberry Pi, you will be greeted with the screen below asking you to accept TeamViewer’s license agreement.
To continue with this guide, you will need to click the Accept License Agreement button.
2. Once you have agreed to the license agreement, you will be returned to the desktop.
To open up the Teamviewer host software click the TeamViewer icon in the taskbar as shown in the screenshot below.
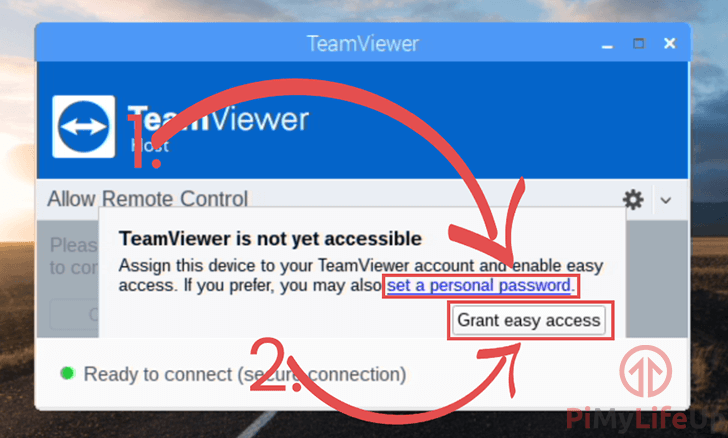
3. In this screen, you need to decide whether you want to associate your Raspberry Pi with your TeamViewer account or to set a password and connect by using the TeamViewer ID.
If you want to rely on using the TeamViewer ID, go ahead and click set a personal password. (1.) to load the options menu. If you select this option, make sure you skip to step 5 of this tutorial.
If you decide to utilize your TeamViewer account to connect to your Raspberry Pi go ahead and click the Grant easy access (2.) button. If you select this, move on to step 4 of this tutorial.
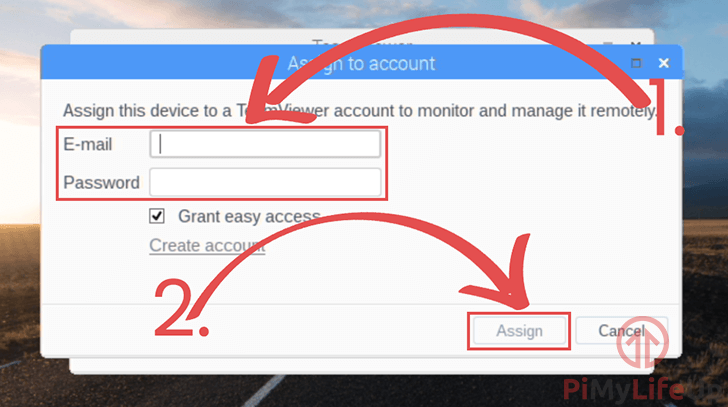
4. If you have decided to connect your Raspberry Pi’s TeamViewer host to your TeamViewer account, you will now be asked to “Assign your account“.
This process will connect your device to your TeamViewer account allowing easy access. All you need to do is enter your Email as well as your Password (1.)
Once you have entered all your information, you need to click the Assign button (2.). Clicking the button will finalize the connection and associate the device.
Now you can move on to Step 6 of this tutorial.
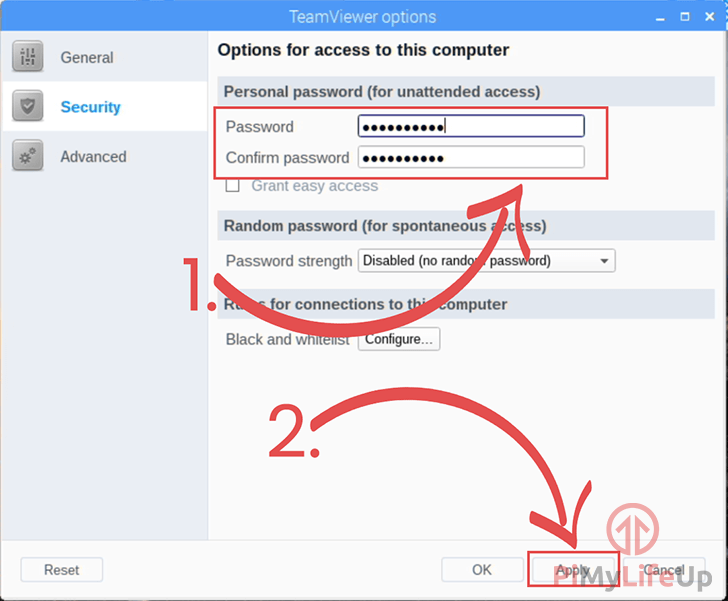
5a. If you have decided to rely on using the TeamViewer ID, you will need to set a password.
Upon clicking “set a personal password.” in step 3, you will now be shown the TeamViewer options menu.
Within this menu click the “Security” tab as shown in the screenshot below.

5b. On this screen set your password under the Personal password (1.) section. Make sure you keep this secure as someone could gain access if they obtain it and your TeamViewer ID.
Once you have set your password, press the Apply button.
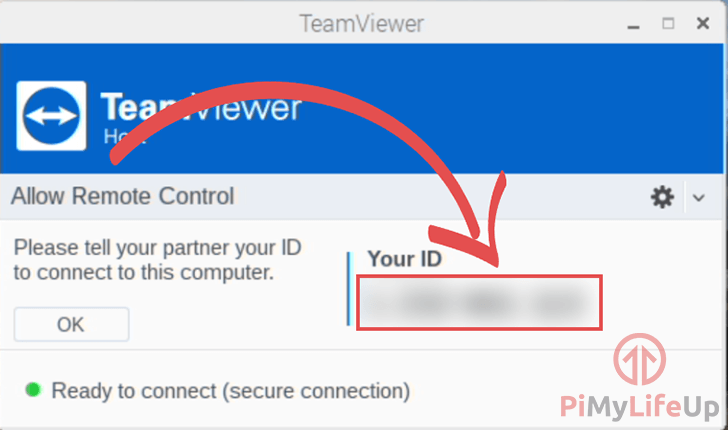
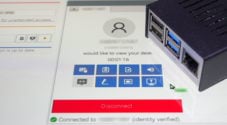
5c. Once you have set your TeamViewer personal access password, you should now be greeted by the default TeamViewer interface as shown below.
Here you will be shown your TeamViewer ID, using this ID and the password you will be able to connect to your Raspberry Pi by utilizing the TeamViewer software.
Using TeamViewer to Connect to your Raspberry Pi
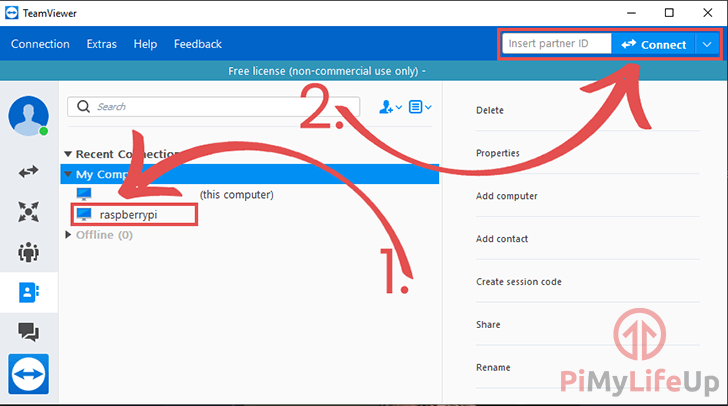
1. With TeamViewer now set up on your Raspberry Pi we can now move onto connecting to it.
To connect to it, you will require a device with the TeamViewer client installed, whether it be a Windows PC or most other devices.
You can download TeamViewer by going to the TeamViewer website. Once installed continue to the next step.
2. Now with TeamViewer loaded you will be able to either enter the TeamViewer ID (2.) and connect to your Raspberry Pi that way.
Or if you connected your Raspberry Pi to your TeamViewer account, you will be able to double-click it in your connections list to connect to the device.
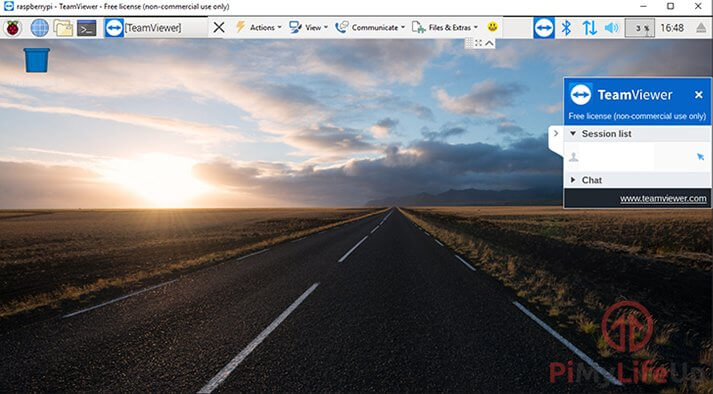
3. Once you have connected to your Raspberry Pi using TeamViewer, you will be greeted by either your desktop or the command line depending on what version of Raspberry Pi OS you are utilizing.
If everything connected properly, then you have now successfully setup TeamViewer on your Raspberry Pi.
Conclusion
By now you should have everything working perfectly. If you have any feedback on this Raspberry Pi TeamViewer tutorial, then please don’t hesitate to leave a comment below.


I had to use “sudo teamviewer info” to get my id.
without sudo my id wasn’t showing
This post showed up on my twitter feed. Personally, to remote into a Linux host, NoMachine is my preference. It was born from Linux and integrates better for Linux than Teamviewer can.
Hi Sasha,
Thank you for that suggestion, I will definitely have to check it out.
Cheers,
Emmet
Excellent tutorial! I was able to help a colleague who needs to set up some Raspberry Pis for a client. Thank you so much!
An important addition here: when setting up TeamViewer on a raspberry pie that DOES NOT have a display hocked up by default, you must run the following command in the terminal:
sudo raspi-config
And you have to set a display resolution other than the default one. Otherwise you wont be able to connect!
Hello! Any chance I can install the full TeamViewer like on a desktop on the Raspberry Pi? (Not the host version). Thanks!
Hi Andrew,
Sadly the full TeamViewer client does not support the ARM architecture that the Raspberry Pi uses.
Cheers,
Emmet
Hi, thank you for the tutorial, it works perfectly! 🙂
Can you please elborate, why TeamViewer Host cannot be installed on Raspberry pi 1?
It’s not able to be installed because the Raspberry Pi 1 isn’t supported. You can try installing it, and the worse case is that it just won’t work.
Gus, confirmed.
Also on the TeamViewer web site they specify machine requirements:
armv7 32 bit: armv7 hardfloat (Raspberry Pi 2+)
So, no.
Hi guys, well done with the tutorial.. I was wondering how to remove TeamViewer?
Hi Paul,
You should be able to remove teamviewer from your Raspberry Pi by just removing the package using apt.
The following command should work for removing teamviewer.
Cheers,
Emmet
Awesome tutorial, thank you!
How do I prevent TeamViewer from starting automatically during Raspbian startup.
Thanks.
Terry
Hi Terry,
If you would like to stop teamviewer from running automatically on your Raspberry Pi you can run the following command.
This command should disable the teamviewer service and stop it from automatically starting up.
Cheers,
Emmet